
Introduction
Redaction is the process of removing or obscuring sensitive information from documents before they're shared or published. In the context of PDFs, this involves eliminating text, images, or metadata that contain confidential or personally identifiable information.
Proper redaction is not just crucial for protecting personal, financial, and proprietary data, it is often required by laws like GDPR, HIPAA, and PCI DSS.
The problem? Simple visual blocks don’t fully protect sensitive data such as names, addresses, credit card details, and medical records – as hidden data layers in PDFs can still expose them, risking compliance violations.
Manual redaction isn’t the answer, either, especially at scale. It’s inefficient, error-prone, and can lead to serious data breaches. Automated, secure solutions are essential to ensure confidentiality and compliance. And doing this properly can be the difference between protecting sensitive data and facing major risks.
In this comprehensive guide, you'll learn how to implement secure PDF redaction on the client using React and Apryse, ensuring your documents meet the strict requirements of modern data privacy regulations.
Redacting Sensitive Data using JavaScript
Apryse provides comprehensive document-handling tools for developers, enterprises, and small businesses. They offer cross-platform SDKs for client, server, mobile, and desktop – to view, edit, or otherwise process PDFs in pretty much any way you like, all with zero third-party dependencies.
We’ll be using WebViewer, Apryse's core client-side library that is a robust document viewer and editor that offers high-quality rendering, conversion, redaction, and general document manipulation in a single customizable component. We’ll be using it in React, with NextJS, but it is compatible with all frameworks and browsers, and supports not just PDFs – but also images, MS Office files, CAD, and more.
💡 You can also redact PDFs on the server using their server SDK. For this, use their Node.js package
@pdftron/pdfnet-node. Here’s a GitHub gist if you need to use this on the server..
Let’s get to it.
Secure client-Side PDF redaction using Apryse WebViewer SDK
Prerequisites
Integrating the SDK into your web application is pretty straightforward. You can clone this GitHub repository for this tutorial. This repo contains a Next.js project that implements the WebViewer SDK. To understand the code for this repo, you can refer to this article.
Once you have cloned the repo successfully, you’ll also need to obtain the Apryse API key from dev.apryse.com.
Once you have it, create a .env.local file and add the following:
NEXT_PUBLIC_APRYSE_KEY=demo:xxxxxxxxxxxxxxxxxxxxxxxxxxxxxxxxxxxxxxxxxx
Replace the placeholder with your actual trial key.
Next, you'll need to set up some static assets correctly. First, add these scripts to your package.json:
{
  "scripts": {
	"dev": "next dev --turbopack",
	"build": "npm run move-static && next build",
	"start": "next start",
	"lint": "next lint",
	"move-static": "cp -a ./node_modules/@pdftron/webviewer/public/. ./public/webviewer"
  }
}
The move-static script copies WebViewer UI’s required files from node_modules to your project's /public/webviewer directory.
If you are on Windows, the cp command will not work. Instead, you can use the following:
{
  "scripts": {
	"dev": "next dev --turbopack",
	"build": "npm run move-static && next build",
	"start": "next start",
	"lint": "next lint",
	"move-static": "xcopy .\\node_modules\\@pdftron\\webviewer\\public\\ .\\public\\webviewer\\  /s"
  }
}
Run this command once during development:
npm run move-static
For production builds, the script runs automatically as part of the build process. Now when configuring the WebViewer in your component, ensure the path property points to /webviewer where these static assets are located.
Building a WebViewer instance
Now with that out of the way, let’s look at the PDFViewer.tsx component. This serves as the backbone of our PDF viewing and editing functionality – embedding Apryse's WebViewer SDK directly into your React app.
By creating this reusable component, we make it simple to integrate features like PDF redaction, annotation, and editing, all within a self-contained viewer.
"use client";

import { WebViewerInstance, WebViewerOptions } from "@pdftron/webviewer";
import { useEffect, useRef } from "react";

const PDFViewer: React.FC = () => {
  const viewer = useRef<HTMLDivElement | null>(null);

  useEffect(() => {
    const loadWebViewer = async () => {
      const WebViewer = (await import("@pdftron/webviewer")).default;
      if (typeof window === "undefined" || !viewer.current) return;

      try {
        const config: WebViewerOptions = {
          path: "/webviewer",
          initialDoc: "/input.pdf",
          licenseKey: process.env.NEXT_PUBLIC_APRYSE_KEY
        };

        const instance: WebViewerInstance = await WebViewer(
          config,
          viewer.current
        );

        instance.Core.documentViewer.addEventListener("documentLoaded", () => {
          instance.UI.setLanguage(instance.UI.Languages.EN);

          const circleAnnot = new instance.Core.Annotations.EllipseAnnotation({
            PageNumber: 1,
            // values are in page coordinates with (0, 0) in the top left
            X: 150,
            Y: 150,
            Width: 300,
            Height: 300,
            Author: instance.Core.annotationManager.getCurrentUser(),
          });

          instance.Core.annotationManager.addAnnotation(circleAnnot);
          instance.Core.annotationManager.redrawAnnotation(circleAnnot);
        });
      } catch (error) {
        console.error("Failed to load WebViewer:", error);
        alert("Failed to load PDF viewer. Please try again later.");
      }
    };

    loadWebViewer();
  }, []);

  return (
    <div className="flex h-screen w-full flex-col bg-gray-50">
      <div
        ref={viewer}
        className="relative h-full w-full overflow-hidden rounded-lg shadow-lg"
      />
    </div>
  );
};

export default PDFViewer;
This component is designated as a client-side component using the "use client" directive. It imports only the essential hooks (useEffect and useRef) and a TypeScript interface (WebViewerConfig). Here's a quick breakdown:
- A viewer reference is initialized using
useRef, pointing to adivwhere the PDF viewer will be rendered. - Within the
useEffecthook, an asynchronous functionloadWebVieweris defined and invoked immediately on the component mount. This dynamically imports the WebViewer module on the client side to prevent server-side errors. - The WebViewer is configured using
WebViewerConfig, specifying the library path, an initial document to load, and the trial license key. - As we discussed earlier, the path must match the location where WebViewer files were moved using
npm run move-static. - The document provided as input (
input.pdf) is a locally stored PDF in thepublicdirectory, but you can also provide a URL to load an external document.
Now, if you run the project using npm run dev, you’ll be able to see the PDF viewer in your browser.
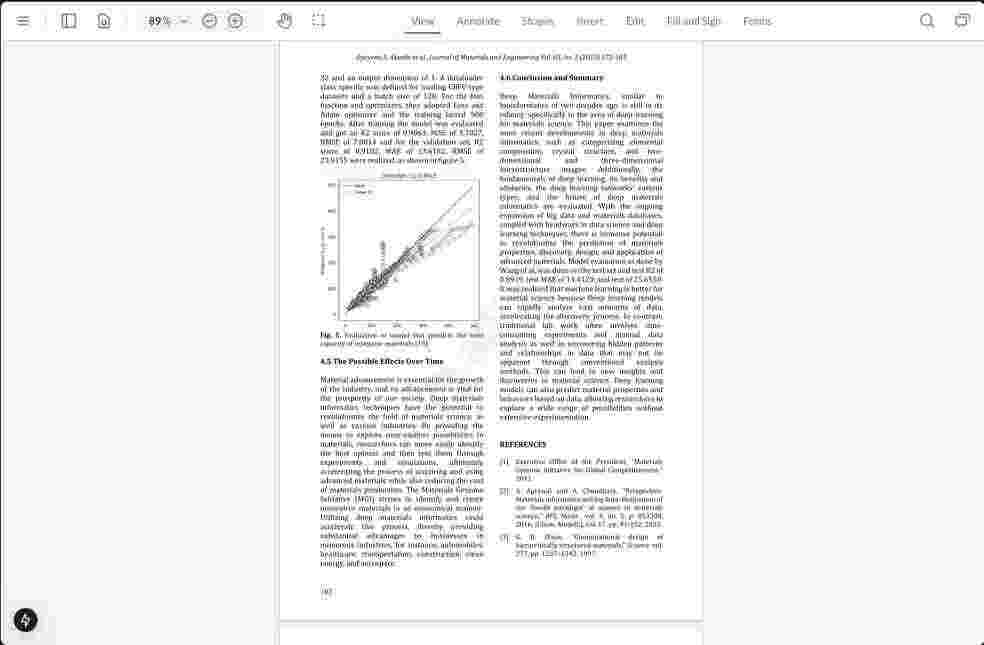
However, this does not provide you with the option of redaction yet. To enable PDF redaction, add these two options in the config object:
const config: WebViewerOptions = {
  path: "/webviewer",
  initialDoc: "/input.pdf",
  licenseKey: process.env.NEXT_PUBLIC_APRYSE_KEY,
  fullAPI: true,          // enable the full API
  enableRedaction: true,  // enable PDF redaction option
};
If you check the PDF viewer now, you’ll see a new option to redact.
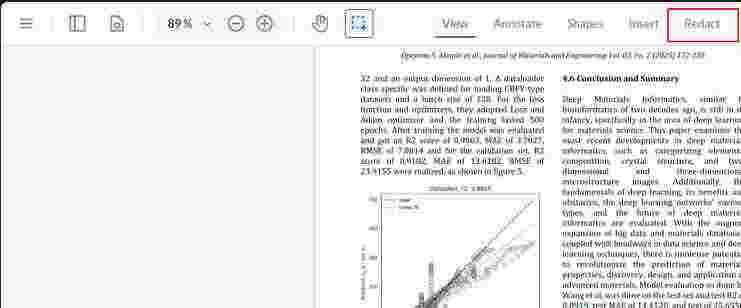
Redaction Options
Clicking the Redact option will provide you with all the necessary items for efficient redaction, such as an eraser, page redaction, and mark-based redaction.
From this section, you can efficiently select pages/areas and redact them.
💡 Keep in mind, compared to less efficient solutions, Apryse WebViewer SDK applies a permanent redaction, which means applying redaction only to the content to be removed.
From the toolbar, you can choose and mark text, regions, or pages for redaction. The redaction panel will display all of them.
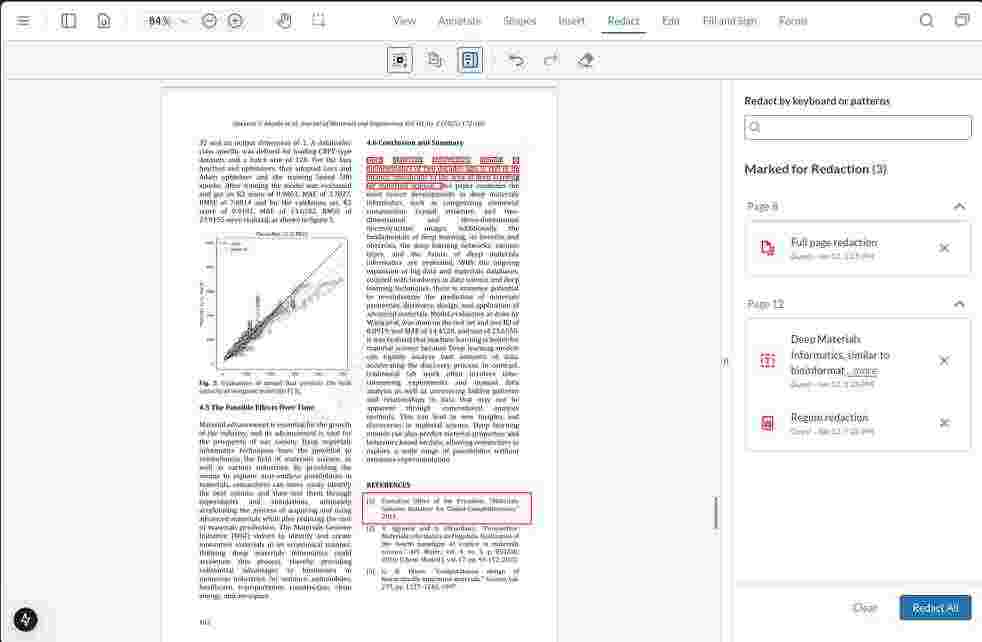
For example, in the above image, you can see that some text, a particular region, and page number 8 of the document are meant to be redacted. Clicking on the Replace All button available in the bottom right will prompt for a confirmation. Once you confirm, it’ll redact the selected sections.
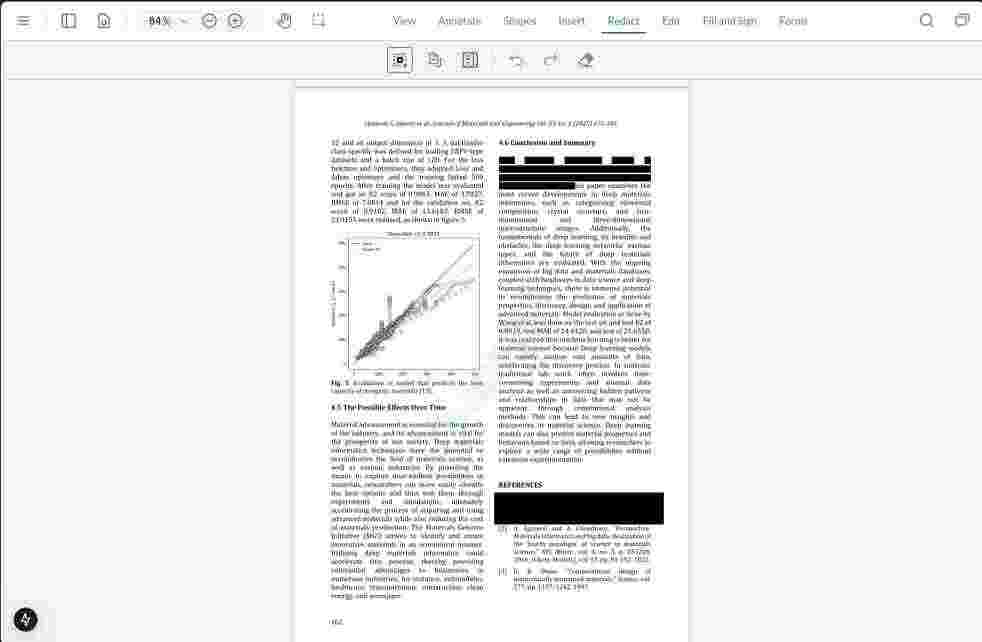
Here’s how it’ll look once redacted:
Automating Redaction Using Custom Patterns
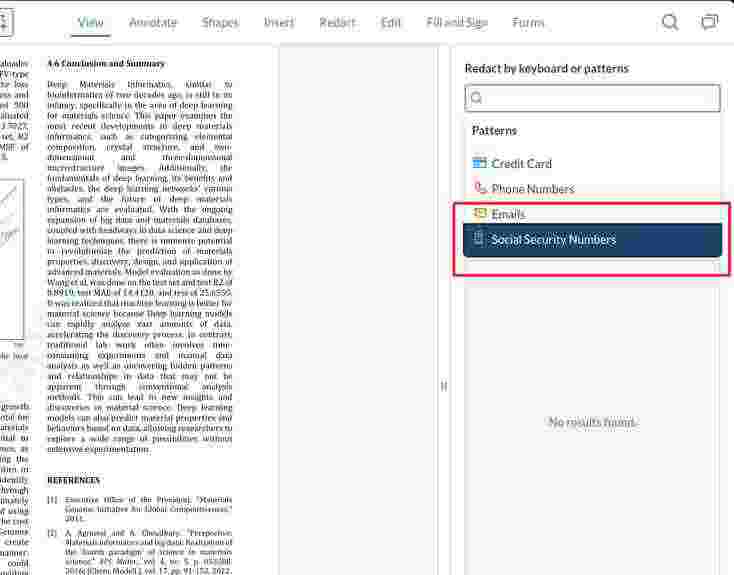
You can also automate the PDF redaction process by selecting a number of predefined patterns – redacting all credit card information/phone numbers/emails at once, for example. If you click on the search bar of the Redaction Panel, it’ll prompt you for options like emails, credit card information, and phone numbers.
But you don’t have to rely on premade patterns the WebViewer ships with, of course. You can also add custom patterns – for example, the code below will add a pattern to redact social security numbers (SSN) from a PDF.
const config: WebViewerOptions = {
   path: "/webviewer",
   initialDoc: "/input.pdf",
   licenseKey: process.env.NEXT_PUBLIC_APRYSE_KEY,
   fullAPI: true,
   enableRedaction: true,
 };

 const instance: WebViewerInstance = await WebViewer(
   config,
   viewer.current
 );

 instance.Core.documentViewer.addEventListener("documentLoaded", () => {
   instance.UI.setLanguage(instance.UI.Languages.EN);

  // ... other options
   instance.UI.addRedactionSearchPattern({
     label: "Social Security Numbers",
     type: "ssn",
     icon: '<svg xmlns="http://www.w3.org/2000/svg" height="24" width="24" viewBox="0 0 30 30"><path d="M0 0h24v24H0z" fill="none"/><path d="M17 3H5c-1.11 0-2 .9-2 2v14c0 1.1.89 2 2 2h14c1.1 0 2-.9 2-2V7l-4-4zm-5 16c-1.66 0-3-1.34-3-3s1.34-3 3-3 3 1.34 3 3-1.34 3-3 3zm3-10H5V5h10v4z"/></svg>',
     regex: /\b\d{3}-?\d{2}-?\d{4}\b/,
   });
 });
This code above adds a custom redaction search pattern for Social Security Numbers (SSNs) to the WebViewer UI.
- We provided a
label– "Social Security Numbers" – which will appear in the WebViewer’s redaction patterns dropdown menu for easy identification. - A unique
typeof "ssn" prevents conflicts with other redaction patterns like passport numbers or phone numbers. - The
iconis just an SVG string (substitute one of your own, as required) to create an icon for our new pattern in the WebViewer dropdown. - The
regexfield contains our regular expression: (/\\b\\d{3}-\\d{2}-\\d{4}\\b/) which matches SSNs in the format123-45-6789. The regex uses word boundaries (\\b) to match only complete SSNs, looking for three digits, a hyphen, two digits, another hyphen, and four digits.
When this configuration is passed to the addRedactionSearchPattern method, the SSN option is added to the UI dropdown list. You can then select this option to find and highlight all SSNs in the document automatically.
Bonus: Redaction using Preliminary Text Searches
You can also perform preliminary text searches for redaction to save time and ensure that no vital information is missed.
To implement this, you'll use the documentLoaded event again. This code will search for all instances of the word "machine learning" in your document and will display these as marked for redaction – using a special kind of annotation called a Redaction Annotation.
instance.Core.documentViewer.addEventListener("documentLoaded", () => {
   instance.UI.setLanguage(instance.UI.Languages.EN);

   // other options
   // ...
   const searchText = "machine learning";
   const searchMode = instance.Core.Search.Mode.HIGHLIGHT;
   const searchOptions = {
     fullSearch: true,
     // The callback function that is called when the search returns a result.
     onResult: async (result: any) => {
       if (result.resultCode === instance.Core.Search.ResultCode.FOUND) {
         const annotation =
           new instance.Core.Annotations.RedactionAnnotation({
             Quads: [result.quads[0].getPoints()],
             PageNumber: result.page_num,
           });
         instance.Core.annotationManager.addAnnotation(annotation);
         instance.Core.annotationManager.redrawAnnotation(annotation);
       }
     },
   };

   // .. other options
   instance.Core.documentViewer.textSearchInit(
     searchText,
     searchMode,
     searchOptions
   );
 });
- In the code above, the variable
searchTextis defined with the value"machine learning". This specifies the term that will be searched throughout the document. - The
searchModeis set toinstance.Core.Search.Mode.HIGHLIGHT, which enables highlighting for each search result to visually mark the occurrences in the document. - The
searchOptionsobject configures additional settings for the search. The key property to note here isfullSearch: true, which ensures that the entire document is searched comprehensively. - The
onResultcallback function is defined to handle each result found during the search. - If a match is found, a new redaction annotation is created using
instance.Core.Annotations.RedactionAnnotation, and positioned using theresult.quads[0].getPoints()method, which retrieves the bounding box of the matched text. - Finally, the
PageNumberis set to the page where the match occurs.
The newly created annotation is added to the document using addAnnotation(), and it is visually redrawn with redrawAnnotation().
Finally, the text search is initiated using textSearchInit(). This triggers the search process with the specified term, mode, and options.
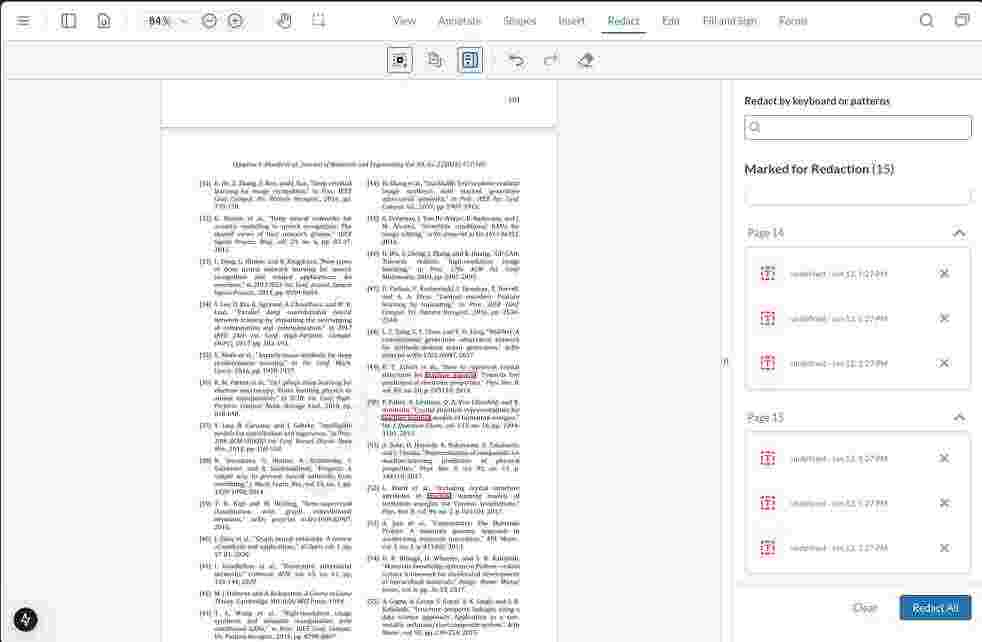
The image above displays how the pre-searching of text occurs and how it is displayed in the redaction panel. The entire workflow effectively automates the identification and marking of sensitive terms for redaction, saving time and minimizing your manual effort.
That’s pretty much everything you need to get started. You can check the full code used for this PDFViewer component here.
Conclusion
PDF redaction has become an essential practice in today's data-driven world. Through this comprehensive guide, you've learned how to implement secure PDF redaction with Apryse's powerful WebViewer SDK. Client-side redaction is so powerful precisely because it makes it easier for non-technical users/staff members to redact sensitive data without ever needing to interact with a server.
Remember that proper redaction is not just about hiding information but permanently removing sensitive data while maintaining document integrity. With these tools and techniques, you can now implement robust PDF redaction workflows that meet modern security standards.
Get started with Apryse today.