 Image Designed Using Canva
Hello there,
Today I would like to introduce a simple React Web Applicating using Tailwind CSS and a tutorial for building this.
Key features:
-
Switch to change between dark mode and light mode
-
Get random jokes and images
-
Share jokes on social media platforms like Facebook and Twitter
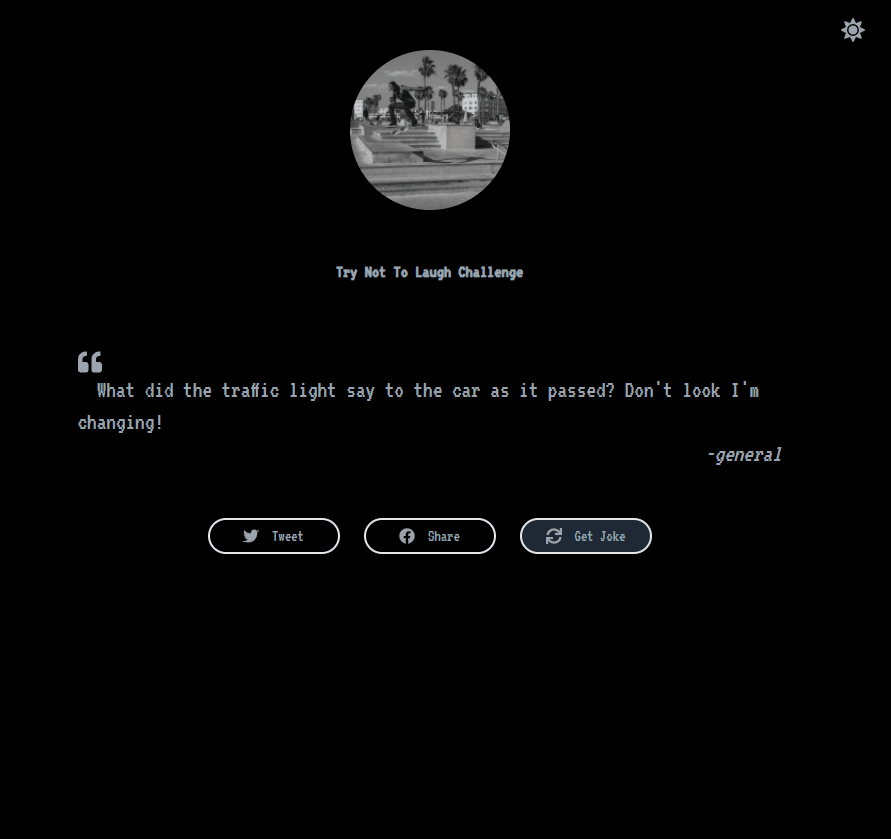
You can see a live demo** here: **Try Not to Laugh Challenge App Web site created using create-react-apptry-not-to-laugh-challenge.netlify.app
In this tutorial, I am using Visual Studio Code as a code editor and Netlify to deploy my application. You can use other tools if you like.
What we will learn on this tutorial:
-
Install Tailwind CSS with Create React App
-
Toggle Theme for Dark Mode and Light Mode
-
Fetching Joke API
Okay, let’s start to code!
- Install Tailwind CSS with Create React App
Before we start, I would like to talk a little about Tailwind CSS. As they introduce in their website TailwindCSS “rapidly build modern websites without ever leaving your HTML.” It means you do not need to write a lot of CSS code but still have a customized look using HTML. Therefore, it is worth giving a try here.
Okay, keep moving on!* **To install Tailwind CSS with Create React App, you have to follow these steps here: **Install Tailwind CSS with Create React App - Tailwind CSS *Start by creating a new Create React App project if you don't have one set up already. The most common approach is to…tailwindcss.com
After your React application is ready, you need to go to your* tailwind.config.js* file and configure it like this:
// tailwind.config.js

module.exports = {
  purge: ['./src/**/*.{js,jsx,ts,tsx}', './public/index.html'],
  darkMode: 'class',
  theme: {
    container: {
      center: true,

       padding: {
        DEFAULT: '1rem',
        sm: '2rem',
        lg: '4rem',
        xl: '5rem',
        '2xl': '6rem',
      },

    },
  },
  variants: {
    extend: {},
  },
  plugins: [],
}
Then go to your *index.css *file and add these lines of code:
@tailwind base;
  @tailwind components;
  @tailwind utilities;

  @import url("https://fonts.googleapis.com/css2?family=VT323&display=swap");

  body {
    font-family: "VT323",
    monospace;
  }
That’s it for the CSS file. This is the beauty of using TailwindCSS that you do not need a lot of customized CSS code and make your application more simple and faster. For more details on this, please have a look at their documentation here before we can move on.
2. Toggle Theme for Dark Mode and Light Mode
To make a Dark-Light Mode theme with TailwindCSS, you need to create these Javascript components: Background.js, ThemeContext.js, and ThemeToggle.js. Let’s dive into details and code like below:
Background.js _uses the className _“bg-white dark:bg-black transition-all” in the body element to make the theme transited between white and black background. You can choose other background colors based on your choice.
//Background.js

import React from 'react';

const Background = ( { children } ) =>
{
    return (

        <body className="bg-white dark:bg-black transition-all">
            {children}
        </body>
    )
}

export default Background;
_ThemeContext.js: _this makes the parent provider for the theme in action.
//ThemeContext.js

import React from 'react';

const getInitialTheme = () => {
    if (typeof window !== 'undefined' && window.localStorage) {
        const storedPrefs = window.localStorage.getItem('color-theme');
        if (typeof storedPrefs === 'string') {
            return storedPrefs;
        }

        const userMedia = window.matchMedia('(prefers-color-scheme: dark)');
        if (userMedia.matches) {
            return 'dark';
        }
    }

   return 'light' // light theme as the default;
};

export const ThemeContext = React.createContext();

export const ThemeProvider = ({ initialTheme, children }) => {
    const [theme, setTheme] = React.useState(getInitialTheme);

    const rawSetTheme = (rawTheme) => {
        const root = window.document.documentElement;
        const isDark = rawTheme === 'dark';

        root.classList.remove(isDark ? 'light' : 'dark');
        root.classList.add(rawTheme);

        localStorage.setItem('color-theme', rawTheme);
    };

    if (initialTheme) {
        rawSetTheme(initialTheme);
    }

    React.useEffect(() => {
        rawSetTheme(theme);
    }, [theme]);

    return (
        <ThemeContext.Provider value={{ theme, setTheme }}>
            {children}
        </ThemeContext.Provider>
    );
};
**ThemeToggle.js **prepares the Toggle UI children for switching between light and dark mode. Please make sure to install react-icons if you use them like this:
//ThemeToggle.js

import React from 'react';
import { FaSun, FaMoon} from "react-icons/fa";
import { ThemeContext } from './ThemeContext';

const Toggle = () => {
    const { theme, setTheme } = React.useContext(ThemeContext);

    return (
        <div className="transition duration-500 ease-in-out rounded-full p-2">
            {theme === 'dark' ? (
                <FaSun
                    onClick={() => setTheme(theme === 'dark' ? 'light' : 'dark')}
                    className="text-gray-500 dark:text-gray-400 text-2xl cursor-pointer"
                />
            ) : (
                    <FaMoon
                        onClick={() => setTheme(theme === 'dark' ? 'light' : 'dark')}
                        className="text-gray-500 dark:text-gray-400 text-2xl cursor-pointer"
                    />
                )}
        </div>
    );
};

export default Toggle;
Now import all these components in your index.js file like below:
//index.js

import React from 'react';
import ReactDOM from 'react-dom';
import './index.css';
import App from './App';
import { ThemeProvider } from './components/ThemeContext';
import Background from './components/Background';
import Toggle from './components/ThemeToggle';


ReactDOM.render(
  <React.StrictMode>
        <ThemeProvider>
      <Background>
         <div className="absolute right-0 top-0 mr-4 mt-4 md:mr-6 md:mt-6">
            <Toggle />
          </div>

        <App />
          </Background>
    </ThemeProvider>,
  </React.StrictMode>,
  document.getElementById('root')
);
That’s it for the theme mode in action. Now continue on our main App.js file.
3. Fetching Joke API
The Joke API I am using here is from a repo created by David Katz (thanks David Katz). You can contribute more jokes to this repo if you like. I think it is fun to read jokes, so this came to the idea for this application.
I am using Axios to fetch the data. If you use the same, please make sure to install Axios in your React application.
//App.js
import React from 'react';
import axios from 'axios'
import { FaFacebook, FaTwitter, FaSync, FaQuoteLeft } from "react-icons/fa"
const API = "https://raw.githubusercontent.com/15Dkatz/official_joke_api/master/jokes/index.json";
class App extends React.Component
{
state = {
jokes: [
{
setup:"What did the fish say when it hit the wall?",
punchline: "Dam.",
type: "general"
}
],
index: 0
};
componentDidMount() {
this.fetchJoke();
}
fetchJoke = () => {
axios.get(API)
.then((res) => {
this.setState(
{
jokes: res.data
},
this.getRandomIndex
);
})
.catch((error) => {
console.log(error);
});
}
getRandomIndex = () => {
const { jokes } = this.state;
if (jokes.length > 0) {
const index = Math.floor(Math.random() * jokes.length);
this.setState({
index
});
}
};
render ()
{
const { jokes, index } = this.state;
const joke = jokes[index];
const tweetURL = `https://twitter.com/intent/tweet?text=${joke.setup} ${joke.punchline} - ${joke.type}`;

const facebookURL = "https://www.facebook.com/sharer/sharer.php?u=https://try-not-to-laugh-challenge.netlify.app/";
return (
<body className="flex flex-col min-h-screen">
<header className="flex flex-col items-center justify-center p-8">
<img className="shadow-lg rounded-full inline-block w-40 h-40 m-8" src={`https://picsum.photos/600?grayscale&random=${index}`} alt="logo" />
<h1 className="font-bold capitalize text-gray-500 dark:text-gray-400 text-center text-lg pt-4">Try-Not-to-Laugh Challenge</h1>
</header>
<main class="flex-grow">
<div className="container text-gray-500 dark:text-gray-400 flex flex-col items-center justify-center gap-4 p-4 md:p-8" id="quote-box">
{joke && (
<div className="text-2xl">
<p id="text">
<FaQuoteLeft /> { joke.setup }
{joke.punchline}
</p>
<cite id="author" className="float-right">
-{joke.type}
</cite>
</div>
)}
<div className="grid grid-cols-1 md:grid-cols-3 gap-6 m-8">
<a
id="tweet-quote"
className="flex items-center justify-center border-2 rounded-full py-1 px-6"
target="_blank"
rel="noreferrer"
href={tweetURL}
>
<FaTwitter/> Tweet
</a>
<a
id="fb-quote"
className="flex items-center justify-center border-2 rounded-full py-1 px-6"
target="_blank"
rel="noreferrer"
href={facebookURL}
>
<FaFacebook/>
Share
</a>
<button
className="flex items-center justify-center bg-gray-800 border-2 rounded-full py-1 px-6"
onClick={this.getRandomIndex}
id="new-quote"
>
<FaSync/>
Get Joke
</button>
</div>
</div>
</main>
<footer className="text-gray-500 dark:text-gray-400">
<div className="text-center text-xs p-2">
Made with TailwindCSS by <a target="_blank" rel="noreferrer" href="https://hellojuninguyen.netlify.app/">juniNguyen.</a>
</div>
</footer>
</body>
);
}
}
export default App;
For random jokes, I called the function *getRandomIndex() *to handle the event on the “Get Joke” button every time it is clicked. To share jokes on social media, just use the react-icons for button and create the URL link href attribute like these:
const tweetURL = `https://twitter.com/intent/tweet?text=${joke.setup} ${joke.punchline} - ${joke.type}`;
const facebookURL = "https://www.facebook.com/sharer/sharer.php?u=https://try-not-to-laugh-challenge.netlify.app/";
For random images, I am using the source from Lorem Picsum. Inside the img element, add the source like this:
<img className="shadow-lg rounded-full inline-block w-40 h-40 m-8" **src={`https://picsum.photos/600?grayscale&random=${index}`} **alt="logo" />
That’s it for this tutorial today, I hope you found it useful. You can fork or clone the source code for this application here. Let me know if you get any issues. Enjoy and happy reading!
Comments
Loading comments…