This tutorial isn't meant to teach you any best practices or production code; instead, it's meant to show you how Redux works and how to integrate it with hooks!
In any true production app, you'll almost certainly use Redux Toolkit instead of basic Redux, but let's get started!
Redux solves managing global state
As we all know, managing state in large web apps, or even smaller ones with less complexity, can be quite difficult.
For example, we may need to transfer props from one parent component to five child components, and then execute functions available in those props, and so on.
It's a pain to keep track of this, which is known as prop drilling. It's also difficult to debug and ensure you've done it correctly in every component that uses the parent component's state.
This is what Redux itself has to say about Redux:
A single centralized place to contain the global state in your application, and specific patterns to follow when updating that state to make the code predictable.
I recently created a crypto web application that allows you to follow cryptos, add currencies to your favorites, set alarms, and more.
Passing props into every component would have been too messy, and it would have quickly gotten out of hand, as I had a navbar with a profile component, a component for a profile, and a bunch of spread-out components that didn't have the same parent.
Let's take a look at the various components that make up Redux and what they all mean and do.
Let's talk about how data flows first. Let's suppose we're in a button component and we want to change the state in Redux. We'll need to call a function to do that, right? Or do we just update the state? Nope, we call functions that hold information about what we want to update as well as a payload with which we want to update it. The state is never directly mutated either.
So here's a simple illustration of how data might flow:
When we click on a button in our button component, it is supposed to increase the countby one. As a result, when we click on it, a redux action is invoked.
The different parts:
1. Store
Our Redux app's state and reducers are stored in a object called store.
2. Reducer
The reducer is responsible for returning a new state, and it does so depending on the action that is passed to it.
The reducer is a function that takes the current state and an action object as inputs and outputs the new state. Pure reducer functions are used to make changes to the state, according to the documentation:
To specify how the state tree is updated based on actions, you write reducer functions. Reducers are pure functions that take the previous state and an action, and return the next state. Like any other functions, you can split reducers into smaller functions to help do the work, or write reusable reducers for common tasks.
3. Action
The action instructs the reducer on what to do with the state, such as changing it to a value we pass into the reducer from the action. The reducer is responsible for actually changing the state of the application, while the action is in charge of specifying how it should change. By passing an object with a type property and a payload property, this action describes what the reducer should do. We can use the type to check for what the reduction should do.
The reducer might perform 5 various things, and we can specify what it should do using a type.
For example, updating a user's user name.
4. Dispatch
The dispatch is the catalyst for your action. It's similar to a button that fires a rocket, which in this case is the action.
Another thing to keep in mind is that with our Redux project, the only way to update the state is to call the dispatch method and pass in the action object.
Why can't we just change the state? Because if we didn't dispatch an action, we'd be able to change the state from anywhere in our application, and we wouldn't be able to figure out where it came from.
As a result, Redux knows when, when, what, and how it was mutated, and we'd be able to debug it more easily with the debugging tools.
It also helps us to have specific ways for changing state rather than having diverse things all throughout.
5. Middleware
For example, when the action tells the reducer what to do, the reducer should be informed what to do and given an argument, but what if the action is a function?
The reducer will thus be unable to do any operations because it only accepts arguments in the form of objects, arrays, primitive valuesand so on, rather than a function that must be run to return something.
As a result, we'll need a middleware that detects whether a function is being supplied as an argument and, if so, calls the function and provides whatever the function produces to the reducer as payload.
Get starting coding
-
Spin up a React app with npx create-react-app projectname.
-
Install the dependencies for Redux with npm i redux react-redux.
Let's get started now that we have everything we need.
The app we'll make will allow you to change the name of a user and the age from the Redux state, as well as display it, in our component.
What we will create:
-
A folder containing our store and all of its parts.
-
A folder that contains our reducers
-
A store.js that will create the store with our reducers.
-
A action.js that will contain all of our different actions.
-
In app.js we will use the store's state, reducers, and actions.
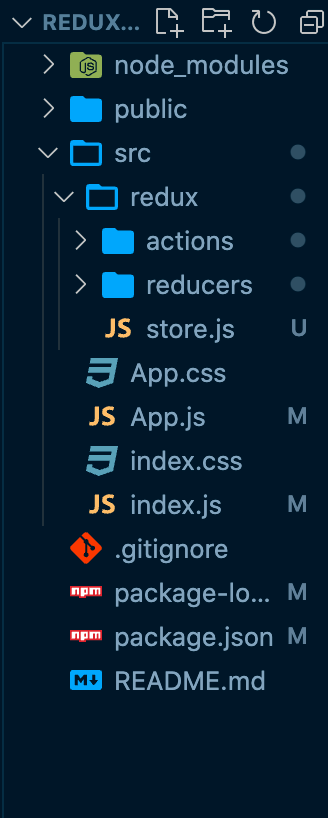
In the src directory, create a redux folder.
In the redux folder, create a reducers folder, a actions folder and a store.js file.
It should look like this now:
Create the reducer
Create a addUserReducer.js in the reducers folder; this is the reducer that will return the user object.
The reducer is simply a function that, depending on the action type and payload, returns a new state.
So, in this file, we'll make a function that takes a state and an action object, checks the type property for value in the action object, and returns the new state depending on what type it contains:
const inititalState = { name: "User 1", age: 23 };
const userReducer = (state = inititalState, action) => {
  switch (action.type) {
    case "CHANGEUSERNAME": {
      return { ...state, name: action.payload };
    }
  }
  return state;
};
export default userReducer;
So, we check if the type is CHANGEUSERNAME, and if it is, we return a new state with a new username that we pass in the payload.
What about the deconstruction? We have our state, which is an object that may or may not contain a user; in either case, we want to create a new object including the new user data, so the ...statewill be destructured into what is within the new object, and we will add our user details from the payload to the object.
But, since we also want to be able to change a user's age, let's include a case for that:
const inititalState = { name: "User 1", age: 23 };
const addUserReducer = (state = inititalState, action) => {
  switch (action.type) {
    case "CHANGEUSERNAME": {
      return { ...state, name: action.payload };
    }
    case "CHANGEAGE": {
      return { ...state, age: action.payload };
    }
  }
  return state;
};
export default addUserReducer;
The reducer is then exported.
Now we need a way to invoke this reducer, which we can do by defining a dispatch action.
Create the action
The action for adding a user will be a function that takes a user argument and returns a type and payload object, which will be the new name.
export const changeUsersName = (name) => {
  return {
    type: "CHANGEUSERNAME",
    payload: name,
  };
};
Now we need a way to dispatch this action from our React component to the reducer.
To do so, we must first add the reducer to the store. Redux has a createStore method that we can use to send in our reducers, middlewares,etc.
So let's get started with the store. In our store.js file, we have the following code: https://gist.github.com/antondevv/7dab8163c180ce306781aa18083c09b4
Before exporting, we create the store and pass it our reducer. We can now use it by importing it into our React components.
Getting the state in our React component
React Redux has something called useSelector which allows us to access the store state from anywhere in our app!
To use that, we must wrap our React App in a store provider, which tells React that we want to be able to use Redux from any component wrapped in the provider. We do this in index.js by importing the store we created and the react-redux provider; your index.js should look like this:
import React from "react";
import ReactDOM from "react-dom";
import App from "./App";

import store from "./redux/store";
import { Provider } from "react-redux";

ReactDOM.render(
  <Provider store={store}>
    <App />
  </Provider>,
  document.getElementById("root")
);
Now anywhere in our React app, we have access to the store.
So let's get the user from the state in App.js.
Let's import the useSelector:
*import* { useSelector } *from* "react-redux";
And simple call the reducer which will return us the state:
const* user *=* useSelector*((*state*)* *=>* state.userReducer*);
Now we have the user.
Let's display it:
import { useSelector } from "react-redux";

function App() {
  const user = useSelector((state) => state.userReducer);

  return (
    <div className="App">
      <h1>Name: {user.name}</h1>
      <h1>Age: {user.age}</h1>
    </div>
  );
}

export default App;
Now let's import our actions:
import { changeUsersName } from "./redux/actions/changeUsersName";

import { changeUsersAge } from "./redux/actions/changeUsersAge";
And let's import the dispatch that will fire the action:
import { useSelector, useDispatch } from "react-redux";
Now we can fire an action by passing it into the dispatch, like this:
dispatch(changeUsersName("name"));
So let's add 2 input fields so we can update the user data.
This is the final code for App.js:
import { useSelector, useDispatch } from "react-redux";
import { changeUsersName } from "./redux/actions/changeUsersName";
import { changeUsersAge } from "./redux/actions/changeUsersAge";
import { useState } from "react";

function App() {
  const user = useSelector((state) => state.userReducer);
  const dispatch = useDispatch();

  const [name, setName] = useState(user.name);
  const [age, setAge] = useState(user.name);

  return (
    <div className="App">
      <h1>Name: {user.name}</h1>
      <h1>Age: {user.age}</h1>
      <hr></hr>
      <form
        onSubmit={(e) => {
          e.preventDefault();
          dispatch(changeUsersName(name));
          dispatch(changeUsersAge(age));
        }}
      >
        <input
          onChange={(e) => setName(e.target.value)}
          placeholder="Change name"
        ></input>
        <input
          onChange={(e) => setAge(e.target.value)}
          placeholder="Change age"
        ></input>
        <input type="submit" value="Change user details" />
      </form>
    </div>
  );
}

export default App;
This is how it should look:
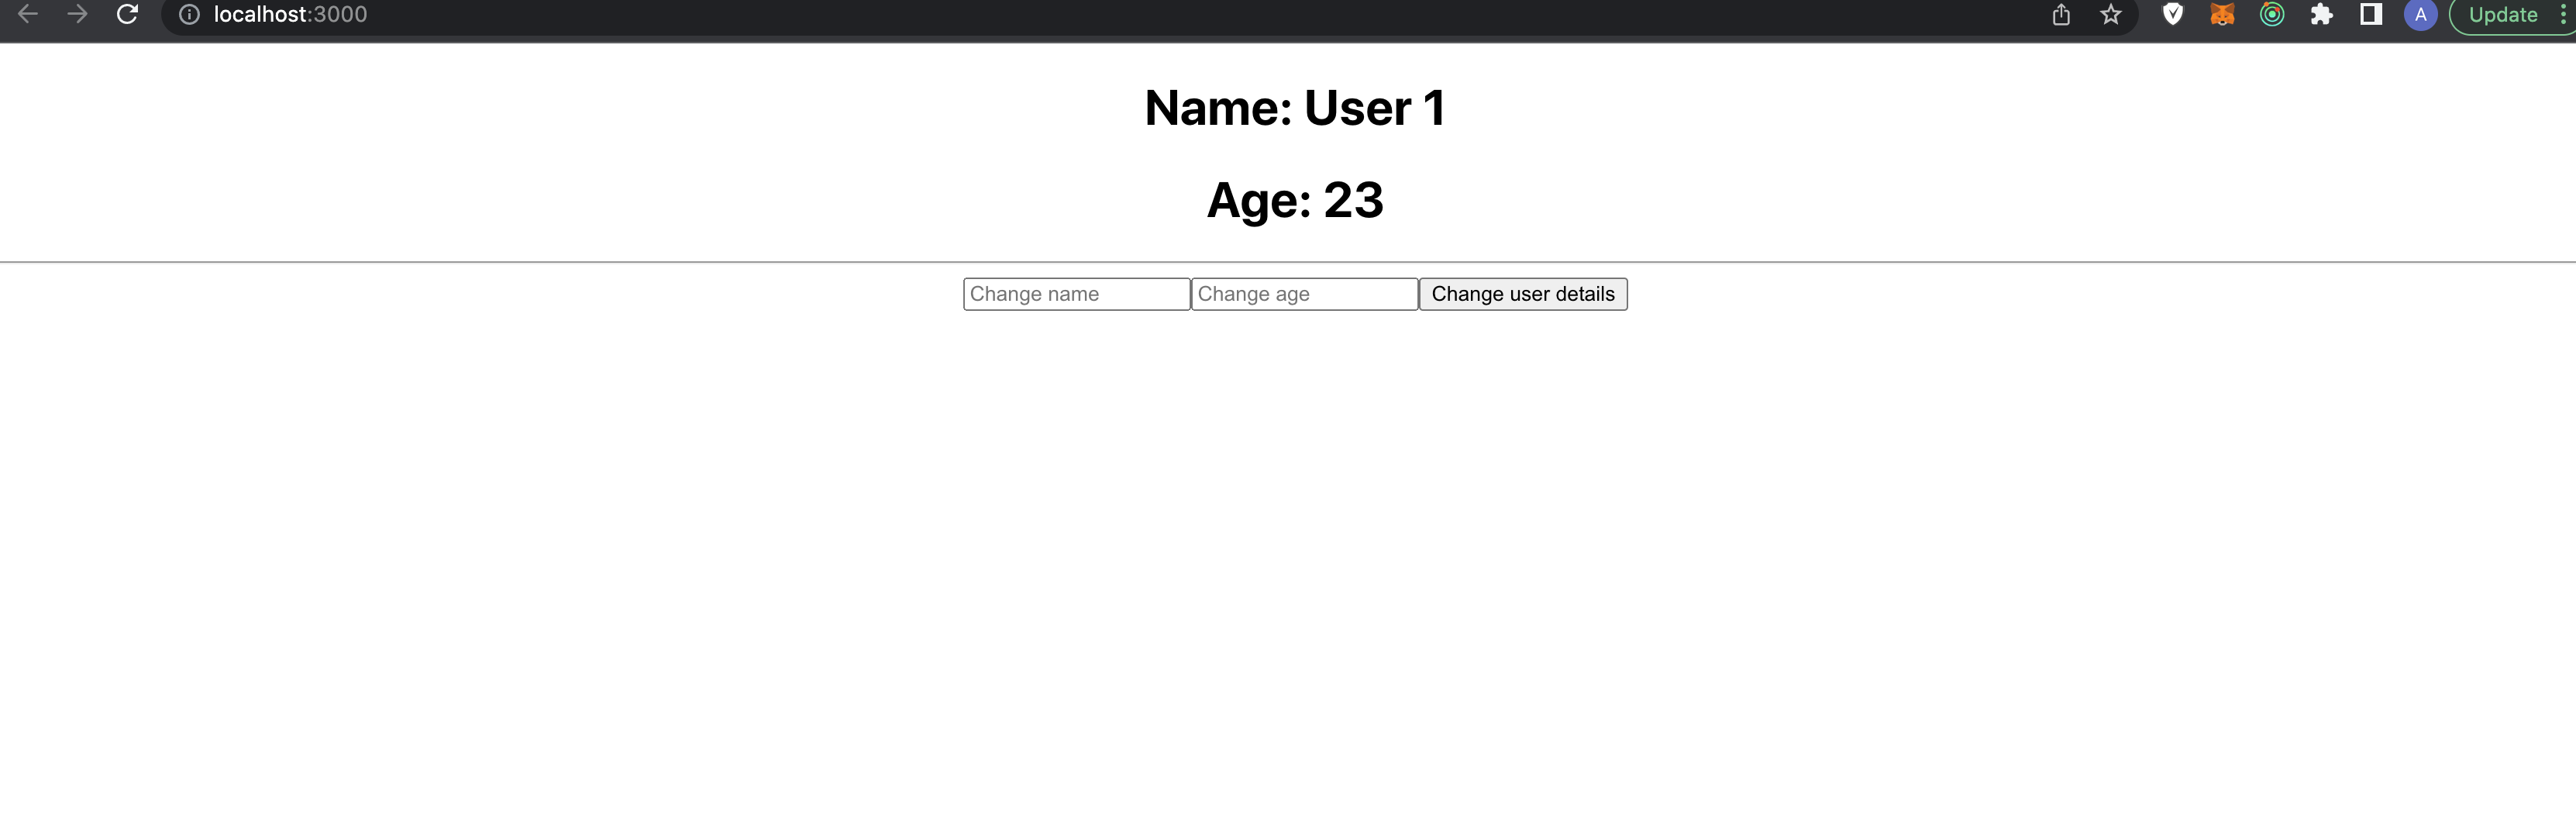 Image made by author
Now we are all set! And we should be able to update the user in Redux state!
I include my GitHub repo if you want to clone it: https://github.com/antondevv/Medium-redux
Comments
Loading comments…