Making APIs that requires photos, so uploading photos to the Amazon S3 bucket and accessing it with the public url is one way and then we can save that public url in our MongoDB database for further retrieval.
Prerequisites before starting
- Any IDE of your choice like (VSCode, etc.)
- GitHub repository. (it's optional but it is preferred to make a code repository).
- Node.js installed.
- Knowledge about how API works and how it is programmed using Node.js, If you don't know how to make APIs with Node.js. First go and read the articles below.
- How to Make REST API with Node.js, Express, and MongoDB
- Create API Endpoints for REST API in Node.js
- AWS account. If you don't have make your account here (for 12months you can use some service free of cost.)
- MongoDB or any other Database (to store the link of the photo).
What is Amazon S3?
Amazon Simple Storage Service (S3) is a cloud storage service. It is object storage here we can save any type of data that will be stored in the form of objects and can be retrieved from anywhere over the internet. We can handle all our items using the AWS console, it provides 99.99 % availability and 99.999% durability. You can read more here.
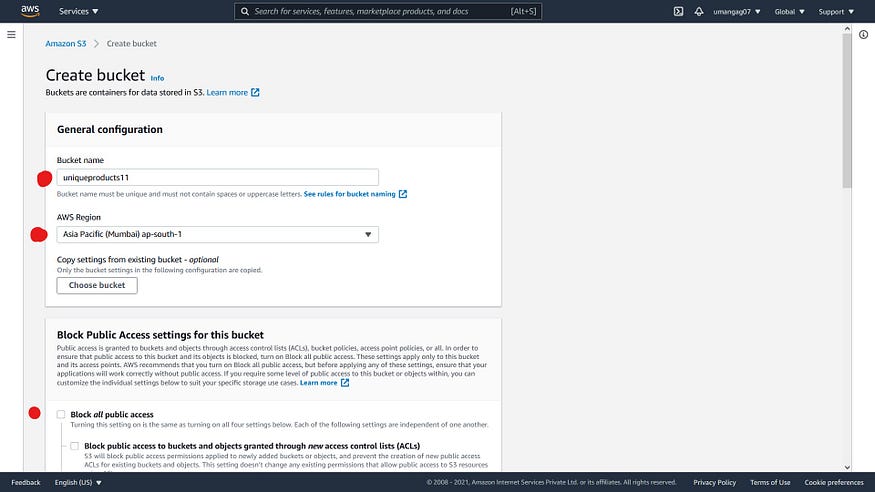
First let's make our S3 bucket with the help of AWS console, sign-in to your console and then search for S3 in the search bar on the top and click on it.
Then create bucket using the option:

Give your bucket a unique name, select your server and uncheck the block all public access settings and then click on create your bucket will be created.
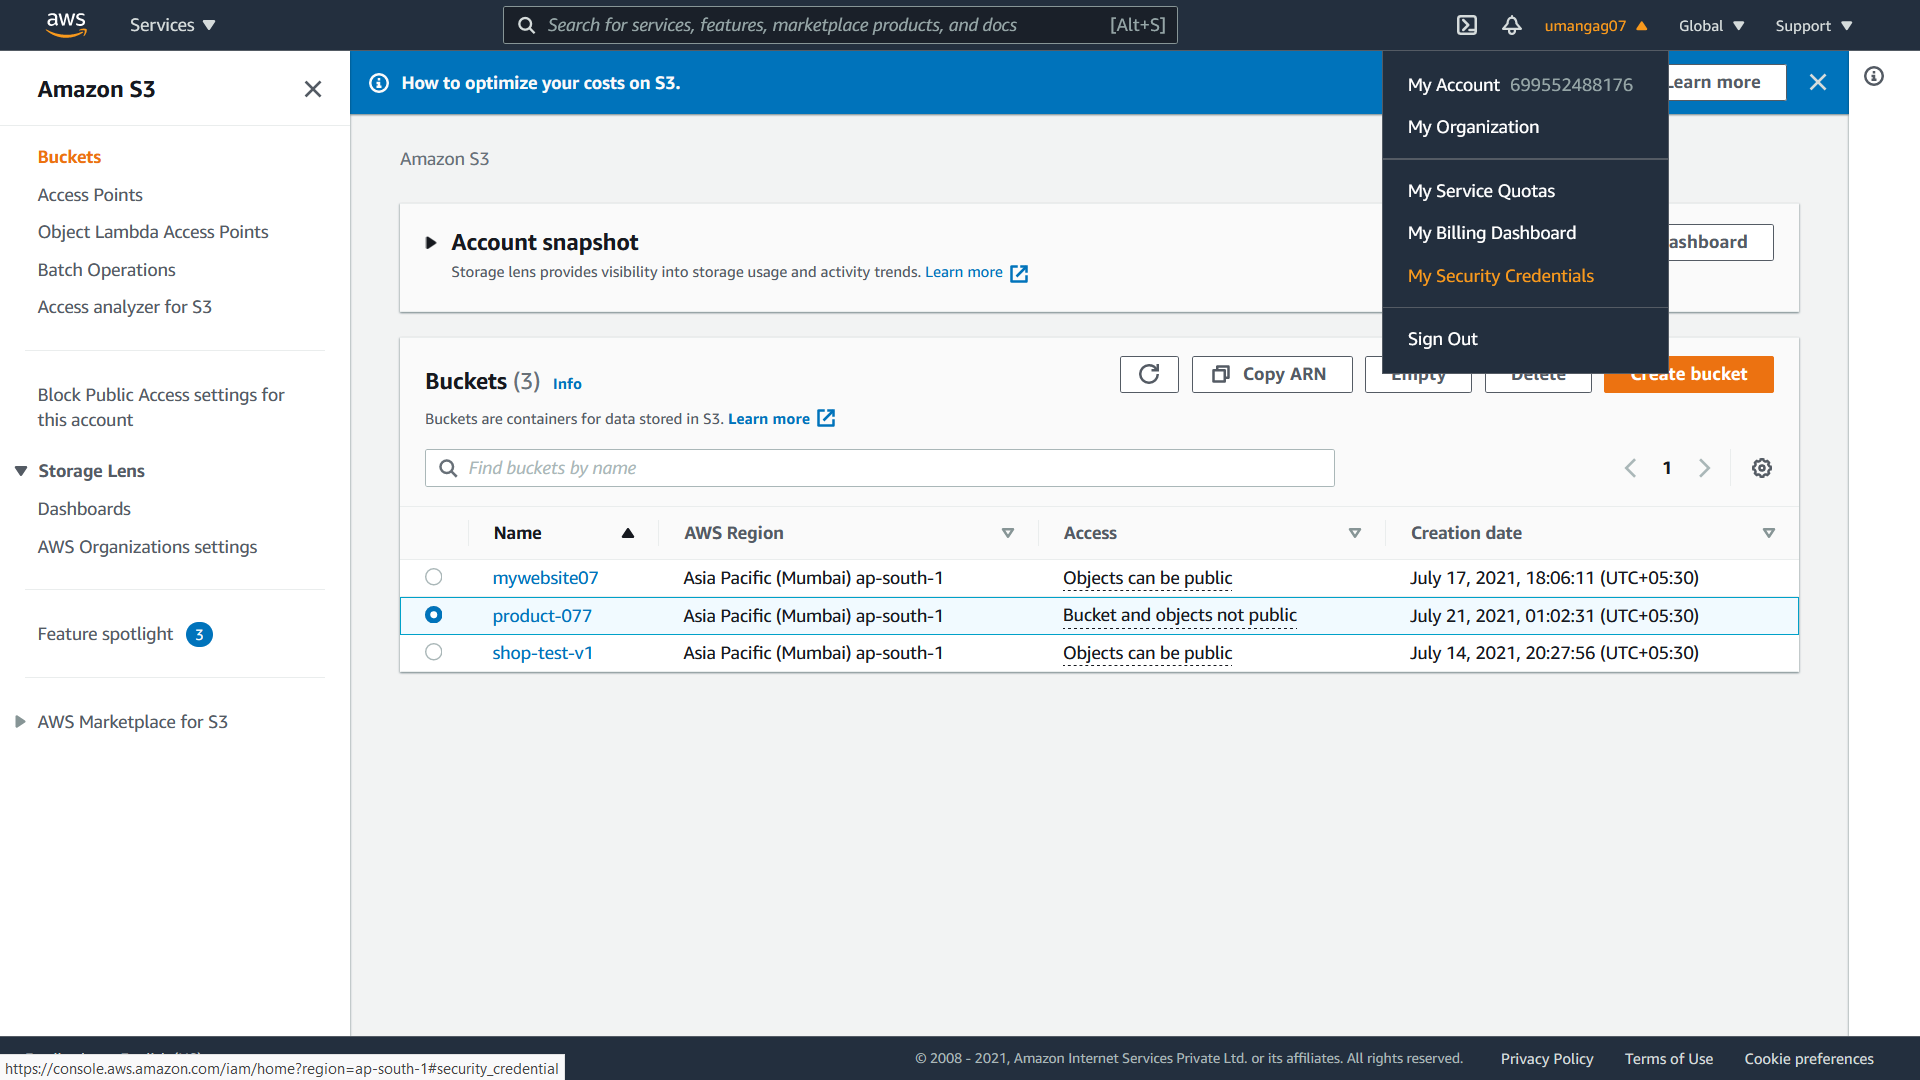
After creating the bucket let's generate our access keys and IDs which will be used in Node.js for the connection.
Click on my credentials from top and then go access keys and generate and save it somewhere or download it (don't share it with anyone).

Now after making S3 bucket and generating the credentials, Let's get started with writing code for uploading of image.
Firstly save the credentials that we generated in the .env file. Be sure to mention this file in your .gitignore file so that you don't share your credentials with others.
PORT = 5000

AWS_ACCESS_KEY_ID="AKIA2FYET3LYEFGEF2AHJ"

AWS_ACCESS_KEY_SECRET="ycOIx4DIVmeoU+8bajusH4/Gnan0Xv2YZrB5K8gO"

AWS_BUCKET_NAME="your bucket name"
(Don't try to use these they are not correct😁😜)
We will take example of shop only, referenced in article in the starting. So we have to store the photo of our product and retrieve the link by which the photo is publicly accessible and we will store it in our MongoDB database.
We will use the below product model for our API:
const mongoose = require('mongoose')

const ProductSchema = mongoose.Schema({

name: {

type: String,

required: true

},

price: {

type: Number,

required: true,

default: 0

},

productImage: { type: String }

})

module.exports = mongoose.model('products', ProductSchema)
Now main things to upload photo will be there in Routes.js file, but before moving ahead few dependencies needs to be installed:
- Multer is used to handle multipart/form data but primarily it is used for uploading images.
- Aws-sdk is used to call AWS services using APIs.
npm i multer aws-sdk
Go through the code below carefully and comments are there to help you out.
const express = require('express')

const router = express.Router() // router will be used to handle the request.

const multer = require('multer') // multer will be used to handle the form data.

const Aws = require('aws-sdk') // aws-sdk library will used to upload image to s3 bucket.

const Product = require('../models/Product') // our product model.

require("dotenv/config") // for using the environment variables that stores the confedential information.

// creating the storage variable to upload the file and providing the destination folder,

// if nothing is provided in the callback it will get uploaded in main directory

const storage = multer.memoryStorage({

destination: function (req, file, cb) {

cb(null, '')

}

})

// below variable is define to check the type of file which is uploaded

const filefilter = (req, file, cb) => {

if (file.mimetype === 'image/jpeg' || file.mimetype === 'image/jpg') {

cb(null, true)

} else {

cb(null, false)

}

}

// defining the upload variable for the configuration of photo being uploaded

const upload = multer({ storage: storage, fileFilter: filefilter });

// Now creating the S3 instance which will be used in uploading photo to s3 bucket.

const s3 = new Aws.S3({

accessKeyId:process.env.AWS_ACCESS_KEY_ID, // accessKeyId that is stored in .env file

secretAccessKey:process.env.AWS_ACCESS_KEY_SECRET // secretAccessKey is also store in .env file

})

// now how to handle the post request and to upload photo (upload photo using the key defined below in upload.single ie: productimage )

router.post('/', upload.single('productimage'), (req, res) => {

console.log(req.file) // to check the data in the console that is being uploaded

// Definning the params variable to uplaod the photo

const params = {

Bucket:process.env.AWS_BUCKET_NAME, // bucket that we made earlier

Key:req.file.originalname, // Name of the image

Body:req.file.buffer, // Body which will contain the image in buffer format

ACL:"public-read-write", // defining the permissions to get the public link

ContentType:"image/jpeg" // Necessary to define the image content-type to view the photo in the browser with the link

};

// uplaoding the photo using s3 instance and saving the link in the database.

s3.upload(params,(error,data)=>{

if(error){

res.status(500).send({"err":error}) // if we get any error while uploading error message will be returned.

}

// If not then below code will be executed

console.log(data) // this will give the information about the object in which photo is stored

// saving the information in the database.

const product = new Product({

name: req.body.name,

price: req.body.price,

productImage: data.Location

});

product.save()

.then(result => {

res.status(200).send({

_id: result._id,

name: result.name,

price: result.price,

productImage: data.Location,

})

})

.catch(err => {

res.send({ message: err })

})

})

})

// Get all the product data from db

router.get('/', (req, res) => {

try {

console.log("hello")

const products = await Product.find()

console.log(products)

res.send(products)

} catch (err) {

res.send({ message: err, m:"not working" })

}

});

module.exports = router
For the code of Index file or the app.js refer to this repository.
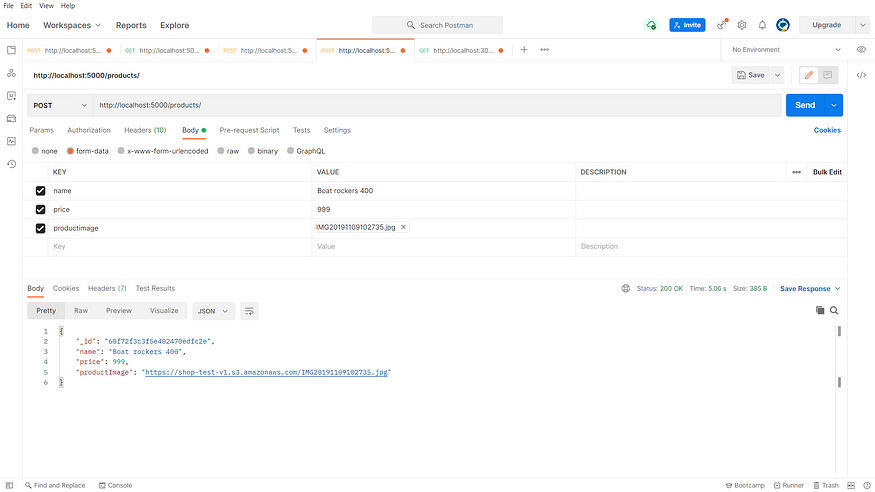
Start your node server and let's make a post request using any API Client (I will use Postman) and let's test it out.
Make a post request to the URI endpoint you created to upload the data.
In body use the form -data instead of JSON and make API call like below and you will get a response. Check your image by clicking on to it. If it opens in the browser then our code working fine.
You can also check by seeing into the bucket in the AWS console and can change the permissions according to your need.
Hurray! You have uploaded the Image onto your AWS S3 bucket!
Got stuck? 🤯
If you find any errors, try console logging things and find error step by step. I am sure there will be an answer to your question on StackOverflow. If you are not able to solve the issue, comment it down or connect with me using my portfolio website: https://www.umangagrawal.codes/
If this article helped you or solved your problem, don't hesitate to let me know your thoughts in the comments.
Comments
Loading comments…