
As internet users, we usually rely on fast.com and speedtest.net for all of our internet performance and network speed tests. Although this is not bad in terms of utilities, it would be great if we could integrate these tools in our applications to run all these tests inside the core of our project, without the need of going back and forth in between our app and these tools, wouldn't be great if we could do so?
Well, we certainly can and we will focus on speedtest.net to give you guys an example of how to proceed with this in this article, are you ready to start this journey, buddy?
Requirements:
This one is a given but if by some chance we forget this. Keep in mind that we would need a fast speed and reliable internet connection to compile, test, and deploy an Internet Speed Tester. For this, we suggest using Xfinity for a smooth, seamless, and error-free programming experience.
Not only is it a dependable gateway but with its in-build advanced security features will protect the code and collateral from all kinds of phishing and third-party attacks. For more information, the Xfinity customer service team is available 24/7 to hook you with plenty of budget-friendly options.
Other than that, we will need three modules, or packages, or libraries or whatever you want to call it in order for us to run this project. We can install them using pip or downloading the files. Most of these packages have their own descriptive section in the Python Package Index (PyPI)repository. Let's add a summary of some of these:
SPEEDTEST | https://pypi.org/project/speedtest/
Description | Speed test module for Python
Version | speedtest==0.0.1
Command | pip install speedtest
Requires | Python >=3.7
COLORAMA | https://pypi.org/project/colorama/
Description | Cross-platform colored terminal text.
Version | colorama==0.4.4
PIP Command | pip install colorama
Requires | Python >=2.7, !=3.0.*,
TQDM | https://pypi.org/project/tqdm/
Description | Fast, Extensible Progress Meter
Version | tqdm==4.62.3
PIP Command | pip install speedtest
Requires | Python !=3.0., !=3.1. to !=3.3.*, >=2.7
Now that we have all these modules installed, let's create a speed_test_pjt.py file and start our first lines of code by adding the necessary imports in this file as follows:
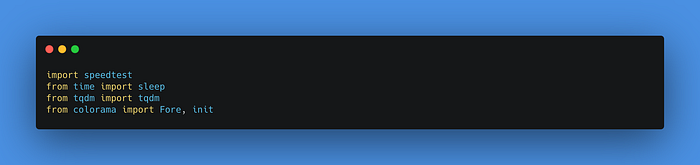
Next, we need to initialize our Colorama module, passing the autoreset parameter as True, that way, the console colors will automatically reset to default after the last Colorama command has been invoked. I am pretty sure you will love this amazing package, buddy!

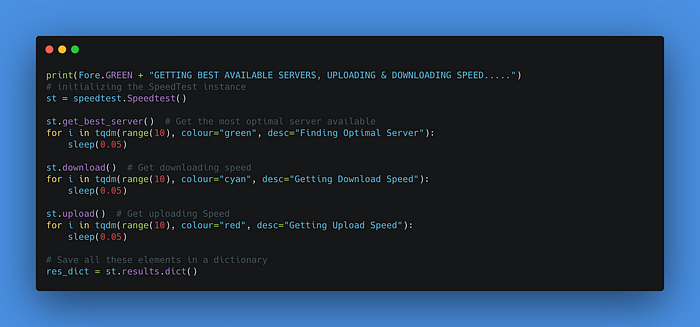
Once we have added this, we proceed to create an instance of the Speed Test class using the SpeedTest() function, get the most optimal server available for our test using get_best_server() in our instance, calling the download() and upload() functions to get downloading and uploading speed information, and save all this data in a dictionary called res_dict that will contain all the returning results of these functions.
We will use tqdm() method of our installed progress bar to display in the screen fake progress of the speed test events so that way something is being shown on the screen while these events are taking place. Let's see the code below, young coders:
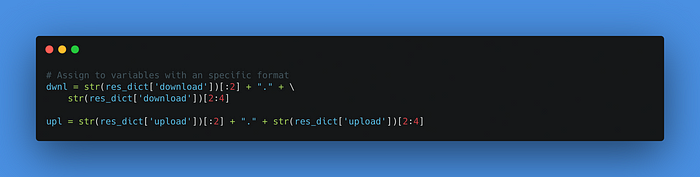
Next, let's retrieve the information from res_dict and assign it to variables with a specific format. This will come in handy in terms of displaying more readable data:
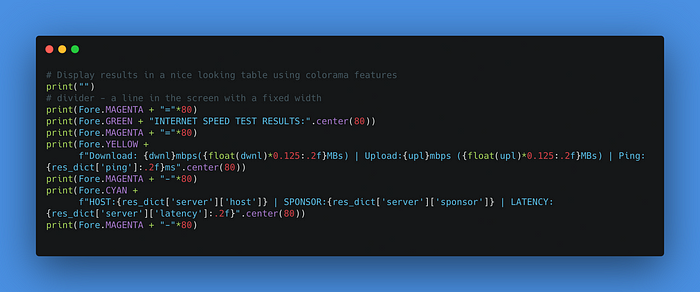
Last but not least, let's give that nice looking table effect to our results combining the power of Colorama, along with some lines, used as dividers, to make it look smooth, shall we?
Ready, tigers! We can now say that our code has been completed. Congrats! You guys did a great job!
Final Code for this Project
# ---------------------------------------------------------------------------------------------
# Description: Build a simple Internet Performance and Network Speed Test Routine
# Author: Made with ❤️ in Python 3 by Alvison Hunter - September 26th, 2021
# JavaScript, Python and Web Development tips at: https://bit.ly/3p9hpqj
# ---------------------------------------------------------------------------------------------

import speedtest
from time import sleep
from tqdm import tqdm
from colorama import Fore, init

init(autoreset=True)

print(Fore.GREEN + "GETTING BEST AVAILABLE SERVERS, UPLOADING & DOWNLOADING SPEED.....")

# initializing the SpeedTest instance
st = speedtest.Speedtest()

st.get_best_server()  # Get the most optimal server available
for i in tqdm(range(10), colour="green", desc="Finding Optimal Server"):
    sleep(0.05)

st.download()  # Get downloading speed
for i in tqdm(range(10), colour="cyan", desc="Getting Download Speed"):
    sleep(0.05)

st.upload()  # Get uploading Speed
for i in tqdm(range(10), colour="red", desc="Getting Upload Speed"):
    sleep(0.05)

# Save all these elements in a dictionary
res_dict = st.results.dict()

# Assign to variables with an specific format
dwnl = str(res_dict['download'])[:2] + "." + \
    str(res_dict['download'])[2:4]

upl = str(res_dict['upload'])[:2] + "." + str(res_dict['upload'])[2:4]

# Display results in a nice looking table using colorama features
print("")

# divider - a line in the screen with a fixed width
print(Fore.MAGENTA + "="*80)
print(Fore.GREEN + "INTERNET SPEED TEST RESULTS:".center(80))
print(Fore.MAGENTA + "="*80)
print(Fore.YELLOW +
      f"Download: {dwnl}mbps({float(dwnl)*0.125:.2f}MBs) | Upload:{upl}mbps ({float(upl)*0.125:.2f}MBs) | Ping: {res_dict['ping']:.2f}ms".center(80))
print(Fore.MAGENTA + "-"*80)
print(Fore.CYAN +
      f"HOST:{res_dict['server']['host']} | SPONSOR:{res_dict['server']['sponsor']} | LATENCY: {res_dict['server']['latency']:.2f}".center(80))
print(Fore.MAGENTA + "-"*80)
Well, we've come to an end. If you found this article helpful, feel free to share it among friends.
Thanks for reading, see you next time!
Comments
Loading comments…