Introduction
The democratization of AI-based tools and text-to-image models has made it possible to generate images and concepts that were previously only accessible to a specific group of professionals and industries. This process also enables experimentation with new visual concepts and ideas in a user-friendly and straightforward manner, where creativity is emphasized and technology is utilized as a tool. The provided video serves as an example of this concept and serves as an in-depth tutorial for individuals interested in exploring this new medium.
Concept
I was searching for some songs in audiio when I came across “Dangerous” by Shelly Fairchild. The beat and the lyrics caught my attention and I decided to search for a way to produce a music video for the song, using only AI text to image models. With the decision taken I did what everyone does: searched the web. I came across this post on Reddit and, in the comments, this tutorial on YouTube. After watching the tutorial, I thought to myself: I can do this, and it looks super easy! Err… not really, thus this tutorial.
What tools you will need
- Your brain and creativity
- A song you can use, either licensed or under a Creative Commons License. You can find a list of music resources here
- A service that can separate the music of your choice into stems (drums, voice, bass, etc.) I used La La Lai
- A Stable Difusion enabled GUI (I use Draw Things AI, the best app for Mac M1 out there)
- A spreadsheet. Yes it will come handy.
- A Google Colab+ account. You can use a regular Google Colab account, if you are not in a hurry but this process takes lots of resources. If you know of a way to run DeForum locally on a Mac or Windows machine, please let me know in the comments.
- A video editing software. I used Adobe Premiere Pro.
First Step: Lyrics to Mood board
I first started by writing down the lyrics and thinking about what story I wanted to tell based on them.
I’m the one to start the fire / I should warn you not to get close to the flame
The initial idea of depicting a woman with the power to ignite a city and drive individuals to madness was formed through the combination of the first two sentences and the overall theme. To establish the tone and atmosphere of the video, I utilized Draw Things AI and conducted various experiments. This step is crucial in determining the model to be used and setting the overall tone of the video. Additionally, it is important to ensure compatibility with samplers available on Deforum, so that any experimentation with models and moods will yield consistent results when using Deforum for animation.

Models Available on Deforum
After several experiments, I decided to go with the following style, using the Dreamlike Diffusion Model, using the DDIM Sampler.
, by William Blake, orange black and red tones, trending on artstation, insane amount of details, cinematic, dramatic light, film grain
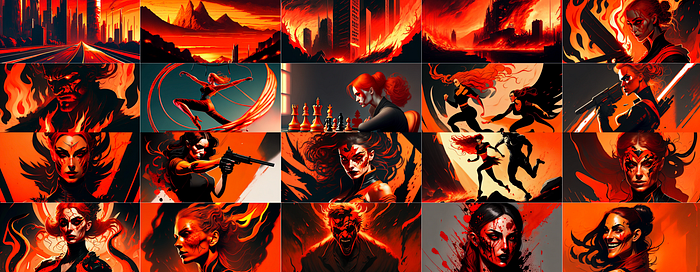
© Mood board by author
By incorporating the primary prompt subject and utilizing the same seed and style previously defined, a mood board can be generated to provide an approximation of the main images in the video. This is commonly known as a mood board and the result can be seen above. It is important to take the time to fine-tune the prompts and ensure that the main images align with your desired outcome. The more effort invested in this process, the better, as rendering the animation will consume resources and it is essential to have a clear vision before proceeding.
Second Step: Identifying the Frames
With the lyrics and corresponding images established, the next step is to align the main images with the appropriate section of the song. To accomplish this, the audio file was imported into Premiere and a sequence set at 30 frames per second was created. The audio was then added to the sequence, and markers were placed at the start of each sentence corresponding to a specific image. This allows for precise synchronization of the images with the corresponding section of the song.
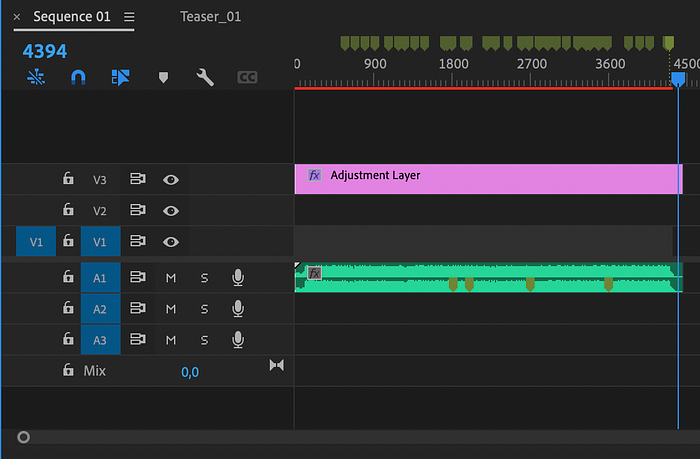
Setting up the markers in Adobe Premiere
The process of synchronizing the images with the lyrics is time-consuming, but it is essential to ensure that the final video has a cohesive connection between the images and lyrics. It is important to take the time to ensure that this foundation is correct. To keep track of the frames numbers and the prompts, I used Google Sheets and the sheet can be accessed here.
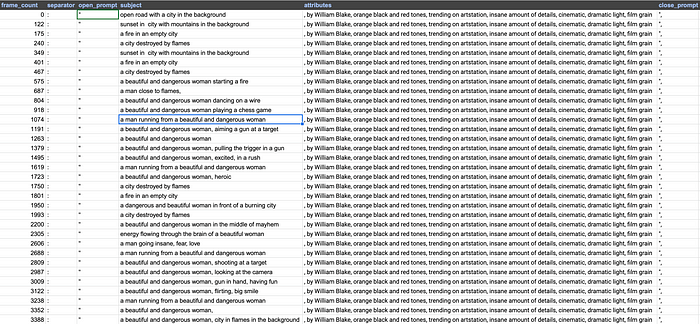
Frames for Prompts — Google Sheets
What does this mean?
At each frame in the column, Deforum is instructed to generate the specified prompt, taking into account the frame number. This is done by “forcing” Deforum to generate a specific image for that frame. For example, at frame 0, Deforum will generate an image of an “open road with a city in the background, by William Blake, orange black and red tones, trending on artstation, insane amount of details, cinematic, dramatic light, film grain” and at frame 122, Deforum will generate an image of a “sunset in city with mountains in the background, by William Blake, orange black and red tones, trending on artstation, insane amount of details, cinematic, dramatic light, film grain”.
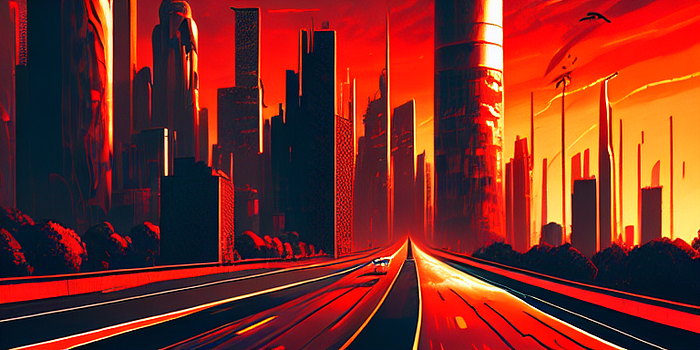
Frame 0
Frame 122
In between we will let Deforum work it’s (slow) magic.
Third Step: Sync to Beat
(If you wish to expedite the process and begin experimenting with creating your video, this step can be skipped and moved on to the next.) However, incorporating synced elements such as zoom and angle can add an additional dynamic to the final product. For the video “Dangerous,” the main beat controlled the zoom, while the voice track controlled the angle of the animation. The basic process for achieving this is uploading the music file to a service such as LaLaL.ai (link provided above), which separates the music track into stems.
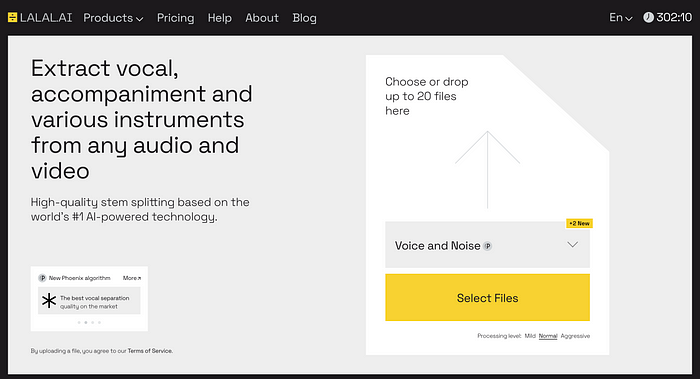
LaLaL.ai interface
After you download the stems, you have to turn these audio files into keyframes. You can do this by using this free tool that allows you to do exactly that. Before you upload the music file please pay attention.
There are two things to take into account here:
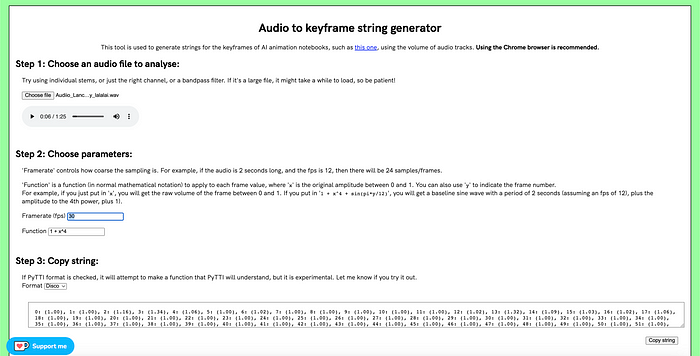
Audio to keyframe string generator interface
- The Framerate (fps) field: it should be the same that you are going to use for your final video, and that you determined when making the sequence in Premiere / or other VES (in my case 30 fps)
- You can leave the function as it is or can play around with it, but using the same format. In my case I went with 1 + x^2 since I wanted the effect to be really noticeable. Upload the music file with your stem and, as you can see in the image above, the “Audio to keyframe generator” generates a string of frames and numbers, where (1.0) means no change, and bigger values will influence the animation’s parameter of your choosing, in this case the Zoom. Copy that string and put it on a notepad as you will use it in the next step. If you want to create another string, based on another stem of the music track, reload the browser and follow the steps above.
Creating the frames: Enter Deforum
This is the more technical part of the whole process and I will try to be as meticulous as possible to cover all the steps. You will start by clicking this link, that will open the Deforum notebook. Don’t get scared by it! It will be ok!
SETUP
Setup Deforum
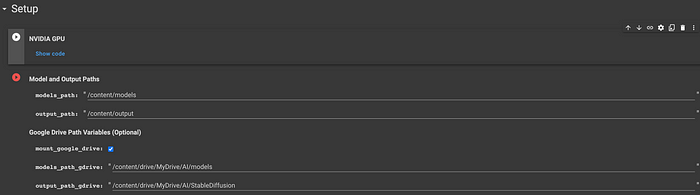
Model and Output Paths
The first thing you are going to do is to Run (click on the Play button) next to “Model and Output Paths”. This will open a dialog asking you permission to connect your Google Drive to the project. Allow for the connection to happen.
When this process is done, you will have a new folder in your Google Drive called “AI”. Inside of it a folder called “models”

Inside the new AI folder in Google Drive
Deforum comes with some default modes, as you can see in the image below

Pre-loaded models in Deforum
If you, like me, want to use another model you have to download the .cpkt file from a site like “Hugging Face” and place it on the “models” folder of your Google Drive.
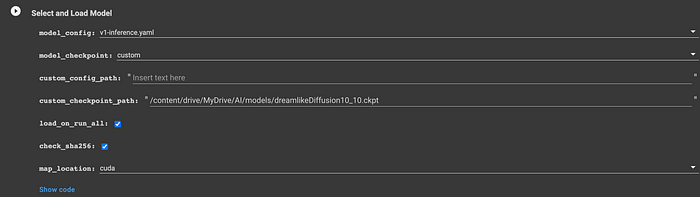
Select and Load Model
The next step is to tell Deforum what model you want to use, and where to find it.
Select and Load Model options in Deforum
For a custom model, like the one we are using for “Dangerous”, you will need to choose “custom” in the model_checkpoint dropdown, and then paste the full path to the model you saved to your Google Drive. (You can copy the path by right-clicking on the .cpkt file on the right side of notebook) Leave the rest of the options as they are. In case your model comes with it’s own config file (.yaml extension) repeat the above for the “model_config” (set it to “custom”) and, after downloading it to “models”, paste the full path to the .yaml file in the “custom_config_path”
Animation Settings
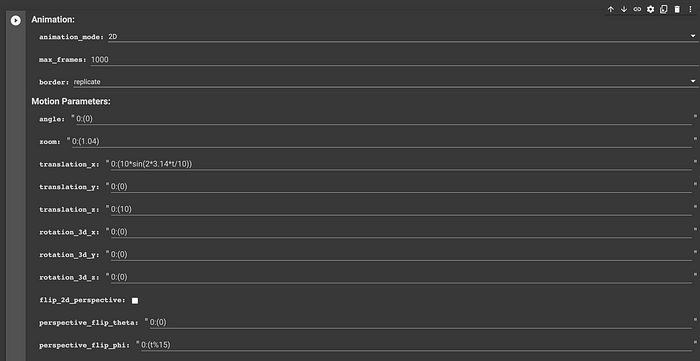
Animation Settings in the DeForum
In order to create an animation you will need to choose “2D” from the “animation_mode” dropdown. The max_frames field should be the amount of frames that you want to DeForum to render. For “Dangerous” I rendered 4346 frames. You can find the total amount of frames for your music video, by going to end of the music track in Premiere / other VES. If your VES doesn’t allow you to check the amount of frames, but just the duration of the track, you can use this online tool that allows you to convert timecode to frames. Please make sure you input the right frames per second value.
Motion Parameters
If you skipped the Beat Sync portion of this tutorial, please ignore the following instructions. For “Dangerous” I used the audio to keyframes beat sync to control the Zoom and Angle of the frames rendering. To do the same all you have to do is to copy and paste the generated string, onto the respective fields you want to sync with the beat. You can also play around with the other parameters, even if I would advise to keep them by default for your first experiments. You can find a thorough description of what they do, and how to control them here. Fair warning: it involves math!
Prompts
The next step is to tell Deforum what prompts we want it to use, when generating our animation. For this we will use the Google Sheet, that we used before, and that gathers into one single cell all the parameters that we need.
I have created the Google sheet in a way that automatically creates the prompt structure as you should paste it in “animation_prompts”, like in the image below. All you have to do is insert the frame number, the subject, the style, and you will get the whole thing formatted. Please be aware that this is Python, so after pasting the content, you should hit “tab” on your keyboard so that all the prompts are indented to the right.

Animation Prompts setup in DeForum We are almost there!!!!
RUN: Load Settings
The next step is to define the size of each frame. The default is the notorious 512 x 512. For Dangerous I used 768 x 432, which is 16:9 aspect ratio. You can calculate Aspect Ratios, based on pixel width or weight using this free online tool.
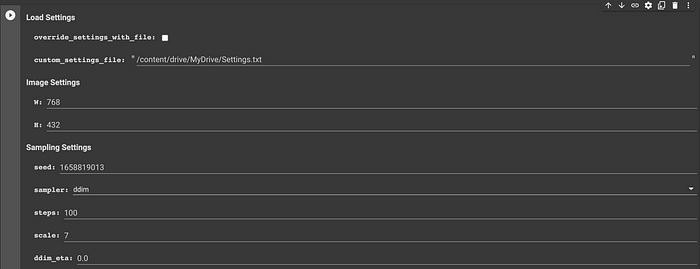
Load Settings in Deforum
As previously mentioned, it is recommended to maintain consistency by sticking with one seed. However, for more experimental results, the seed field can be left with its default value (-1) and be prepared for unexpected outcomes. It is crucial to consider the number of steps and the scale, also known as the Guidance Scale. A higher number of steps will result in a higher quality image, but also an increased rendering time per frame. The scale determines the flexibility of the AI interpreting the prompt. A larger number will result in a more accurate representation of the prompt, but it can also lead to undesirable results.
Also important is to remember that, while the first frame will be rendered using the full steps, the subsequent frames will be rendered at a lower step. The reason for this is explained in the “Deforum Settings” website:
Considering that during one frame, a model will attempt to reach its prompt by the final step in that frame. By adding more steps, the frame is sliced into smaller increments as the model approaches completion. Higher steps will add more defining features to an output at the cost of time. Lower values will cause the model to rush towards its goal, providing vague attempts at your prompt. Beyond a certain value, if the model has achieved its prompt, further steps will have very little impact on final output, yet time will still be a wasted resource. Some prompts also require fewer steps to achieve a desirable acceptable output.
During 2D & 3D animation modes, coherence is important to produce continuity of motion during video playback. The value under Motion Parameters, “strength_schedule” achieves this coherence by utilizing a proportion of the previous frame, into the current diffusion. This proportion is a scale of 0–1.0 , with 0 meaning there’s no cohesion whatsoever, and a brand new unrelated image will be diffused. A value of 1.0 means ALL of the previous frame will be utilized for the next, and no diffusion is needed. Since this relationship of previous frame to new diffusion consists of steps diffused previously, a formula was created to compensate for the remaining steps to justify the difference. That formula is as such:
Target Steps — (strength_schedule * Target Steps)
Your first frame will, however, yield all of the steps — as the formula will be in effect afterwards.
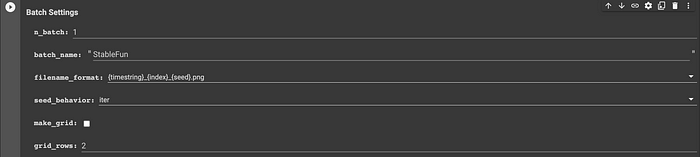
Before you run all the code, and get ready to way lots of hours, you just need to instruct Deforum where to save your images. You will find that under “Batch Settings” in the field “batch_name”. If the directory doesn’t exist, Deforum will create it for you.
Batch Settings
Let’s RUN!
After you satisfied with all the parameters, you just need to run all the code. You achieve this by going to the top menu and choose “Run All” from the Runtime menu.
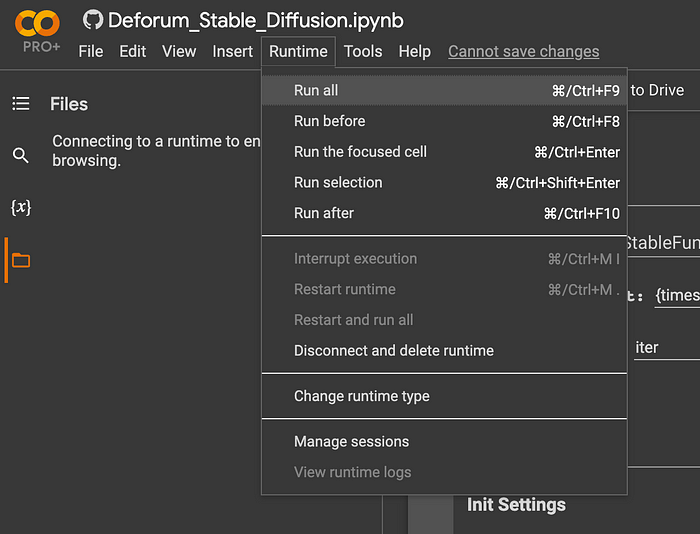
Google Colab menu
And now what?
Now you wait, and wait, until all your frames are rendered. In case something goes wrong, you can actually resume the process from the last frame that was rendered. You will be able to this by going to the “Animation Settings section, and under resume animation, paste the timecode of the last frame that was processed, and check the box.

Resume Animation
You can find this timecode in the folder where your frames are being saved, in Google Drive. It’s the first part of the file name, before the “_”
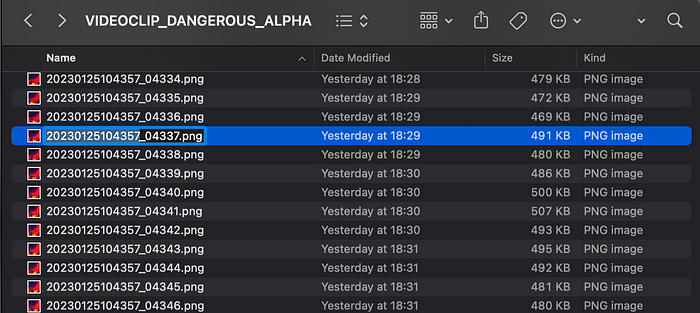
Resume from string
Post Production
After all your frames are rendered, or even before that, all you have to do is to import them in Premiere / other VES, give all the images a duration of one frame (00:00:00:01), select them by ascending order (from 0000 to the last frame), choose “Automate to Sequence” and use the following settings:
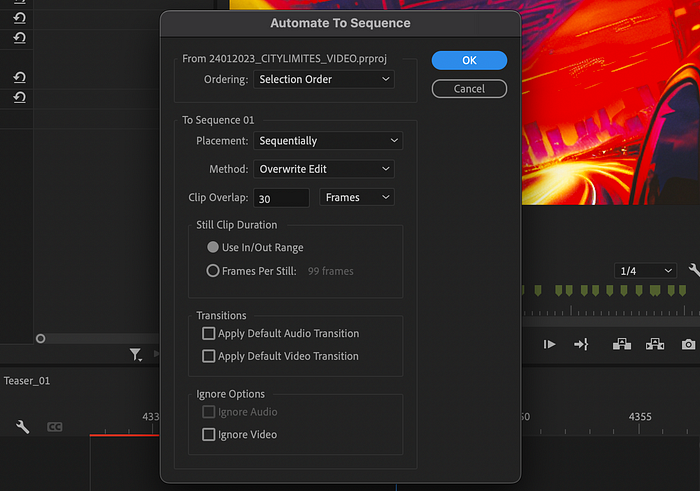
Automate to Sequence For “Dangerous” I created an adjustment layer that scaled all the images so that they could fill the screen (1920x1080 with a scale factor of 284%), added some Noise (3.0%) and did some color grading using Lumetri and Kodak 5218 filter.
Conclusions
While, at first, the process might seem complicated I hope this tutorial has given you the basics to start experimenting on creating music videos with Stable Diffusion and Deforum. As with everything regarding this technology, experimenting is the only way to achieve great results, and there will be some errors in the way. Play with the different parameters so you understand what they do, while doing small animations that are not so time intensive; see how you can generate different images by using different prompts and styles and, most important of all, have lots of fun.
Can’t wait to see what you come up with!
FAQ
This section will be used to answer the questions I’m sure I will be getting from you.
- How long did the whole process take? From mood board to publishing the whole process took one week. I was forced, due to an error in Google Drive to make the rendering in two phases. The first started at 10h44 25/01/2023 and ended at 21h07 of the same day (10h23m) and the second phase went from 10h31 26/01/2023 until 18h31 of the same day (8h). So in total, just in rendering, 18h23m were spent, for a music video with a duration of 00:02:28:28.
- In Google Colab when I click with the mouse, sometimes, all of this code appears. How do I get rid of it? This is something that really got on my nerves, so here’s the solution: Right click on anywhere on the grey area, select form, and hide code.

Hide Code in Google Colab
Comments
Loading comments…