First you need to download this library and include it into the necessary component of the Angular Application.
Click here to download the library file. (If you cannot download the js file, please follow this link and click download).
Next, put this downloaded js file into the assets folder found in src directory of the project.
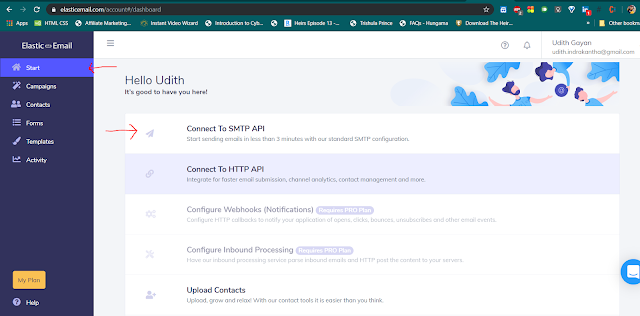
Next we have to get the help of an email service provider to send the email. I here use Elastic Email site for this. First go to the Elastic Email site to create an account. Just complete the sign up process, it's that simple. After logging into the site, go to Start — → Connect To SMTP API .
Next, you can see a button to create new credentials. Create a new credentials following the simple steps. The system will generate a password for you. Copy that password and save it somewhere before you close that popup model.
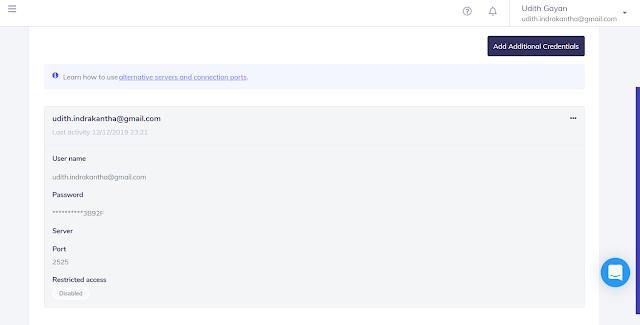
Finally you'll see something like this.
Here, your user name and password (You saved it earlier) can be seen .These details are used to access this.
Coding part
Go to your angular project's relevant component from which an email must be sent.
-
Import the smtp.js file from assets folder to the component by typing
import './../../../assets/smtp.js'; //path might change declare let Email : any;
-
Write the code to send the email with the user-inputs within onSubmit() method as below,
import { Component, OnInit } from '@angular/core';
import { ProfileService } from '../profile.service';
import { SnotifyService } from 'ng-snotify';
import { Model } from './contact-form';
import { NgForm } from '@angular/forms';
import './../../../assets/js/smtp.js'; //file path may change →
declare let Email: any;

@Component({ selector: 'app-contact',
templateUrl: './contact.component.html',
styleUrls: ['./contact.component.scss']})


export class ContactComponent implements OnInit {
model: Model = new Model();
constructor( private profile: ProfileService, private snotify: SnotifyService
) { }

ngOnInit() {
}

onSubmit(f: NgForm) {

Email.send({
Host : 'smtp.elasticemail.com',
Username : 'udith.indrakantha@gmail.com',
Password : '**************************',
To : 'udith.indrakantha@gmail.com',
From : `udith.indrakantha@gmail.com`,
Subject : this.model.subject,
Body : `
<i>This is sent as a feedback from my resume page.</i> <br/> <b>Name: </b>${this.model.name} <br /> <b>Email: </b>${this.model.email}<br /> <b>Subject: </b>${this.model.subject}<br /> <b>Message:</b> <br /> ${this.model.message} <br><br> <b>~End of Message.~</b> `
}).then( message => {alert(message); f.resetForm(); } );

}

}
Here, within Email.send(….); method, you can give the elastic mail registered email as the _username _, and earlier saved password for the password field. From: email should be equal to the elastic mail's registered email and you can set the receiver's email under To field. Other fields can be taken from your form created .
That's it.

