The AsyncOpenAI class is a Python wrapper for the OpenAI API that allows users to perform asynchronous requests to the API. The class inherits from the OpenAI class and overrides some of its methods to use the asyncio library for concurrency. The AsyncOpenAI class provides the following benefits:
- Faster performance: Users can send multiple requests to the API in parallel and wait for the results without blocking the main thread. This can improve the efficiency and responsiveness of the application.
- Easier error handling: Users can use the
try/exceptsyntax to catch and handle any exceptions raised by the API requests. The class also provides acancelmethod to cancel any pending requests. - Simpler code: Users can use the
async/awaitsyntax to write concise and readable code that works with the API. The class also supports theasync withcontext manager to automatically close the session when done.
Here is the brief documentation from the README.md from OpenAI’s official GitHub repository openai-python (openai/openai-python: The official Python library for the OpenAI API (github.com)
import asyncio
from openai import AsyncOpenAI

client = AsyncOpenAI(
    # defaults to os.environ.get("OPENAI_API_KEY")
    api_key="My API Key",
)


async def main() -> None:
    chat_completion = await client.chat.completions.create(
        messages=[
            {
                "role": "user",
                "content": "Say this is a test",
            }
        ],
        model="gpt-3.5-turbo",
    )


asyncio.run(main())
Integrating with Pandas
Pandas DataFrames are a staple for data manipulation and analysis. However, when it comes to making API calls for each row in a DataFrame, things can get a bit tricky. Traditional methods of looping through a DataFrame and making synchronous API calls can be time-consuming, especially when dealing with large datasets. This is where asynchronous operations come into play.
Asynchronous operations allow multiple tasks to be executed concurrently, rather than sequentially. This means that while one task is waiting for a response (such as an API call), other tasks can continue to execute. This can significantly reduce the overall time required to process large datasets.
The Wrong Way of Using AsyncOpenAI Class
I ought to admit, I rarely use async (e.g., asyncio) in my code, so I’m have no clear idea how to make it works with Pandas methods such as .map() and .apply() , thus naturally I was starting with the code below, where I use .map() to attempt to map every single value stored in the text column to the function. I’m quite sure this is not rare since when I was trying to search for the solution, I found a post on StackOverflow where someone was also posting the following and asking for the proper way to use the AsyncOpenAIclass with Pandas.

After digging into how async works, here is something I was confident that it will work:
# Async (Standalone from above)
async def get_embedding(text):
    response = await client.embeddings.create(input=text, model=EMBEDDING_ENGINE)
    return response.data[0].embedding


def apply_async_get_embedding(dfi):
    loop = asyncio.get_event_loop()
    tasks = [loop.create_task(get_embedding(row[''text''])) for _, row in dfi.iterrows()]
    return loop.run_until_complete(asyncio.gather(*tasks))


results = apply_async_get_embedding(df)
df[''embedding''] = results
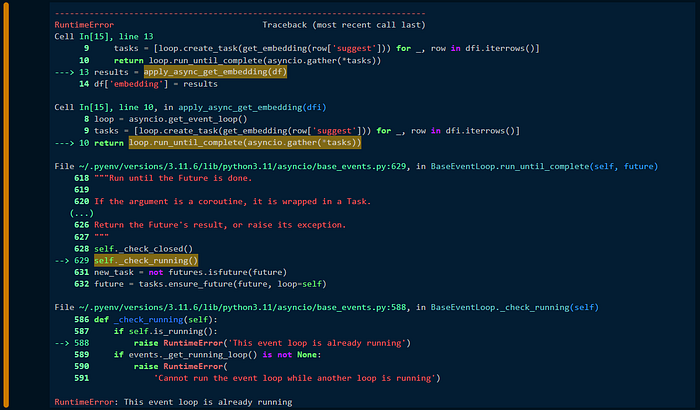
But… here we go again. I got another error, showing “This event loop is already running”.
Error Message from the Async Code:

The error “RuntimeError: This event loop is already running” typically occurs when we try to nest the event loop. This means that the code is trying to create a new event loop while an existing one is already present. This can cause conflicts and lead to the error.
A common solution is to use the nest_asyncio package, which allows nested use of asyncio.run and loop.run_until_complete1. You can install it using pip and apply it in your code as follows:
Below is the description lifted from the nest_asyncio GitHub repo:
By design asyncio does not allow its event loop to be nested. This presents a practical problem: When in an environment where the event loop is already running it’s impossible to run tasks and wait for the result. Trying to do so will give the error “
RuntimeError: This event loop is already running".The issue pops up in various environments, such as web servers, GUI applications and in Jupyter notebooks.This module patches asyncio to allow nested use ofasyncio.runandloop.run_until_complete.
All we need to do is add the following two lines in our Jupyter Notebook, and our previous code will work:
import asyncio

nest_asyncio.apply()
One Correct Way of Using AsyncOpenAI Class with Pandas
So now let’s sum up all these into the working code.
1. Install the packages
!pip install openai
!pip install nest_asyncio
2. Import the packages
import pandas as pd
import seaborn as sns

from openai import AsyncOpenAI

import asyncio
import nest_asyncio
3. Import and Preview the Dataset

4. Set up the “AsyncOpenAI” client object
client = AsyncOpenAI(api_key="Your API Key")
5. [CORE] Define the Async Functions
nest_asyncio.apply()

EMBEDDING_ENGINE = ''text-embedding-ada-002''

async def get_embedding(text):
    response = await client.embeddings.create(input=text, model=EMBEDDING_ENGINE)
    return response.data[0].embedding


def apply_async_get_embedding(dfi):
    loop = asyncio.get_event_loop()
    tasks = [loop.create_task(get_embedding(row[''Review''])) for _, row in dfi.iterrows()]
    return loop.run_until_complete(asyncio.gather(*tasks))
6. Apply the Async Function to the DataFrame (df)

Now we can see the returned embeddings are stored in the last column embedding of the DataFrame df.
Here is the link to the full notebook.
That’s it for this article. Hope to share this so someone who is looking for the solution doesn’t have to go through the hassle of trials and errors to make the AsyncOpenAI class to work with the values stored in a Pandas DataFrame.
