The Problem:
- As part of a personal project, I was trying to build a service to enrich my bookmarks.
- But Twitter having shut down their API, 80% of my bookmarks could not be enriched automatically.
The Solution
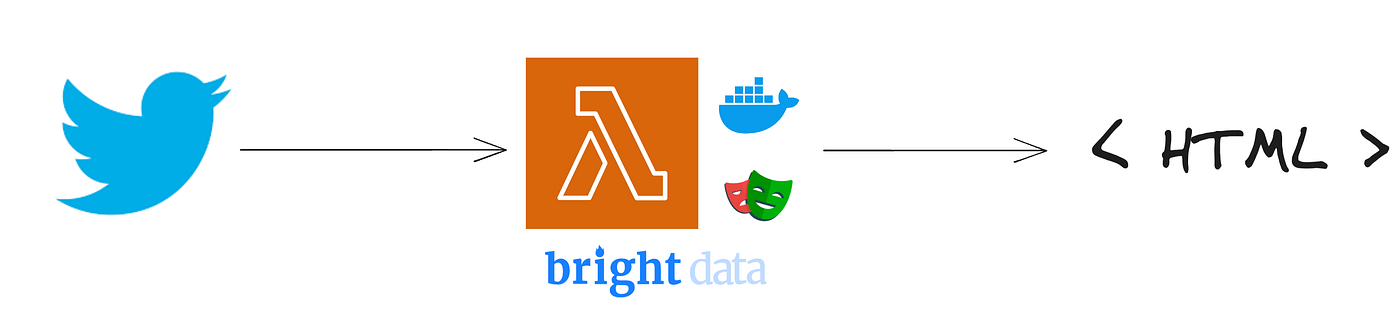
- I came to develop a solution to scrape single tweets. This solution is an AWS Lambda that I can call from my bookmark project.
- It takes a tweet URL list as input and returns the HTML and a screenshot of each tweet.
- It makes use of playwright and Brightdata to access and scrape the tweets.
Disclaimer:
- This is intended for personal use with limited volumes (my bookmarked tweets).
- I'm a Product Manager, not a professional software engineer. My code is certainly naive, and I'm taking free advice if you feel so inclined.
What you can expect from this article
I'm writing the article I wish I had when starting this project. I'm taking it step by step, introducing concepts and adding complexity as I go. I you are interested only in the final result / code, jump straight to the last chapter.
What you need to get started:
- An AWS account
- A BrightData account
- Postman installed
- Docker installed
- AWS CLI installed
Create a publicly accessible dummy AWS Lambda
Create a lambda
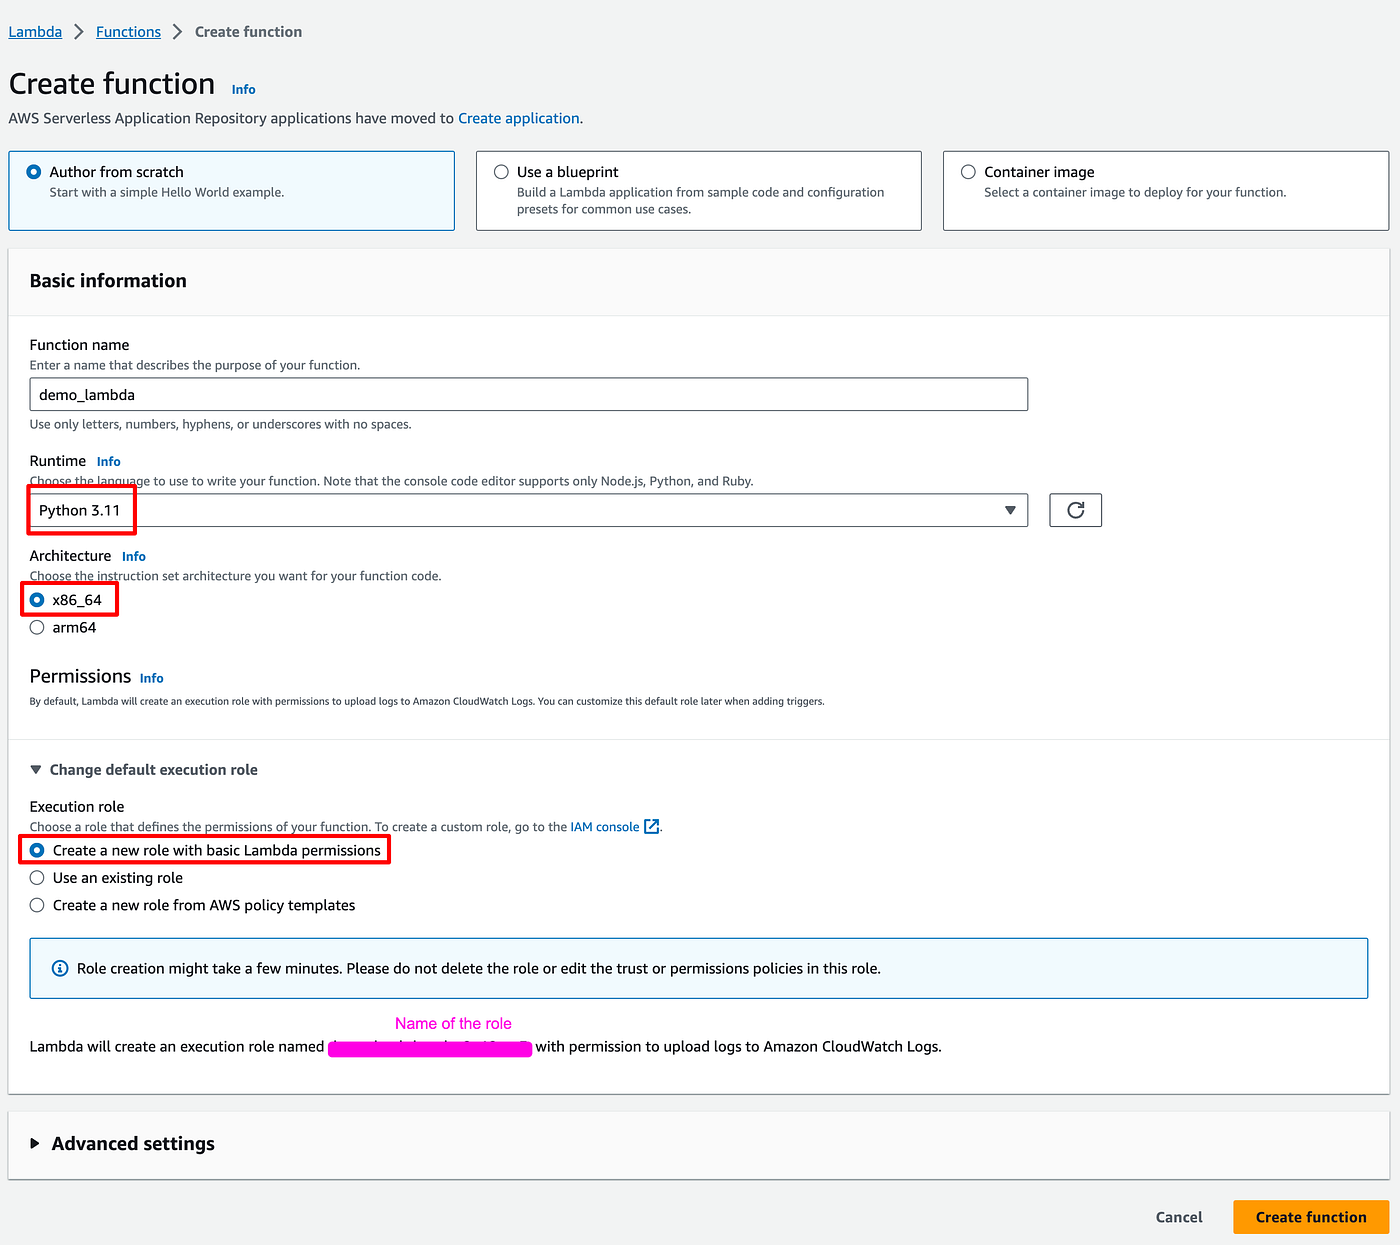
Observations:
- Runtime: the code in this article is in Python.
- Architecture: this will be of importance when we move to Docker.
- Execution role: AWS creates an execution role for your lambda. This will be important later on (access rights / permission management can be quite confusing on AWS)

You have created your 1st lambda:
- The lambda has an ARN, a sort of ID that uniquely identify it (each object in AWS has and can be referenced by it).
- However it has no URL. Meaning that there is no endpoint that we can hit to run it for now (it can be used only from within AWS as it is).
- Note the tabs below. We'll use the code tab until we switch to Docker. And we'll also use the Configuration tab.
Make your lambda publicly accessible
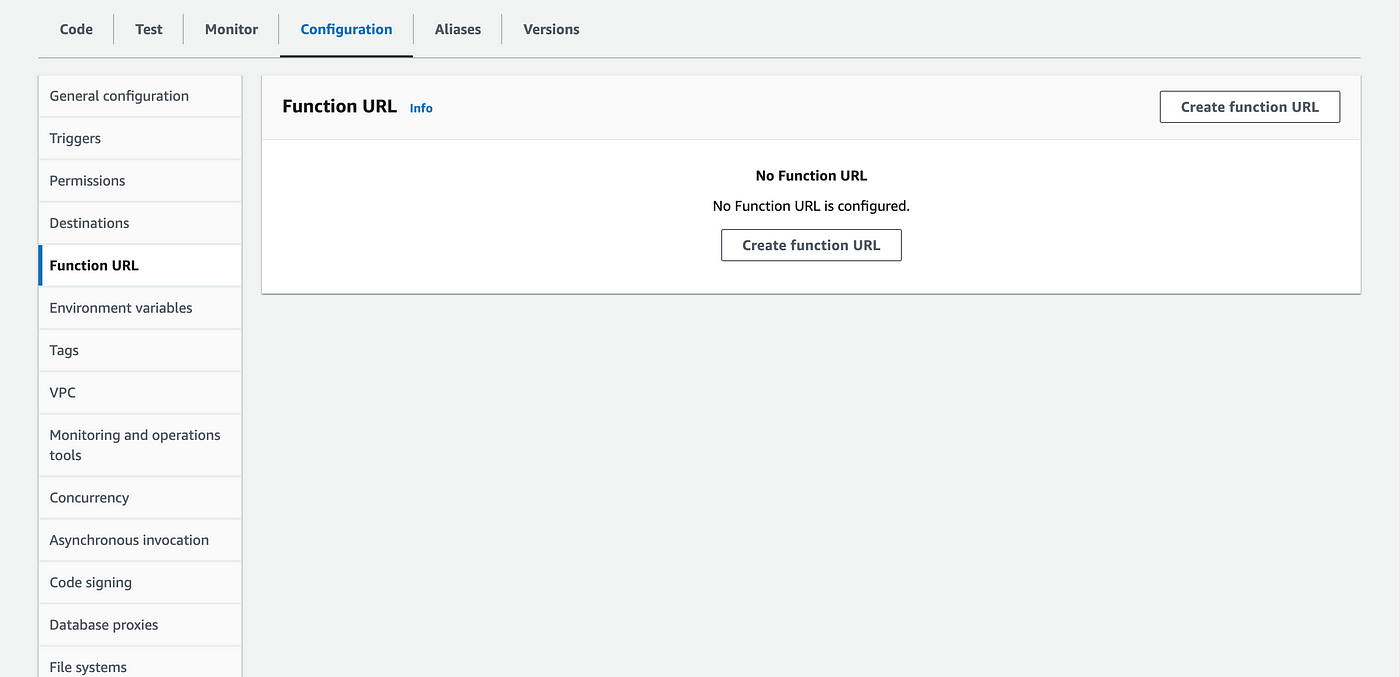
- Go to Configuration > Function URL
- Click Create function URL

In the Function URL creation screen:
- In the Auth type choose "None"
- AWS is displaying the "policy statement". We'll see more of these. Policy statements are rules telling who can access what. Here it says that everybody is allowed on the action InvokeFunctionURL for your lambda.
Back to the main screen:
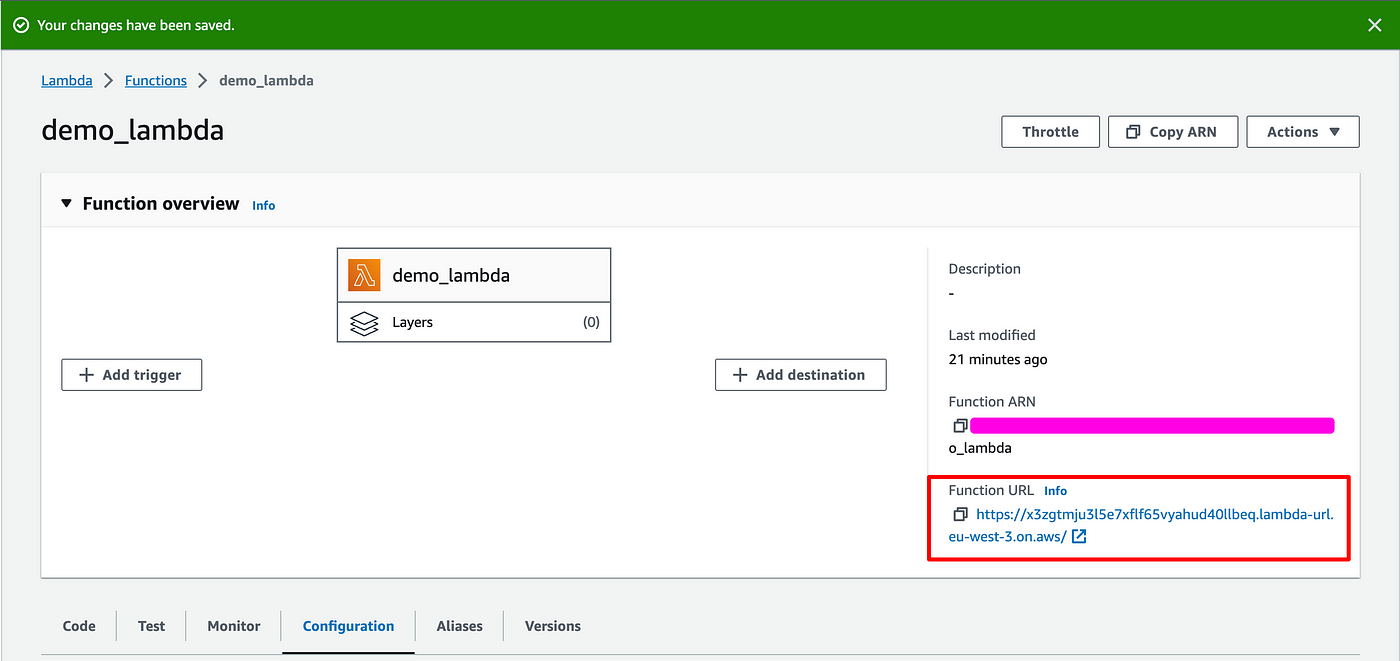
You can notice that the Function URL field now has a value:
- Copy it.
- Open Postman
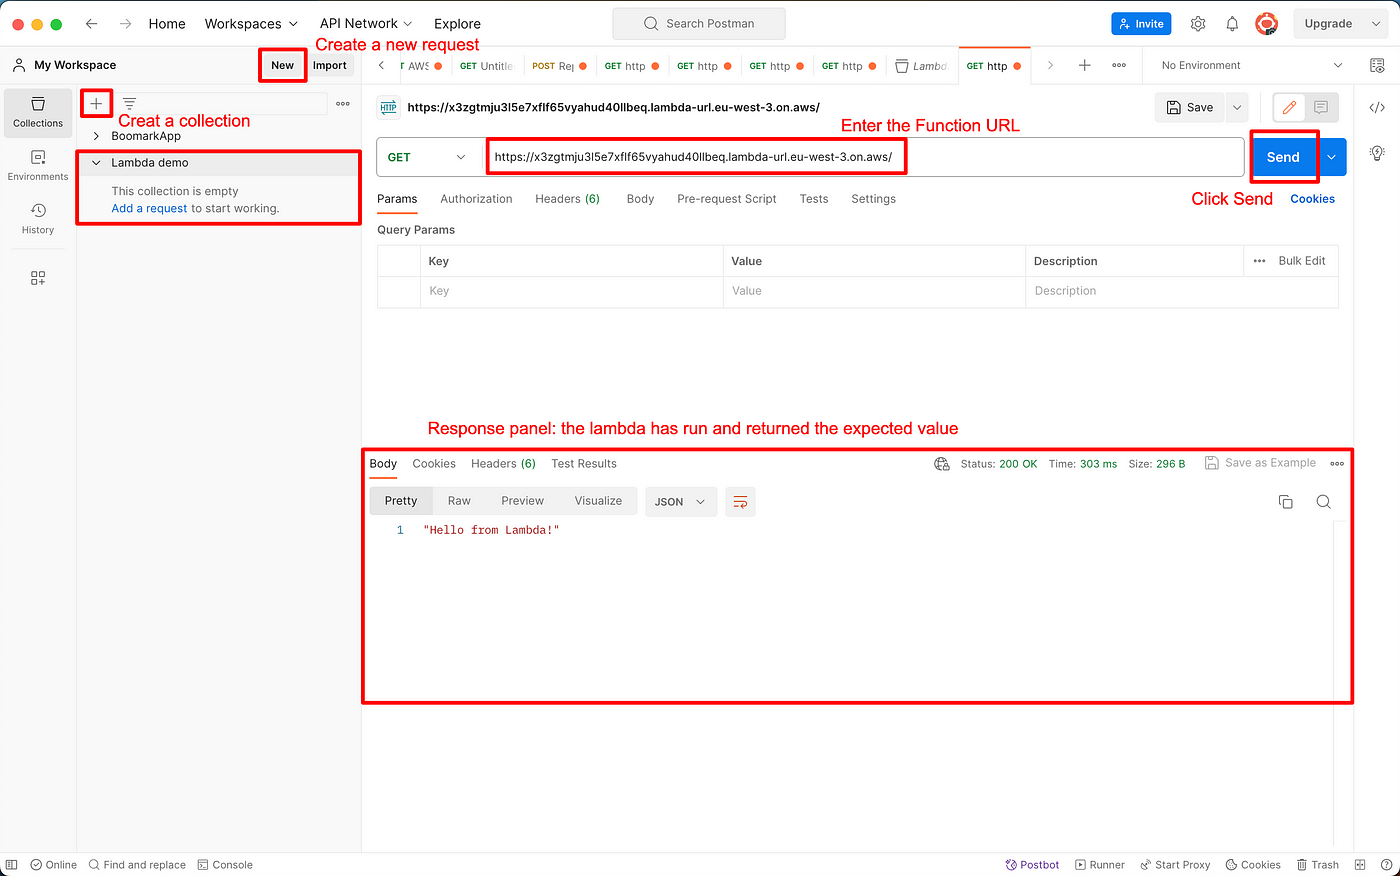
In Postman:
- Create a collection (similar to a project to organize your requests)
- Create a new request
- Enter Function URL (notice that it's preceded by "GET", we'll let it as it is for now, but we'll change the method later)
- Click Send
If you did not change the initial code in the lambda, the response should read "Hello from Lambda!".
🔥 🔥 You created you first Lambda 🔥 🔥
Add authentication to your Lambda
At this point the lambda URL is accessible to anyone. The goal is to allow only authenticated queries to reach our lambda endpoint. To do so, we will:
- Create a new AWS user with limited permissions (it's a good security practice that users are provided with exactly what the permissions they need, nothing more).
- Change the Lambda permission to make it invokable only by that user.
- Create an access key for that user that we can use to authenticate our requests.
Create a new AWS user with limited permissions
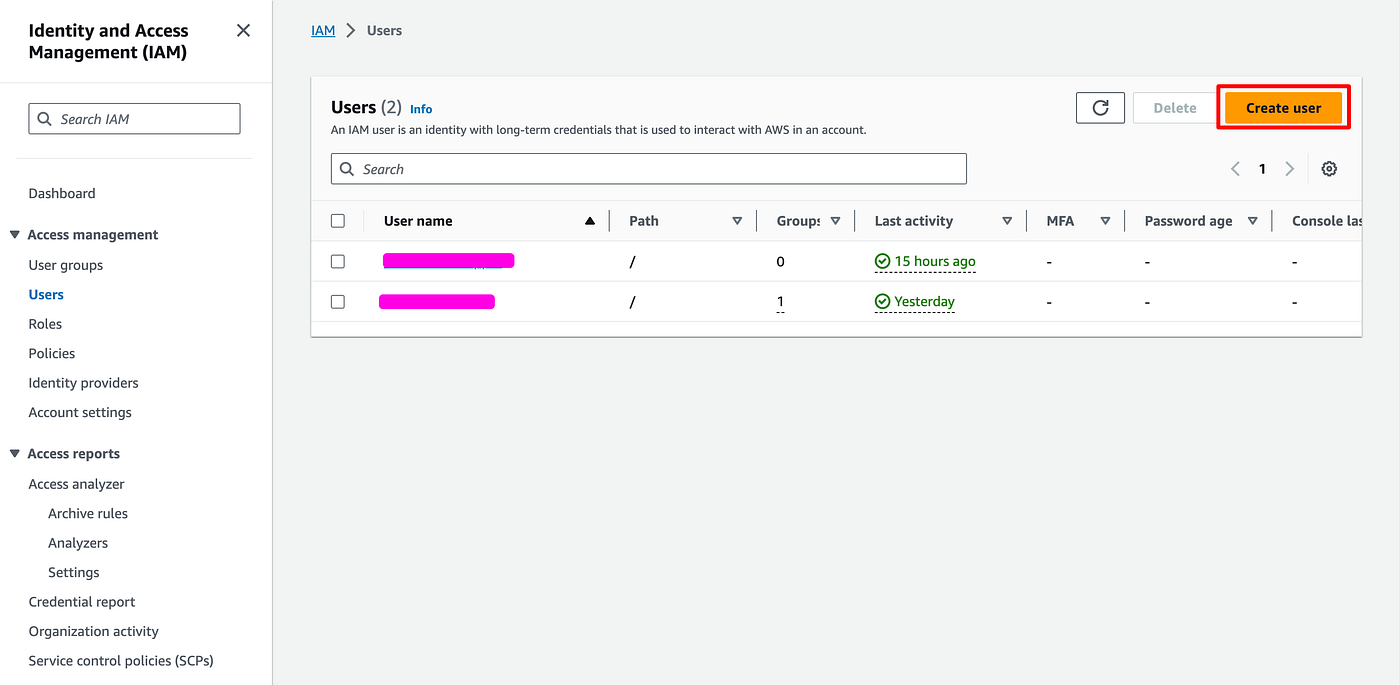
- In AWS, navigate to the IAM service, then "Users".
- Click on Create user
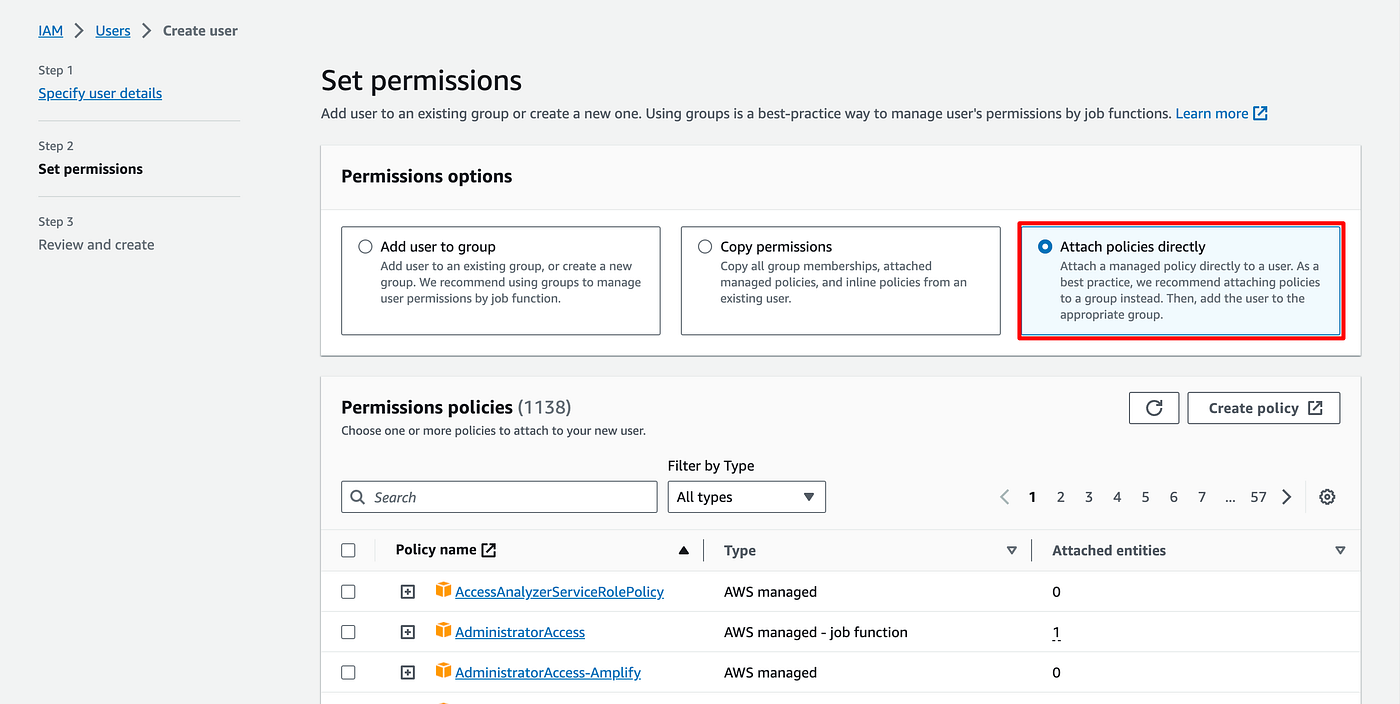
- Give it a name
- Choose "Attach policies directly"
- Click Next then Create on the next screen
- You are redirected to your Users list.
- Click on the user you just created.
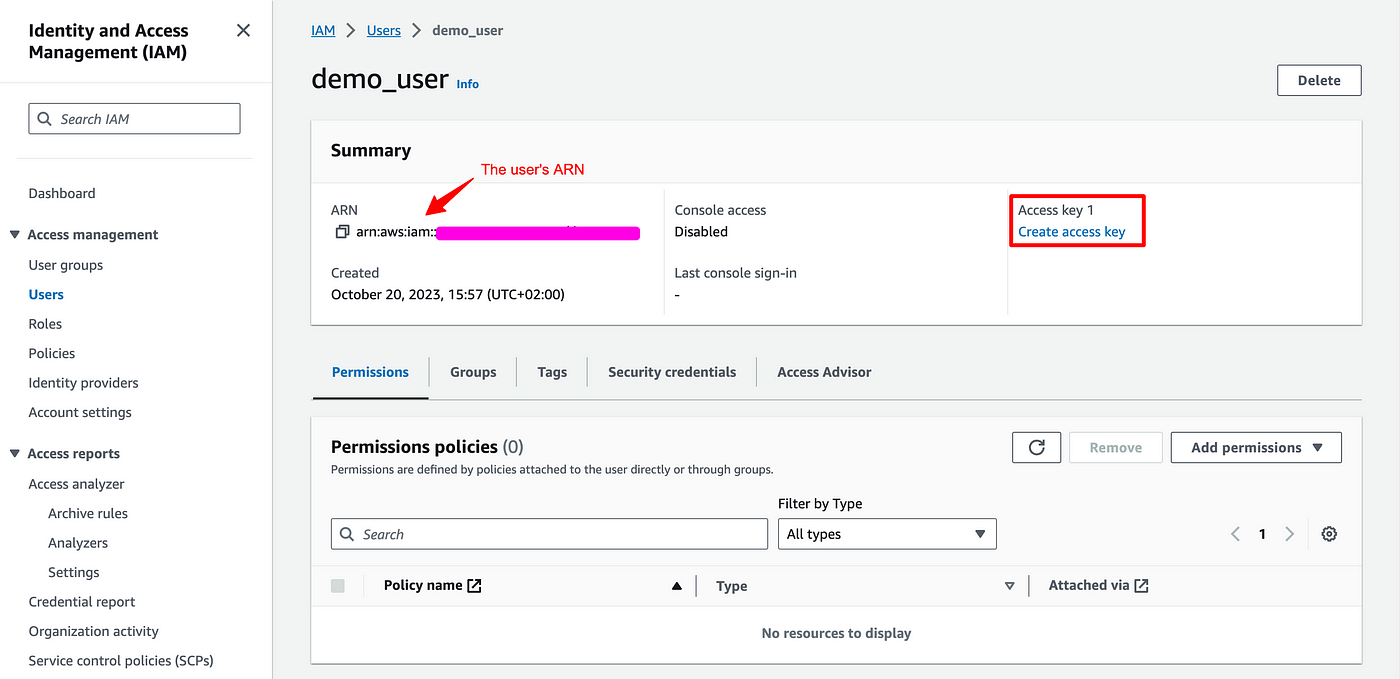
- The user has an ARN: take note of it, we are going to need it.
- Observe that there is currently no Access key for this user. We'll be back to create one.
Change the Lambda permission
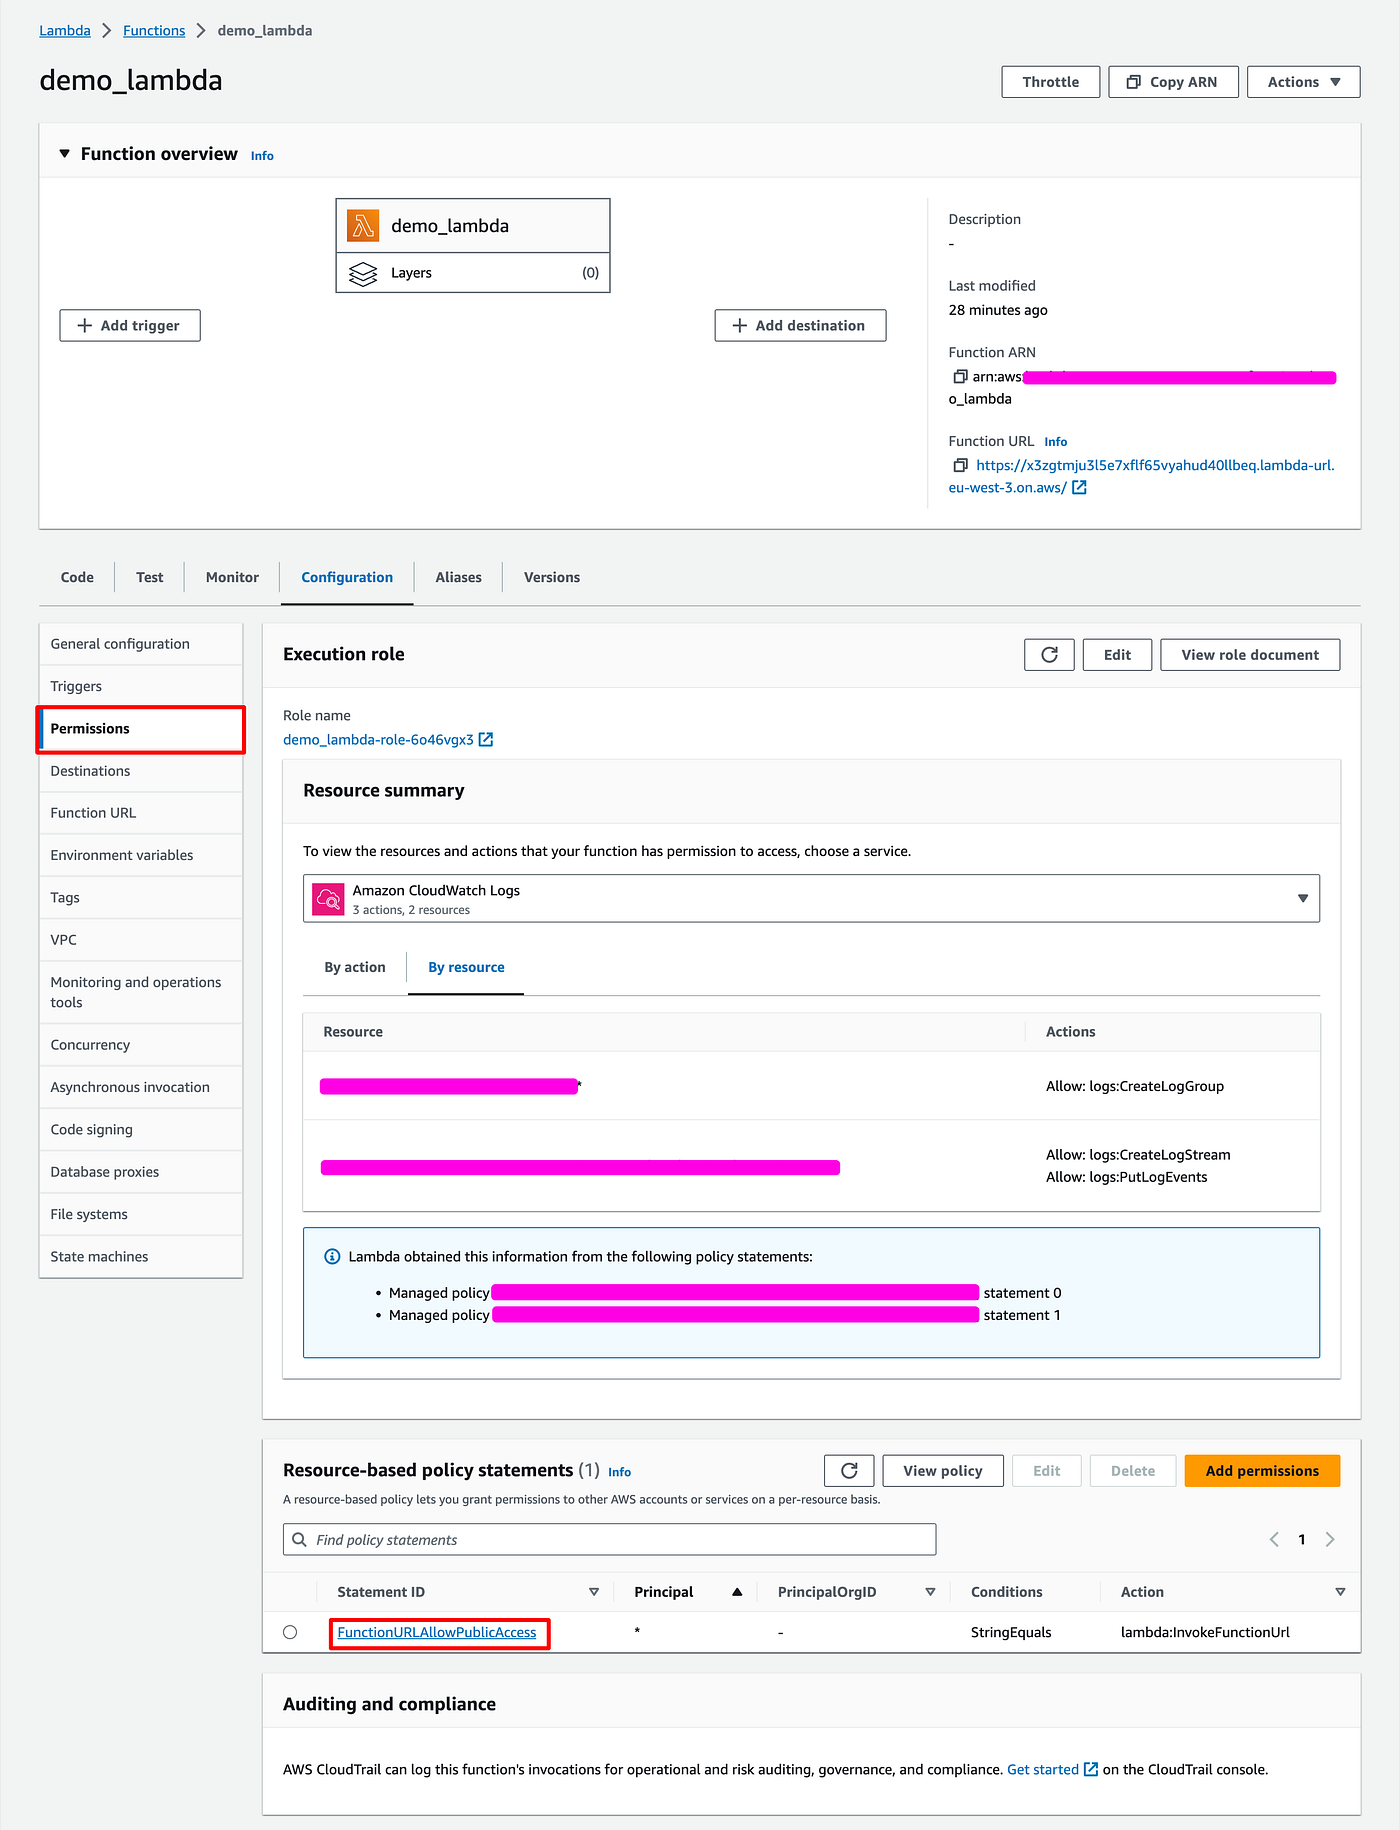
In the lambda configuration:
- Got to Configuration > Permissions
- Scroll to the policy statements
- Clicks on FunctionURLAllowPublicAccess
- In the popup, click Edit
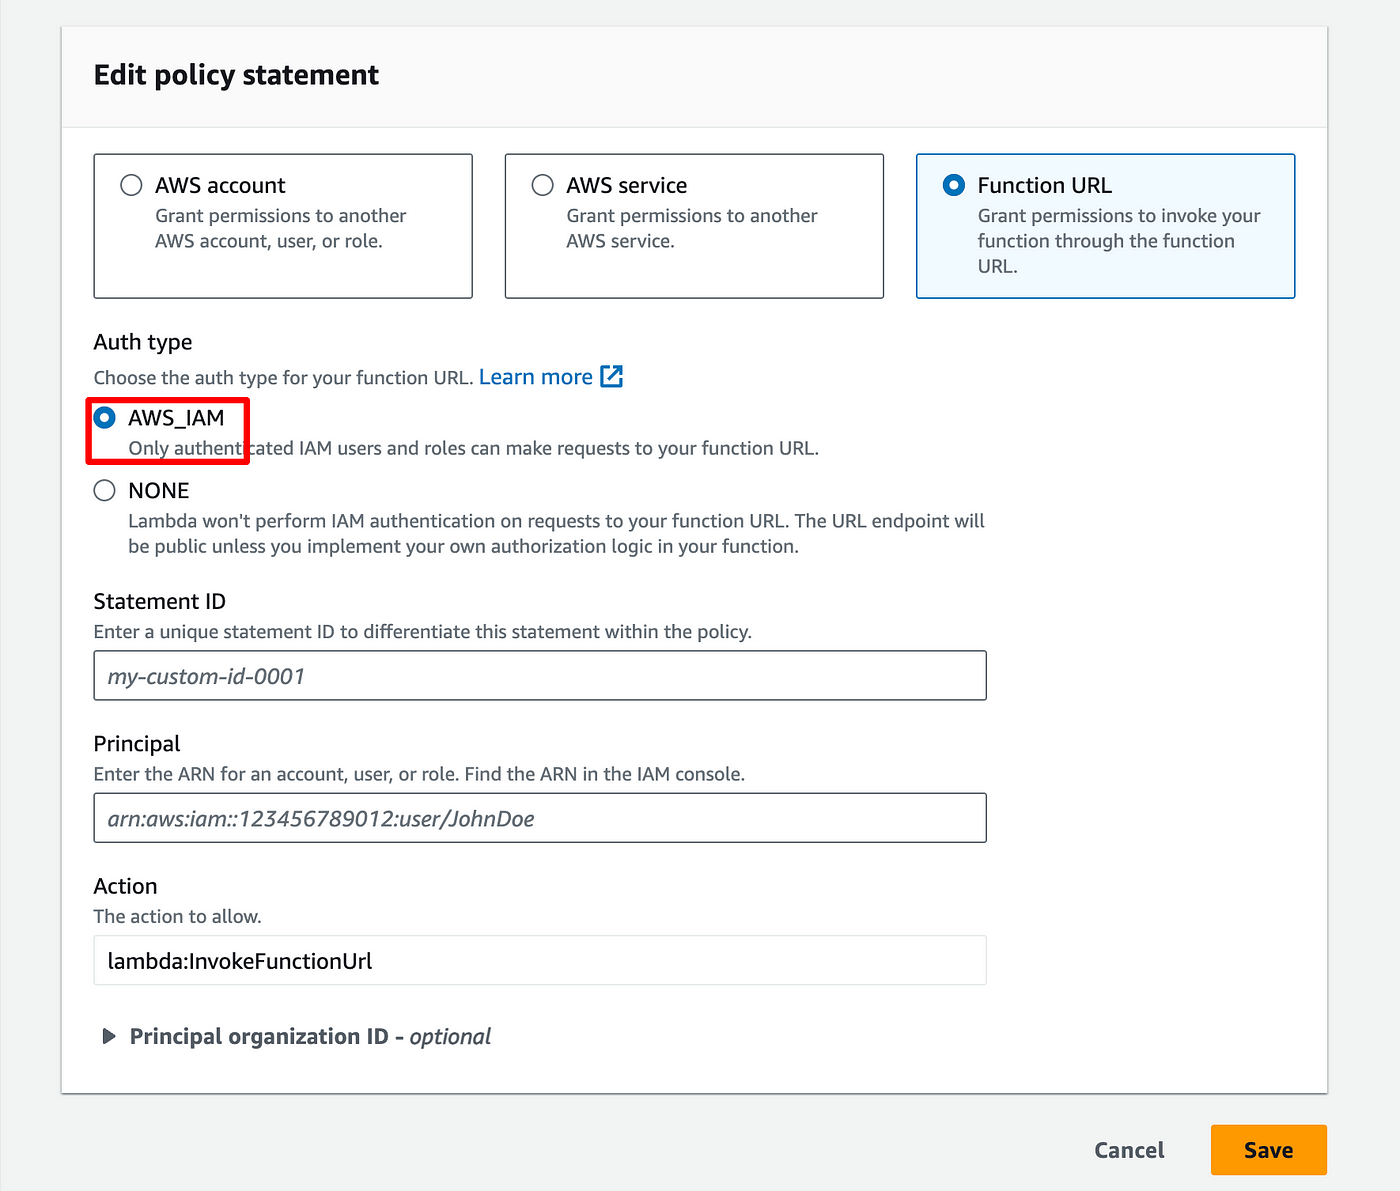
- Choose AWS_IAM
- Give a name to the policy
- Enter the ARN of the user you just created
- And click Save
Then go to Configuration > Function URL
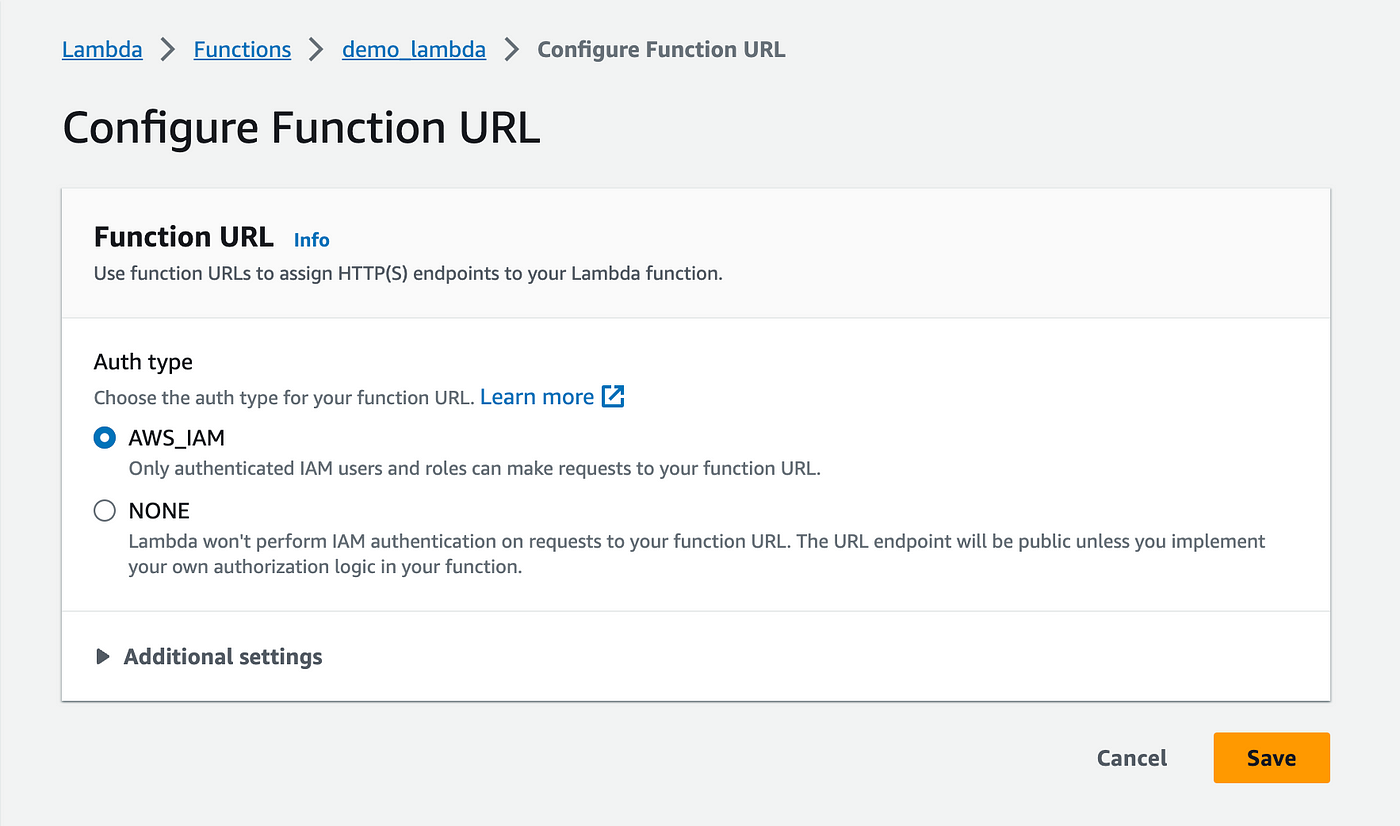
- Click on Edit
- And choose AWS_IAM for the Auth type instead of None
Now your endpoint requires an authentication. So if you try again your previous Postman call it should fail.
Create an access key for the user
In order for you to be able to access the Lambda through a 3rd party app (such as Postman, or some application you are building), you need to connect as a user that has access to the Lambda.
You already created the user. Now you need an Access Key to be able to connect to AWS programmatically as this user.
So the last remaining step is to create an access key for the user:
- Go back to the user's details
- Click Create Access Key
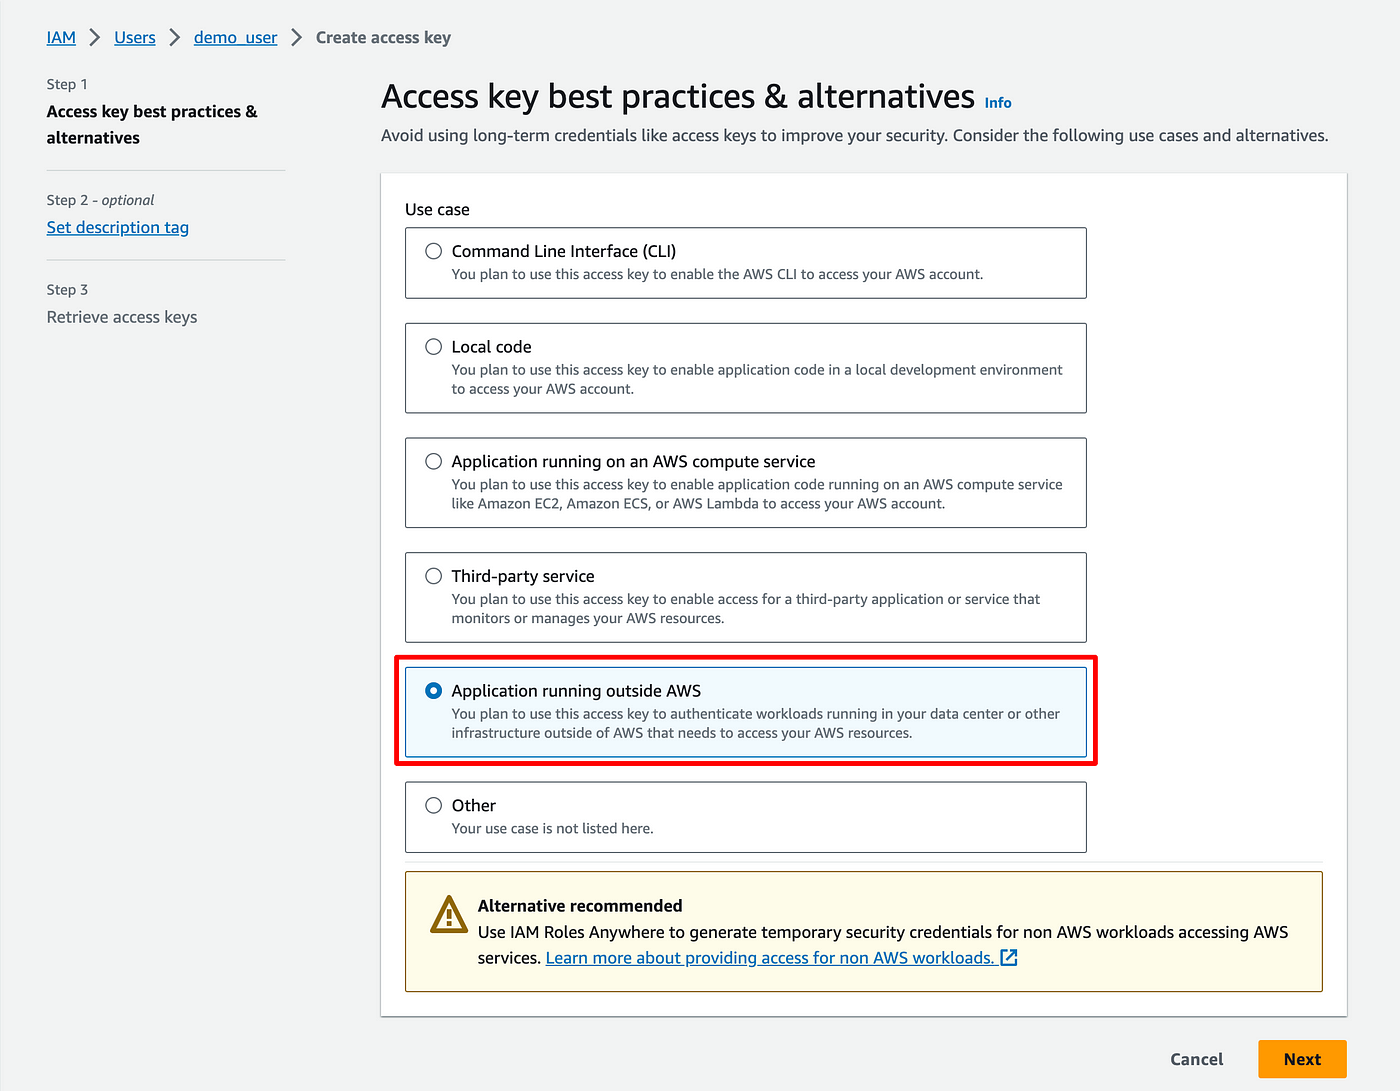
- Choose Application running outside AWS, then Next
- Ignore the next step, just click Create access key
- On the next screen, take note of your Access key and Secret Access key, we are going to need them
Now go back to Postman:
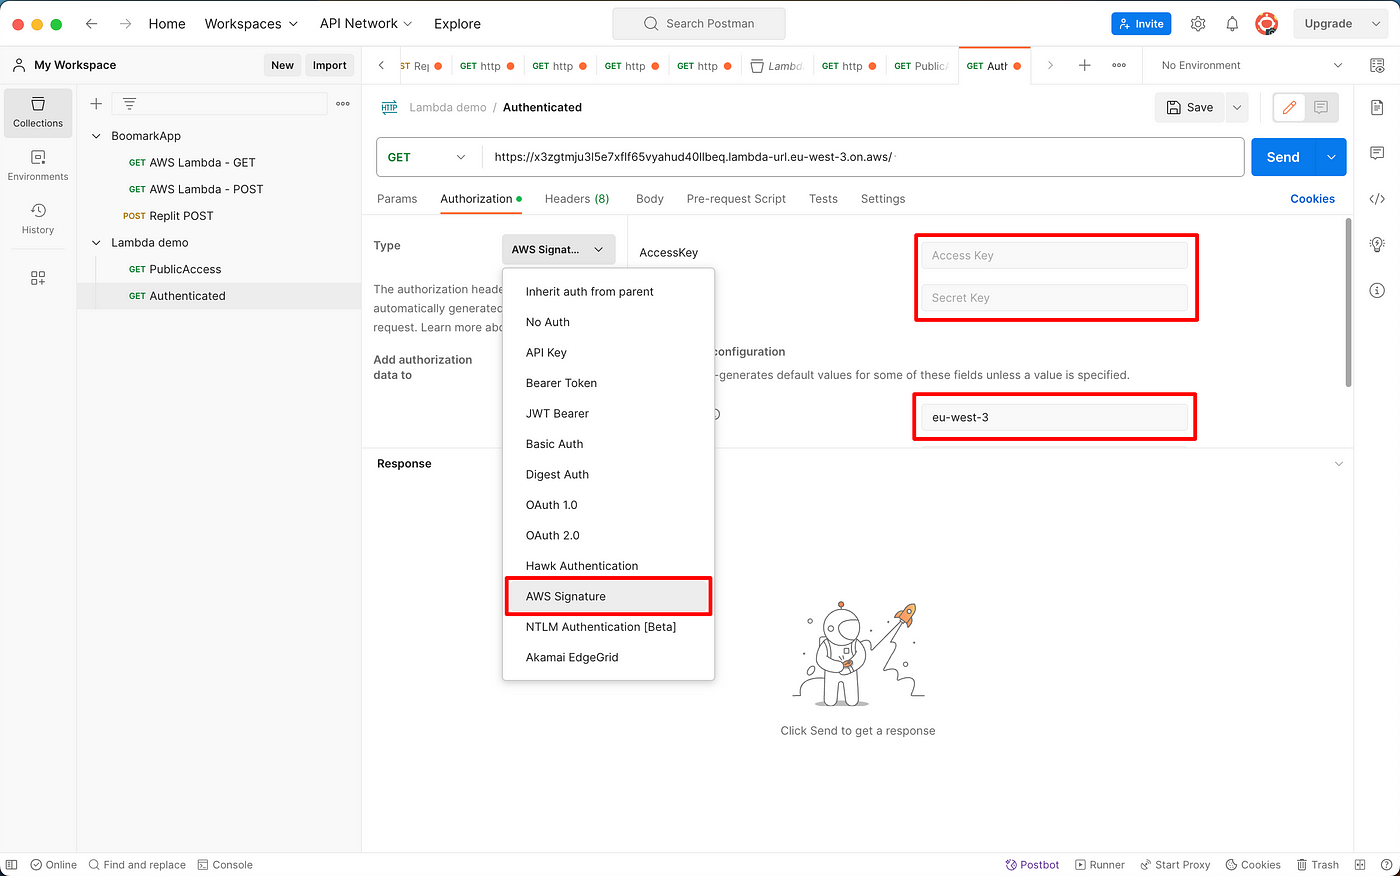
- Go to Authorization
- Choose AWS Signature
- Enter the Access key and Secret access key of the AWS user
- Enter the region of your AWS account
If you send the request it should return the same result as earlier
🔥 🔐 You have now secured your Lambda 🔐 🔥
Use the POST method with parameters
The tweet-scraping service will take a list of tweets as input, and return the corresponding HTML. For now, we will:
- Enable our Lambda to retrieve POST parameters passed in the request body.
- Look into AWS Cloudwatch, a service that will be very useful to debug AWS Lambda calls.
Pass a list of tweets as input
As a first step we will pass the lambda a list of tweet urls and it will return their IDs.
Given a tweet url: https://twitter.com/akshay_pachaar/status/1713110082093989916 The tweet ID is: 1713110082093989916
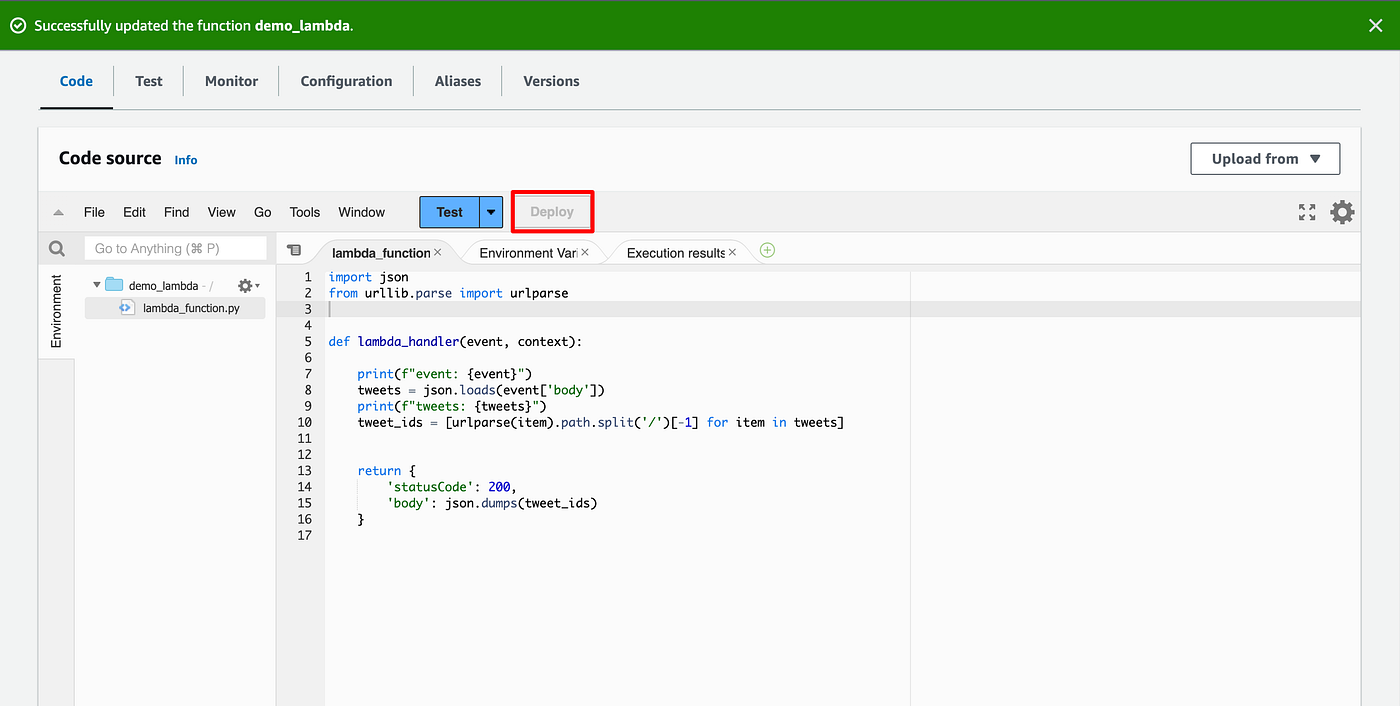
- In the Code section, replace the code with the code below
- Click Deploy
import json
from urllib.parse import urlparse

def lambda_handler(event, context):

    print(f"event: {event}")
    tweets = json.loads(event['body'])
    print(f"tweets: {tweets}")
    tweet_ids = [urlparse(item).path.split('/')[-1] for item in tweets]

    return {
        'statusCode': 200,
        'body': json.dumps(tweet_ids)
    }
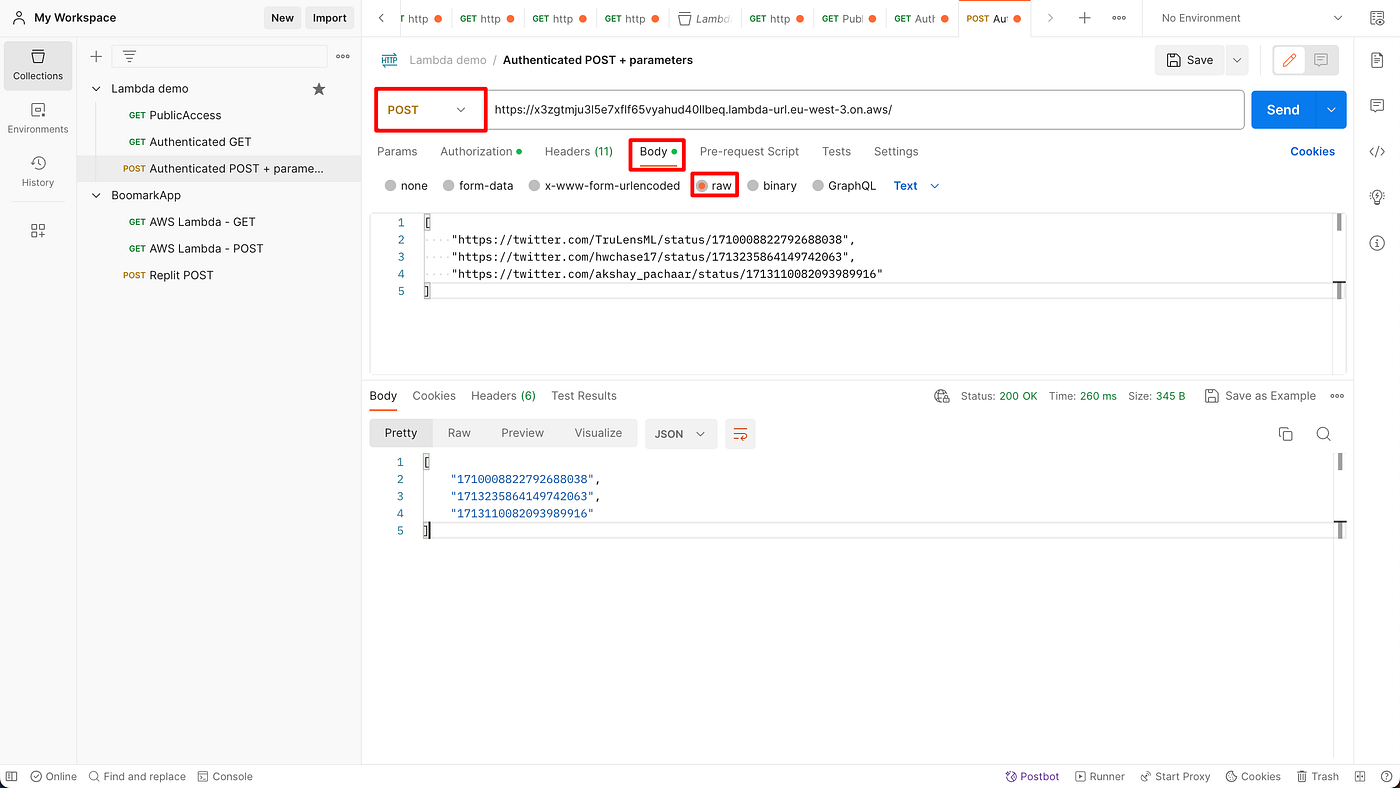
- In Postman, create a POST request to the lambda endpoint with a list of tweet as parameters in the body (write the list in the textarea after choosing the "raw" format).
- Your lambda should return the list of tweet IDs (shown in the response panel in Postman).
AWS Cloudwatch
This service allows to track calls and responses, as well as log data for debugging purposes.
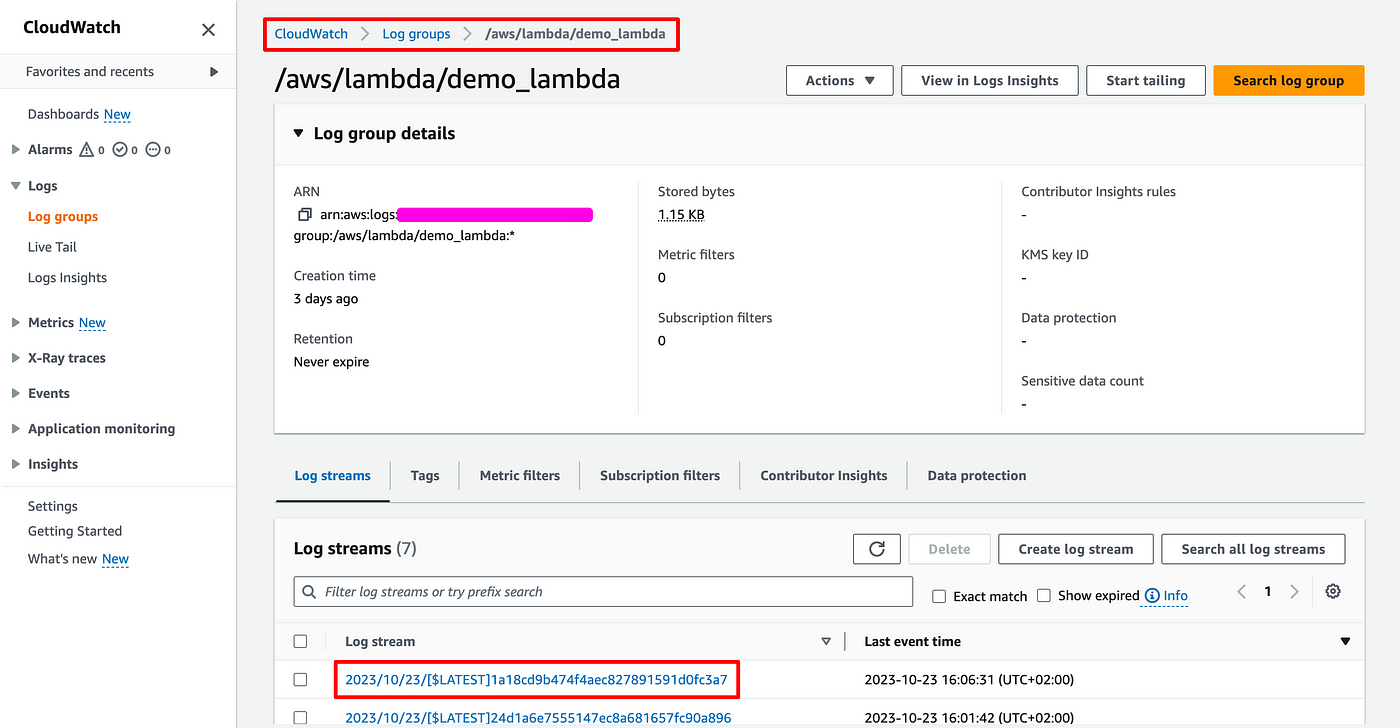
- Go to CloudWatch > Log groups > [the name of your lambda]
- Click on the first Log stream in the list
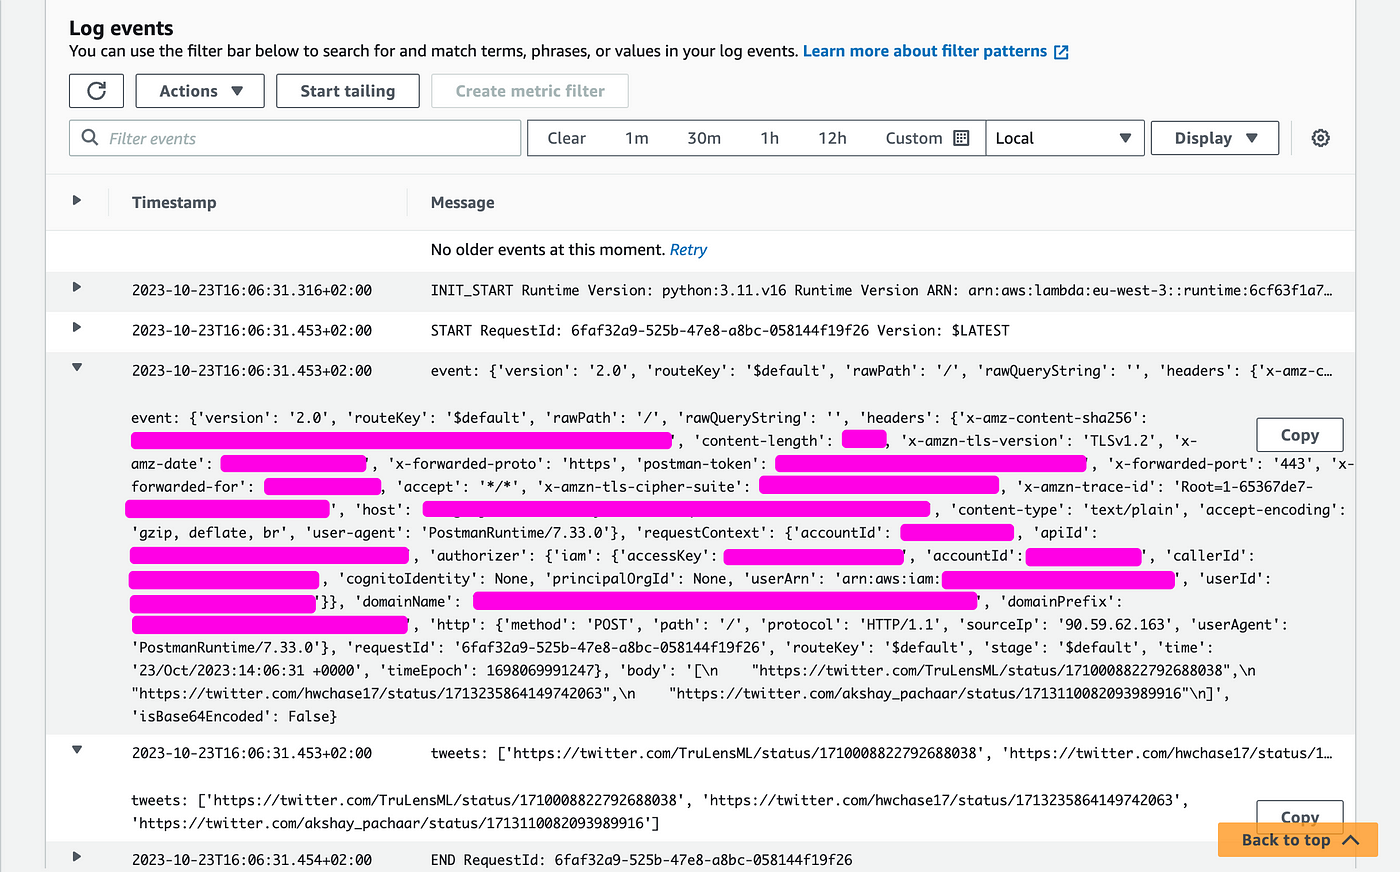
In the logs, you'll find:
- The results of print statements (in the piece of code we had a print(event) and a print(tweets) which resulted in corresponding logs)
- The error message when the lambda fails.
🔥 📮 You can now pass your input to your Lambda 📮 🔥
Run your lambda from a Docker image
In order to run playwright in a Lambda, we need to use a Docker image. In this chapter we will:
- Build a Docker image with the same code we added in the previous step
- Upload it to Amazon ECR
- Create a new lambda to use the Docker image and test it
Build a Docker image
We are going to build the Docker image needed to use playwright to scrape Twitter.
It was adapted from the following article with minor edits. Go read that article to understand more about it: https://www.cloudtechsimplified.com/playwright-aws-lambda-python/
For now:
- Create a new project in your IDE
- Create a Dockerfile
- Enter the following code
# Define function directory
ARG FUNCTION_DIR="/function"

FROM mcr.microsoft.com/playwright/python:v1.21.0-focal as build-image

# Install aws-lambda-cpp build dependencies
RUN apt-get update &&
    apt-get install -y
    g++
    make
    cmake
    unzip
    libcurl4-openssl-dev

# Include global arg in this stage of the build
ARG FUNCTION_DIR
# Create function directory
RUN mkdir -p ${FUNCTION_DIR}

# Copy function code
COPY app/* ${FUNCTION_DIR}

# Install the runtime interface client
RUN pip3 install
    --target ${FUNCTION_DIR}
    awslambdaric

# Install boto3 and any other dependencies
RUN pip3 install
    --target ${FUNCTION_DIR}
    boto3

# Multi-stage build: grab a fresh copy of the base image
FROM mcr.microsoft.com/playwright/python:v1.21.0-focal

# Include global arg in this stage of the build
ARG FUNCTION_DIR
# Set working directory to function root directory
WORKDIR ${FUNCTION_DIR}

# Explicitly set the PATH
ENV PATH="/usr/bin:${PATH}"

# Copy in the build image dependencies
COPY --from=build-image ${FUNCTION_DIR} ${FUNCTION_DIR}

ENTRYPOINT [ "/usr/bin/python", "-m", "awslambdaric" ]
CMD [ "app.handler" ]
In the same project:
- Create an "app" folder
- Create an "app.py" file in that folder
- Paste the following code
import json
from urllib.parse import urlparse

def handler(event, context):

    print(f"event: {event}")
    tweets = json.loads(event['body'])
    print(f"tweets: {tweets}")
    tweet_ids = [urlparse(item).path.split('/')[-1] for item in tweets]

    return {
        'statusCode': 200,
        'body': json.dumps(tweet_ids)
    }
Given that you have Docker installed and you navigated within your Terminal to the project folder, run the below command.
docker build --platform=linux/amd64 -t demo-repo .
This will build the Docker image following the Dockerfile instructions. Note that:
- The platform should be the same as the one chosen when creating the lambda (here amd64 matches the x86_64 architecture)
- You can name the image as you wish, changing the "demo-repo" bit
Upload the image to AWS ECR
Go to AWS ECR > Repositories > Create
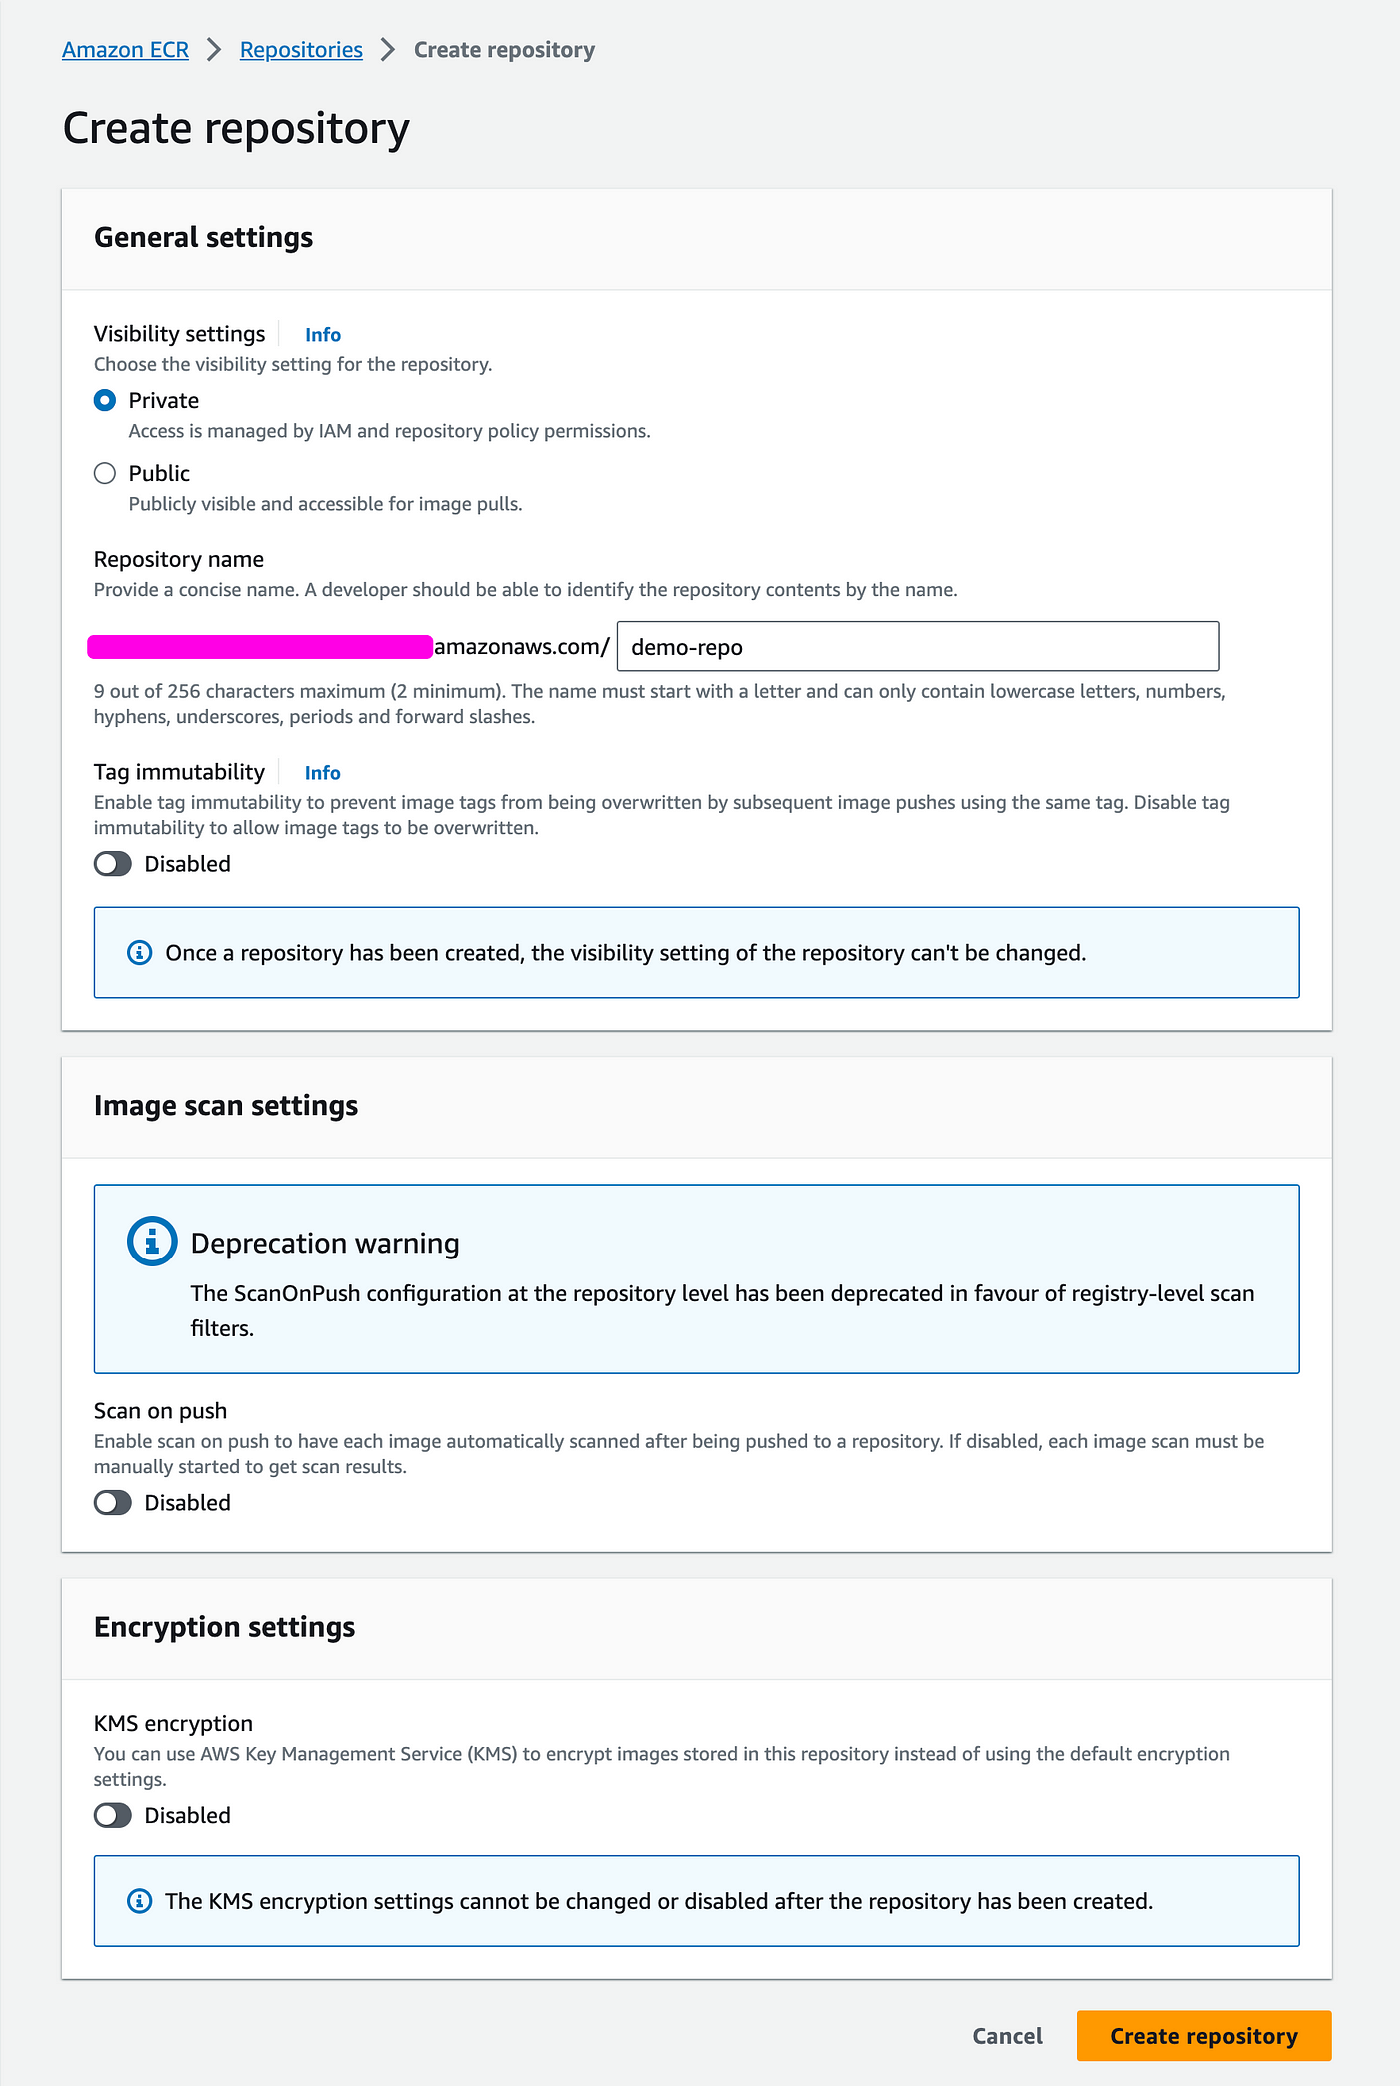
- Give it a name, probably the same as your docker build (here "demo-repo")
- Click Create
- You are redirected to your repositories list. Click on your repo.
- Click on View push commands, you'll get the popup below with the necessary commands
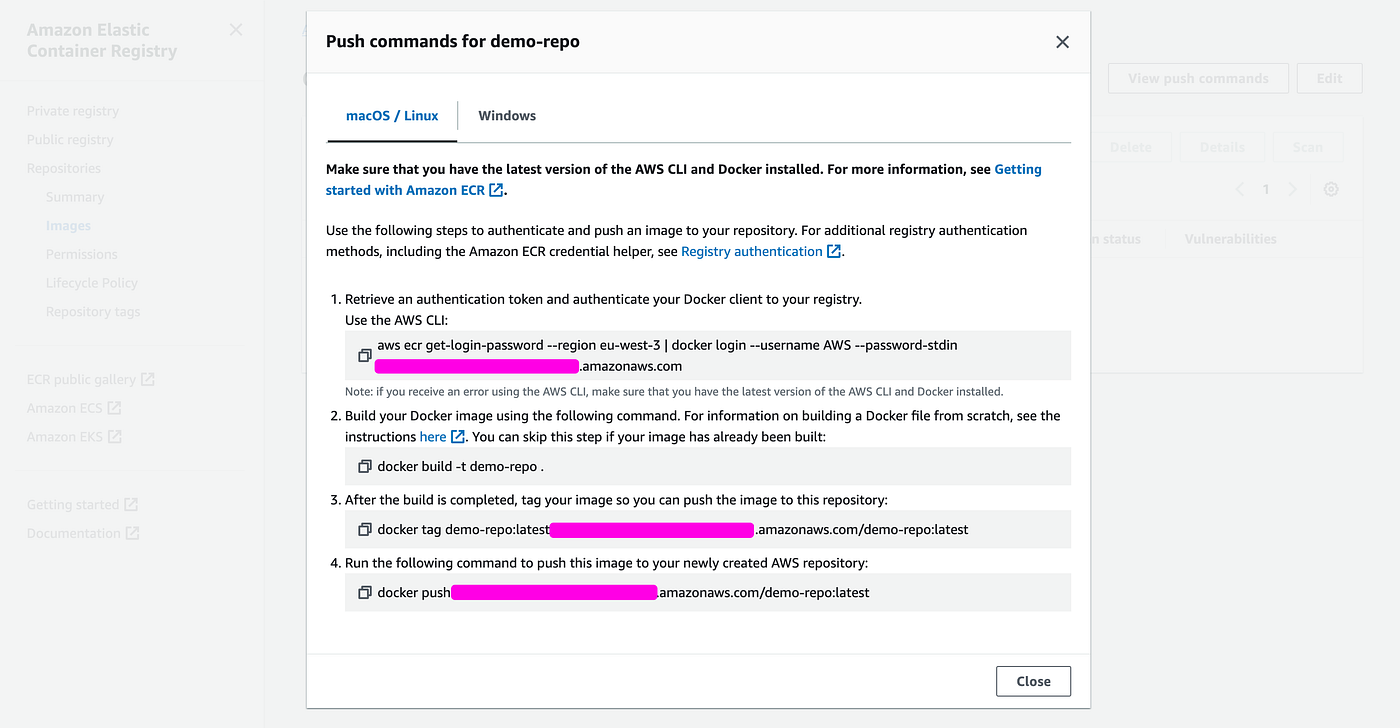
- Copy and run the docker tag and docker push commands
- Note: this supposes you are logged in with AWS CLI. To understand how to do it, you can read this: https://docs.aws.amazon.com/fr_fr/cli/latest/userguide/cli-authentication-user.html
- If you refresh your repo it should now contain the docker image.
Create a new lambda
We now need to create a new lambda to make use of the Docker image.
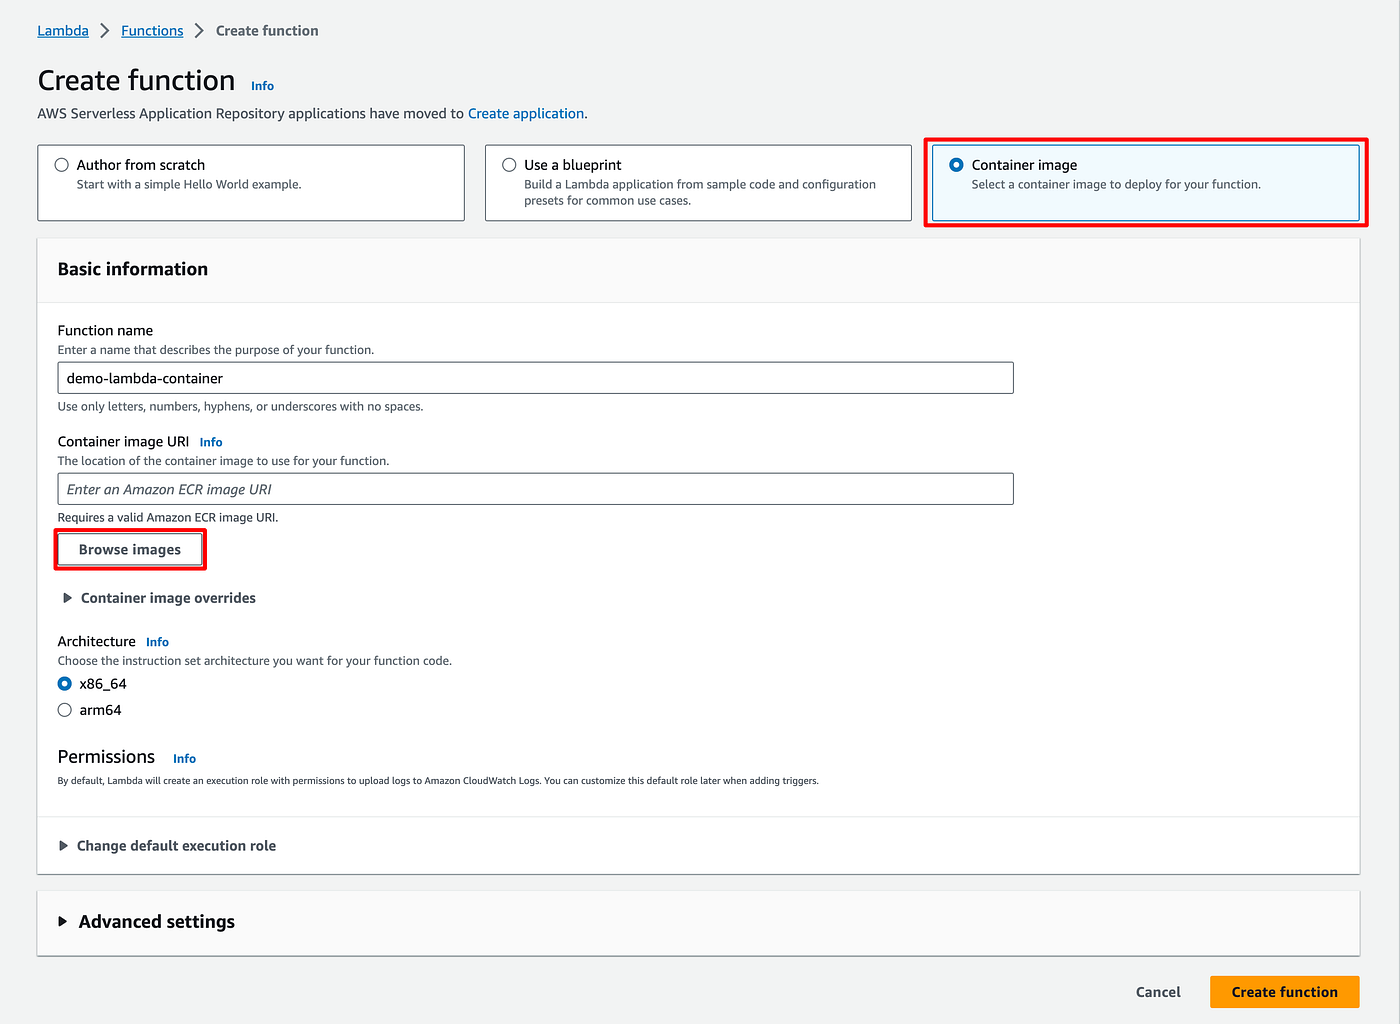
- Create a new lambda
- Choose Container image
- Then Browse image
- Choose your repo and the latest image
- Choose the same architecture that you used to build your image
Authorize invoking the lambda
Run the authorization steps (see chapter 2 of the tutorial):
- In Configuration > Function URL, give your Lambda a function URL authorized through AWS IAM
- In Configuration > Permissions, Add a permission to invoke the URL with the same user as above as the Principal
Test your Lambda
The application code did not change since the last test, it was just embedded in a Docker image. So we should get the same result using the same request.
- In Postman, duplicate the last request.
- Change the endpoint URL using the new lambda function URL.
- The result should be identical to the last test.
🔥 🐳 You created your first Docker image-based Lambda 🐳 🔥
Scrape with playwright and Brightdata
Why Brightdata?
If you scrape Twitter with playwright from your own computer (using Jupyter), it's fairly straight forward. But once you run the same code from within an AWS Lambda, Twitter returns a generic "Javascript not enabled" page. My understanding is that requests from AWS services are detected as scraping attempts and blocked from accessing the content.
Brightdata Scraping Browser remediates the issue.
Brightdata is pay-as-you-go service. For scraping individual tweets as I'm doing the cost is really marginal (probably around 1 cent / tweet).
You can store your Brightdata credentials in environment variables on AWS:
- Go to Configuration > Environment variables > Edit
- Create 2 variables: BRIGHTDATA_USER and BRIGHTDATA_PASS
Using Twitter embeds
I chose to scrape the content of individual tweets using the Twitter embeds, because the HTML is easier to parse, and it allows to easily take a screenshot of a tweet.
Given a tweet url:
  https://twitter.com/akshay_pachaar/status/1713110082093989916
The tweet ID is:
  1713110082093989916
And the tweet embed url is:
  https://platform.twitter.com/embed/Tweet.html?id=1713110082093989916
To align with that, we need to create a new Postman request with a list of Twitter embeds urls in the body
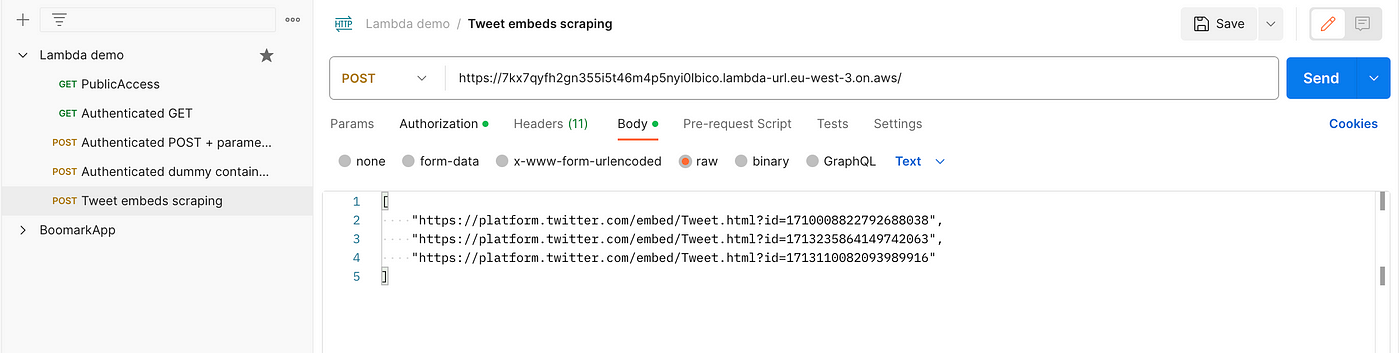
Using playwright in the lambda
Playwright is a framework for Web Testing and Automation using a headless browser. In the code below, the lambda uses playwright through Brightdata.
- Use the following code for your lambda
- Build your image, tag it and push it to ECR
import json
import time
import datetime
import os
from playwright.sync_api import sync_playwright

def handler(event, context):

    BRIGHTDATA_USER = os.environ['BRIGHTDATA_USER']
    BRIGHTDATA_PASS = os.environ['BRIGHTDATA_PASS']
    AUTH = f'{BRIGHTDATA_USER}:{BRIGHTDATA_PASS}'  # Replace with your actual Brightdata credentials
    SBR_WS_CDP = f'wss://{AUTH}@brd.superproxy.io:9222'

    print(f"event: {event}")
    tweets = json.loads(event['body'])
    print(f"tweets: {tweets}")

    response=[]

    with sync_playwright() as pw:
        print('Connecting to Scraping Browser...')
        browser = pw.chromium.connect_over_cdp(SBR_WS_CDP)
        page = browser.new_page()

        for tweet in tweets:
            try:
                page.goto(tweet, timeout=10*1000)
                page.wait_for_selector("article", timeout=30*1000)
                time.sleep(1)

                content = page.content()

                response.append(content)

            except Exception as e:
                print(f"An error occurred on {url}: {str(e)}")

        print("finished")
        browser.close()

    return response
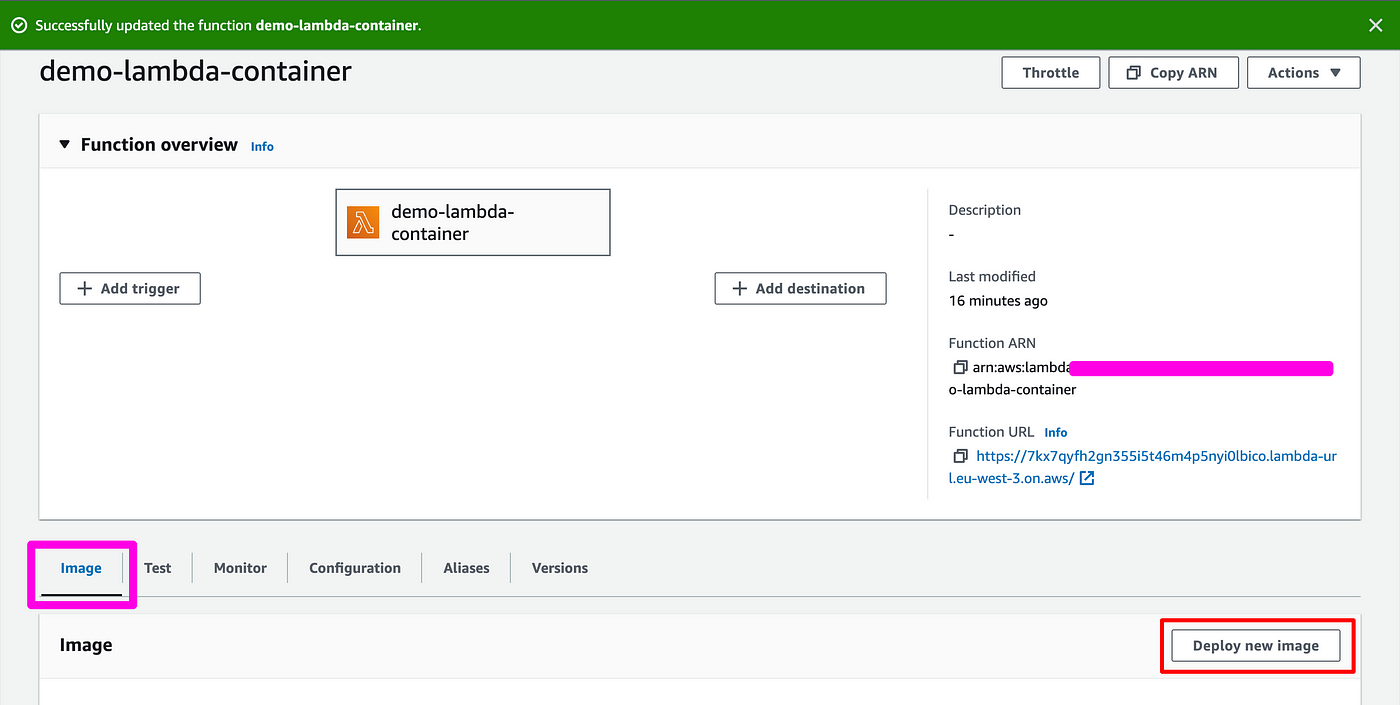
- Deploy the new image in your lambda: click on Deploy new image, then choose your repo and the latest image uploaded.
If you try it out as is, there is a good chance it's not going to work for 2 reasons:
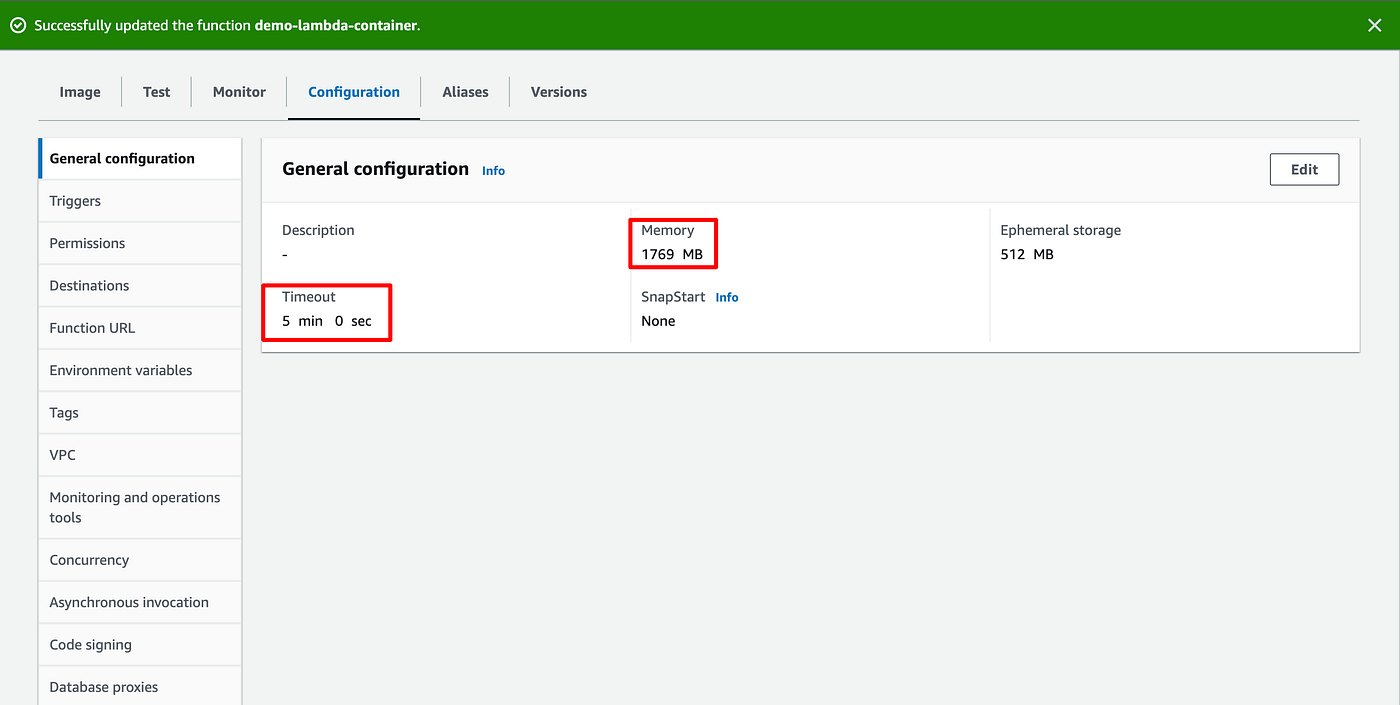
- AWS Lambda have a timeout of 3 seconds, which is too short for the code to run.
- AWS Lambda has a memory allocation too low to load playwright and web pages efficiently.
To fix both issues:
- Go to Configuration > General configuration
- Click Edit and adjust the values
By now you should have a working scraping service: test it with Postman, you should get some HTML back:

🔥 🕷 You are now scraping Twitter 🕷 🔥
Add screenshots
Playwright can take screenshots. But our Lambda is short-lived: it disappears as soon as it has executed, and any asset with it.
So, in order to make the screenshot available, we need to store them somewhere. We are going to store them on AWS S3.
To do so, we need to:
- Create an S3 bucket
- Give our Lambda the permission to write to that bucket
- Add the code to take and save screenshots to S3.
Create an S3 bucket
- Go to S3 > Buckets > Create Bucket
- Give it a name
- Uncheck the Block all public access if you want to be able to retrieve the screenshots from outside S3 (for example if you want to be able to display them in Notion or any other tool that displays images based on a URL)
Grant permission to the lambda to create objects in your S3 bucket
- When we created the Lambda, a role was automatically created for it (see beginning of the article).
- We need to add a permission to this role so that the Lambda can create objects in your S3 bucket.
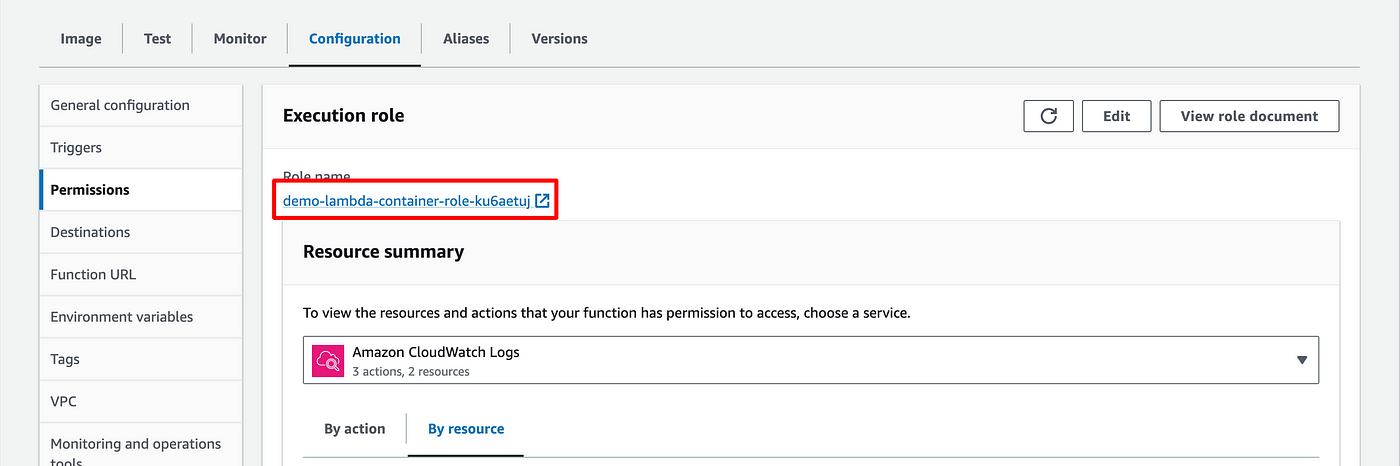
- A link to the role associated to your lambda can be found in Configuration > Permission
- Click on it, a tab will open directly in IAM
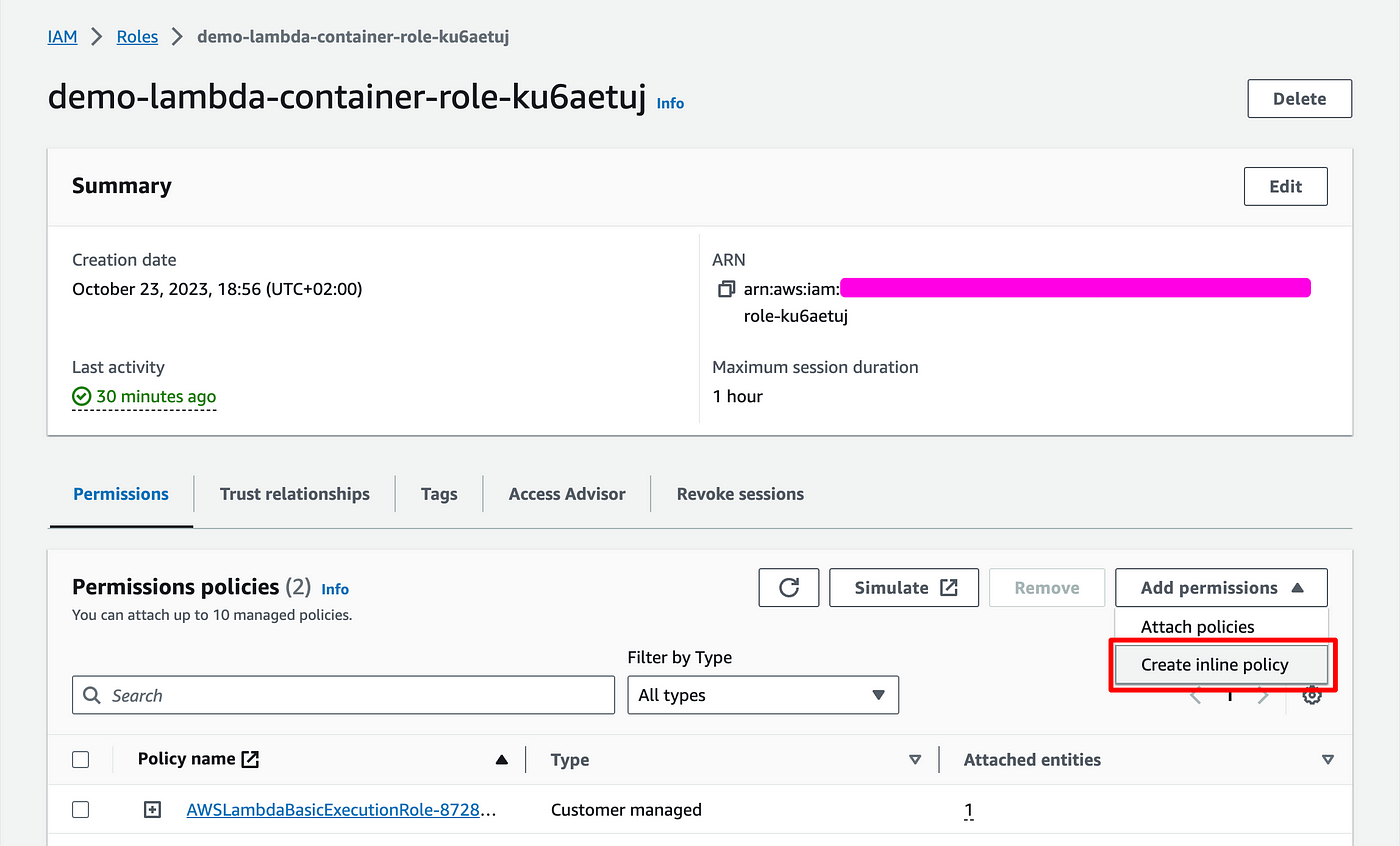
- Click Attach permissions > Create inline policy
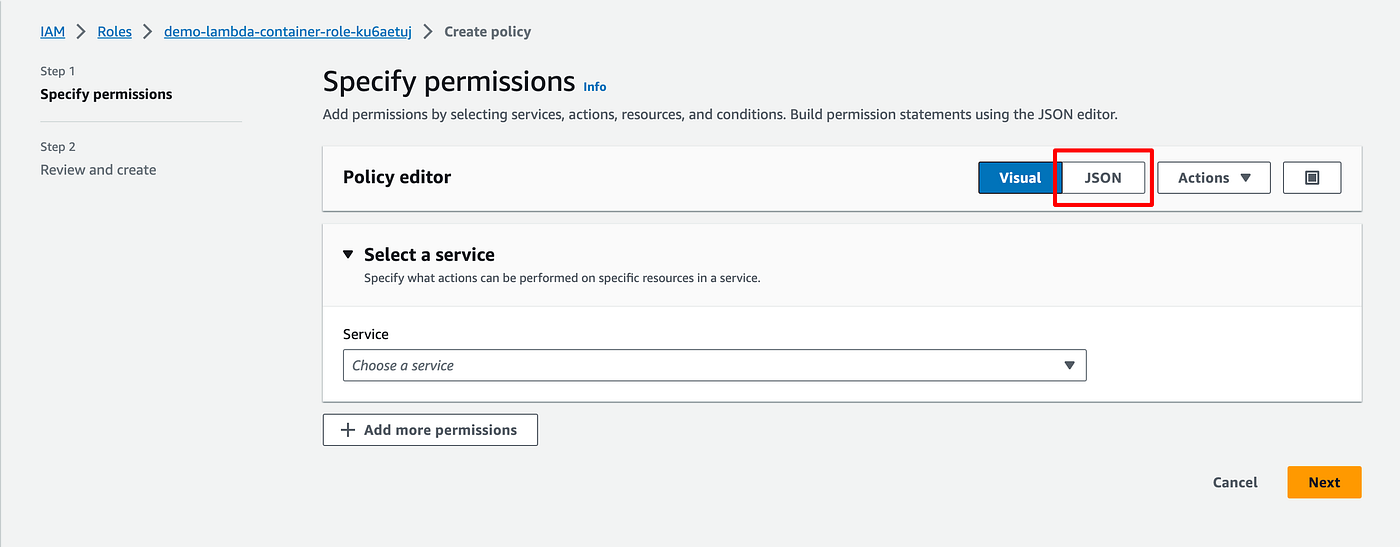
- Click JSON to edit directly the policy
- Replace the code with the following (replace "demo-bucket-tutorial" by the name of your bucket)
{
    "Version": "2012-10-17",
    "Statement": [
        {
            "Sid": "VisualEditor0",
            "Effect": "Allow",
            "Action": "s3:PutObject",
            "Resource": "arn:aws:s3:::demo-bucket-tutorial/*"
        }
    ]
}
- Give it a name and create a policy.
- This policy should now show up in the list of policies attached to the role.
Add code to make and upload screenshots
import json
import time
import datetime
import os
from playwright.sync_api import sync_playwright

import boto3
from botocore.exceptions import ClientError

def handler(event, context):

    BRIGHTDATA_USER = os.environ['BRIGHTDATA_USER']
    BRIGHTDATA_PASS = os.environ['BRIGHTDATA_PASS']
    AUTH = f'{BRIGHTDATA_USER}:{BRIGHTDATA_PASS}'  # Replace with your actual Brightdata credentials
    SBR_WS_CDP = f'wss://{AUTH}@brd.superproxy.io:9222'

    print(f"event: {event}")
    tweets = json.loads(event['body'])
    print(f"tweets: {tweets}")

    response=[]

    with sync_playwright() as pw:
        print('Connecting to Scraping Browser...')
        browser = pw.chromium.connect_over_cdp(SBR_WS_CDP)
        page = browser.new_page()
        page.set_viewport_size({"width": 1920, "height": 1080})

        for tweet in tweets:
            try:
                print(f"tweet: {tweet}")
                page.goto(tweet, timeout=10*1000)
                page.wait_for_selector("article", timeout=30*1000)
                time.sleep(1)

                # After navigating to the page and performing any required actions:
                element = page.query_selector("article")

                # Get the current timestamp and convert it to a string
                timestamp = datetime.datetime.now().strftime("%Y%m%d_%H%M%S_%f")

                # Use the timestamp as part of the file name
                screenshot_path = f'/tmp/screenshot_{timestamp}.png'
                element.screenshot(path=screenshot_path, type='jpeg', quality=80)
                print("screenshot taken")

                s3_url = upload_screenshot_to_s3(screenshot_path, 'demo-bucket-tutorial')
                print("screenshot uploaded")
                content = page.content()

                data = {
                    "html": content,
                    "url": s3_url
                }

                response.append(data)

            except Exception as e:
                print(f"An error occurred on {tweet}: {str(e)}")

        print("finished")
        browser.close()

    return response

s3 = boto3.client('s3')

def upload_screenshot_to_s3(file_path, bucket_name, object_name=None):
    if object_name is None:
        object_name = f"{file_path.split('/')[-1]}"

    try:
        s3.upload_file(file_path, bucket_name, object_name)
        return f"s3://{bucket_name}/{object_name}"
    except Exception as e:
        print(f"Error uploading screenshot: {e}")
- Replace your lambda code with the code above.
- Run your Postman query
- You should see a list of files in your S3 bucket (3 after the first run if you used a body containing 3 tweets as I did), that you can download.
- The screenshots are limited to the
<article>section as illustrated by the example below.

Concluding thoughts
🔥 🔥 You are now done 🔥 🔥
Thanks for reading. I hope you found this valuable / instructive.
If you identify ways to improve my code, I'm curious, so please let me know.
Comments
Loading comments…