In recent years, the field of machine learning has witnessed an unprecedented surge in its computational demands, especially after the significant advancements in large generative models. The ever-increasing complexity of algorithms, coupled with the explosion of data, has necessitated the use of high-performance distributed computing for training and deploying models effectively. However, this has exposed a significant challenge — the existing distributed computing infrastructure for implementing end-to-end machine learning applications remains somewhat primitive.
Machine learning encompasses a vast array of algorithms, from deep neural networks to ensemble methods, each with its unique set of computational demands and data processing needs. This heterogeneity makes it challenging to create a one-size-fits-all solution for parallelization. Moreover, parallelizing machine learning algorithms involves distributing data, parameters, and computations across multiple nodes or processors. While this parallelism can significantly speed up training processes, it also introduces new concerns, such as data consistency, communication overhead, load balancing, and fault tolerance. Ensuring that all nodes have access to the right data, managing the exchange of data and gradients, optimizing the distribution of computational workload, and handling failures gracefully without compromising integrity are complex tasks that require careful orchestration.
Overview
1. Ray
Ray is an open-source high-performance distributed execution framework for scaling machine learning applications which was developed at the University of California Berkeley in the RISELab and open-sourced in 2017. Ray is gaining popularity for its ability to simplify the development of distributed applications and its efficient handling of resources in a cluster, which makes it well-suited for large-scale machine learning and other high-performance computing tasks.
These are some key processes that Ray automatically handles:
- Orchestration — Managing the various components of a distributed system.
- Scheduling — Coordinating when and where tasks are executed.
- Fault tolerance — Ensuring tasks are complete regardless of inevitable points of failure.
- Auto-scaling — Adjusting the number of resources allocated to dynamic demand.
 Ray Framework Layers | Source: anyscale.com
Ray’s unified compute framework consists of three layers:
- Ray AI Runtime (AIR) — An open-source, Python, domain-specific set of libraries that equip ML engineers, data scientists, and researchers with a scalable and unified toolkit for ML applications.
- Ray Core — An open-source, Python, general purpose, distributed computing library that enables ML engineers and Python developers to scale Python applications and accelerate machine learning workloads.
- Ray Clusters — A set of worker nodes connected to a common Ray head node. Ray clusters can be fixed-size, or they can autoscale up and down according to the resources requested by applications running on the cluster.
Each of Ray AIR’s five native libraries distributes a specific ML task:
- Data: Scalable, framework-agnostic data loading and transformation across training, tuning, and prediction.
- Train: Distributed multi-node and multi-core model training with fault tolerance that integrates with popular training libraries.
- Tune: Scalable hyperparameter tuning to optimize model performance.
- Serve: Scalable and programmable serving to deploy models for online inference, with optional microbatching to improve performance.
- RLlib: Scalable distributed reinforcement learning workloads that integrate with the other Ray AIR libraries.
2. Databricks
Databricks Lakehouse is a unified, open analytics platform for building, deploying, sharing, and maintaining enterprise-grade data, analytics, and AI solutions at scale. It is an open data management architecture that combines the flexibility, cost-efficiency, and scale of data lakes with the data management and ACID transactions of data warehouses, enabling business intelligence (BI) and machine learning (ML) on all data.
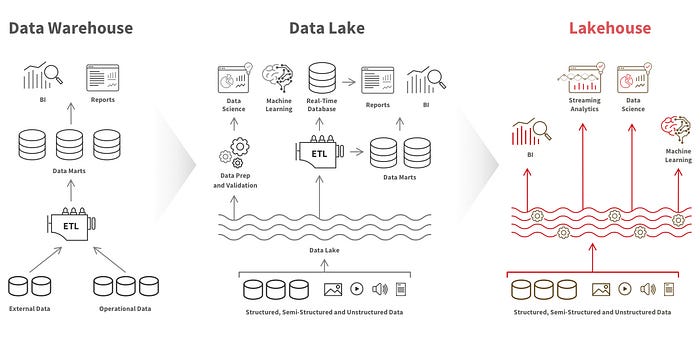 Data Lakehouse vs Data Warehouse vs Data Lake | Source: databricks.com
Key features and components of Databricks include:
- Unified Platform: Databricks integrates data lakes, data warehouses, and machine learning capabilities into a single platform.
- Data Processing and Analytics: Use Databricks to process, store, clean, share, analyze, model, and monetize datasets. It covers everything from business intelligence (BI) to machine learning.
- Workspace Interface: The Databricks workspace provides a unified interface for various data tasks, including data processing workflows, SQL queries, dashboards, visualizations, and more.
- Managed Integration with Open Source: Databricks actively contributes to open-source projects like Apache Spark, Delta Lake, MLflow, and Redash.
- Proprietary Tools: Databricks also offers proprietary tools like Workflows, Unity Catalog, Delta Live Tables, Databricks SQL, and Photon.
3. Llama 2
Meta’s Llama 2**** is an auto-regressive large language model (LLM) that uses an optimized transformer architecture. It is pre-trained and fine-tuned with 2 Trillion tokens and 7 to 70 Billion parameters which makes it one of the powerful open-source models. It comes in three different model sizes (i.e. 7B, 13B and 70B) with significant improvements over the Llama 1 models, including being trained on 40% more tokens, having a much longer context length (4k tokens), and using grouped-query attention for fast inference of the 70B model. It outperforms other open-source LLMs on many external benchmarks, including reasoning, coding, proficiency, and knowledge tests.
Fine-tuning Llama 2 and Batch Inference using Ray AI Runtime
I will be leveraging Ray AI Runtime (AIR) running on top of Databricks Lakehouse cluster to perform distributed data preprocessing, fine-tuning, hyperparameter tuning, and batch inference using Llama-2–13b-hf model (with QLoRA) and Databricks-dolly-15k dataset.
One of the primary reasons for selecting Ray AIR for fine-tuning and batch inference is because of its seamless integration with Apache Spark on Databricks and some popular deep-learning frameworks like PyTorch and Hugging Face.

1. Getting Started
In this section, I will go through the code to explain each step in detail.
You have to first request access to Llama 2 models via Meta website and also accept to share your account details with Meta on Hugging Face website. It typically takes a few minutes or hours to get the access.
🚨 Note that your Hugging Face account email MUST match the email you provided on the Meta website, or your request will not be approved.
1.1. Hardware Requirements I ran multiple experiments to determine which instance type can be used for the different model sizes. The following shows the results of the experiments.
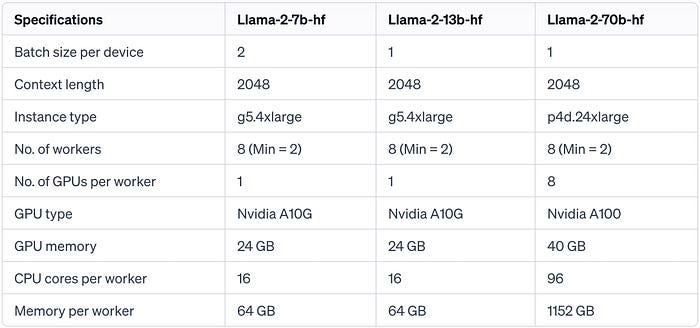 Hardware requirements for all Llama-2 variants
Moreover, you have to choose the Databricks runtime version 13.1 ML (GPU, Scala 2.12, Spark 3.4.0)**** or above for your cluster as Ray integration support starts from this version in Databricks.
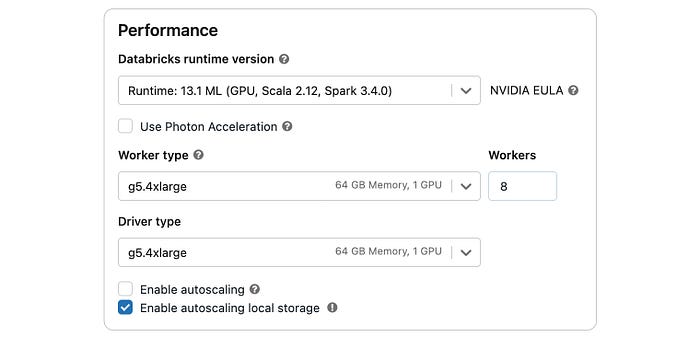 Databricks Cluster Details
1.2. Installing the libraries
Let’s begin by installing all required libraries using %pip install on the driver and worker nodes. %pip magic command in Databricks installs the same package across all nodes in the cluster automatically by running once in your notebook.
%pip install peft==0.5.0
%pip install datasets==2.12.0 bitsandbytes==0.40.0 einops==0.6.1 trl==0.4.7
%pip install torch==2.1.0 accelerate==0.21.0 transformers==4.31.0 tokenizers==0.13.3
%pip install pyarrow==8.0.0
%pip install ray[default,rllib,tune]==2.5.1
%pip install protobuf==3.20.0
%pip install xformers==0.0.22
You need to restart the kernel by running the following command to use updated packages.
dbutils.library.restartPython();
1.2. Setting up imports and utilities
import ray
import torch
import transformers
import warnings
import numpy as np

from huggingface_hub import login
from datasets import load_dataset
from typing import Any, Dict, List, Optional
from transformers import AutoModelForCausalLM, AutoTokenizer, BitsAndBytesConfig, TrainingArguments, Trainer
from peft import prepare_model_for_kbit_training, LoraConfig, get_peft_model

from ray.util.spark import setup_ray_cluster, shutdown_ray_cluster, MAX_NUM_WORKER_NODES
from ray.data.preprocessors import BatchMapper
from ray.air.integrations.mlflow import MLflowLoggerCallback
from ray.air.integrations.mlflow import setup_mlflow

transformers.set_seed(42)
warnings.simplefilter("ignore")
1.3. Initializing Ray runtime You have to set up and initialize the Ray cluster according to the size of your Databricks cluster.
num_cpu_cores_per_worker = 16 # total cpu''s present in each node
num_gpu_per_worker = 1 # total gpu''s present in each node
resource_per_worker_int = (num_cpu_cores_per_worker / num_gpu_per_worker) - 2
use_gpu = True
username = dbutils.notebook.entry_point.getDbutils().notebook().getContext().tags().apply(''user'')
ray_log_dir = f"/local_disk0/user/{username}/ray/logs"
try:
  shutdown_ray_cluster()
except:
  print("No Ray cluster is initiated")

# Start the ray cluster and follow the output link to open the Ray Dashboard - a vital observability tool for understanding your infrastructure and application.
setup_ray_cluster(
  num_worker_nodes=MAX_NUM_WORKER_NODES,
  num_cpus_per_node=num_cpu_cores_per_worker,
  num_gpus_per_node=num_gpu_per_worker,
  collect_log_to_path=ray_log_dir
)

ray.init(address=''auto'', ignore_reinit_error=True)

cluster_resources = ray.cluster_resources()
print(cluster_resources)

num_workers = int(cluster_resources["CPU"] / num_cpu_cores_per_worker)
1.4. Loading the dataset You have to load databricks-dolly-15k dataset from Hugging Face Hub and split it into train and test datasets for fine-tuning the model.
dataset_name = "databricks/databricks-dolly-15k";
hf_dataset = load_dataset(dataset_name, (split = "train")).train_test_split(
  (test_size = 0.2),
  (seed = 57)
);

print(hf_dataset);
1.5. Creating the prompt template You have to create a prompt template function to generate prompts using the data features in the dataset.
INTRO_BLURB = "Below is an instruction that describes a task. Write a response that appropriately completes the request."
INSTRUCTION_KEY = "### Instruction:"
INPUT_KEY = "Input:"
RESPONSE_KEY = "### Response:"
END_KEY = "### End"

PROMPT_NO_INPUT_FORMAT = """{intro}

{instruction_key}
{instruction}

{response_key}
{response}

{end_key}""".format(
  intro=INTRO_BLURB,
  instruction_key=INSTRUCTION_KEY,
  instruction="{instruction}",
  response_key=RESPONSE_KEY,
  response="{response}",
  end_key=END_KEY
)

PROMPT_WITH_INPUT_FORMAT = """{intro}

{instruction_key}
{instruction}

{input_key}
{input}

{response_key}
{response}

{end_key}""".format(
  intro=INTRO_BLURB,
  instruction_key=INSTRUCTION_KEY,
  instruction="{instruction}",
  input_key=INPUT_KEY,
  input="{input}",
  response_key=RESPONSE_KEY,
  response="{response}",
  end_key=END_KEY
)

def apply_prompt_template(prompt):
  instruction = data["instruction"]
  response = data["response"]
  context = data.get("context")

  if context:
    full_prompt = PROMPT_WITH_INPUT_FORMAT.format(instruction=instruction, response=response, input=context)
  else:
    full_prompt = PROMPT_NO_INPUT_FORMAT.format(instruction=instruction, response=response)

  return { "text": full_prompt }

def generate_prompt(prompt):
    return apply_prompt_template(prompt)
You have to apply the prompt template function to the dataset.
hf_train_dataset = hf_dataset["train"].map(generate_prompt);
hf_test_dataset = hf_dataset["test"].map(generate_prompt);
Now, you have to convert the Hugging Face dataset into the Ray dataset.
ray_train_dataset = ray.data.from_huggingface(hf_train_dataset);
ray_test_dataset = ray.data.from_huggingface(hf_test_dataset);
2. Distributed Data Preprocessing

2.1. Implementing preprocessing function
You need to define a preprocessing function to convert a batch of data to a format that the Llama 2 model can accept. Ray AIR BatchMapper will then map this function onto each incoming batch during the fine-tuning.
The most important component is the tokenizer, which is a Hugging Face component associated with the Llama 2 model that turns natural language into formatted tokens with the right padding and truncation necessary for training.
model_name = "meta-llama/Llama-2-13b-hf"
hf_token = ''<add your access token here>'' # You need an access token
max_length = 2048 # This is an appropriate max length according to the dataset
batch_size = 4096

login(token=hf_token)

tokenizer = AutoTokenizer.from_pretrained(
    model_name,
    trust_remote_code=True,
    padding_side="left",
    add_eos_token=True,
    add_bos_token=True
)
tokenizer.pad_token = tokenizer.eos_token

def preprocess_function(batch: Dict[str, Any]) -> Dict[str, Any]:
    result = tokenizer(
        list(batch["text"]),
        max_length=max_length,
        truncation=True,
        padding="max_length",
        return_tensors="np",
    )

    result["labels"] = result["input_ids"].copy()

    return dict(result)

batch_preprocessor = BatchMapper(preprocess_function, batch_format="pandas", batch_size=batch_size)
3. Distributed Fine-tuning of Llama 2 (with QLoRA)

Each worker node contains a copy of the batch preprocessor to process partitioned batches of the Ray dataset, and individual model copies to train on these batches. PyTorch DDP synchronizes their weights, resulting in an integrated, fine-tuned model.
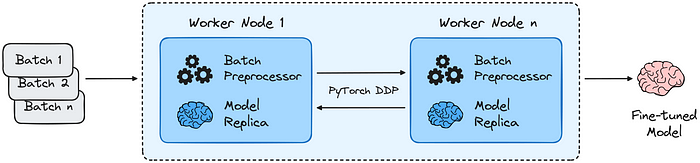 Ray AIR distributed fine-tuning flow | Source: github.com
3.1. Creating an experiment in MLflow You have to first create an experiment in MLflow to register and save the fine-tuned model along with its artefacts.
import mlflow

experiment_name = "exp-llama2-13b-hf"
experiment_location = f"/Users/{username}/LLM/{experiment_name}"
artifact_location = f"dbfs:/Users/{username}/{experiment_name}/artifacts"

tags = {
    "base_model_name": model_name,
    "n_gpus": str(num_workers),
    "num_cpu_cores_per_worker": str(num_cpu_cores_per_worker),
    "num_gpu_per_worker": str(num_gpu_per_worker),
    "max_length": str(max_length),
}

if not mlflow.get_experiment_by_name(experiment_location):
    mlflow.create_experiment(name=experiment_location, artifact_location=artifact_location)

mlflow.set_experiment(experiment_name=experiment_location)
3.2. Initializing trainer function for each worker
The trainer_init_per_worker function creates a Hugging Face Transformers Trainer that gets distributed by Ray using Distributed Data Parallelism (using PyTorch Distributed Data Parallel). Each worker has its own copy of the model, however, it operates on a different batch of data. At the end of each step, all the workers sync gradients.
def trainer_init_per_worker(
    train_dataset: ray.data.Dataset,
    eval_dataset: Optional[ray.data.Dataset] = None,
    **config,
) -> Trainer:
    device = torch.device("cuda" if use_gpu and torch.cuda.is_available() else "cpu")
    print(f"Using device: {device}")

    login(token=config.get("hf_token"))

    tokenizer = AutoTokenizer.from_pretrained(
        pretrained_model_name_or_path=config.get("model_name"),
        trust_remote_code=True,
        padding_side="left",
        add_eos_token=True,
        add_bos_token=True
    )
    tokenizer.pad_token = tokenizer.eos_token

    bnb_config = BitsAndBytesConfig(
        load_in_4bit=True,
        bnb_4bit_use_double_quant=True,
        bnb_4bit_quant_type="nf4",
        bnb_4bit_compute_dtype=torch.bfloat16
    )

    num_gpus = torch.cuda.device_count()
    max_memory = config.get("max_memory")

    model = AutoModelForCausalLM.from_pretrained(
        pretrained_model_name_or_path=config.get("model_name"),
        quantization_config=bnb_config,
        device_map="auto",
        max_memory={i: max_memory for i in range(num_gpus)},
        trust_remote_code=True
    )

    model.gradient_checkpointing_enable()
    model = prepare_model_for_kbit_training(model)

    peft_config = LoraConfig(
        lora_alpha=config.get("lora_alpha", 16),
        lora_dropout=config.get("lora_dropout", 0.1),
        r=config.get("lora_r", 64),
        bias="none",
        task_type="CAUSAL_LM",
        target_modules=[
                "q_proj",
                "k_proj",
                "v_proj",
                "o_proj",
                "gate_proj",
                "up_proj",
                "down_proj",
                "lm_head",
            ] # Choose all linear layers from the model
    )

    model = get_peft_model(model, peft_config)

    training_arguments = TrainingArguments(
        output_dir="checkpoints",
        per_device_train_batch_size=config.get("per_device_train_batch_size", 1),
        gradient_accumulation_steps=config.get("gradient_accumulation_steps", 1),
        optim="paged_adamw_8bit",
        save_steps=config.get("save_steps", 50),
        logging_steps=config.get("logging_steps", 50),
        learning_rate=config.get("learning_rate", 2e-4),
        bf16=True,  # set True if you''re using A10G or A100 GPU otherwise False
        fp16=False, # set True if you''re using V100 or T4 GPU otherwise False
        max_grad_norm=0.3,
        max_steps=config.get("max_steps", 1000),
        weight_decay=config.get("weight_decay", 0.001),
        logging_strategy="steps",
        save_strategy="steps",
        warmup_ratio=config.get("warmup_ratio", 0.03),
        group_by_length=False,
        lr_scheduler_type=config.get("lr_scheduler_type", "constant"),
        ddp_find_unused_parameters=False,
        push_to_hub=False,
        disable_tqdm=False,
    )

    trainer = Trainer(
        model=model,
        train_dataset=train_dataset,
        args=training_arguments,
        tokenizer=tokenizer,
        data_collator=transformers.DataCollatorForLanguageModeling(tokenizer, mlm=False)
    )
    model.config.use_cache = False

    return trainer
3.3. Defining Transformers trainer
Ray Transformers Trainer integrates with the Hugging Face Transformers library to scale training and fine-tuning across multiple workers, each with its own copy of the Hugging Face transformers.Trainer set up in the previous step.
The following parameters need to be specified:
trainer_init_per_worker- Training function copied onto each worker.trainer_init_config- Training configuration copied onto each worker.scaling_config- Specify how to scale and the hardware to run on.datasets- Specify which datasets to run training and evaluation on.run_config- Specify checkpointing behaviour (how many times to save the model and how to compare between saved models).preprocessor- The same Ray AIR preprocessor defined above is used to transform raw data into tokenized batches.
from ray.air.config import RunConfig, ScalingConfig, CheckpointConfig
from ray.train.huggingface import TransformersTrainer

max_memory = f''{23000}MB'' # Memory of each GPU per worker
logging_steps = 100
save_steps = 100
max_steps = 3000

trainer = TransformersTrainer(
    trainer_init_per_worker=trainer_init_per_worker,
    trainer_init_config={
        "model_name": model_name,
        "hf_token": hf_token,
        "max_memory": max_memory,
        "logging_steps": logging_steps,
        "save_steps" : save_steps,
        "max_steps": max_steps
    },
    scaling_config=ScalingConfig(
        num_workers=num_workers,
        use_gpu=use_gpu,
        resources_per_worker={"GPU": num_gpu_per_worker, "CPU": resource_per_worker_int}
    ),
    datasets={
        "train": ray_train_dataset
    },
    run_config=RunConfig(
        local_dir=f"/local_disk0/user/{username}/hf",
        checkpoint_config=CheckpointConfig(
            num_to_keep=1,
            checkpoint_score_attribute="loss",
            checkpoint_score_order="min",
        ),
        callbacks=[
            MLflowLoggerCallback(
                experiment_name=experiment_location,
                tags=tags,
                save_artifact=True
            )
        ],
        verbose=0
    ),
    preprocessor=batch_preprocessor
)
3.4. Starting fine-tuning
Finally, you have to call the fit() method to start fine-tuning with Ray AIR. It returns a result object which has metrics and checkpoint information.
result = trainer.fit();
print(result.checkpoint);
print(result.metrics);
3.5. Merging weights and trying out the fine-tuned model Once you have the fine-tuned weights, just merge them with the pre-trained model. You have a memory-efficient fine-tuned model and tokenizer ready for inference.
from peft import AutoPeftModelForCausalLM

local_checkpoint = result.checkpoint

model = AutoPeftModelForCausalLM.from_pretrained(
    local_checkpoint.path,
    device_map="auto",
    torch_dtype=torch.bfloat16
)
model = model.merge_and_unload()
device = torch.device("cuda:0" if use_gpu else "cpu")

# Specify input
text = "### Instruction:\nWhat are different ways people help each other?"

# Tokenize input text
inputs = tokenizer(text, return_tensors="pt").to(device)

# Get the generated text output
outputs = model.generate(
    input_ids=inputs["input_ids"].to(device),
    attention_mask=inputs["attention_mask"],
    max_new_tokens=128, # Adjust max_new_tokens variable as you wish (maximum number of tokens the model can generate to answer the input)
    pad_token_id=tokenizer.eos_token_id
)

# Decode output & print it
print(tokenizer.decode(outputs[0], skip_special_tokens=True))
3.6. Start MLflow run to log model You have to log the fine-tuned model in MLflow using the following code
with mlflow.start_run(run_name="llama-2-13b-hf-finetuned") as run:
    pipe = transformers.pipeline(
        task="text-generation",
        model=model,
        tokenizer=tokenizer,
        framework="pt",
        torch_dtype=torch.bfloat16,
        device_map="auto"
    )
    pip_reqs = mlflow.transformers.get_default_pip_requirements(model)
    mlflow.transformers.log_model(
        artifact_path="model",
        transformers_model=pipe,
        pip_requirements=pip_reqs
    )
3.7. Clearing CUDA memory in PyTorch. You can free up the GPU resources by running the following code
import torch
import gc

del model

gc.collect()
torch.cuda.empty_cache()
3.8. Registering the model in MLflow You have to register and save the fine-tuned model in MLflow to load it again later for batch inference.
model_name_registry = "llama-2-13b-hf-finetuned"
model_registered = mlflow.register_model(
    model_uri=f"runs:/{run.info.run_id}/model",
    name=model_name_registry,
    await_registration_for=600
)

print(f"Model version {model_registered.version} has been registered.")

client = mlflow.MlflowClient()

client.transition_model_version_stage(
    name=model_name_registry,
    version=model_registered.version,
    stage="Staging",
    archive_existing_versions=True
)
4. Distributed Hyperparameter Tuning (optional)

You can perform hyperparameter tuning by running multiple trial experiments to find the better-performing fine-tuned model.
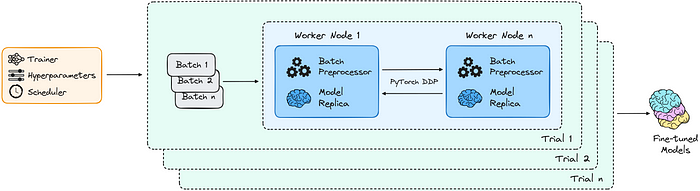 Ray AIR distributed hyperparameter tuning flow | Source: github.com
4.1. Defining Tuner
You have to pass the previous TransformersTrainer object into Ray AIR Tuner and configure the parameter search space and behavioural settings for scheduling, scaling, and checkpointing.
There are four major components passed into the Tuner:
trainer- TheTransformersTrainerwith scaling, preprocessing, and fine-tuning logic from earlier.param_space- The possibilities of hyperparameters to tune and search for any given trial.tune_config- Specify how to compare different experiments, the number of trials, as well as any advanced search algorithms and schedulers like ASHA.run_config- Used to specify checkpointing behaviour, custom callbacks, failure/retry configurations, and more.
from ray import tune
from ray.tune import Tuner
from ray.tune.schedulers.async_hyperband import ASHAScheduler

total_num_trials = 4
max_tune_steps = 3000

tuner = Tuner(
    trainer,
    param_space={
        "trainer_init_config": {
            "learning_rate": tune.choice([2e-5, 2e-4, 2e-3, 2e-2]),
            "max_steps": tune.choice([1200, 1800, 2400, max_tune_steps]),
            "weight_decay": tune.choice([0.01, 0.1, 1.0, 10.0]),
        }
    },
    tune_config=tune.TuneConfig(
        metric="loss",
        mode="min",
        num_samples=total_num_trials,
        scheduler=ASHAScheduler(
            max_t=max_tune_steps,
        ),
    ),
    run_config=RunConfig(
        checkpoint_config=CheckpointConfig(
            num_to_keep=1,
            checkpoint_score_attribute="loss",
            checkpoint_score_order="min",
        ),
        callbacks=[
            MLflowLoggerCallback(
                experiment_name=experiment_location,
                tags=tags,
                save_artifact=True
            )
        ],
    ),
)
4.2. Starting hyperparameter tuning
Finally, you have to call the fit() method to start hyperparameter**** tuning with Ray AIR. It returns a result object which has metrics and checkpoint information.
tune_results = tuner.fit();
tune_results_df = tune_results.get_dataframe().sort_values("loss");
tune_results_df.display();
best_result = tune_results.get_best_result();

print(best_result.checkpoint);
print(best_result.metrics);
5. Distributed Batch Inference

You can perform distributed batch inference using Ray AIR BatchPredictor which applies batches of inputs to the fine-tuned model to generate predictions at scale.
 Ray AIR distributed batch inference flow | Source: github.com
5.1. Loading fine-tuned model You have to first load the fine-tuned model from the MLflow model repository.
from mlflow.store.artifact.models_artifact_repo import ModelsArtifactRepository

model_name_registry = "llama-2-13b-hf-finetuned"
model_uri = f"models:/{model_name_registry}/Staging"

local_artifact_path = ModelsArtifactRepository(model_uri).download_artifacts(artifact_path="pipeline")
5.2. Creating batch predictor
You have to create a Ray AIR BatchPredictor from TransformersCheckpoint and specify the predictor class, task and some additional arguments.
from ray.train.huggingface import TransformersCheckpoint, TransformersPredictor
from ray.train.batch_predictor import BatchPredictor

local_checkpoint = TransformersCheckpoint.from_directory(local_artifact_path)

predictor = BatchPredictor.from_checkpoint(
    checkpoint=local_checkpoint,
    predictor_cls=TransformersPredictor,
    task="text-generation",
    use_gpu=True,
    device_map="auto",
    torch_dtype=torch.float16
)
5.3. Running batch inference
You have to use the checkpoint to run batch prediction with TransformersPredictor which wraps around Hugging Face Pipelines.
import pandas as pd
import re

def remove_response(batch: pd.DataFrame) -> pd.DataFrame:
    batch = batch["text"].replace(to_replace=''(### Response:|Input:)(\s+)?(\n.*)+'', value='', regex=True)
    return pd.DataFrame(batch, columns=["text"])

predictions = predictor.predict(
    ray_test_dataset.map_batches(remove_response, batch_format="pandas"),
    batch_size=4096,
    min_scoring_workers=1,
    max_scoring_workers=3,
    num_gpus_per_worker=1,
    feature_columns=["text"],
    max_new_tokens=128
)
predictions_df = predictions.to_pandas();
predictions_df.display();
Conclusion
Now, you have the capability of efficiently scaling up the fine-tuning and batch inferencing of large language models such as Llama 2 (including 7B, 13B, and 70B variants) across multiple nodes without having to worry about the complexity of distributed systems.
If you’re looking for this entire code written in a single notebook, then go to my GitHub repository. Cheers!! 🍺
 Source: giphy.com
References
[1] https://docs.ray.io/en/releases-2.5.1/ray-overview/index.html
[2] https://docs.ray.io/en/releases-2.5.1/ray-air/getting-started.html
[9] https://www.philschmid.de/sagemaker-llama2-qlora
[10] https://blog.ovhcloud.com/fine-tuning-llama-2-models-using-a-single-gpu-qlora-and-ai-notebooks/
Comments
Loading comments…