
Photo by Rock’n Roll Monkeyon Unsplash
ChatGPT has become incredibly popular worldwide, but what people may not know is that OpenAI has an application interface with even more impressive language processing capabilities.
Integrating OpenAI’s API into your projects allows you to use their language processing technology for tasks like translation, summarization, question answering, and idea generation. This can enhance your projects and provide a better user experience.
This tutorial will cover how to set up a new Node.js project to interact with OpenAI’s API, from obtaining API keys to making HTTP requests and using createCompletion for single turn prompt requests.
However, since the release of the GPT-3.5-Turbo and GPT-4 models, it is recommended to use the multi-turn chat completion mode to build your project going forward, unless there is a specific use case where fine-tuning the model is required. If you’re interested, check out my GPT-3.5-Turbo and GPT-4 model tutorials.
Prerequisites
For this beginner-friendly JavaScript OpenAI API tutorial, you’ll need:
- Node.js installed on your machine.
- Familiarity with JavaScript language.
What you’ll learn
- How to obtain an OpenAI API key
- How to set up the project and install relevant NPM packages
- How to generate a blog post content using OpenAI API You can find the full code on GitHub at this link (Intro branch).
Generate API key
To generate an API key for the OpenAI API, you’ll need to sign up for an account on the OpenAI website at https://beta.openai.com/signup/
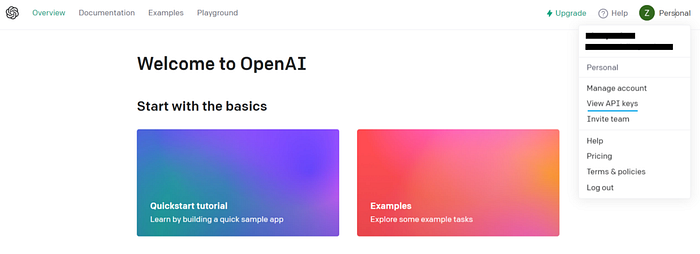
OpenAI Dashboard Screenshot
After logging in, you can create a new API key by accessing your profile menu on the website and clicking “View API Keys.” On the API Key page, click “Create API Key.” Your new API key will be displayed on the API keys page, where you can also manage or revoke it if needed.
Project Setup
To begin, let’s set up our node project using npm init and create a folder structure to keep our code organized.
Our folder structure looks something like this:
📦wordpress-automation
 ┣ 📂node_modules
 ┣ 📂src
 ┃ ┣ 📂openai
 ┃ ┃ ┗ OpenAI.js
 ┣ .env
 ┣ .gitignore
 ┣ .prettierrc
 ┣ index.js
 ┣ package-lock.json
 ┗ package.json
Next, we’ll install some necessary npm packages that we’ll use in this project:
npm install openai dotenv
The openai package is the official Node.js library for OpenAI, designed to simplify interaction with the OpenAI API in your code. It includes various classes and methods that correspond with different API endpoints, making it easy to handle requests and responses. Additionally, it features a Configuration class, which enables flexible setup of the OpenAI API.
Just a heads up though, this package is currently in beta and subject to change. You can always check the latest version on openai-node GitHub repository.
We’ll also use dotenv to manage our API keys. While I won’t go into detail on this package, there are plenty of online resources available if you’d like to learn more.
Generate blog post using the OpenAI API
// OpenAI.js

import { Configuration, OpenAIApi } from "openai";
export class OpenAI {
  constructor(apiKey) {
    // Create the Configuration and OpenAIApi instances
    this.openai = new OpenAIApi(new Configuration({ apiKey }));
  }
  // Asynchronous function to generate text from the OpenAI API
  async generateText(prompt, model, max_tokens, temperature = 0.85) {
    try {
      // Send a request to the OpenAI API to generate text
      const response = await this.openai.createCompletion({
        model,
        prompt,
        max_tokens,
        n: 1,
        temperature,
      });
      console.log(`request cost: ${response.data.usage.total_tokens} tokens`);
      // Return the text of the response
      return response.data.choices[0].text;
    } catch (error) {
      throw error;
    }
  }
}
InOpenAI.js, we made an instantiable class that connects to the OpenAI API and generates text using the openai library. The class makes it easy for us to generate text by handling all the connection details.
We created a function called generateText() which takes in four input parameters:
prompt: This is the text that you want to use as a starting point for the generated text.model: This is the name of the model that you want to use to generate the text. It can be any of the models available on the OpenAI API.max_token: This is the maximum number of tokens (i.e. words or phrases) that you want the generated text to contain.temperature: This is a value between 0 and 1 that controls the randomness of the generated text. A higher temperature means more randomness, while a lower temperature means more similarity to the input text. The function returns the generated blog post content. Inside thegenerateText()function, we create an instance of theOpenAIApiclass by passing in a configuration object which includes the API key. Then, we use thecreateCompletionmethod of theOpenAIApiclass, passing in an object with properties like the model to use, the prompt, the temperature, and the maximum number of tokens to generate. We also wait for the response and return the generated text from the response. Basically, this is made easy as the openai library handles all the connection details in theOpenAIApiclass and generating the text ingenerateText()function.
// index.js

import { OpenAI } from "./src/openai/OpenAI.js";
import dotenv from "dotenv";
dotenv.config();
// Creating a new instance of the OpenAI class and passing in the OPENAI_KEY environment variable
const openAI = new OpenAI(process.env.OPENAI_KEY);
const topic = "NodeJs";
const model = "text-davinci-003";
// Function to generate the prompt for the OpenAI API
// In the future, it will be moved to a helper class in the next code review
const generatePrompt = (topic) => {
  return `Write an blog post about "${topic}", it should in HTML format, include 5 unique points, using informative tone.`;
};
// Use the generateText method to generate text from the OpenAI API and passing the generated prompt, the model and max token value
await openAI
  .generateText(generatePrompt(topic), model, 800)
  .then((text) => {
    // Logging the generated text to the console
    // In the future, this will be replaced to upload the returned blog text to a WordPress site using the WordPress REST API
    console.log(text);
  })
  .catch((error) => {
    console.error(error);
  });
In index.js, we brought in our OpenAI class and made a new instance of it by giving it the OPENAI_KEY. We kept our API Key in the .env file so it stays safe.
Then, we created the topic constant that we’ll use to make our final query prompt by passing it into the generatePrompt method.
Finally, we run the generateText method by passing in all the necessary parameters and we log the returned blog content in HTML format in the console.
[Running] node "d:\Work\wordpress\JavaScript Guide\wordpress-automation\index.js"
request cost: 617 tokens
<h1>5 Reasons To Use Node.js for Your Next Web Development Project</h1>
<p>Node.js has quickly become one of the most popular JavaScript frameworks for web development. Node.js is an open-source, cross-platform runtime environment for server-side and networking applications. It's a powerful tool to use when building dynamic web applications.</p>
<p>Here are 5 reasons why you should consider using Node.js for your next web development project.</p>
<h2>1. Speed and Scalability</h2>
<p>Node.js is known for it's speed and scalability. By using the JavaScript runtime environment, applications can be written in a single language to run on both the client and server-side. This makes it easier to develop and debug applications, as well as providing better performance than other server-side languages.</p>
<h2>2. Modular Architecture</h2>
<p>Node.js uses a modular architecture where code can be divided into reusable components. This makes it easier to develop complex applications, as well as making them more maintainable and scalable. Node.js modules are also extensively used in the development of web servers and other server-side applications.</p>
<h2>3. Easy to Learn</h2>
<p>Node.js is an easier language to learn than traditional server-side languages. Because it's based on JavaScript, developers who are familiar with JavaScript will find it more intuitive to use than other server-side languages. Additionally, Node.js comes with a large library of useful modules that makes developing complex applications much easier.</p>
<h2>4. Support for Multiple Platforms</h2>
<p>Node.js is supported on multiple platforms including Windows, Linux, and Mac OS. This makes it easier to develop applications that can be used on different operating systems, and it also makes it easier to share code with other developers who may have different systems.</p>
<h2>5. Community Support</h2>
<p>Node.js has a large community of developers who are willing to share their knowledge and expertise. This makes it easier to get help or find solutions to any problems that may arise during the development process. Additionally, the Node.js community is constantly developing new modules to help make development easier and faster.</p>
<p>If you're looking for an efficient and powerful web development solution, then Node.js is a great choice. With its speed, scalability, and modular architecture, Node.js is capable of creating powerful, dynamic web applications. Additionally, its support for multiple platforms, as well as its large community, make it a great choice for developers of all levels.</p>
[Done] exited with code=0 in 22.579 seconds
With just a few lines of code, We used the OpenAI API’s Completion endpoint and the davinci model to generate this blog post in HTML format. It’s incredibly straightforward.
Conclusion
Integrating the OpenAI API with Node.js is a straightforward process that requires only a few lines of JavaScript code and the OpenAI package. While some familiarity with JavaScript is necessary, the OpenAI API documentation provides comprehensive guidance to help you gain a deeper understanding of the API. With these tools at your disposal, you can unleash your creativity and develop your next great AI project.
Further Readings
Official Documentaions
- OpenAI API documentation
- OpenAI Node.js library GitHub repository
Comments
Loading comments…