 We will use all Kafka APIs
Hey all, in this article we are going to cover basics of hands on with Kafka, using NestJS as our Typescript based backend of choice.
As usual, if you don't want to read but see the source code… in the end of article you will find my git repository with everything set.
If you are new here, I am using Medium to write about some random software engineering contents, specially with Typescript. Recently I added some tutorials about both GraphQL and REST API's with NestJS. In this article I will try to skip some of REST/GraphQL to focus on Kafka and NestJS.
Before moving forward, is required to know the basics of Docker, Node.js and Typescript/Javascript in order to follow the practical guide without having much issues. GraphQL Back-End in Node.js Made Easy with NestJS *In this article, I will show you how to start a GraphQL back-end project in a very, very, very easy way…using NestJS!*javascript.plainenglish.io
Cool, so what is Kafka?
Before going to the hands on, a brief explanation is always valid. We use Kafka but the formal way would be Apache Kafka which is a framework implementation of software bus that uses stream processing, and it's open source. Wikipedia gives a more detailed explanation here.
Trying to abstract the explanation, you can think about a way that you can send messages to specific places where you “don't care” who will receive it, if they will ever receive. These specific places that you put messages are called topics and you can think that when you are adding a message there then you are being a producer and whoever will take this information can be considered a **consumer. **This process can allow several of millions of consumers to somehow get a message that was sent.
The process is completely asynchronous and contains five major API's that are:
-
Producer: responsible to create messages
-
Consumer: responsible to… consume messages
-
Connector: can “reuse” both Producer/Consumer API and link topics
-
Streams: responsible to convert inputs to output result
-
Admin: used to manage Kafka topics.
We could take hundred of hours just to go deeper on what, why and how Kafka is interesting but for now we will focus on using it in a short real life example.
Want to see who also uses Kafka? What about ~80% of all Fortune 100 companies?
For using Kafka, you are in a luck! You don't need to do much to make it up and running. With help of Docker you will be able to use my sample to run a docker command that setup all the required servers, and including a dashboard tool to facilitate our process.
Shall we start?
Before getting the hands on, we must make sure that we have a Kafka configured and up and running. Make sure to have Docker in your computer before moving forward. Since we are going to use NestJS, I will use a folder called nestjs-kafka-tutorial that will contain my github project to be shared. So, in your working folder, let's first create a file that will allow us to run what we need to run, called docker-compose.yml, containing the following:
version: '2'
services:
  zookeeper:
    image: confluentinc/cp-zookeeper:latest
    environment:
      ZOOKEEPER_CLIENT_PORT: 2181
      ZOOKEEPER_TICK_TIME: 2000
    ports:
      - 22181:2181

  kafka:
    image: confluentinc/cp-kafka:latest
    depends_on:
      - zookeeper
    ports:
      - 29092:29092
    environment:
      KAFKA_BROKER_ID: 1
      KAFKA_ZOOKEEPER_CONNECT: zookeeper:2181
      KAFKA_ADVERTISED_LISTENERS: PLAINTEXT://kafka:9092,PLAINTEXT_HOST://localhost:29092
      KAFKA_LISTENER_SECURITY_PROTOCOL_MAP: PLAINTEXT:PLAINTEXT,PLAINTEXT_HOST:PLAINTEXT
      KAFKA_INTER_BROKER_LISTENER_NAME: PLAINTEXT
      KAFKA_OFFSETS_TOPIC_REPLICATION_FACTOR: 1

  kafka_ui:
    image: provectuslabs/kafka-ui:latest
    depends_on:
      - kafka
    ports:
      - 8080:8080
    environment:
      KAFKA_CLUSTERS_0_ZOOKEEPER: zookeeper:2181
      KAFKA_CLUSTERS_0_NAME: local
      KAFKA_CLUSTERS_0_BOOTSTRAPSERVERS: kafka:9092
In short, we are running a required server, brokers that will be orchestrated and an UI tool. The images that are there were found as free to use over the internet and at the moment I am writing this article are still free to use.
Having that, we can run the following command in your root folder:
docker compose up -d
That will reflect in something like:
➜  nestjs-kafka-tutorial git:(main) ✗ docker compose up -d
[+] Running 4/4
 ⠿ Network nestjs-kafka-tutorial_default        Created                                                                                                                                                     0.1s
 ⠿ Container nestjs-kafka-tutorial_zookeeper_1  Started                                                                                                                                                     0.6s
 ⠿ Container nestjs-kafka-tutorial_kafka_1      Started                                                                                                                                                     1.5s
 ⠿ Container nestjs-kafka-tutorial_kafka_ui_1   Started                                                                                                                                                     2.4s
➜  nestjs-kafka-tutorial git:(main) ✗
If will detach from the terminal (it will run in the background) and will “magically” start the Kafka for you. To see if its working, you can just open the http://localhost:8080/ and will expect the following:
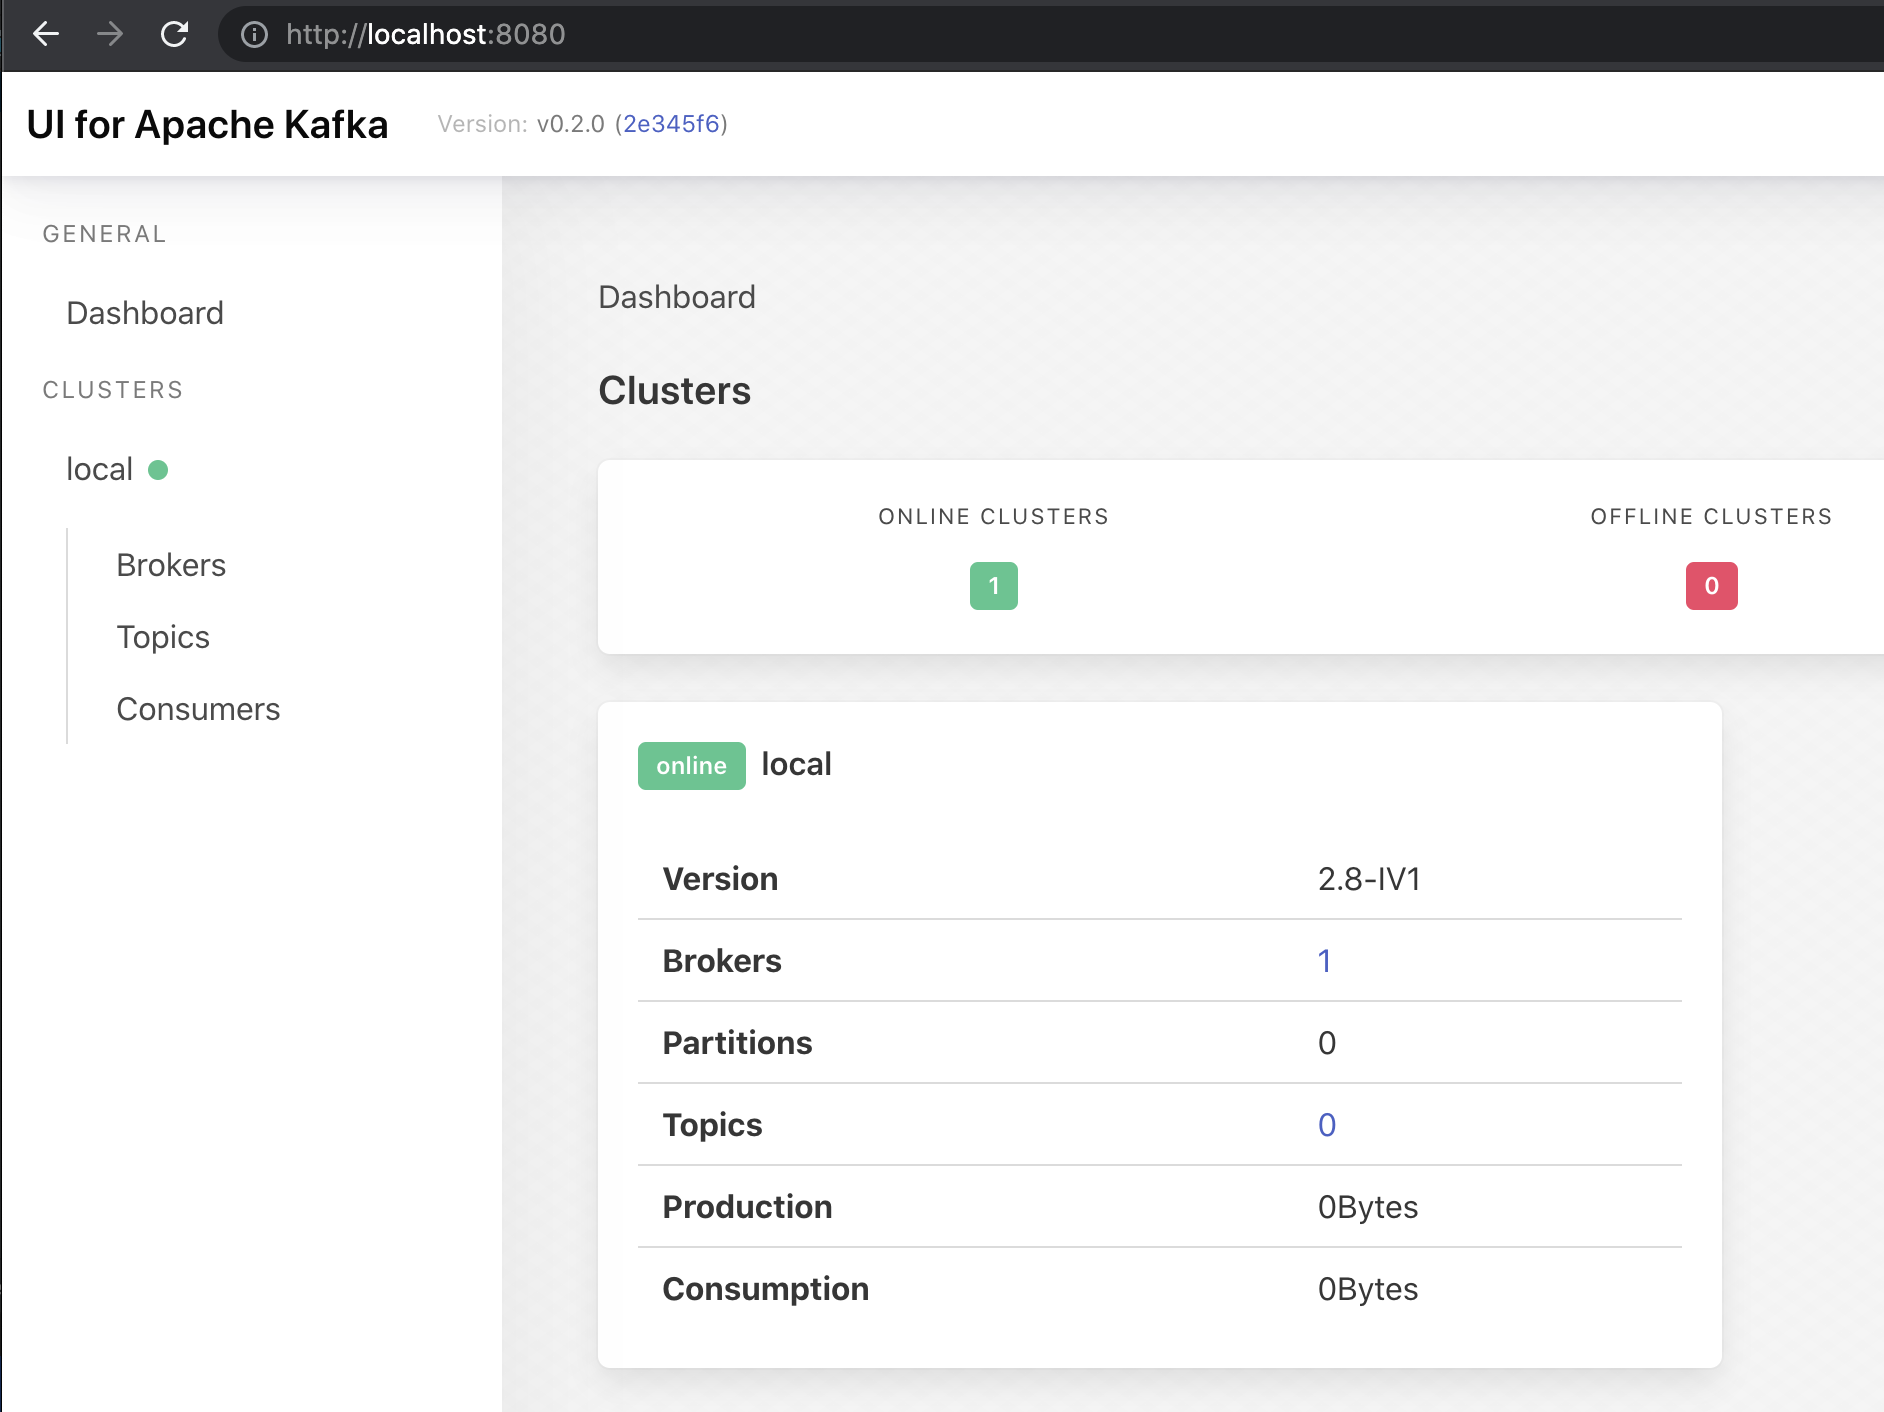 UI for Apache Kafka using the docker compose file
If you have the online cluster, you are good to go!
Let's just test if we can “play” with Kafka. Let's create a topic in the topic button, following by add a topic:
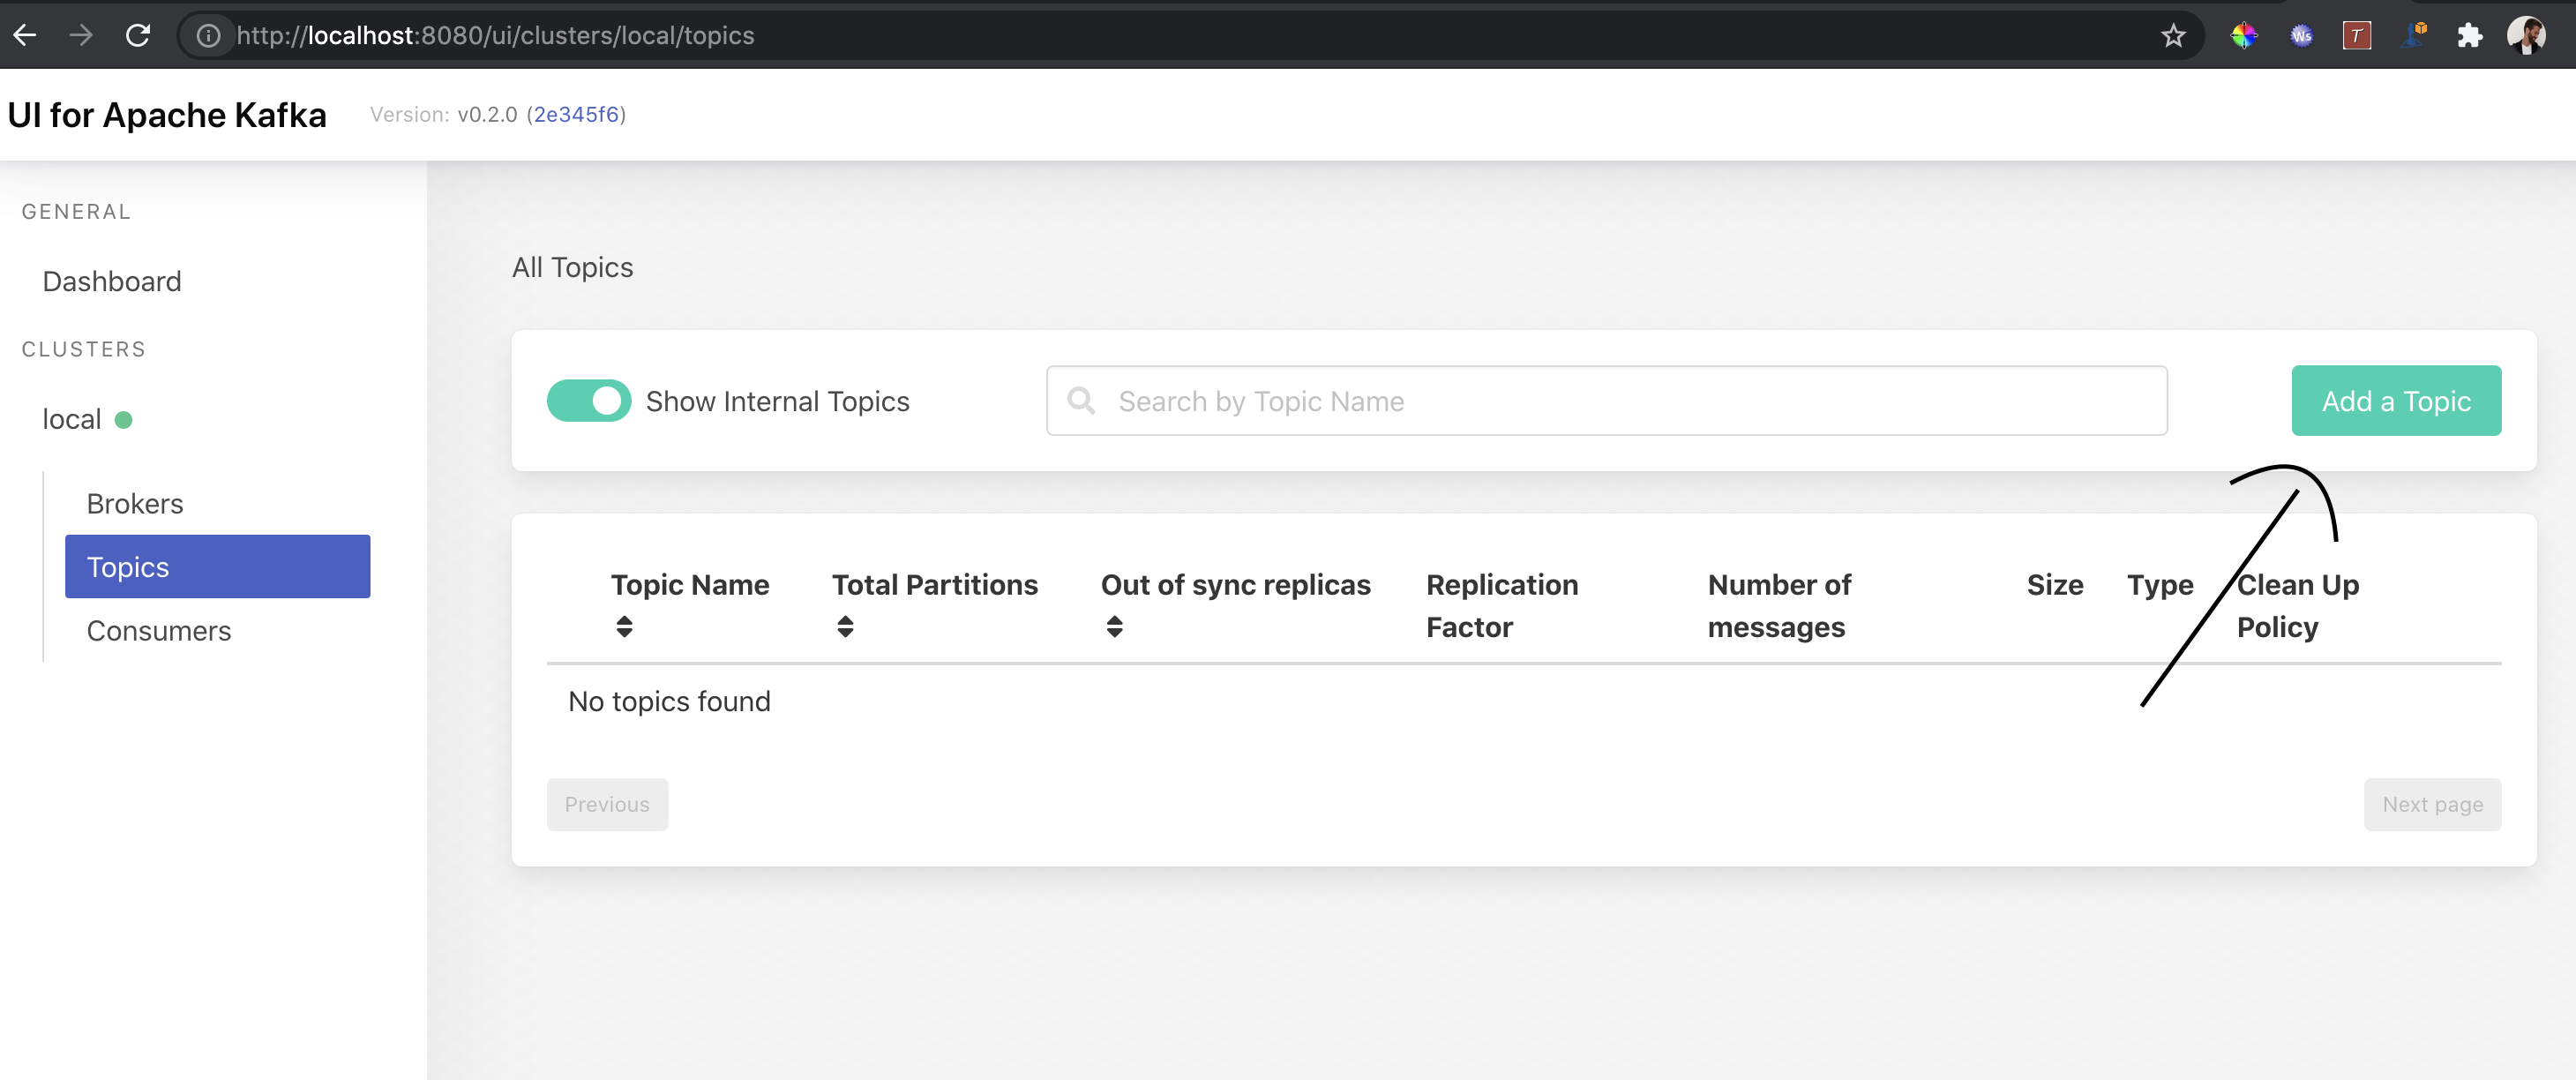 Adding a topic…
Now we can create a new topic by any name (would recommend to search for naming pattern though):
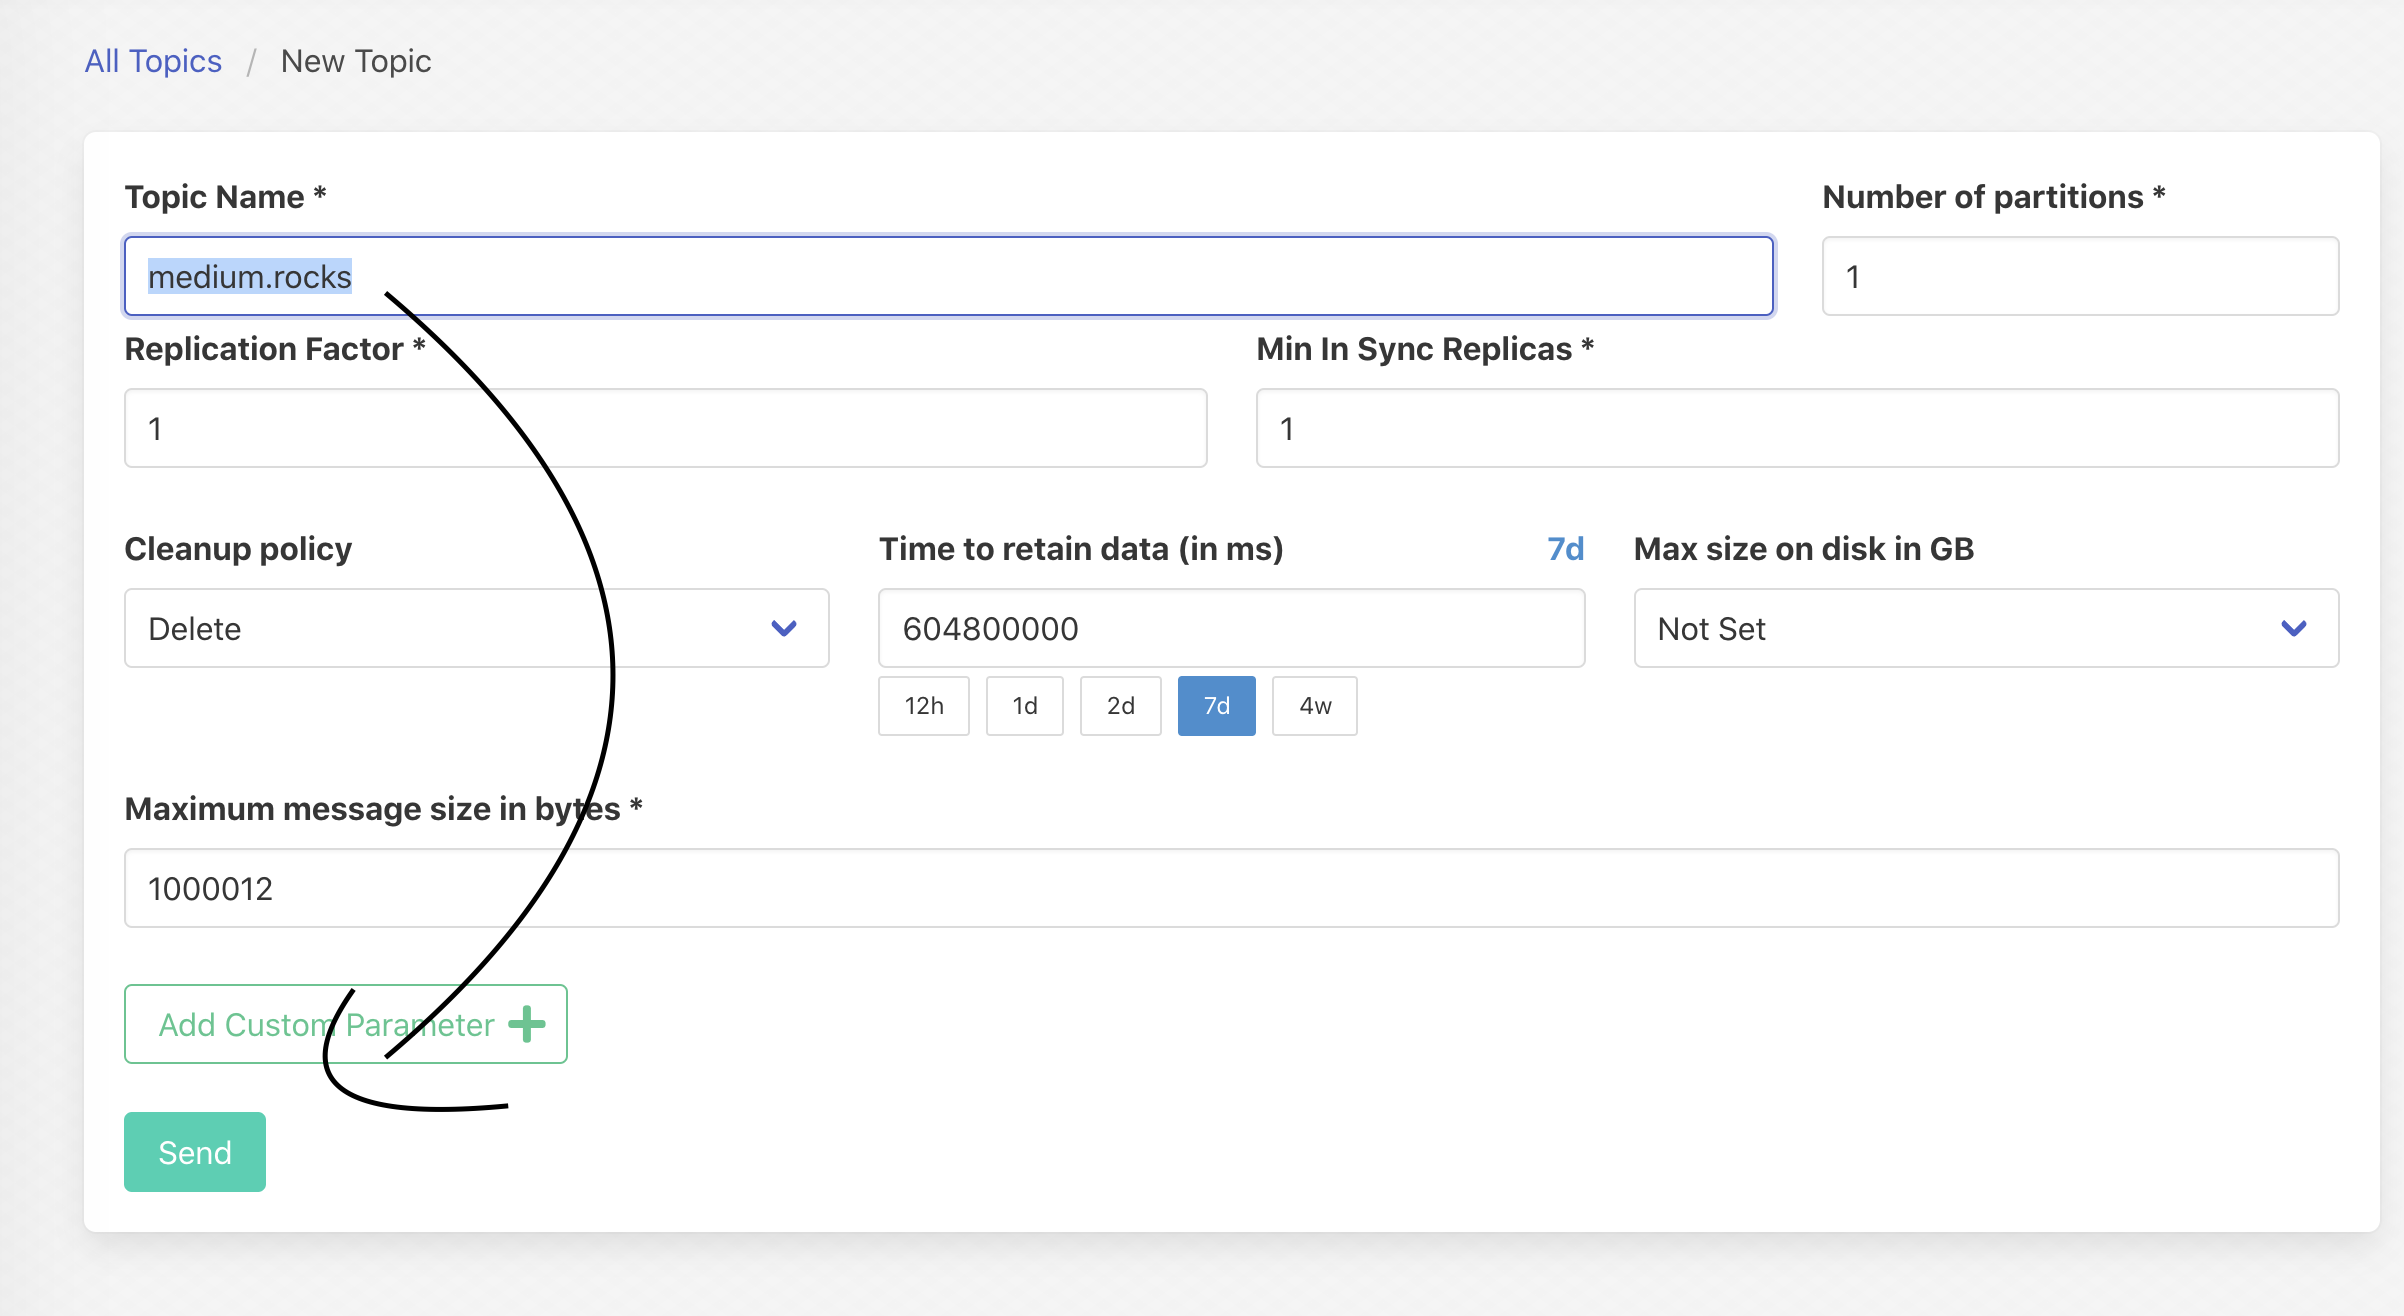 Creating a medium.rocks topic
With that set we are allowed to send messages to a topic called “medum.rocks”. Now, to send a message using the dashboard we can do the following:
- Click on Produce message
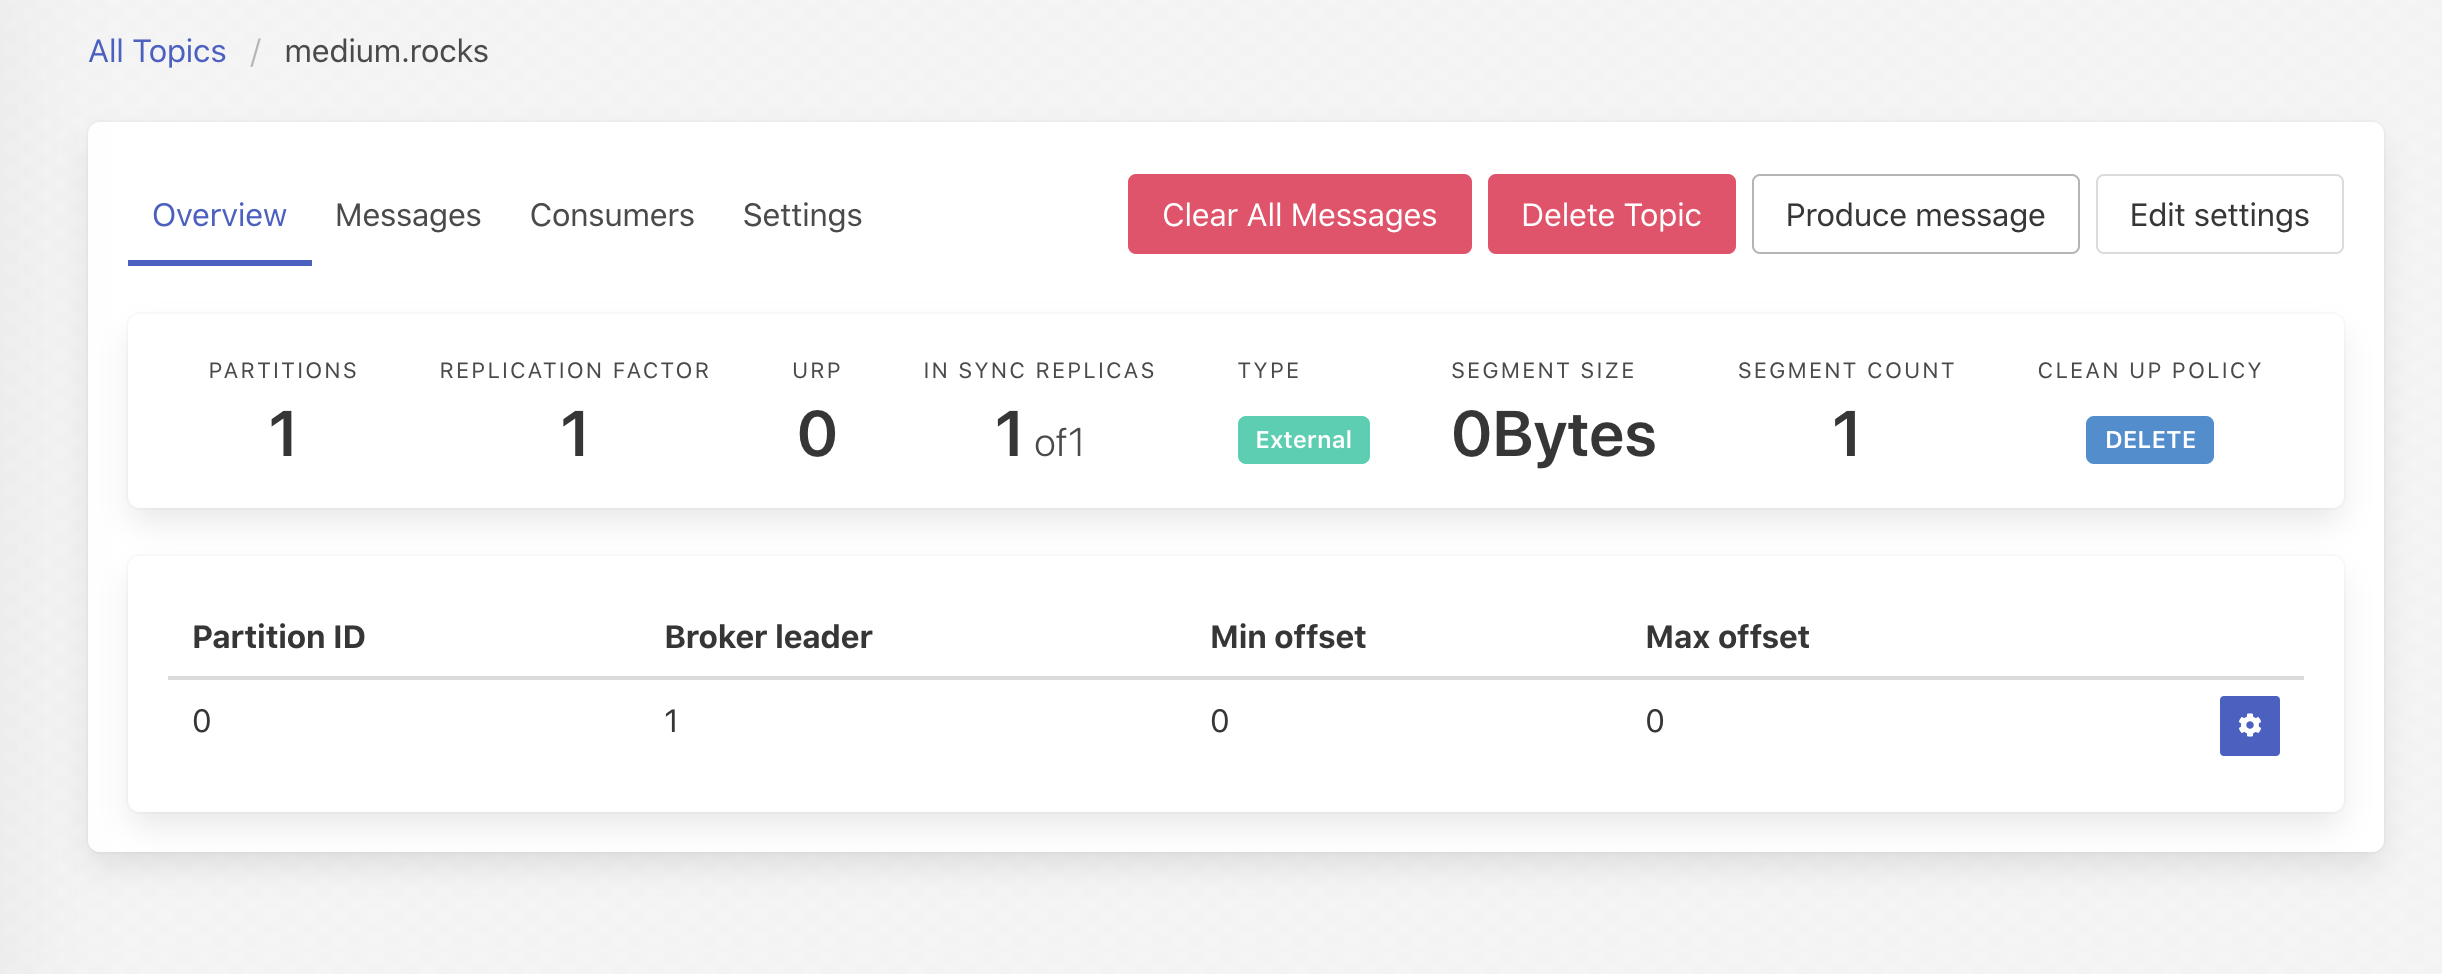
- Add key and content and send
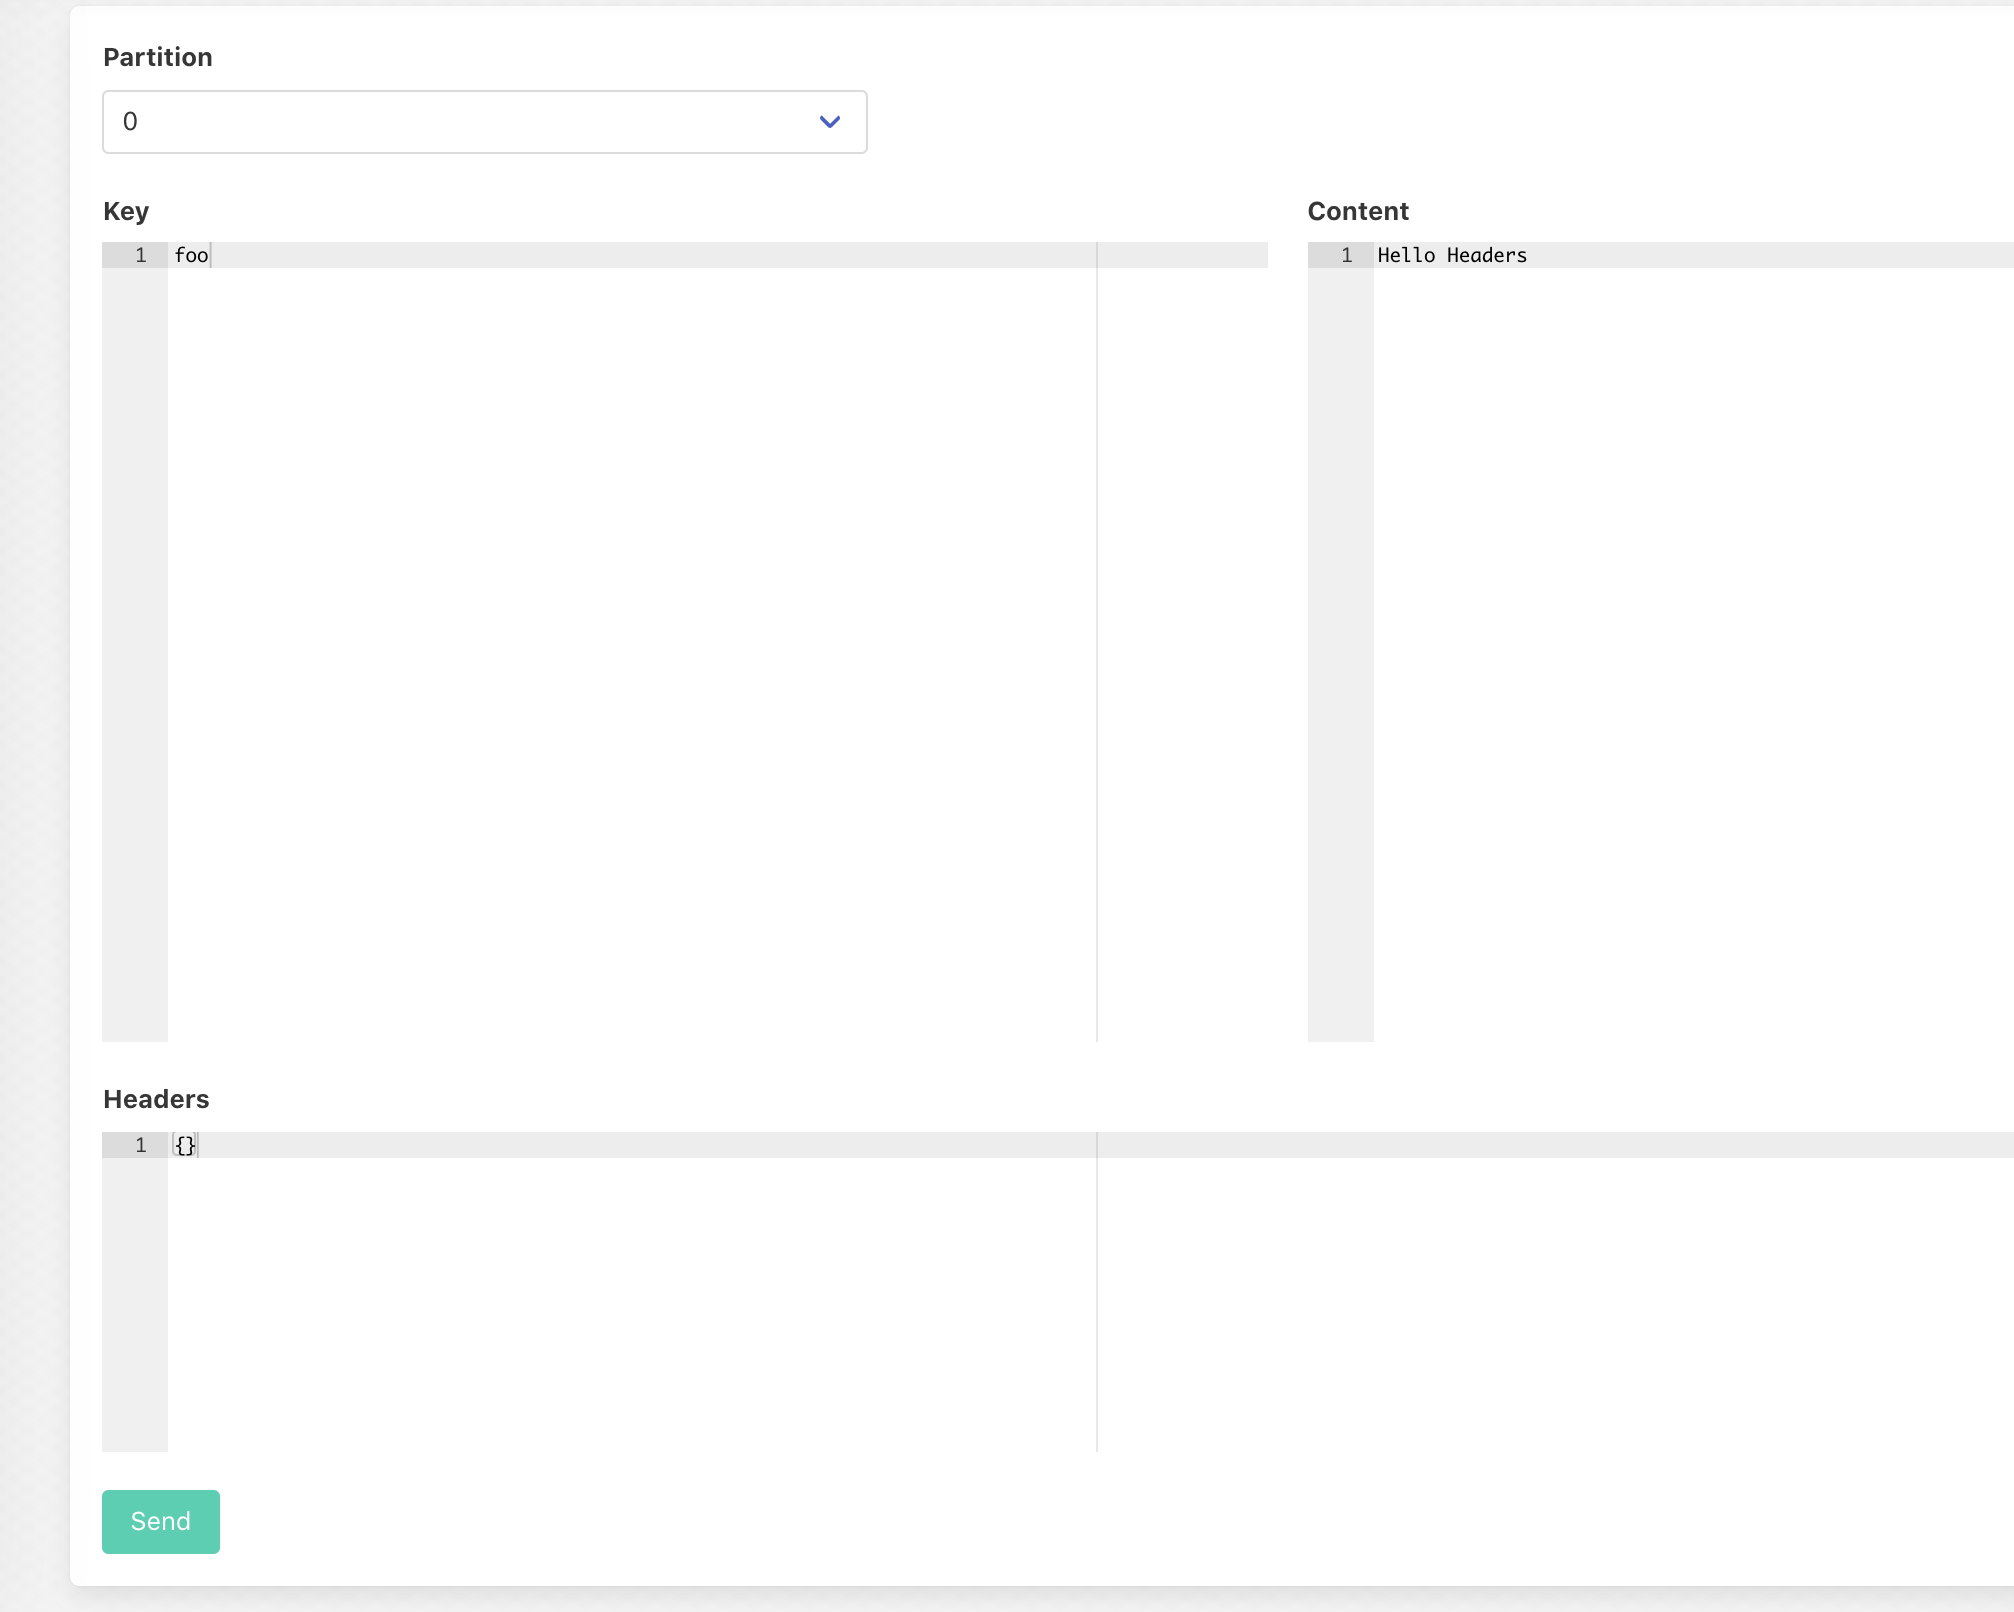
If you refresh your browser you will see the following:
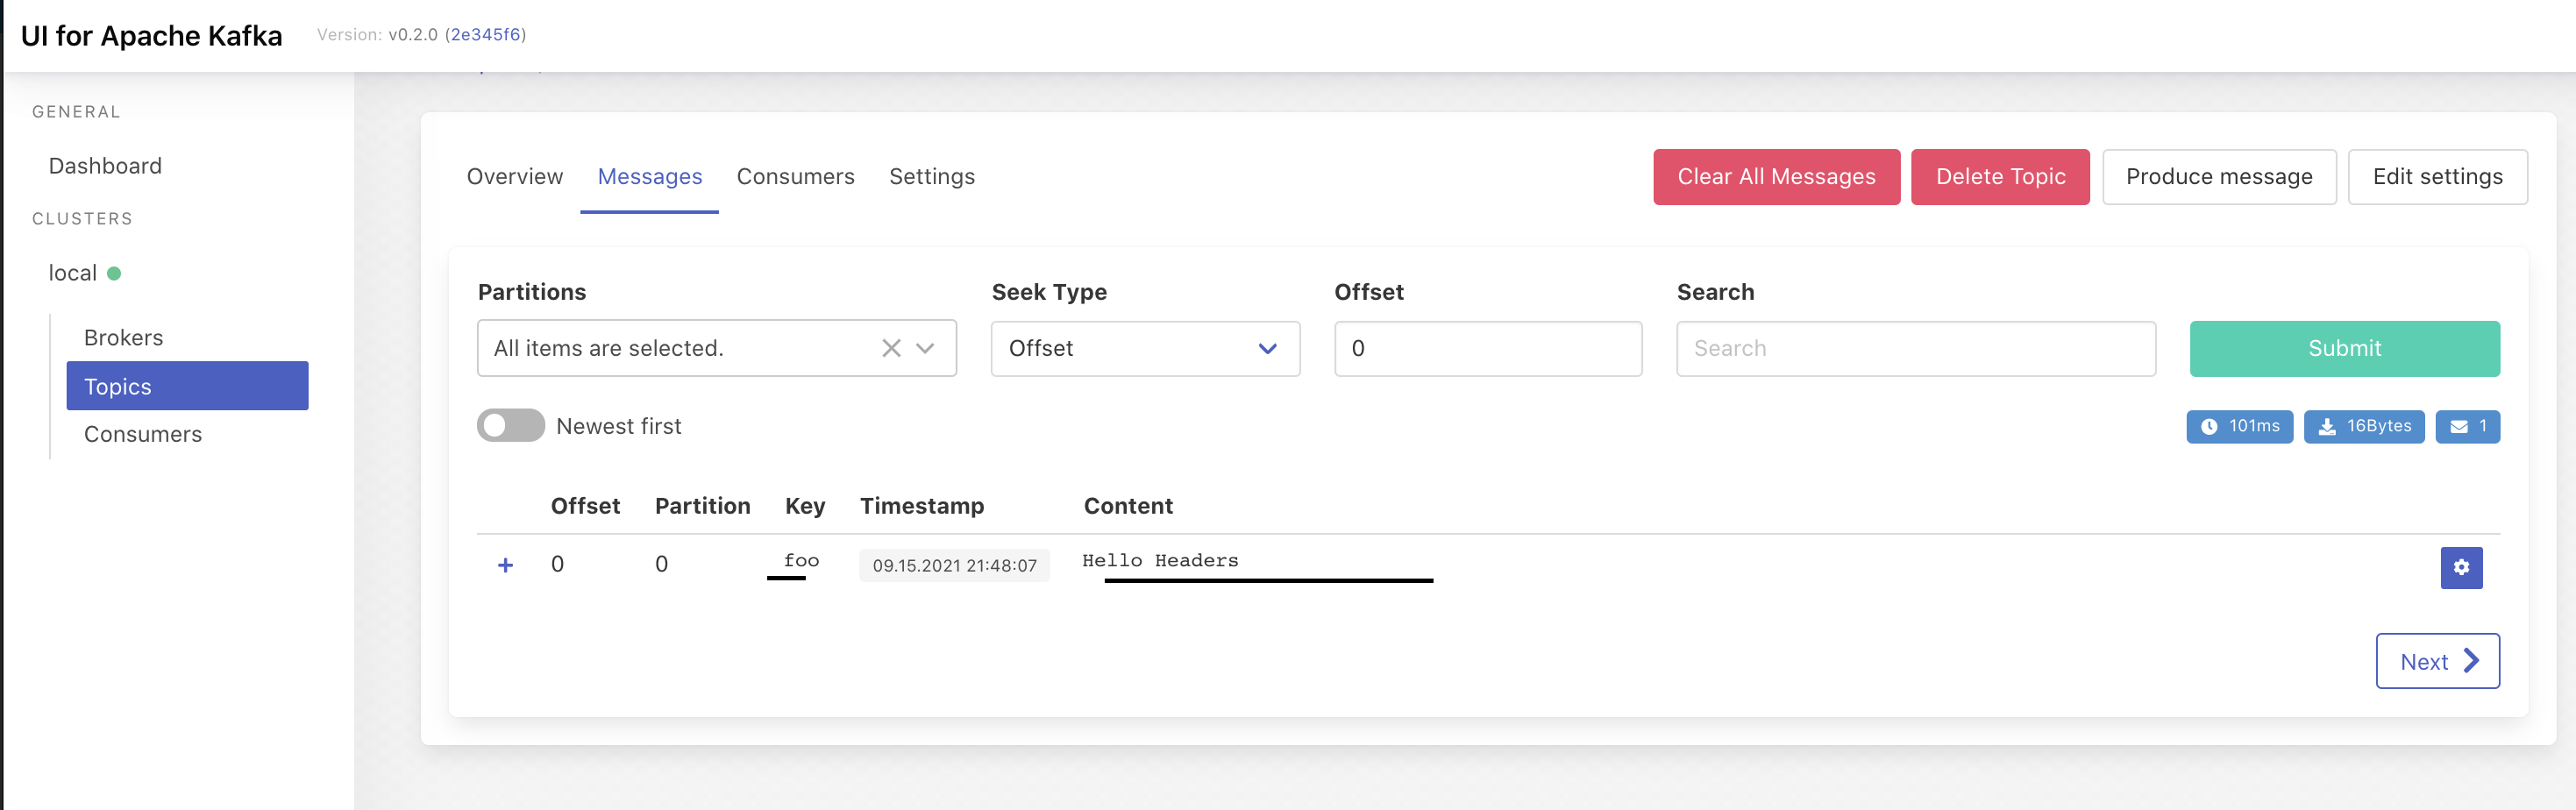
If you have this done and working, we are good to go for CODING! And don't worry, in this article we are going to share JSON content over STRING or anything else. After all, we are love Typescript isn't it?
Let's do NestJS! NestJS is an extremely scalable framework that by default uses ExpressJS under the hood for supporting building API's. It supports building both monolithic and non monolithic API's. For shorting this article, I will create two mini projects in my git repo that one will contain the Producer project and another the Consumer one. I might go back in another article to just go over the micro services configuration and scaffolding but this one we will make Kafka to work!
So, make sure to install their CLI:
npm i -g @nestjs/cli
In our root folder, let's create the Producer API!
nest new producer
I will use yarn as a package manager but feel free to use whatever you want:
**nestjs-kafka-tutorial** **git:(main)** nest new producer

⚡  We will scaffold your app in a few seconds..

CREATE producer/.eslintrc.js (631 bytes)

CREATE producer/.prettierrc (51 bytes)

CREATE producer/README.md (3339 bytes)

CREATE producer/nest-cli.json (64 bytes)

CREATE producer/package.json (1964 bytes)

CREATE producer/tsconfig.build.json (97 bytes)

CREATE producer/tsconfig.json (365 bytes)

CREATE producer/src/app.controller.spec.ts (617 bytes)

CREATE producer/src/app.controller.ts (274 bytes)

CREATE producer/src/app.module.ts (249 bytes)

CREATE producer/src/app.service.ts (142 bytes)

CREATE producer/src/main.ts (208 bytes)

CREATE producer/test/app.e2e-spec.ts (630 bytes)

CREATE producer/test/jest-e2e.json (183 bytes)

? **Which package manager would you ❤️  to use?** yarn

✔ Installation in progress... ☕

🚀  Successfully created project producer

👉  Get started with the following commands:

$ cd producer

$ yarn run start

Thanks for installing Nest 🙏

Please consider donating to our open collective

to help us maintain this package.

**🍷  Donate:** https://opencollective.com/nest
That should be enough to have the basic NestJS project scaffolded. The basic scaffolding of a NestJS project gives a minimum configuration with a REST endpoint set, running on port 3000. For this part, make sure in your terminal you are working inside the folder called ‘producer'.
Before doing anything inside of the producer, remove the .git folder and .gitignore since in this project we already have the .git in our root and we are avoiding to overkill on configuration and NOT talk about Kafka.
nestjs-kafka-tutorial git:(main) ✗ cd producer
producer git:(master) ✗ rm -rf .git
➜  producer git:(main) ✗
➜  producer git:(main) ✗ rm -rf .gitignore
➜  producer git:(main) ✗
We now need to add the Kafka and microservice module.
Adding the kafkajs is simple as:
yarn add kafkajs
Response will be something like:
**➜  producer** **git:(main) ✗** yarn add kafkajs

**yarn add v1.22.10**

warning ../../../package.json: No license field

[1/4] 🔍  Resolving packages...

[2/4] 🚚  Fetching packages...

[3/4] 🔗  Linking dependencies...

warning " > ts-loader@9.2.5" has unmet peer dependency "webpack@^5.0.0".

[4/4] 🔨  Building fresh packages...

success Saved lockfile.

success Saved 1 new dependency.

info Direct dependencies

└─ kafkajs@1.15.0

info All dependencies

└─ kafkajs@1.15.0

✨  Done in 3.61s.
Now the microservice module:
yarn add @nestjs/microservices
It will be something like:
**➜  producer** **git:(main) ✗** yarn add @nestjs/microservices

**yarn add v1.22.10**

warning ../../../package.json: No license field

[1/4] 🔍  Resolving packages...

[2/4] 🚚  Fetching packages...

[3/4] 🔗  Linking dependencies...

warning " > ts-loader@9.2.5" has unmet peer dependency "webpack@^5.0.0".

[4/4] 🔨  Building fresh packages...

success Saved lockfile.

success Saved 2 new dependencies.

info Direct dependencies

└─ @nestjs/microservices@8.0.6

info All dependencies

├─ @nestjs/microservices@8.0.6

└─ json-socket@0.3.0

✨  Done in 5.07s.

**➜  producer** **git:(main) ✗**
Cool, we have the minimum to do something for our Producer!
Now, using our app.module.ts that is our main module of the NestJS app, we can configure the Kafka module like the following:
import { Module } from '@nestjs/common';
import { AppController } from './app.controller';
import { AppService } from './app.service';
import {ClientsModule, Transport} from '@nestjs/microservices';

@Module({
  imports: [
    ClientsModule.*register*([
      {
        name: 'any_name_i_want',
        transport: Transport.*KAFKA*,
        options: {
          client: {
            clientId: 'any_client_id_i_want',
            brokers: ['localhost:29092'],
          },
          consumer: {
            groupId: 'an_unique_string_id',
          },
        },
      },
    ]),
  ],
  controllers: [AppController],
  providers: [AppService],
})
export class AppModule {}
Again, I am avoiding but it is 100% recommended to move any hard code configuration string to a .env file in order to facilitate running the same project in different environments. Besides that, the main important thing here is:
brokers: ['localhost:29092'],
This port 29092 and localhost was set in our docker-compose.yml. In a real scenario, you should change this URL to your stage/production one, and again… use a .env file to set it up else you will be coding more than you should.
Let's just run the app to see if we have any errors on adding the Kafka Module:
➜  producer git:(main) ✗ yarn start
yarn run v1.22.10
warning ../../../package.json: No license field
$ nest start
[Nest] 14895  - 09/15/2021, 10:09:16 PM     LOG [NestFactory] Starting Nest application...
[Nest] 14895  - 09/15/2021, 10:09:16 PM     LOG [InstanceLoader] ClientsModule dependencies initialized +27ms
[Nest] 14895  - 09/15/2021, 10:09:16 PM     LOG [InstanceLoader] AppModule dependencies initialized +0ms
[Nest] 14895  - 09/15/2021, 10:09:16 PM     LOG [RoutesResolver] AppController {/}: +4ms
[Nest] 14895  - 09/15/2021, 10:09:16 PM     LOG [RouterExplorer] Mapped {/, GET} route +2ms
[Nest] 14895  - 09/15/2021, 10:09:16 PM     LOG [NestApplication] Nest application successfully started +1ms
Seems all good! With the ClientsModule we can inject a Kafka Client in our controller! Let's do this now:
To use a kafka client, please go to your src/app.controller.ts.
It contains for the scaffolding the following:
import { Controller, ***Get ***} from '@nestjs/common';
import { AppService } from './app.service';

@Controller()
export class AppController {
  constructor(private readonly appService: AppService) {}

  @Get()
  getHello(): string {
    return this.appService.getHello();
  }
}
In the constructor we can add the kafka client as easy as:
import { Controller, ***Get***, Inject } from '@nestjs/common';
import { AppService } from './app.service';
import { ClientKafka } from '@nestjs/microservices';

@Controller()
export class AppController {
  constructor(
    private readonly appService: AppService,
    @Inject('any_name_i_want') private readonly client: ClientKafka,
  ) {}

  @Get()
  getHello(): string {
    return this.appService.getHello();
  }
}
The only thing here that looks odd is the ‘any_name_i_want'. This variable should be the same you set on your client module, which is already duplicating code and another reason to have it on your .env.
Cool, now adding a random ‘get' request called ‘kafka-test' that you cannot ever say its a REST endpoint:
import { Controller, ***Get***, Inject } from '@nestjs/common';
import { AppService } from './app.service';
import { ClientKafka } from '@nestjs/microservices';

@Controller()
export class AppController {
  constructor(
    private readonly appService: AppService,
    @Inject('any_name_i_want') private readonly client: ClientKafka,
  ) {}

  @Get()
  getHello(): string {
    return this.appService.getHello();
  }

  @Get('kafka-test')
  testKafka(){
    return this.client.emit('medium.rocks', {foo:'bar'})
  }
}
When you hit a get to localhost:3000/kafka-test, the app will try to emit a JSON message to the topic that we created before which is called ‘medium.rocks'. I used Postman to test but you can do a cURL like this:
curl --location --request GET 'http://localhost:3000/kafka-test'
You will receive something like:
[

{

"topicName": "medium.rocks",

"partition": 0,

"errorCode": 0,

"baseOffset": "2",

"logAppendTime": "-1",

"logStartOffset": "0"

}

]
This will be just confirming that you send over the message you wanted.
Going back to the kafka dashboard that we talked before, you can refresh the browser and see the following:
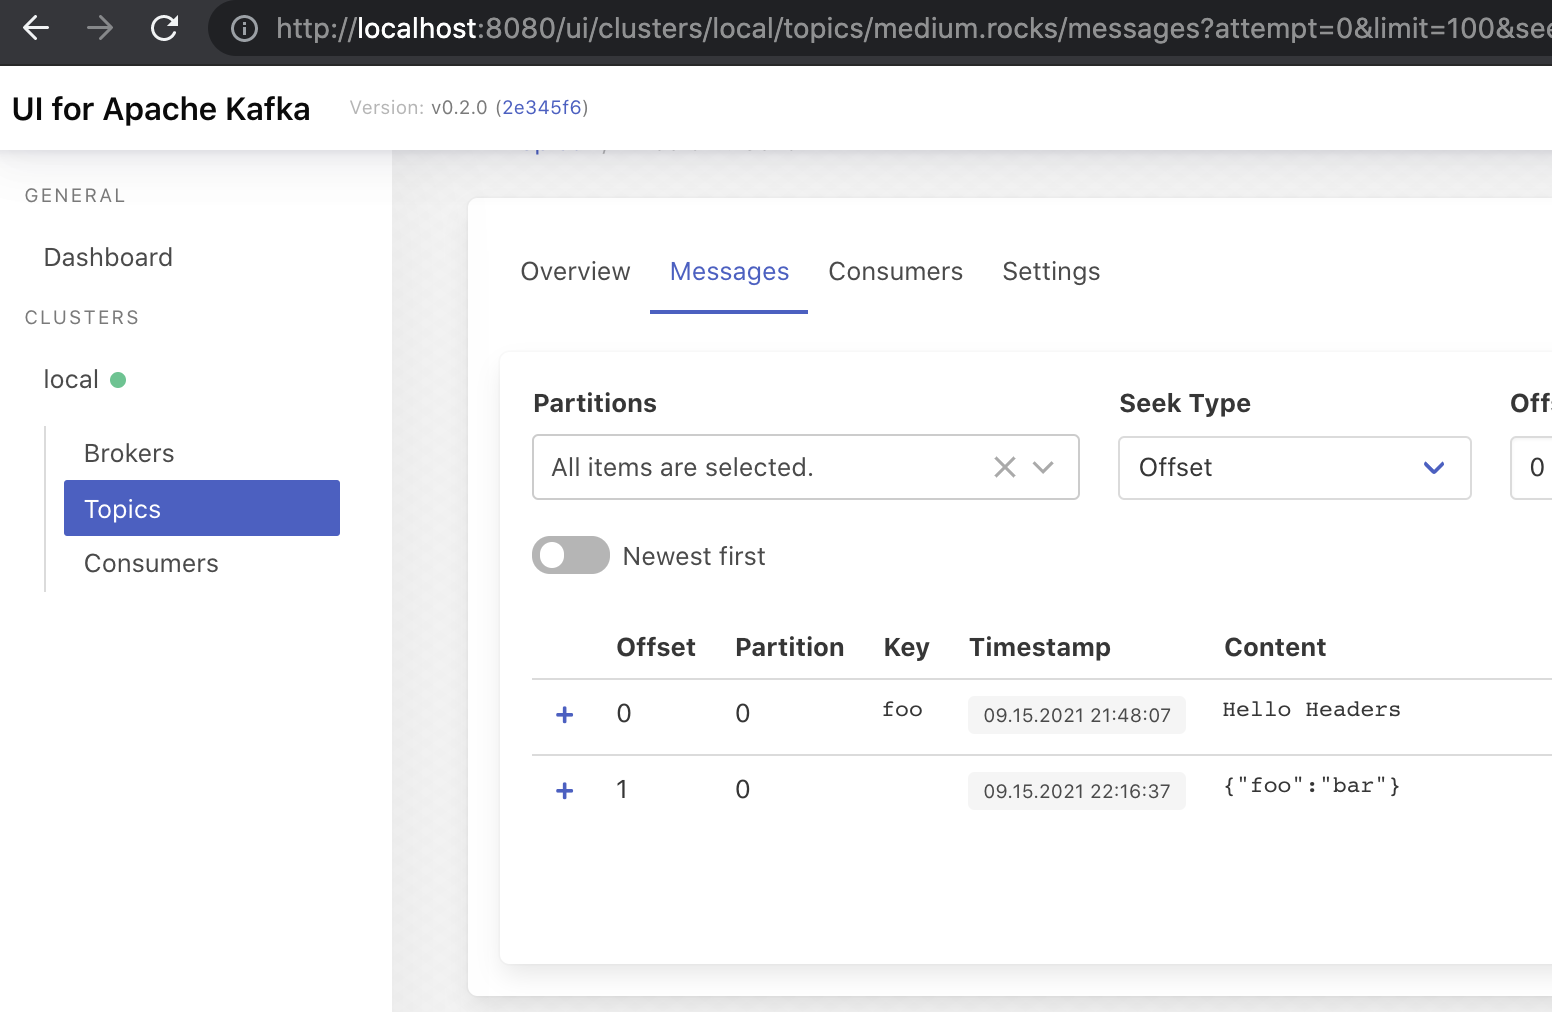
Now you have the foo/bar content there and another benefit of Kafka… a Consumer doesn't need to read your message in real time. I won't go deep in this but you can configure a consumer to read from a specific point or only from “real time messages”, which creates a lot of possibilities for you as a software engineer.
For a beginner, we are over with the producer. Now we go create a consumer and as a bonus I want to show a way to do the classical “request/response” approach that sometimes makes sense to use when communicating between kafkas.
To create a consumer, we will follow exactly the same NestJS scaffolding… So going back to our root folder:
nest new consumer
Response as producer:
**➜  nestjs-kafka-tutorial** **git:(main) ✗** nest new consumer

⚡  We will scaffold your app in a few seconds..

CREATE consumer/.eslintrc.js (631 bytes)

CREATE consumer/.prettierrc (51 bytes)

CREATE consumer/README.md (3339 bytes)

CREATE consumer/nest-cli.json (64 bytes)

CREATE consumer/package.json (1964 bytes)

CREATE consumer/tsconfig.build.json (97 bytes)

CREATE consumer/tsconfig.json (365 bytes)

CREATE consumer/src/app.controller.spec.ts (617 bytes)

CREATE consumer/src/app.controller.ts (274 bytes)

CREATE consumer/src/app.module.ts (249 bytes)

CREATE consumer/src/app.service.ts (142 bytes)

CREATE consumer/src/main.ts (208 bytes)

CREATE consumer/test/app.e2e-spec.ts (630 bytes)

CREATE consumer/test/jest-e2e.json (183 bytes)

? **Which package manager would you ❤️  to use?** yarn

✔ Installation in progress... ☕

🚀  Successfully created project consumer

👉  Get started with the following commands:

$ cd consumer

$ yarn run start

Thanks for installing Nest 🙏

Please consider donating to our open collective

to help us maintain this package.

**🍷  Donate:** https://opencollective.com/nest

**➜  nestjs-kafka-tutorial** **git:(main) ✗**
Now opening the consumer folder and removing the .git and .gitignore for the sake of this article:
**➜  nestjs-kafka-tutorial** **git:(main) ✗** cd consumer

**➜  consumer** **git:(master) ✗** rm -rf .git .gitignore
Installing kafkajs and microservice module from NestJS:
**➜  consumer** **git:(main) ✗** yarn add @nestjs/microservices kafkajs

**yarn add v1.22.10**

warning ../../../package.json: No license field

[1/4] 🔍  Resolving packages...

[2/4] 🚚  Fetching packages...

[3/4] 🔗  Linking dependencies...

warning " > ts-loader@9.2.5" has unmet peer dependency "webpack@^5.0.0".

[4/4] 🔨  Building fresh packages...

success Saved lockfile.

success Saved 3 new dependencies.

info Direct dependencies

├─ @nestjs/microservices@8.0.6

└─ kafkajs@1.15.0

info All dependencies

├─ @nestjs/microservices@8.0.6

├─ json-socket@0.3.0

└─ kafkajs@1.15.0

✨  Done in 6.53s.

**➜  consumer** **git:(main) ✗**
Now, opening the consumer/src/app.module.ts:
import { Module } from '@nestjs/common';
import { AppController } from './app.controller';
import { AppService } from './app.service';
import { ClientsModule, Transport } from '@nestjs/microservices';

@Module({
  imports: [
    ClientsModule.*register*([
      {
        name: 'any_name_i_want',
        transport: Transport.*KAFKA*,
        options: {
          client: {
            clientId: 'any_client_id_i_want',
            brokers: ['localhost:29092'],
          },
          consumer: {
            groupId: 'an_unique_string_id',
          },
        },
      },
    ]),
  ],
  controllers: [AppController],
  providers: [AppService],
})
export class AppModule {}
Again… This article is just to show how to use Kafka in Typescript, with NestJS. Please do not ever use hardcoded configuration in your projects. Use at least a .env instead.
Everything looks the same, right? But, for a consumer we need to change the main.ts file and allow us to be consuming the messages. To do that we will update the main.ts with:
import { ***NestFactory ***} from '@nestjs/core';
import { AppModule } from './app.module';
import {MicroserviceOptions, Transport} from '@nestjs/microservices';

async function bootstrap() {
  const app = await ***NestFactory***.createMicroservice<MicroserviceOptions>(
    AppModule,
    {
      transport: Transport.*KAFKA*,
      options: {
        client: {
          brokers: ['localhost:29092'],
        },
      },
    },
  );
  await app.listen();
}
bootstrap();
I already said a lot but see that brokers could be using a .env file… That is your homework
Now we are finally going to configure the consumer… We will refactor the scaffolding and listen to the “medium.rocks” topic. To do this, in our app.controller.ts let's refactor with:
import {Controller} from '@nestjs/common';
import {
  ***Ctx***,
  KafkaContext,
  ***MessagePattern***,
  Payload,
} from '@nestjs/microservices';

@Controller()
export class AppController {
  constructor() {
  }

  @MessagePattern('medium.rocks')
  readMessage(@Payload() message: any, @Ctx() context: KafkaContext) {
    const originalMessage = context.getMessage();
    const response =
      `Receiving a new message from topic: medium.rocks: ` +
      ***JSON***.stringify(originalMessage.value);
    ***console***.log(response);
    return response;
  }
}
Now we have a function called readMessage that will try to read from time to time any message arriving from the topic called ‘medium.rocks', and if something happens it will log in our console.
Before testing, in the producer/src/app.controller.ts, I will be just adding a date in order to see the differences of messages that we are sending:
@Get('kafka-test')
testKafka(){
  return this.client.emit('medium.rocks', {foo:'bar', data: new ***Date***().toString()})
}
Please restart your producer before continuing.
Once the producer is restarted, in another tab please start the consumer with:
yarn start
You will see something like:
➜  consumer git:(main) ✗ yarn start
yarn run v1.22.10
warning ../../../package.json: No license field
$ nest start
[Nest] 16855  - 09/15/2021, 10:47:23 PM     LOG [NestFactory] Starting Nest application...
[Nest] 16855  - 09/15/2021, 10:47:23 PM     LOG [InstanceLoader] ClientsModule dependencies initialized +25ms
[Nest] 16855  - 09/15/2021, 10:47:23 PM     LOG [InstanceLoader] AppModule dependencies initialized +1ms
[Nest] 16855  - 09/15/2021, 10:47:23 PM     LOG [ServerKafka] INFO [Consumer] Starting {"timestamp":"2021-09-15T20:47:23.274Z","logger":"kafkajs","groupId":"nestjs-group-server"}
[Nest] 16855  - 09/15/2021, 10:47:26 PM     LOG [ServerKafka] INFO [ConsumerGroup] Consumer has joined the group {"timestamp":"2021-09-15T20:47:26.292Z","logger":"kafkajs","groupId":"nestjs-group-server","memberId":"nestjs-consumer-server-f20adf4c-dca8-4196-9a08-f33a88ae281f","leaderId":"nestjs-consumer-server-f20adf4c-dca8-4196-9a08-f33a88ae281f","isLeader":true,"memberAssignment":{"medium.rocks":[0]},"groupProtocol":"RoundRobinAssigner","duration":3017}
[Nest] 16855  - 09/15/2021, 10:47:26 PM     LOG [NestMicroservice] Nest microservice successfully started +5ms
Now we can cURL our producer again:
curl --location --request GET 'http://localhost:3000/kafka-test'
Once doing this, in your consumer tab you should be seeing something like:
[Nest] 16855  - 09/15/2021, 10:47:26 PM     LOG [NestMicroservice] Nest microservice successfully started +5ms
Receiving a new message from topic: medium.rocks: {"foo":"bar","data":"Wed Sep 15 2021 22:48:02 GMT+0200 (Central European Summer Time)"}
That's it. The extremely basic scenario is solved with NestJS! You can produce and consume messages from a Kafka server with two different applications!
With this approach you can handle the majority of async process between publishing messages to a specific topic and consuming them in order to process the information that was received.
Of course there are a whole new universe on micro-services to be learnt, as well of patterns on how to configure Kafka, how to name topics, how should we handle messages with Schema, versioning and so on… But, with this article at least you can get your hands on with a minimum knowledge of what's happening.
Before getting over with this huge beginners article, I would like to add a proof of concept for specific cases when you actually need to receive the response of a consumed Kafka message. Let's do this right now!
To try a request/response approach, which in several scenarios wouldn't be ideal but for others might make sense, NestJS allow us (under the hood) to receive a response from the consumer. It basically allow us to connect/disconnect into the same topic we are sending a message but finishing with .reply. In our case, we need a new topic called ‘medium.rocks.reply'. For that I am only going to create a new topic within our UI tool:
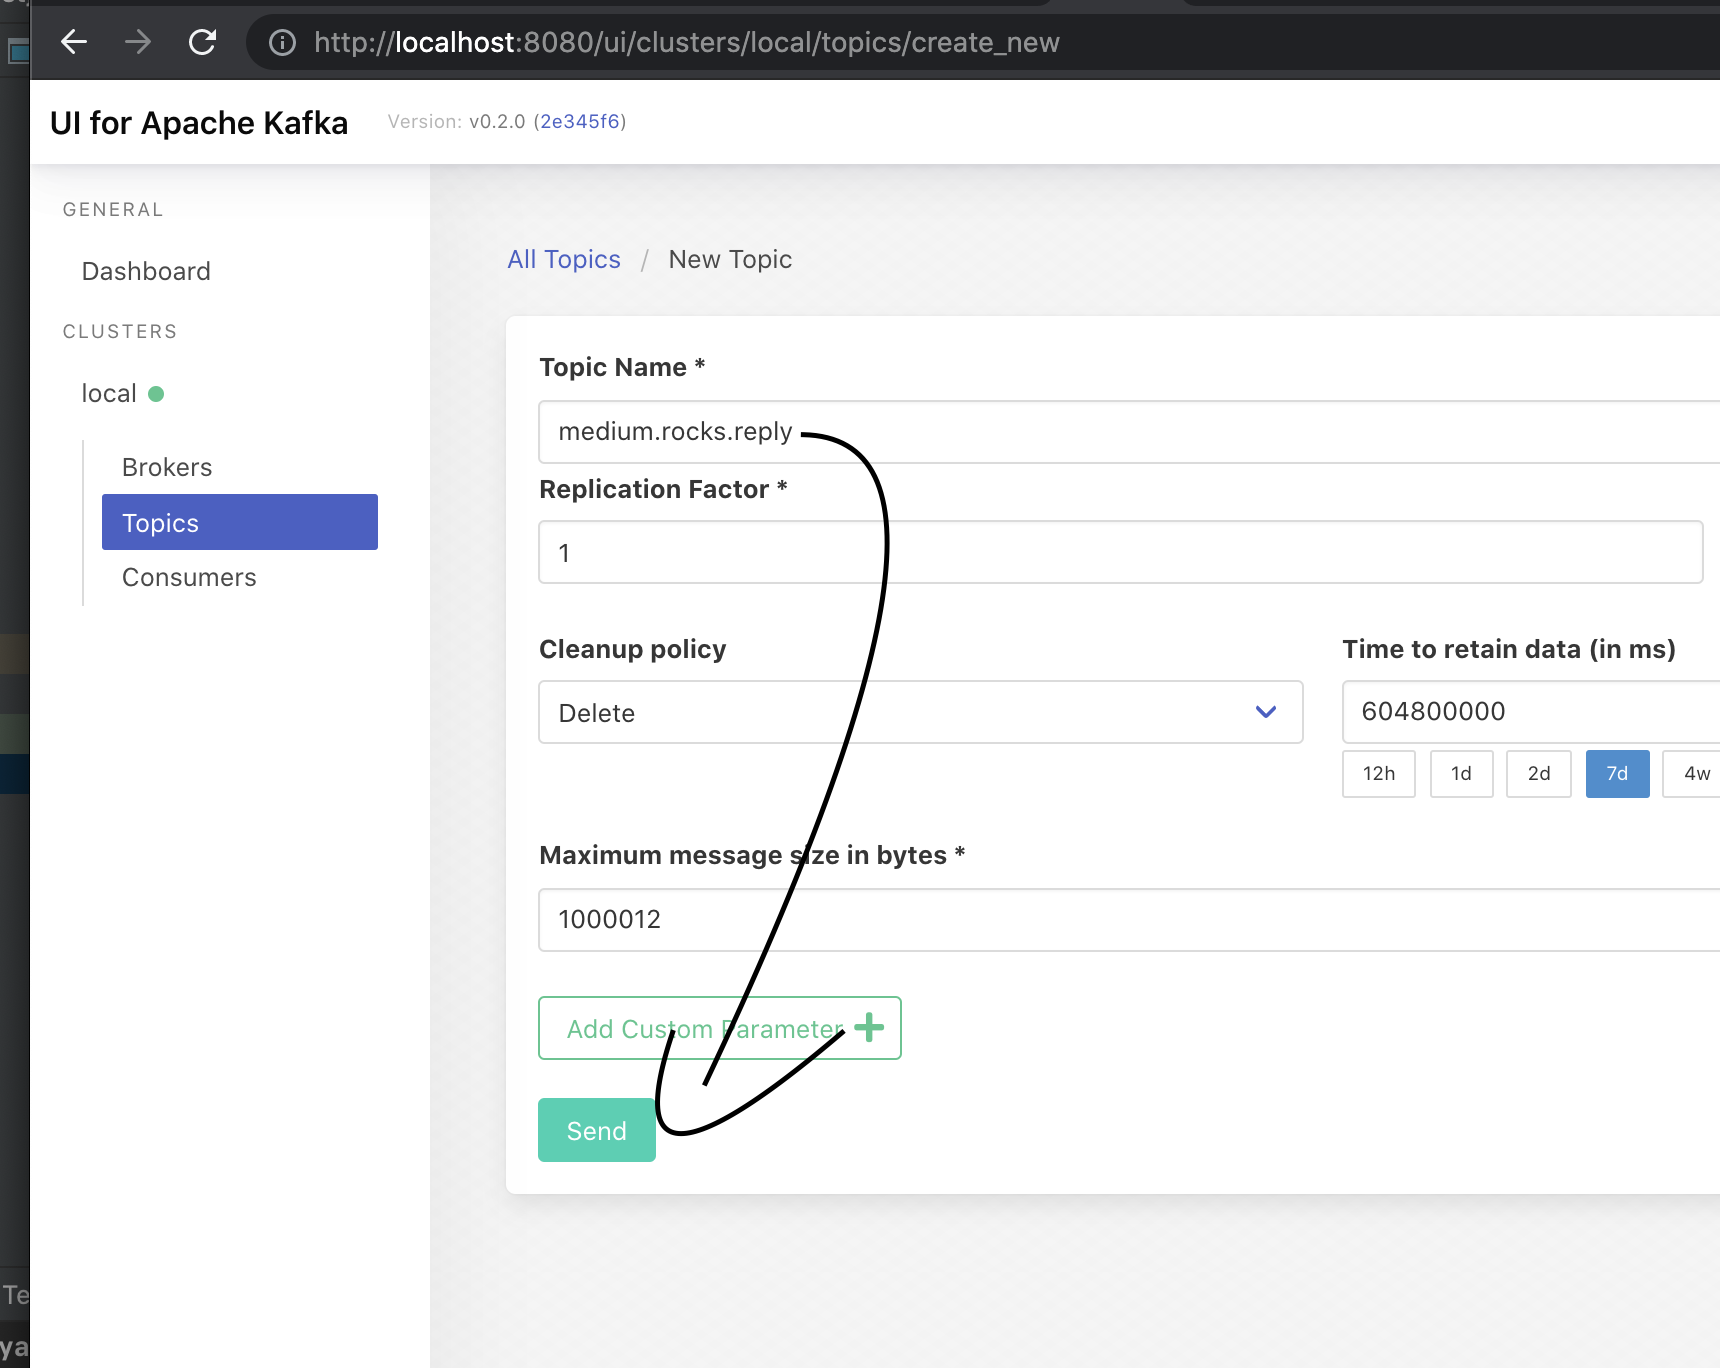
That should be enough to allow NestJS to work with request/response.
Please note that this process might not be required if you don't have any blockers on auto creating topics but in some Enterprise companies you might need to create the topic before using. For this article I tested both creating or not creating and they work since we are using a docker compose which doesn't block us to create new topics on the fly.
Now, in our producer, and specifically in our controller we need to send an event before receiving a response of it, but we also need to configure a way to receive it, which in NestJS is the subscribeToResponseOf. The process is quite straightforward and should look like this:
import {Controller, ***Get***, Inject, OnModuleDestroy, OnModuleInit} from '@nestjs/common';
import { AppService } from './app.service';
import { ClientKafka } from '@nestjs/microservices';

@Controller()
export class AppController implements OnModuleInit, OnModuleDestroy{
  constructor(
    private readonly appService: AppService,
    @Inject('any_name_i_want') private readonly client: ClientKafka,
  ) {}

  async onModuleInit() {
    ['medium.rocks'].forEach((key) => this.client.subscribeToResponseOf(`${key}`));
    await this.client.connect();
  }

  async onModuleDestroy() {
    await this.client.close();
  }

  @Get()
  getHello(): string {
    return this.appService.getHello();
  }

  @Get('kafka-test')
  testKafka(){
    return this.client.emit('medium.rocks', {foo:'bar', data: new ***Date***().toString()})
  }


  @Get('kafka-test-with-response')
  testKafkaWithResponse(){
    return this.client.send('medium.rocks', {foo:'bar', data: new ***Date***().toString()})
  }


}
We are only adding an array in the onModuleInit because your controller might be producing/listening for more than one topic in a real scenario. Also, NestJS will auto add a .reply in the topic that is trying to subscribe. So, in our case it's the medium.rocks.reply.
Cool, that should be enough. Let's run again the producer and hit the kafka-test-with-response:
**➜  consumer** **git:(main) ✗** curl --location --request GET 'http://localhost:3000/kafka-test-with-response'

Receiving a new message from topic: medium.rocks: {"foo":"bar","data":"Wed Sep 15 2021 23:11:13 GMT+0200 (Central European Summer Time)"}**%**                                                                              **➜  consumer** **git:(main) ✗**
That's AWESOME! We can either emit a message or wait for a response in specific scenarios!
These both approaches should allow you to do the majorities of real life challenges your will face!
Kafka, API's, Typescript and software engineering is way too detailed to be contained in a single article. In this article I tried to simplify a hands on coding with Typescript and Kafka, using NestJS. Even though this article is for beginners on Kafka, it is required a lot of pre-knowledge on building API's, knowing Docker and Typescript. I really hope the abstraction in this article to allow you as a reader to start your proof of concept and play around with Kafka using NestJS. Microservices are a trend that cannot be ignored if you are in a willing to become a software engineer.
This article went bigger than I expected and I tried to avoid several topics here. Please feel yourself free to suggest any topic that I could write in more details and share in a new article.
As usual, my POC can be found as an open source in my public github project here.
I really like to write and share knowledge within things that I believe I can contribute. If this article was somehow useful for you, please like and/or comment it as it makes me to understand if it's useful or not. I also learn when I am translating my knowledge into article and any feedback is welcome!
If you are still lost, specially with NestJS please don't forget to get my beginners guide on NestJS!
for RestAPI scaffolding here: Creating a REST API series with NestJS — Part 01 — Scaffolding and basic CLI usage Welcome back! In the mini series of article I am going to guide you on how to built a REST API using NestJS frameworkmakinhs.medium.com
And for GraphQL with NestJS and Typescript here: GraphQL Back-End in Node.js Made Easy with NestJS *In this article, I will show you how to start a GraphQL back-end project in a very, very, very easy way…using NestJS!*javascript.plainenglish.io
Thanks for reading and see you soon!
Comments
Loading comments…