
CRUD operations in a Django application mean performing create, read, update, and delete operations on the database. An admin user can do all these operations using the Django admin site. But in this article, we will learn how to implement it within the website using the Django ModelForm.
Let's get started.
Project Setup
First, we need to create a Django project. Let's install Django:
$ pip install Django
Then create a Django project named main:
$ django-admin startproject main
Within the project, we will create a separate app named employee because the application will perform CRUD operations on an employee information database.
$ python manage.py startapp employee
Then in the project root directory, we will create a folder named templates. And inside the templates folder, we will create an HTML file named base.html. In base.html we will write the common templates that the entire project will share.
We will create another templates folder inside the employee app. Then inside the template folder, we will create another folder named employee. Inside templates/employee we will create the templates specifically for the employee app.
For our CRUD application we will need four templates:
list.html(To display the fetched data). This will be the homepage.create.html(To create new employee entity)edit.html(To update/edit existing employee information)delete.html(To delete an employee entity)
Let's create these four templates inside templates/employee.
Then we need to create an urls.py file inside the employee app. Here we will write the URL configurations for the application.
So far the project structure will be the following:
.
├── employee
│   ├── __init__.py
│   ├── admin.py
│   ├── apps.py
│   ├── models.py
│   ├── templates
│   │   └── employee
│   │       ├── create.html
│   │       ├── delete.html
│   │       ├── edit.html
│   │       └── list.html
│   ├── tests.py
│   ├── urls.py
│   └── views.py
├── main
│   ├── __init__.py
│   ├── asgi.py
│   ├── settings.py
│   ├── urls.py
│   └── wsgi.py
├── manage.py
└── templates
    └── base.html
Now we need to add the employee app in main/settings.py. Add ‘employee.apps.EmployeeConfig' to the INSTALLED_APPS list:
## Application definition

INSTALLED_APPS = [

'django.contrib.admin',

'django.contrib.auth',

'django.contrib.contenttypes',

'django.contrib.sessions',

'django.contrib.messages',

'django.contrib.staticfiles',

## apps

'employee.apps.EmployeeConfig',

]
We also need to add the templates directory with our project's base directory. Modify the TEMPLATES list in main/settings.py like this:
TEMPLATES = [

{

'BACKEND': 'django.template.backends.django.DjangoTemplates',

'DIRS': [BASE_DIR / 'templates'],

'APP_DIRS': True,

'OPTIONS': {

'context_processors': [

'django.template.context_processors.debug',

'django.template.context_processors.request',

'django.contrib.auth.context_processors.auth',

'django.contrib.messages.context_processors.messages',

],

},

},

]
The initial project setup is done.
Run the initial migration:
$ python manage.py migrate
Operations to perform:
  Apply all migrations: admin, auth, contenttypes, employee, sessions
Running migrations:
  Applying contenttypes.0001_initial... OK
  Applying auth.0001_initial... OK
  Applying admin.0001_initial... OK
  Applying admin.0002_logentry_remove_auto_add... OK
  Applying admin.0003_logentry_add_action_flag_choices... OK
  Applying contenttypes.0002_remove_content_type_name... OK
  Applying auth.0002_alter_permission_name_max_length... OK
  Applying auth.0003_alter_user_email_max_length... OK
  Applying auth.0004_alter_user_username_opts... OK
  Applying auth.0005_alter_user_last_login_null... OK
  Applying auth.0006_require_contenttypes_0002... OK
  Applying auth.0007_alter_validators_add_error_messages... OK
  Applying auth.0008_alter_user_username_max_length... OK
  Applying auth.0009_alter_user_last_name_max_length... OK
  Applying auth.0010_alter_group_name_max_length... OK
  Applying auth.0011_update_proxy_permissions... OK
  Applying auth.0012_alter_user_first_name_max_length... OK
  Applying employee.0001_initial... OK
  Applying sessions.0001_initial... OK
Then run the server to see if everything is working or not:
$ python manage.py runserver
Watching for file changes with StatReloader
Performing system checks...System check identified no issues (0 silenced).
December 30, 2021 - 08:31:28
Django version 4.0, using settings 'main.settings'
Starting development server at [http://127.0.0.1:8000/](http://127.0.0.1:8000/)
Quit the server with CONTROL-C.
Creating the Employee Model
Inside employee/models.py we will create our Employee model.
from django.db import models

import uuid

class Employee(models.Model):

emp_name = models.CharField(max_length=200)

emp_email = models.EmailField()

emp_contact = models.CharField(max_length=20)

emp_role = models.CharField(max_length=200)

emp_salary = models.IntegerField()

id = models.UUIDField(default=uuid.uuid4, unique=True, primary_key=True, editable=False)

def __str__(self):

return self.emp_name
We need to register this model in admin.py to see it on the admin site.
from django.contrib import admin

from .models import Employee

admin.site.register(Employee)
Now make migrations to the database and create a superuser to gain admin access using the following commands:
$ python manage.py makemigrations
$ python manage.py migrate$ python manage.py createsuperuser
Creating the Views and URL patterns
Inside employee/views.py we will create four view functions:
from django.shortcuts import render

def employees_list(request):

return render(request, 'employee/list.html', context)

def create_employee(request):

return render(request, 'employee/create.html', context)

def edit_employee(request, pk):

return render(request, 'employee/edit.html', context)

def delete_employee(request, pk):

return render(request, 'employee/delete.html', context)
Then we will create URL patterns for each view inside employee/urls.py:
# ./employee/urls.py

from django.urls import path

from . import views

urlpatterns = [

path('', views.employees_list, name='employees-list'),

path('create/', views.create_employee, name='create-employee'),

path('edit/', views.edit_employee, name='edit-employee'),

path('delete/', views.delete_employee, name='delete-employee'),

]
After that, we need to add employee.urls to our project's urls.py.
# ./main/urls.py

from django.contrib import admin

from django.urls import path, include

urlpatterns = [

path('admin/', admin.site.urls),

path('', include('employee.urls')),

]
Now each URL endpoint will work. But we are yet to implement CRUD. We will do it one by one.
First Read the Database
Go to the admin site and create some employees.
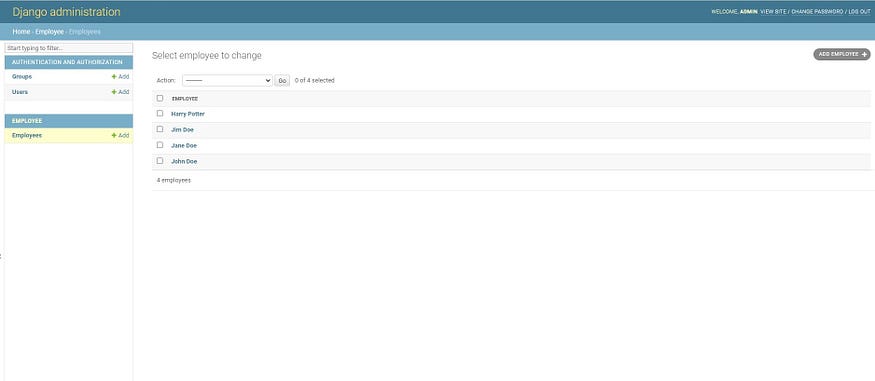
Adding some employees from the admin site
First, we will work with the employee_list view and list out the employee information. This will be the Read of CRUD. Later we will handle Create so that we don't need to create employees from the admin site.
employee_list view function:
from django.shortcuts import render, redirect

from .models import Employee

def employees_list(request):

employees = Employee.objects.all()

context = {

'employees': employees,

}

return render(request, 'employee/list.html', context)
list.html will list out the employee information in a table.
list.html:
<!-- ./employee/templates/employee/list.html -->

{% extends 'base.html' %}

{% block title %}

<title>Employee List</title>

{% endblock title %}

{% block content %}

<h1 style="text-align: center; padding-top: 1em; padding-bottom: 1em;">Employees Information</h1>

<table class="table table-striped">

<thead>

<tr>

<th scope="col">Name</th>

<th scope="col">Email</th>

<th scope="col">Contact</th>

<th scope="col">Role</th>

<th scope="col">Salary</th>

<th scope="col">Action</th>

</tr>

</thead>

<tbody>

{% for emp in employees %}

<tr>

<th scope="row">{{ emp.emp_name }}</th>

<td>{{ emp.emp_email }}</td>

<td>{{ emp.emp_contact }}</td>

<td>{{ emp.emp_role }}</td>

<td>{{ emp.emp_salary }}</td>

<td>

<a style="margin-right: 30px;" href="{% url 'edit-employee' emp.id %}">Edit</a>

<a href="{% url 'delete-employee' emp.id %}">Remove</a>

</td>

</tr>

{% endfor %}

</tbody>

</table>

<div class="text-center">

<a href="{% url 'create-employee' %}"><button type="button" class="btn btn-primary">Add New Info</button></a>

</div>

{% endblock content %}
list.html is extending the base.html file. For some simple styling, we will add Bootstrap to the base.html and extend it to all other templates.
base.html:
<!-- ./templates/base.html -->

<!DOCTYPE html>

<html lang="en">

<head>

<meta charset="UTF-8">

<meta http-equiv="X-UA-Compatible" content="IE=edge">

<meta name="viewport" content="width=device-width, initial-scale=1.0">

<link href="https://cdn.jsdelivr.net/npm/bootstrap@5.1.3/dist/css/bootstrap.min.css" rel="stylesheet" integrity="sha384-1BmE4kWBq78iYhFldvKuhfTAU6auU8tT94WrHftjDbrCEXSU1oBoqyl2QvZ6jIW3" crossorigin="anonymous">

{% block title %}

{% endblock title %}

</head>

<body>

<div class="container">

{% block content %}

{% endblock content %}

</div>

<script src="https://cdn.jsdelivr.net/npm/bootstrap@5.1.3/dist/js/bootstrap.bundle.min.js" integrity="sha384-ka7Sk0Gln4gmtz2MlQnikT1wXgYsOg+OMhuP+IlRH9sENBO0LRn5q+8nbTov4+1p" crossorigin="anonymous"></script>

</body>

</html>
The home page will now fetch employee data from the database and list them out.
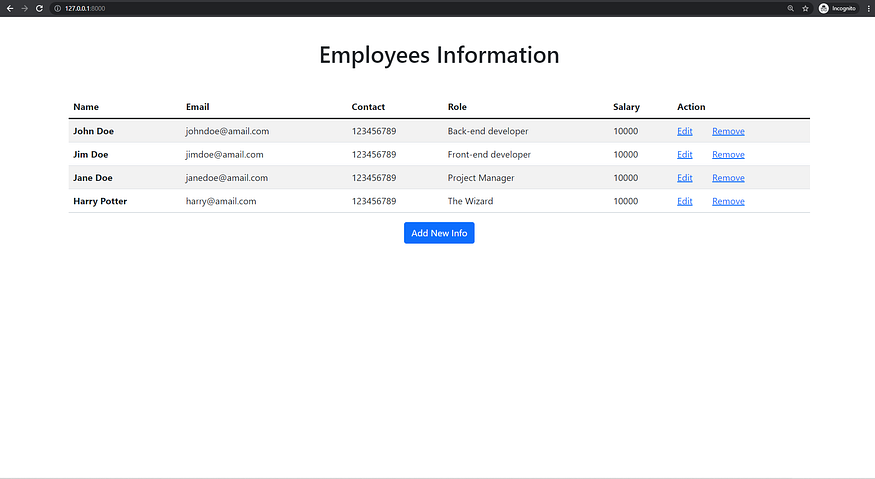
Reading and displaying the data
Creating New Employee
Now we will implement the Create of CRUD so that we no longer need admin access to add new data.
Inside the employee app, we need to create a forms.py file. Then we will fetch the Employee model fields and create a form with those fields. We will do that with the help of Django ModelForm.
forms.py:
from django import forms

from django.forms import ModelForm

from .models import Employee

class EmployeeForm(ModelForm):

class Meta:

model = Employee

fields = ('emp_name', 'emp_email', 'emp_contact', 'emp_role', 'emp_salary')

widgets = {

'emp_name': forms.TextInput(attrs={'class': 'form-control', 'placeholder': 'Name'}),

'emp_email': forms.TextInput(attrs={'class': 'form-control', 'placeholder': 'Email'}),

'emp_contact': forms.TextInput(attrs={'class': 'form-control', 'placeholder': 'Contact No.'}),

'emp_role': forms.TextInput(attrs={'class': 'form-control', 'placeholder': 'Role'}),

'emp_salary': forms.TextInput(attrs={'class': 'form-control', 'placeholder': 'Salary'}),

}
We are using the widgets dictionary to add bootstrap styling to the form. We will create a form field in create.html to take the inputs.
create.html:
from django import forms

from django.forms import ModelForm

from .models import Employee

class EmployeeForm(ModelForm):

class Meta:

model = Employee

fields = ('emp_name', 'emp_email', 'emp_contact', 'emp_role', 'emp_salary')

widgets = {

'emp_name': forms.TextInput(attrs={'class': 'form-control', 'placeholder': 'Name'}),

'emp_email': forms.TextInput(attrs={'class': 'form-control', 'placeholder': 'Email'}),

'emp_contact': forms.TextInput(attrs={'class': 'form-control', 'placeholder': 'Contact No.'}),

'emp_role': forms.TextInput(attrs={'class': 'form-control', 'placeholder': 'Role'}),

'emp_salary': forms.TextInput(attrs={'class': 'form-control', 'placeholder': 'Salary'}),

}
Don't forget to add method='POST' to the form tag and {% csrf_token %} inside the form.
Then we will modify the create_employee view function.
create_employee view function:
from django.shortcuts import render, redirect

from .models import Employee

from .forms import EmployeeForm

# employee_list view here ....

def create_employee(request):

form = EmployeeForm()

if request.method == 'POST':

form = EmployeeForm(request.POST)

if form.is_valid():

form.save()

return redirect('employees-list')

context = {

'form': form,

}

return render(request, 'employee/create.html', context)
Don't forget to import the EmployeeForm from forms.py before the create_employee function.
Now if we click on the Add New Info button on the home page, we should be taken to the create/ URL. Here we will see the following form:
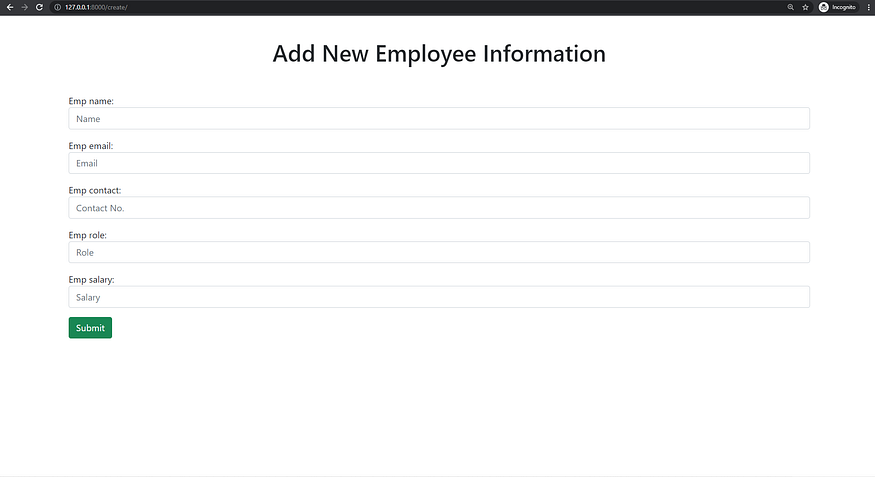
The create page
If we fill up the form and hit submit, a new employee instance should be created. The new employee information will appear on the homepage.
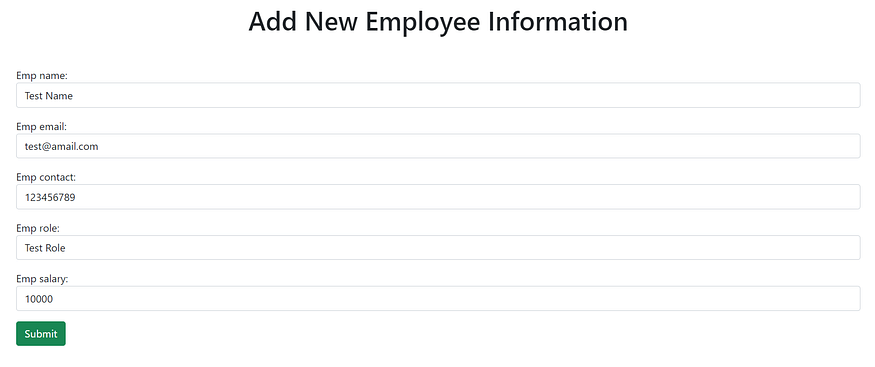
Creating a new employee using the form

New employee information appeared on the homepage
The Create functionality is implemented.
Updating/Editing existing data
Now we will move on to the Update of CRUD. The edit_employee view is almost similar to the create_employee view. We just need to pass the employee instance to the form.
edit_employee view function:
from django.shortcuts import render, redirect

from .models import Employee

from .forms import EmployeeForm

# employee_list view here ...

# create_employee view here ...

def edit_employee(request, pk):

employee = Employee.objects.get(id=pk)

form = EmployeeForm(instance=employee)

if request.method == 'POST':

form = EmployeeForm(request.POST, instance=employee)

if form.is_valid():

form.save()

return redirect('employees-list')

context = {

'employee': employee,

'form': form,

}

return render(request, 'employee/edit.html', context)
edit.html is also almost similar to create.html. We just need to pre-populate the form with the existing data.
edit.html:
<!-- ./employee/templates/employee/edit.html -->

{% extends 'base.html' %}

{% block title %}
	<title>Edit</title>
{% endblock title %}

{% block content %}
	<h1 style="text-align: center; padding-top: 1em; padding-bottom: 1em;">Edit Employee Information</h1>

	<form action="" method="POST">
		{% csrf_token %}
		{{ form.as_p }}
		<input type="submit" class="btn btn-success"> </form>
{% endblock content %}
Now we should be able to edit employee information.
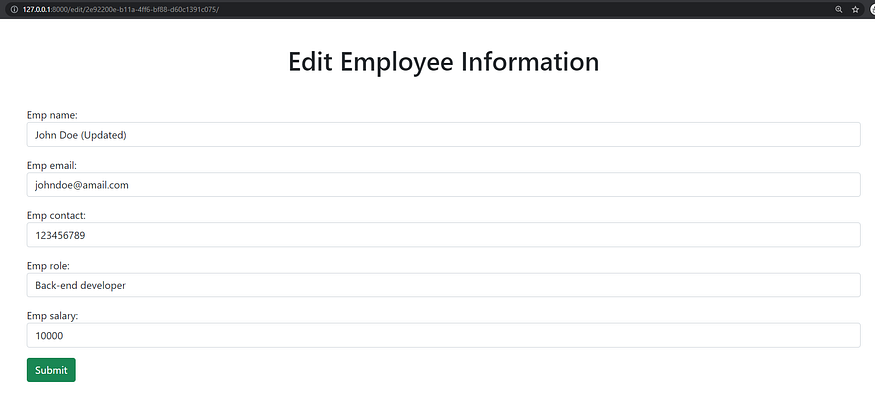
Editing employee
And the update will appear on the homepage.
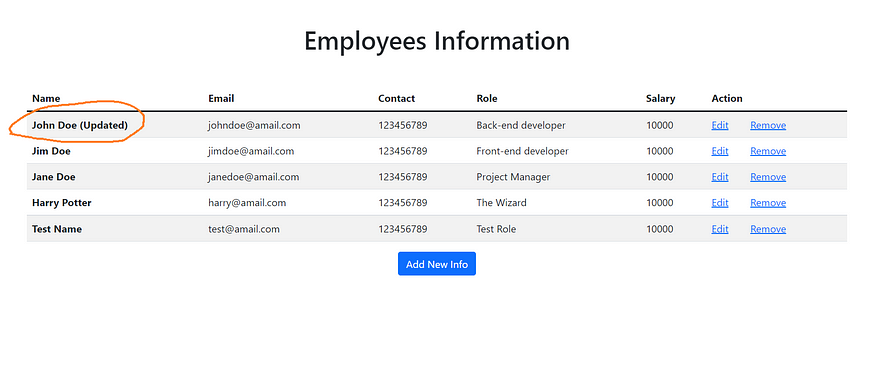
Update on the homepage
Deleting Employee
Implementing Delete is fairly easy. We just need to delete the instance from the database when someone clicks on Remove.
delete_employee view function:
from django.shortcuts import render, redirect

from .models import Employee

from .forms import EmployeeForm

# employee_list view here ...

# create_employee list here ...

# edit_employee list here ...

def delete_employee(request, pk):

employee = Employee.objects.get(id=pk)

if request.method == 'POST':

employee.delete()

return redirect('employees-list')

context = {

'employee': employee,

}

return render(request, 'employee/delete.html', context)
delete.html:
<!-- ./employee/templates/employee/delete.html -->

{% extends 'base.html' %}

{% block title %}

<title>Delete</title>

{% endblock title %}

{% block content %}

<form action="" method="POST">

{% csrf_token %}

<br><br>

<div class="alert alert-danger" role="alert">

Are you sure you want to delete "{{ employee.emp_name }}"?

</div>

<p>

<a href="{% url 'employees-list' %}"> <-- Go back</a>

</p>

<p>

<input class="btn btn-danger" type="submit" value="Confirm">

</p>

</form>

{% endblock content %}
By clicking Remove we want to be directed to a confirmation page. Here we will see a confirmation alert. By hitting Confirm we will delete the employee.
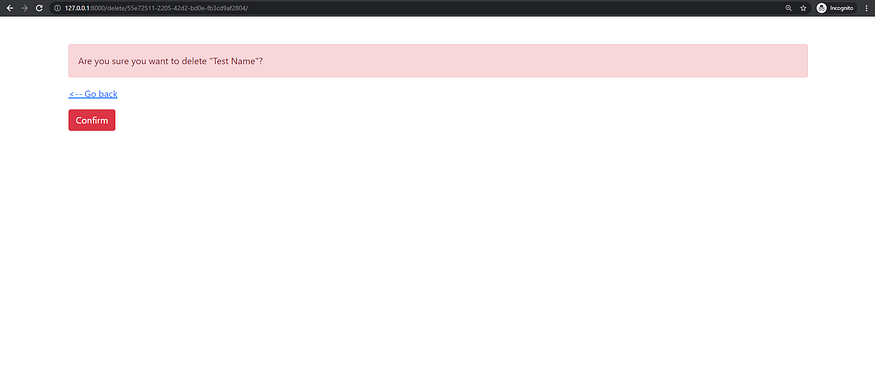
Delete confirmation page
The CRUD app is complete! Our application can now perform Create, Read, Update, and Delete operations.
I hope you find the post helpful. Thanks for reading.
Find the Source Code on GitHub
I am sharing the GitHub repository for this project. You can see and use the source code from there:
Comments
Loading comments…