
This article is about creating an OTP-style user sign-up system. I will divide the roadmap into sections so that you can directly look at the one you actually require.
Section 1: Setting up the backend in Express JS. Section 2: Create Basic Express App Section 3: Creating OTP Service. Section 4: Creating Email Service. Section 5: Database Persistence. Section 6: Assembling the services with routes and controllers.
Section 1: Setting up the backend
Since you need the submitted form data, this is the very first step you need to do. In this particular section we
- Create Basic Express App.
- Create Routes for handing endpoints.
- Not creating controller since it is simple process and do not need multiple routes/controllers
Section 2: Create Basic Express App
const express = require("express");
const app = express();

// Application configurations
const PORT = process.env.PORT || 3000;
app.use(express.json());

// Application Routing
app.use("/", require("../routes/router"));

app.listen(PORT, () => {
  console.log("Sever started at PORT", PORT);
});

// Router.js file inside ./routes/router.js

const router = require("express").Router();
router.use("/auth", require("./auth.route"));
module.exports = router;

// auth.route.js file in ./routes/auth.route.js

const router = require("express").Router();
router.post("/", async (req, res) => {
  res.send("Success");
});
module.exports = router;
Section 3: Creating OTP Service
We have multiple OTP generators available on npm. I am selecting otp-generator for this specific app.
We create a directory called services where our mailing service and OTP service reside.
Inside the services directory, I created a file otp.js that implements the OTP generating facility.
const otpGenerator = require('otp-generator');
const { OTP_LENGTH, OTP_CONFIG } = require('../constants/constants');
module.exports.generateOTP = () => {
  const OTP = otpGenerator.generate(OTP_LENGTH, OTP_CONFIG);
  return OTP;
};

// The OTP_LENGTH is a number, For my app i selected 10.
// The OTP_CONFIG is an object that looks like
OTP_CONFIG: {
  upperCaseAlphabets: true,
  specialChars: false,
},
- To read more about the library you can explore the documentations - https://www.npmjs.com/package/otp-generator.
Section 4: Creating Email Service
In this section, I would like to mention that we have multiple options for creating an email service. The major choices that I would choose from are:
- AWS SES
- SENDGRID
- NODEMAILER NPM
I would be using the nodemailer npm package to easy the process of sending emails here. For Sendgrid the process is quite lenghty and you need to do a lot of registerations. For AWS SES you need to first get your account out of the Sandbox mode that require provide a large amount of details. Since this is a demo design pattern article I am not going deep into sendgrid and aws ses for simplicity sake .
To get started with nodemailer, you need to determine the mailing service. In my case, I am using the GMAIL service to send mails. Another way is using domain email with SMTP information. I assume most of the people do not work with domain emails and SMTP, GMAIL is the best service to demo here.
Before starting with nodemailer, there is a setting that needs to be configured on the Gmail account.
To enable sending emails from your Gmail account, you need to enable “Less Secure Apps’ Setting. This is an important setup, missing which will cause failure in sending emails. Make sure to enable that.
Also in addition to the above point. Less Secure Apps do not work with accounts having Multi-Factor Authentication (MFA). I suggest you only send emails with service accounts or isolated accounts used just for purpose of mailing. Sending emails with Gmail and nodemailer is not recommended for security purposes even on nodemailer documentations**
After you enabled your “Less Secure Apps” settings. Here is what needs to be done.
const MAIL_SETTINGS: {
  service: 'gmail',
  auth: {
    user: process.env.MAIL_EMAIL,
    pass: process.env.MAIL_PASSWORD,
  },
},

const nodemailer = require('nodemailer');
const transporter = nodemailer.createTransport(MAIL_SETTINGS);

module.exports.sendMail = async (params) => {
  try {
    let info = await transporter.sendMail({
      from: MAIL_SETTINGS.auth.user,
      to: params.to,
      subject: 'Hello ✔',
      html: `
      <div
        class="container"
        style="max-width: 90%; margin: auto; padding-top: 20px"
      >
        <h2>Welcome to the club.</h2>
        <h4>You are officially In ✔</h4>
        <p style="margin-bottom: 30px;">Pleas enter the sign up OTP to get started</p>
        <h1 style="font-size: 40px; letter-spacing: 2px; text-align:center;">${params.OTP}</h1>
   </div>
    `,
    });
    return info;
  } catch (error) {
    console.log(error);
    return false;
  }
};
You can provide your “GMAIL email and password” from the env file. The file will initialise the transporter object and then sendMail wrapper can be used from the appropriate controller.
Section 5: Database Persistence
In this section, I’ll set up the auth controller, generating OTP and user and associating them.
Now my auth.route.js looks like:
const router = require("express").Router();
const authController = require("../controllers/auth.controller");

router.post("/", authController.signUpUser);
router.post("/verify", authController.verifyEmail);

module.exports = router;
The / route handles the user and OTP creation.
The / verify route handles verification of the OTP.
NOTE: You can use the same route in order to handle the logic, but for simplification purposes, I used different routes.
The MongoDB model I designed is:
const mongoose = require("mongoose");

const userSchema = new mongoose.Schema({
  name: {
    type: String,
    required: false,
  },
  email: {
    type: String,
    required: true,
  },
  created: {
    type: String,
    default: new Date().toISOString(),
  },
  password: {
    type: String,
    required: true,
  },
  lastActive: {
    type: String,
    required: false,
  },
  active: {
    type: Boolean,
    default: false,
  },
  otp: {
    type: String,
    required: true,
  },
});

module.exports = mongoose.model("User", userSchema);
Note: I changed my created attribute type to Date.
The active status determines if the user is verified or not. The last active status can be used whenever the user logs in or perform some application logic. The otp stores the generated OTP.
The controller file is the interesting one and all the logic is defined there.
const { encrypt, compare } = require("../services/crypto");
const { generateOTP } = require("../services/OTP");
const User = require("../models/User");

module.exports.signUpUser = async (req, res) => {
  const { email, password } = req.body;
  const isExisting = await findUserByEmail(email);
  if (isExisting) {
    return res.send("Already existing");
  }
  // create new user
  const newUser = await createUser(email, password);
  if (!newUser[0]) {
    return res.status(400).send({
      message: "Unable to create new user",
    });
  }
  res.send(newUser);
};

module.exports.verifyEmail = async (req, res) => {
  const { email, otp } = req.body;
  const user = await validateUserSignUp(email, otp);
  res.send(user);
};

const findUserByEmail = async (email) => {
  const user = await User.findOne({
    email,
  });
  if (!user) {
    return false;
  }
  return user;
};

const createUser = async (email, password) => {
  const hashedPassword = await encrypt(password);
  const otpGenerated = generateOTP();
  const newUser = await User.create({
    email,
    password: hashedPassword,
    otp: otpGenerated,
  });
  if (!newUser) {
    return [false, "Unable to sign you up"];
  }
  return [true, newUser];
};

const validateUserSignUp = async (email, otp) => {
  const user = await User.findOne({
    email,
  });
  if (!user) {
    return [false, "User not found"];
  }
  if (user && user.otp !== otp) {
    return [false, "Invalid OTP"];
  }
  const updatedUser = await User.findByIdAndUpdate(user._id, {
    $set: { active: true },
  });
  return [true, updatedUser];
};
When a user signs up. We first check if it is already existing or not. If existing we can perform custom logic in this scenario. Otherwise, we create a new user with hashed password. I used bcrypt to hash the password, you can use any.
In summary of the above code. When user first signs up:
- Check if email/user is existing
- If existing, can perform custom logic and return
- If not, create a new user by hashing a password and generating OTP
To verify OTP:
- We send email and OTP to the controller
- if the email is not existing, throw an error
- if the email is existing and the OTP is incorrect, throw an error
- if none of the checks fails, then update active as true and return
Section 6: Assembling the roadmap
The last remaining piece here is the sending of mail when the user tries signing up. We integrate our mailing service to our controller to perform the last remaining step. And then our controller looks like
const { encrypt, compare } = require("../services/crypto");
const { generateOTP } = require("../services/OTP");
const { sendMail } = require("../services/MAIL");
const User = require("../models/User");

module.exports.signUpUser = async (req, res) => {
  const { email, password } = req.body;
  const isExisting = await findUserByEmail(email);
  if (isExisting) {
    return res.send("Already existing");
  }
  // create new user
  const newUser = await createUser(email, password);
  if (!newUser[0]) {
    return res.status(400).send({
      message: "Unable to create new user",
    });
  }
  res.send(newUser);
};

module.exports.verifyEmail = async (req, res) => {
  const { email, otp } = req.body;
  const user = await validateUserSignUp(email, otp);
  res.send(user);
};

const findUserByEmail = async (email) => {
  const user = await User.findOne({
    email,
  });
  if (!user) {
    return false;
  }
  return user;
};

const createUser = async (email, password) => {
  const hashedPassword = await encrypt(password);
  const otpGenerated = generateOTP();
  const newUser = await User.create({
    email,
    password: hashedPassword,
    otp: otpGenerated,
  });
  if (!newUser) {
    return [false, "Unable to sign you up"];
  }
  try {
    await sendMail({
      to: email,
      OTP: otpGenerated,
    });
    return [true, newUser];
  } catch (error) {
    return [false, "Unable to sign up, Please try again later", error];
  }
};

const validateUserSignUp = async (email, otp) => {
  const user = await User.findOne({
    email,
  });
  if (!user) {
    return [false, "User not found"];
  }
  if (user && user.otp !== otp) {
    return [false, "Invalid OTP"];
  }
  const updatedUser = await User.findByIdAndUpdate(user._id, {
    $set: { active: true },
  });
  return [true, updatedUser];
};
Note: The error handling can be drastically improved in the whole process. The article only focuses on the important aspects of the roadmap that designs the data flow.
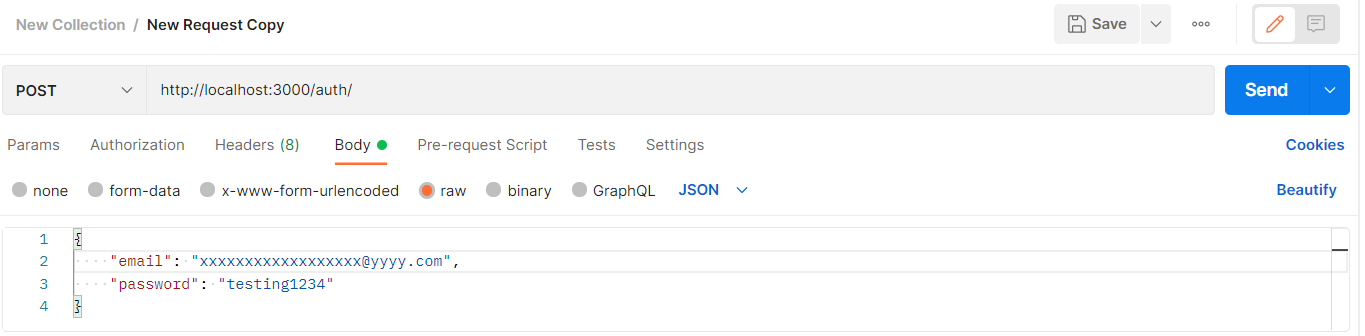
Sending the request with Postman
The mail send by nodemailer

I will be adding a link to the GitHub repository for all the centralization of the code. Thank you for your time. If you have any questions/suggestions, dm or drop your comment in the comment section.
Github Repository Link:
Comments
Loading comments…