
For me, it’s always hard to start a new application from scratch.
It’s especially hard when coming from frameworks like Ruby on Rails or Symphony, where you get your initial application structure out of the box.
In the world of TypeScript, we tend to refrain from the idea of sometimes opinionated frameworks. It’s up to us to come up with something great from scratch and it usually takes several iterations to get it right. That’s why I decided to write a small practical guide from my personal experiences on how you can structure your TypeScript Node.js app.
This article will include some hands-on examples, and I will touch on a couple of important basic architectural principles. We are going to use a simplified version of the ports and adapters architecture.
It’s useful if you are already familiar with the following concepts:
- You have a good understanding of Typescript.
- You know basic OOP concepts such as interfaces and factory functions and should be familiar with polymorphism. We will apply those principles with a functional coding style.
- You have a love for software architecture and would like to learn more about it.
I will first introduce the concepts and then go through a hands-on example of how you can apply those while designing your application.
Ports and Adapters
The idea of Ports and Adapters got quite popular over the past decade. It’s a simple but powerful idea on how you can structure your application:
The idea of Ports and Adapters is that the application is central to your system. All the inputs and outputs reach or leave the core of the application through a port. This port isolates the application from external technologies, tools and delivery mechanics. — https://www.thinktocode.com/2018/07/19/ports-and-adapters-architecture/
Let’s look at a simple use case to understand what this means:
A user would like to print a document.
Let’s forget about the real complexity of the problem for a moment and only look at the essential parts: The first thing we need is a printing device that prints the document. We also need the driver that translates your virtual document into low-level and device-specific messages/commands that your printer can understand.
The driver's job is to encapsulate all the logic that the particular printer needs and exposes an abstract version of the printer to the operating system.
There is an excellent reason why we are doing this: The Operating System has to support all kinds of printers. If we make printers pluggable through drivers, we can just add a new one without the need of changing/extending the core of the operating system.
Translating this example into ports and adapters: The driver is the adapter and the abstract printer representation is the port. The adapter can and will change in the future; the port can stay the same.
Your app should be flexible enough to replace certain parts that might get replaced in the future. Also, sometimes you may have different devices for different jobs.
That’s why we don’t want to add anything that is not 100% related directly to your application's core.
Now that we a rough idea of Ports and Adapters, let’s look at the layers:
The Layers
Layers help you to control the data-flow of your application. They create clear boundaries between different types of services and abstraction levels:
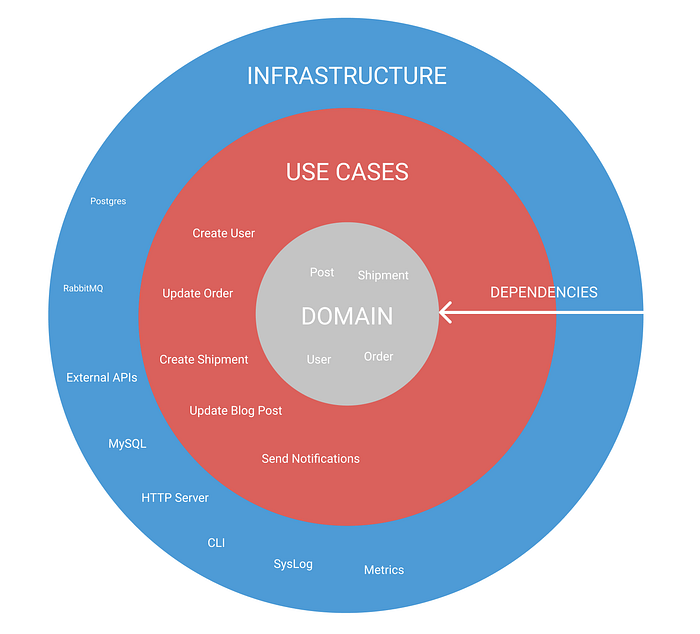
In “Ports and Adapters” architecture, you can very often find the following layers:
- Infrastructure Layer: Includes all the adapters/third party dependencies. This layer includes database calls such as Postgres, third-party API clients for external APIs, or in our example, printer drivers for a specific printer technology. Those concerns should be separated from the core of your application. In this layer, changes usually occur very often and are very specific to a particular technology and problem.
- Use Cases Layer: This is the place where the magic happens. It includes the use cases of your app—for example, “printDocument” or “createUser.” You can see it as the core of your application. This layer houses the actual application logic.
- Domain Layer: defines the models you are using. For example, “Document” or “Printer.” I typically use this layer only for simple interfaces. Those interfaces describe data objects and don’t define any functionality (no method definitions). Those objects are usually passed between the layers.
- Maybe more: There are no strict rules about how many layers your application should have. Suppose you want to add another “presentation” layer for your API or CLI commands that are perfectly fine. It always depends on what you are building.
Inversion of Control
Have you seen the arrow in the drawing? There is an essential rule that helps you to get the dependencies management right:
Your dependencies should always point from the outside in.
That means that whenever you find yourself importing some service like “postgres” or “mysql” from the infrastructure layer into the use case layer, step back and think twice:
The arrow means that the use case layer shouldn’t have any direct dependencies on the outer layer.
You may ask yourself: How is this achievable? How can I save a user when I’m not allowed to access my database dependency? Here is where word direct comes into play: You will only access your database indirectly through an interface. We are inverting the dependency through “inversion of control”.
Let’s look at the following “create user” example to see how we can achieve “inversion of control”:
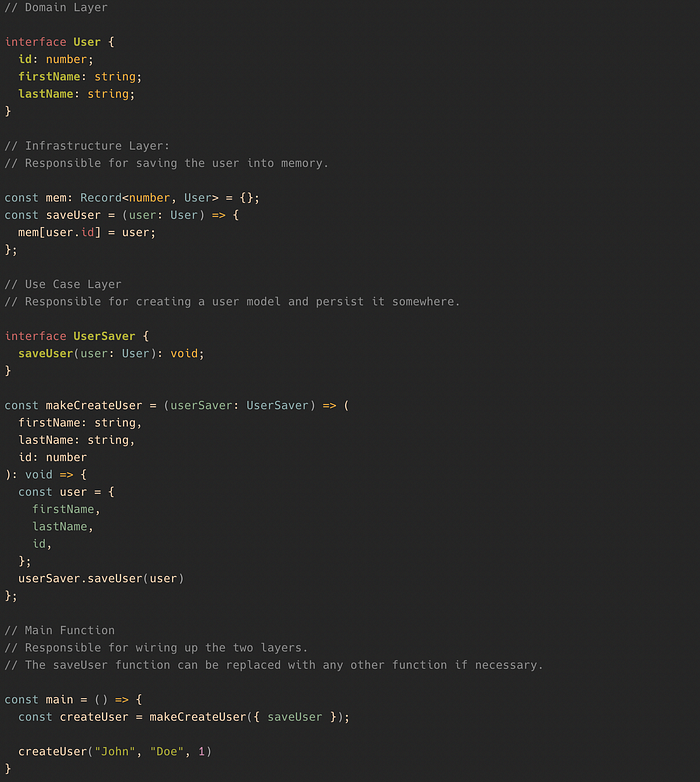
Instead of calling the saveUser function from the infrastructure layer directly, we are injecting it into the createUser function. createUser only takes an interface that describes how this function should look like. We are basically composing the functionality from functions of different layers.
This way, we have inverted the relationship between the memory storage and the createUser use case. This is also called dependency injection. You can now replace the memory storage with a database call without changing anything in the use case layer.
Your main function is responsible for composing the relationship between those layers.
TypeScript shines at this technique. Typed languages have, in this case, a clear advantage compared to untyped languages such as JavaScript. Interfaces are a crucial building block to achieve a readable and clean inversion of control.
Here are some more reasons why this is such a useful idea:
- When testing the “createUser” method, you can simply pass in a mock of the memory storage.
- When you want to replace your Memory Storage with a database, you can do it without touching the use case logic directly.
- Whenever you want to change something in one layer, the other layers are not affected.
- It’s possible to make decisions independently. You can define, for example, your user creation logic independent from your persistence strategy.
Please also check out this StackOverflow answer, which sums it up quite nicely: https://stackoverflow.com/questions/3058/what-is-inversion-of-control.
Folder Structure
Now it’s time to dig into the folder structure.
I find this aspect particularly difficult. For some reason, it’s just hard for me to move files around until everything fits. Don’t be afraid of changing your initial structure often in the beginning. I usually start with the following structure:
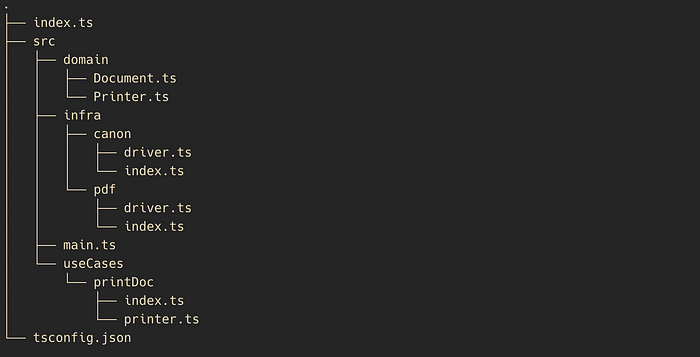
You see the layers and purpose of your application immediately.
The src folder holds all our code. This is typical for TypeScript apps since we also have a couple of config files such as tsconfig.ts, lintrc, babelrc, etc., in the root directory.
The src/useCases folder includes all of your use cases. When you’re opening this folder, you should understand the purpose of your app immediately. Name the use case in such a that it’s clear what it does. I have also seen architectures where the use cases are directly in the src folder along side the infra modules. This can also work. It depends on your taste.
The src/infra folder holds all the infrastructure code. Here you can see folders named by their technology. It’s perfectly fine to have a folder called postgres because it describes exactly what this module is made for.
The src/domain folder holds the data objects as discussed before.
The src/main.ts module is responsible for wiring up your application. It will connect the layers and also bootstrap your application. Your main function can become quite big. It can make sense to split up this logic in an additional layer.
Every folder includes an index.ts file. I use those files to control which functionality should be publicly available to other modules. Only expose functionality to the outside that if it is somewhere else.
Testing: I find it very useful to keep your test files close to the implementation. It adds the benefit that you don’t need to expose any logic to the outside that is not necessary. I won’t cover testing in this article, but it’s undoubtedly useful to keep it in mind.
Let’s print a document.
We are finally ready to implement our first use case. I will walk you through the “printDocument” feature. This example is by no means complete, and all functions would surely be more complicated if this would be a real-life application. Especially the use case would hold more logic than only creating a document. You would maybe notify the user that the document got printed, or drop some metrics to an external service.
First, let’s create a data Object interface called “Document.” We will later use it as our document representation:
/src/domain/print.ts

As you can see, I keep it simple. You don’t find any method definitions here. The document only holds the fields the document needs. We also don’t find any external dependencies. Keep it nice and clean. Remember: the domain objects are only used to be passed around. It can make sense to define some hard business calculations/rules here if they are used frequently.
Now it’s time to build our use case module called “printDoc.” The print function takes a Document with title and body and translates it to a payload that the printer adapter needs:
/src/useCases/printDoc/printer.ts
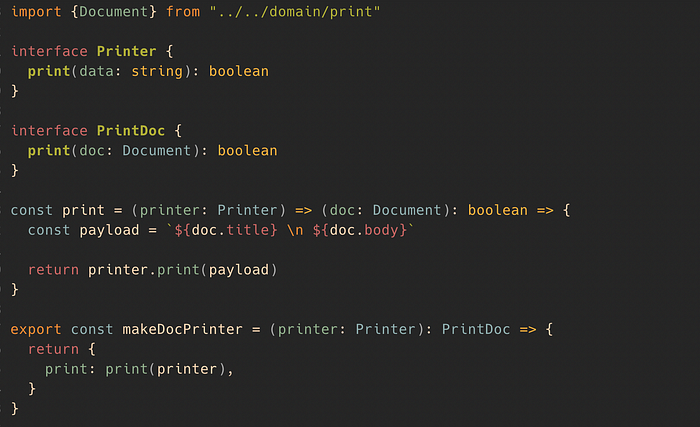
It is the first time we are making use of a Port. You can pass any printer (adapter) you like as long it has the same functions that our use case needs. I make use of a factory function here. Have you noticed that this factory function takes the interface Printer? Printer is our port definition.
One important note: It’s very easy to fall into a leaky abstraction:This can be avoided by keeping the method signature for your port as simple as possible. Also, don’t pass any device-specifics such as “print speed, color settings, etc.” if it’s not generally applicable for other devices. But don’t go too crazy with your generalization by considering all kinds of future use cases that most likely never occur.It’s recommended to pass printer specific configurations into the factory function of your adapter. The next code snippet shows you how that could look like.
You may also notice that I’m keeping the interfaces close to the consumer. There is nothing wrong with having an extra folder for your types, but I prefer having my interfaces close to the consumer. It makes your code much more readable, especially when you’re jumping through your codebase.
While working on your app, you will notice that you sometimes have to duplicate interfaces to not tap into other use cases. Don’t worry too much about it. Sometimes it’s just better to copy a piece of code instead of making everything strictly reusable.
Don’t be afraid of creating interfaces with only one method. Small interfaces help you a lot to keep your app composable—checkout the Liskov Substitution Principle to understand better why this is useful.
Let’s now care about the virtual printer integration/adapter in the infrastructure layer.
Have you noticed that we implement a whole lot of code without even bothering about the actual printing device? This is another big benefit of the ports and adapters architecture: You can defer certain aspects of your app to a later point in time or simply implement it later without interrupting your development flow.
src/infra/terminal/printer.ts
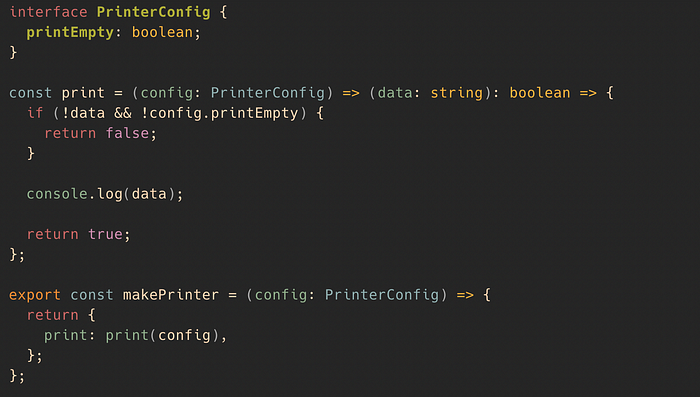
This code is relatively straight forward. A simple console log will do it in our example. You would probably do some fancy byte encoding for your particular printing protocol in real life. The makePrinter factory function also takes a config object. You can pass on some printer-specific attributes here.
The last missing piece is the wiring up of our use case in our main application.
src/main.ts
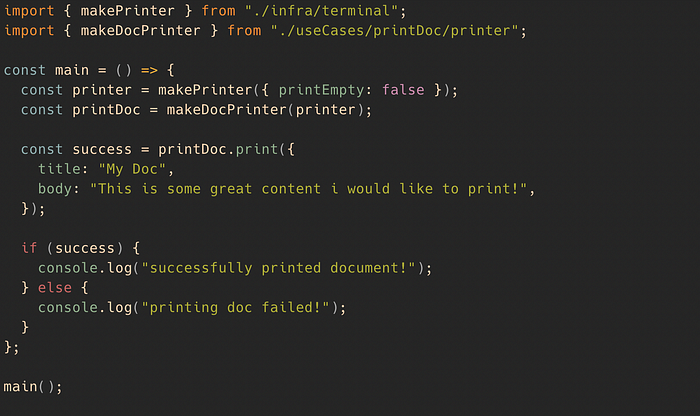
We are calling the makePrinter function and passing some configuration. We are creating the printDoc useCase and pass the printer down to our use case.
Alright, folks, here we have it! You can design any use case in that way if you keep the core principles in mind.
Some key learnings
- Ports and Adapters are an excellent base architecture for your TypeScript application. Interfaces make it possible to use Inversion of Control to invert dependencies. You have now the possibility to structure your app in a way that you can extend it in the future. This applied not only for OOP based apps. This principle can also be used if you prefer a more functional coding style like me.
- Using layers in your app keeps your data flow in order. Every layer has its responsibility, and you should be careful when crossing layer boundaries.
- Use Cases define precisely what your app is doing. It’s easy for the code reader to understand what your app is doing.
- Watch out for leaky abstractions while deciding on layer boundaries. It’s sometimes better to keep your function signature simple.
- An Interface is a helpful tool to avoid direct dependencies on a piece of logic.
- Keep your interfaces close to the consumer.
- Don’t be afraid of architecture
Thank you for reading this article! I hope you found some useful information here.
Comments
Loading comments…