
Photo by Lukas Blazek on Unsplash
What is Node.js?
When we think JavaScript, we think browser, websites, web pages, interactivity, event listeners, onclick, etc. These are all related to the browser.
In fact, the browser used to be the only runtime environment for JavaScript. So whenever we wrote JavaScript we would only really see it in action once we open a web page on the browser.
This limited JavaScript from being used outside of the browser. But now, we can run JavaScript code almost anywhere…how? By installing the one they call, Node.js. Node.js is a new environment for JavaScript.
Now there are two ways to run JavaScript:
-
On a browser environment
-
On a Node.js environment
So to summarize what Node.js is:
-
Node.js is a new(ish) runtime environment for JavaScript.
-
Node.js can be installed on any server, it's open-source and free
-
Node.js allows us to run JavaScript outside the browser, on a server for example
-
Node.js allows us to write backend or server code in JavaScript! Before this was not possible, you had to use Java or PHP for instance.
Now that you have heard of the great almighty Node.js, it's time to install Node.js on your local computer
Please follow the instructions on the official website: https://nodejs.org/en/download/
To check node is properly installed run this command in your terminal:
node --version
What about NPM? Node's equally cool best friend!
So node also has this really cool thing that comes with it called NPM. You don't need to install it separately, it will be there after you install node.
It stands for: node package manager.
Because node is open source, and developers are nice people (usually), developers can expose their projects for other developers to use. This way other developers can benefit and they don't need to write code from scratch.
All these nice developers need to do is turn their code into a module and, they can publish it on npm as a package.
NPM acts as an online marketplace for packages that anybody can use for free to help them out with their project.
For example, to do complex excel processing in our project, we can install a third-party npm package and use it instead of building that logic from scratch. That way we can reduce our development time and focus on our own features.
To use npm, simply go and look for the package you desire (if one exists) on the npm website. In this article, we will use a package I discovered called XLSX
To choose the right package from several other packages that do the same thing, you look for the following key considerations:
-
check out the weekly downloads = more popular = better package
-
make sure it was updated recently = good support
-
read and make sure it has good documentation = easy to use
To install a package, you need to use a command with npm. You need to be in your project folder and run this:
npm install package_name
When you install a third-party package in your project, you are thereby creating a dependency. This means your project depends on another project. This can get messy right? Luckily, npm will manage your dependencies in your project for you.. more on that later! (Hint: package.json)
So anytime somebody wants to run your app npm will look for dependencies and grab the depending code from npm and download it into your local project.
Learn by example! Let's start a Node.js project from scratch!
Let's make an application to parse an excel file from our file system and convert it into a json file. Notice how we are going to use javascript to do this, and we don't even need the browser to do anything.
Alrighty, so to get started, make a folder for your project. Create an index.js file, this will be where our code will be.
Then run the command npm init to create an official node project:
npm init
- Say yes to all the default options
Ok interesting, so you will see a new file package.json that just came about, lets go check it out. Seems like it has some data about our project, okay cool! We will come back to it later..
Alright with that file there, we can do an npm install on a package we chose. Let's install the excel package from before, xslx. This package will allow us to parse our excel and convert it into JSON!
npm install xlsx
OK now let's go back into our package.json and see what happened!
We can see a new object of dependencies { } in our file. In here, there is “xlsx” and the version number. NPM automatically adds our packages in here whenever we do an npm install. NPM keeps track of all the dependencies we install so that when people are running the project for the first time, npm knows what dependencies we need to install to get this project fully working!
Ahh, something else changed too, what is this package-lock.json that appeared?!
NPM will also auto-generate a package-lock.json, you don't need to manage this or edit it at all. It's like a snapshot of package.json. So don't worry too much about it. You shouldn't push or publish this to your git repo either. It's just used locally by npm.
The last thing that we see that also got created was the node_modules folder.
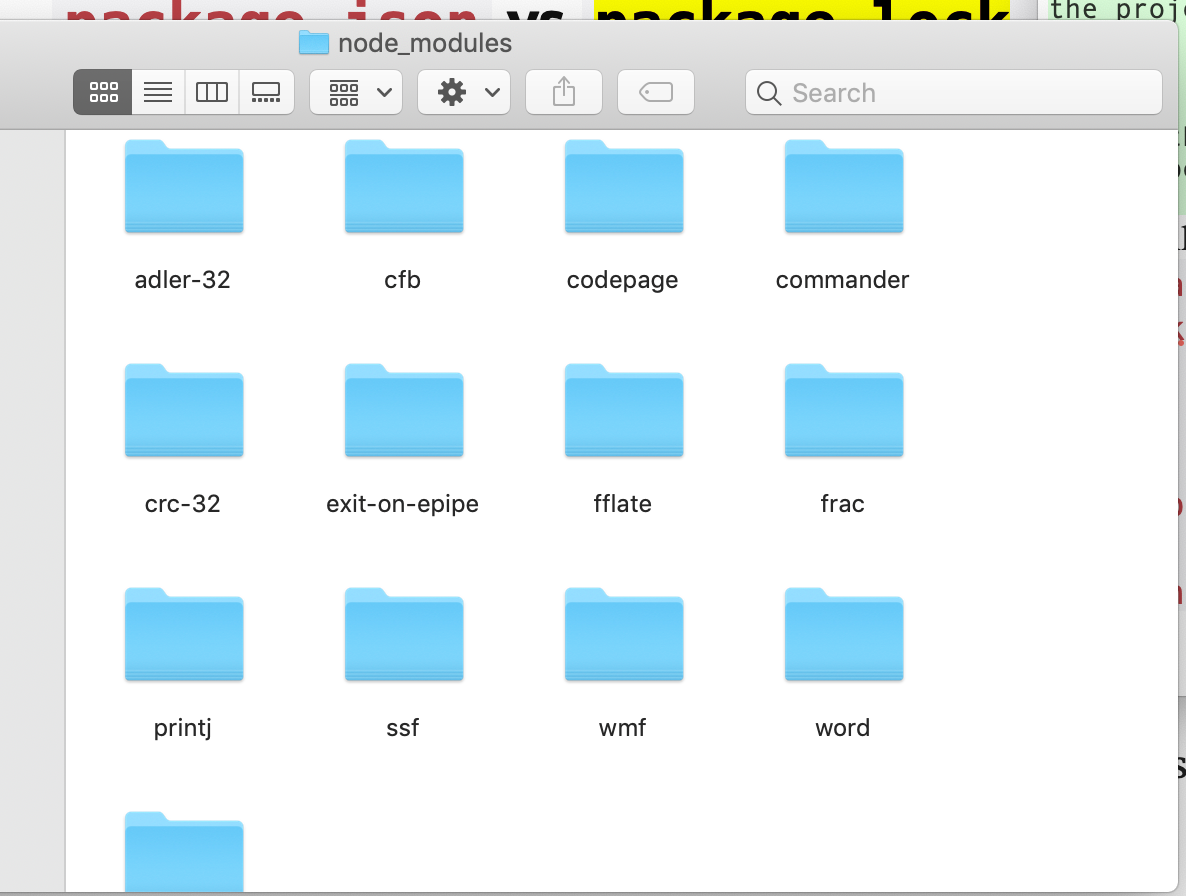
Hold on a second… where did all of these folders come from, I only recognize XLSX, the one that I installed. Okay, so let's open the XLSX folder, and we will see all the code for this package that we can use in our app, so that's good. Seems like a nice developer made this all ready to use for us. Cool cool cool!
Just like any other node project, the XLSX project will also have its own package.json and its own dependencies. Let's open up that package.json and take a look at the dependencies.
"dependencies": {
"adler-32": "~1.2.0",
"cfb": "¹.1.4",
"codepage": "~1.14.0",
"commander": "~2.17.1",
"crc-32": "~1.2.0",
"exit-on-epipe": "~1.0.1",
"fflate": "⁰.3.8",
"ssf": "~0.11.2",
"wmf": "~1.0.1",
"word": "~0.3.0"
},
Ahhuhhh so that's where all those other folders in our node_modules came from. XLSX has its own dependencies.
So as you can see npm is really useful because it allows us to run any project with dependencies just by doing npm install, it will know to install all of those dependencies for us and place them in the node modules folder. It will also install the dependencies, of the dependencies! :-)
So node_modules has all the code of our dependencies. As such it can be large in size.
In fact, since we have that package.json file that tells us exactly what we need to download and install, we don't need to publish the entire node*modules folder since the code can be downloaded at any time using the package.json. That is the whole point of the package.json file. ^_^
So anytime you download a node project, the first thing you do is run NPM INSTALL, this will look at all the package.json(s) and download all the code from npm and place it in node_modules.
npm install
Best practice: In order to not push this large folder, what we typically do is add this in the .gitignore file
node_modules/
And this will not publish the node_modules/ folder to your repo. Saving you time and space! :)
Using an npm package
OK the fun part, — now it's time to actually code haha finally, so let's go back into our index.js file. This is a JavaScript file! Coding in Node is just like JavaScript really, so if you know JavaScript you will be fine! You just need to know the extra features Node.js gives you such as access to your server's file system!
The first thing we need to do is bring in the package we installed as a dependency, so this is done with the require syntax. This will look in the node_modules folder for that package and if it's there it will give you access to the functionality.
const xlsx = require(‘xlsx');
This is the syntax. You can name the variable what you like but the correct syntax is require(‘package name');
So the app we are going to build today is going to take data from an excel file and convert it to JSON and save it as a JSON file on your server.
As I said, we are going to need a third-party open-source package called xlsx.
We will also need access to the file system. This is built-in with node so you don't need to npm install this. But you do need to require it.
var fs = require(‘fs');
Alright so let's just bring in an excel file to this project in the root directory. Please make a note of the name of the file. For this article, I create an Excel file named Data.xlsx and I added it to my project folder.
So let's write our function to convert an excel file to JSON. We will make use of xlsx.readFile() and xlsx.utils.sheet_to_json(). Without these functions, we would have to create these functions ourselves.
-
xlsx.readFile(filePath) — accepts a file name / path
-
xlsx.utils.sheet_to_json(sheet) — converts a single sheet into JSON
function convertExcelFileToJsonUsingXlsx() {

  // Read the file using pathname
  const file = xlsx.readFile('./Data.xlsx');

  // Grab the sheet info from the file
  const sheetNames = file.SheetNames;
  const totalSheets = sheetNames.length;

  // Variable to store our data
  let parsedData = [];

  // Loop through sheets
  for (let i = 0; i < totalSheets; i++) {

      // Convert to json using xlsx
      const tempData = xlsx.utils.sheet_to_json(file.Sheets[sheetNames[i]]);

      // Skip header row which is the colum names
      tempData.shift();

      // Add the sheet's json to our data array
      parsedData.push(...tempData);
  }

 // call a function to save the data in a json file

 generateJSONFile(parsedData);
}
Let's now write another function to store our excel data in a JSON file on our server. Let's make a new function for that to separate our logic.
As you can see below we use the built-in node fs.writeFileSync method which accepts a file path/file name and the data we are writing to that file. We wrap it in a try-catch in case it fails.
-
writeFileSync() —
function generateJSONFile(data) {
   try {
   fs.writeFileSync('data.json', JSON.stringify(data))
   } catch (err) {
   console.error(err)
   }
}
Let's call our function at the top of the file.
convertExcelFileToJsonUsingXlsx();
This is the first function that will run once we execute this file. It will convert the excel file to JSON and then call the second function to save the data into a JSON file.
Speaking of running it…how do we run this node project?
So we don't need to run our code on the browser anymore! We just run it with node. We can run it anywhere a node environment exists. With that said, the simplest way to run our code is simply using just the following command:
node index.js
After we run this command, node will run all the contents of index.js, just like any other javascript file, it will execute code line by line. You can see the output is indeed a JSON file of all our data! This means our code works! Yay!
Another way to run our code is with npm start. To make this work, you must go to the package.json file and update the scripts object. We add a new start script, so that we are able to call npm start. Notice how it is set to node index.js which is an equivalent command. Note: in the scripts object you can define other commands like npm test to run your tests.
“scripts”: {

  “test”: “echo \”Error: no test specified\” && exit 1",

  “start”: “node index.js”

},
So now we can use the command npm start instead of node index.js to start our application. This is more normal and what people are used to when running a project.
Ta-da! Congrats on trying out your first NPM package and running your first Node.js project.
Comments
Loading comments…