While working on a small React application for a client recently, I was asked to create a “sticky banner” that would appear on every page of a site. That banner would contain a link that would take a user from anywhere on the site and bring them to a specific part of a specific page. In a non-React application, a link like this could be easily made using and anchor element and the href attribute. In React however, internal navigation cannot be handled with anchor tags, which left me to find another way.
After some quick searches on Google to find out if there was a generally accepted solution, I found that most people seemed content to use additional libraries such as react-scroll, but I wanted to find a way to use react-router’s built-in features to work for me. Here is what I found!
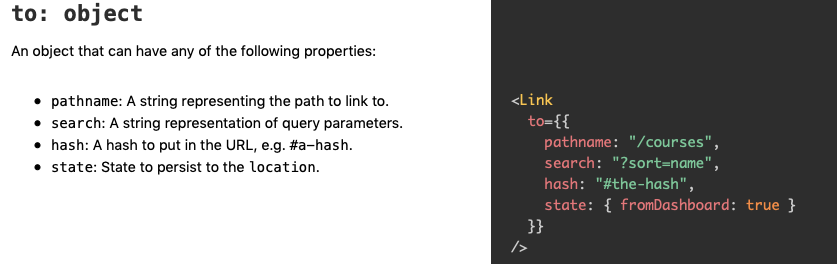
To do this, I used react-router’s Link component. I had used the NavLink for my navigation bar to take advantage of its styling options, but the Link component has additional options that were perfect for this situation. Specifically, the “to: object” options, as explained at react training.
 https://reacttraining.com/react-router/web/api/Link/to-function
Now, looking at these options, you might think I’d just use the hash option, but as far as I can tell, the hash option only works when linking to a part of a page that has already been loaded, and not for linking to an entirely different component. Instead, the key to making this work was to use state! Once I knew that there was a way to pass state through my Link component, I knew that there would have to be a way to access that state in the new component. The example given on the site was also the perfect clue for how to best use this discovery. Here is my implementation of the Link component:
<div className='banner' onClick={this.handleScroll} >
<Link className='banner-link' to={{
pathname: '/designs',
state: {
fromBanner: true
}
}}
>
ULTIMATE WEDDING PACKAGE
</Link>
</div>
After passing the state fromBanner: true, all I needed to do was check that state in the component I was linking to, and then take the appropriate action from there. However, even though I am sending “state”, this state won’t be a part of the state of the component I’m linking to. Instead, this state will located in the component’s props. Adding a console.log(this.props) into ComponentDidMount reveals this fun information:
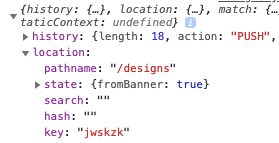
If I load this component without clicking on the link, that state is listed as “null”, but with the link the state shows what I passed through using the to: object above. And just like that, pretty much everything is in place. From here, I only needed to do two things:
-
Run a check in ComponentDidMount to check this.props.location.state, and then scroll to appropriate location if it comes back true
-
Write additional logic into the link so that it will still scroll to that location if the link is clicked from within the target Component
The first part required adding a ref to the element I wanted to scroll to. I created the ref at the top of the component by writing targetRef=React.CreateRef(), and then attaching that ref to the element I wanted to scroll to: <div ref={ref => {this.targetRef = ref}} >
Finally, I put the ref into action by calling this function in the ComponentDidMount of my target component:
scrollToTarget = () => {
  setTimeout(() => {
    this.targetRef.scrollIntoView({ behavior: 'smooth' })
  }, 500);
}
// setTimeout is optional, but instantly scrolling can be jarring
For the second part, I did two things. First I passed my setTimeout function to the Banner component when calling it from the target Component. Second, I added an onClick function to the parent element of the Link that checks for the prop I passed in the previous step. If the prop exists, it runs the function to scroll to the target ref.
And that’s it! Just below is the code I used for my Banner component, followed by the code for the target component. Thank you for reading, and happy coding!
import React from "react";
import { Link } from "react-router-dom";
export default class Banner extends React.Component {
handleScroll = () => {
if (this.props.scrollToTarget) {
this.props.scrollToTarget();
}
};
render() {
return (
<div className="banner" onClick={this.handleScroll}>
<Link
className="banner-link"
to={{
pathname: "/designs",
state: {
fromBanner: true,
},
}}
>
ULTIMATE WEDDING PACKAGE
</Link>
</div>
);
}
}
import React from "react";
import Banner from "./Banner";

export default class Designs extends React.Component {
  targetRef = React.createRef();

  componentDidMount = () => {
    if (this.props.location.state) {
      this.scrollToTarget();
    }
  };

  scrollToTarget = () => {
    setTimeout(() => {
      this.targetRef.scrollIntoView({
        behavior: "smooth",
      });
    }, 500);
  };

  render() {
    return (
      <>
        <Banner scrollToTarget={this.scrollToTarget} />
        <div>// some content</div>
        <div>// some other content</div>
        <div
          ref={(ref) => {
            this.targetRef = ref;
          }}
        >
          // the content you want the link the scroll to
        </div>
      </>
    );
  }
}
Comments
Loading comments…