
Introduction
In our current scenario, we all know that infrastructure as a code has been a key player for deploying multiple infrastructure components. This usage of IaaC tools has changed a lot of things in terms of cost, security, availability, speed to deploy, and many more things.
But if we look at the past 10–15 years, so that time people has to provide their effort to create infrastructure elements and most importantly they had to do these things separately within a short time. That was a very challenging task to do manually and separately. Since then different IaaC tools come into the picture, among them Terraform has been chosen by most of the clients just because of its benefits rather than others.
Benefits:
- Multi-Cloud Infrastructure Deployment: Terraform can create infrastructures in a multi-cloud environment. It can be applied to AWS, Azure, GCP as well as On-Premises environments and even cross-cloud platforms also.
- Reduced Development Costs: Development costs can be reduced by creating sample infrastructures or on-demand environments.
- Infrastructure-as-a-code: As we codify infrastructure elements over here, so we will have a copy after deploying as well. To create a DR environment, this copy will be playing an important role to deploy so quickly. In future, if we need to create a few common elements which are already here now, then we just need to execute that copy only, so deployment could be completed within 7–8 mins.
- Reduced Time to Provision: It takes less time to provision and even to create any element as well. As a manual task, provisioning can be lengthy due to human interference, but as it’s fully automated, so deployment time has been reduced to a great extent.
Architecture:
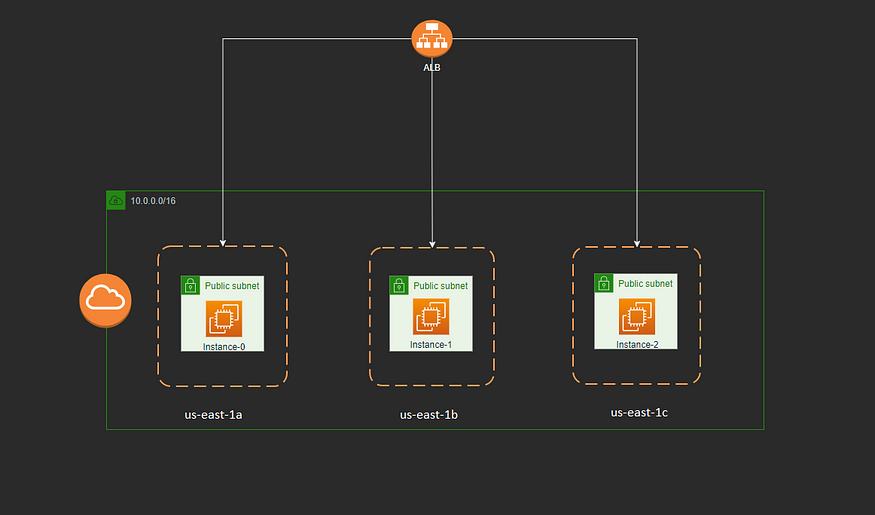
Deployment Elements:
- Create a VPC
- Create 3 Public Subnets
- Create Internet Gateway
- Public Route Tables
- Security Group
- 3 EC2 Instances
- Target Group creation and Application Load Balancer
Note: Here, I have created a single file for networking elements like VPC, subnets, Internet gateway and Route tables. Similarly created ec2.tf for only EC2 instances and so on.
Step 1: Define Provider Details
- Create provider.tf to mentioned cloud provider details:
    terraform {
      required_providers {
        aws = {
          source  = "hashicorp/aws"
          version = "3.61.0"
        }
      }
    }


# Configure AWS provider:


    provider "aws" {
      region  = "us-east-1"
      version = "3.61.0"
    }
Step 2: Defining All Required Variables in the variable.tf File
#####################################################
# VPC Requirement
#####################################################

variable "custom_vpc" {
  description = "VPC for testing environment"
  type        = string
  default     = "10.0.0.0/16"
}

#####################################################
# EC2 Requirement
#####################################################

variable "instance_tenancy" {
  description = "it defines the tenancy of VPC. Whether it's defsult or dedicated"
  type        = string
  default     = "default"
}

variable "ami_id" {
  description = "ami id"
  type        = string
  default     = "ami-087c17d1fe0178315"
}

variable "instance_type" {
  description = "Instance type to create an instance"
  type        = string
  default     = "t2.micro"
}

variable "ssh_private_key" {
  description = "pem file of Keypair we used to login to EC2 instances"
  type        = string
  default     = "./Keypair-01.pem"
}
Step 3: Create Networking Components (VPC, Subnets, Igw, Route Tables)
- First, create the vpc_subnet.tf file and put the below codes:
#############################################

#Creating Virtual Private Cloud:

#############################################
resource "aws_vpc" "custom_vpc" {
  cidr_block           = var.custom_vpc
  instance_tenancy     = var.instance_tenancy
  enable_dns_support   = true
  enable_dns_hostnames = true
}

#############################################

# Creating Public subnet:

#############################################

resource "aws_subnet" "public_subnet" {
  count             = var.custom_vpc == "10.0.0.0/16" ? 3 : 0
  vpc_id            = aws_vpc.custom_vpc.id
  availability_zone = data.aws_availability_zones.azs.names[count.index]
  cidr_block        = element(cidrsubnets(var.custom_vpc, 8, 4, 4), count.index)

  tags = {
    "Name" = "Public-Subnet-${count.index}"
  }
}

#############################################

# Creating Internet Gateway:

#############################################

resource "aws_internet_gateway" "igw" {
  vpc_id = aws_vpc.custom_vpc.id

  tags = {
    "Name" = "Internet-Gateway"
  }
}

#############################################

# Creating Public Route Table:

#############################################
resource "aws_route_table" "public_rt" {
  vpc_id = aws_vpc.custom_vpc.id

  tags = {
    "Name" = "Public-RouteTable"
  }
}

#############################################

# Creating Public Route:

#############################################

resource "aws_route" "public_route" {
  route_table_id         = aws_route_table.public_rt.id
  destination_cidr_block = "0.0.0.0/0"
  gateway_id             = aws_internet_gateway.igw.id
}

#############################################

# Creating Public Route Table Association:

#############################################

resource "aws_route_table_association" "public_rt_association" {
  count          = length(aws_subnet.public_subnet) == 3 ? 3 : 0
  route_table_id = aws_route_table.public_rt.id
  subnet_id      = element(aws_subnet.public_subnet.*.id, count.index)
}

#############################################

# Creating VPC FlowLogs:

#############################################

resource "aws_flow_log" "vpc_flow_log" {
  iam_role_arn         = data.aws_iam_role.iam_role.arn
  log_destination_type = "cloud-watch-logs"
  log_destination      = aws_cloudwatch_log_group.cloudwatch_log_group.arn
  traffic_type         = "ALL"
  vpc_id               = aws_vpc.custom_vpc.id
}

##############################################

# Creating CloudWatch Log Group:

##############################################

resource "aws_cloudwatch_log_group" "cloudwatch_log_group" {
  name              = "VPC-FlowLogs-Group"
  retention_in_days = 30
}
Step 4: Create Custom Security Group
- Create security_group.tf and put below codes:
locals {
  ingress_rules = [{
    name        = "HTTPS"
    port        = 443
    description = "Ingress rules for port 443"
    },
    {
      name        = "HTTP"
      port        = 80
      description = "Ingress rules for port 80"
    },
    {
      name        = "SSH"
      port        = 22
      description = "Ingress rules for port 22"
  }]

}

resource "aws_security_group" "sg" {

  name        = "CustomSG"
  description = "Allow TLS inbound traffic"
  vpc_id      = aws_vpc.custom_vpc.id
  egress = [
    {
      description      = "for all outgoing traffics"
      from_port        = 0
      to_port          = 0
      protocol         = "-1"
      cidr_blocks      = ["0.0.0.0/0"]
      ipv6_cidr_blocks = ["::/0"]
      prefix_list_ids  = []
      security_groups  = []
      self             = false
    }
  ]

  dynamic "ingress" {
    for_each = local.ingress_rules

    content {
      description = ingress.value.description
      from_port   = ingress.value.port
      to_port     = ingress.value.port
      protocol    = "tcp"
      cidr_blocks = ["0.0.0.0/0"]
    }
  }
  tags = {
    Name = "AWS security group dynamic block"
  }

}
Step 5: Create 3 EC2 Instances
- Create an ec2.tf file and put the below codes:
####################################################################

# Creating 3 EC2 Instances:

####################################################################

resource "aws_instance" "instance" {
  count                = length(aws_subnet.public_subnet.*.id)
  ami                  = var.ami_id
  instance_type        = var.instance_type
  subnet_id            = element(aws_subnet.public_subnet.*.id, count.index)
  security_groups      = [aws_security_group.sg.id, ]
  key_name             = "Keypair-01"
  iam_instance_profile = data.aws_iam_role.iam_role.name

  tags = {
    "Name"        = "Instance-${count.index}"
    "Environment" = "Test"
    "CreatedBy"   = "Terraform"
  }

  timeouts {
    create = "10m"
  }

}

resource "null_resource" "null" {
  count = length(aws_subnet.public_subnet.*.id)

  provisioner "file" {
    source      = "./userdata.sh"
    destination = "/home/ec2-user/userdata.sh"
  }

  provisioner "remote-exec" {
    inline = [
      "chmod +x /home/ec2-user/userdata.sh",
      "sh /home/ec2-user/userdata.sh",
    ]
    on_failure = continue
  }

  connection {
    type        = "ssh"
    user        = "ec2-user"
    port        = "22"
    host        = element(aws_eip.eip.*.public_ip, count.index)
    private_key = file(var.ssh_private_key)
  }

}


####################################################################

# Creating 3 Elastic IPs:

####################################################################

resource "aws_eip" "eip" {
  count            = length(aws_instance.instance.*.id)
  instance         = element(aws_instance.instance.*.id, count.index)
  public_ipv4_pool = "amazon"
  vpc              = true

  tags = {
    "Name" = "EIP-${count.index}"
  }
}

####################################################################

# Creating EIP association with EC2 Instances:

####################################################################

resource "aws_eip_association" "eip_association" {
  count         = length(aws_eip.eip)
  instance_id   = element(aws_instance.instance.*.id, count.index)
  allocation_id = element(aws_eip.eip.*.id, count.index)
}
Step 6: Fetch Availability Zone and Instance Role Details Using Data Block
- Create data.tf and put below code:
###################################################

# Fetching all availability zones in us-east-1

###################################################

data "aws_availability_zones" "azs" {}}
Step 7: Create Target Group and Application Load Balancer
- Create alb.tf and put below code:
####################################################
# Target Group Creation
####################################################

resource "aws_lb_target_group" "tg" {
  name        = "TargetGroup"
  port        = 80
  target_type = "instance"
  protocol    = "HTTP"
  vpc_id      = aws_vpc.custom_vpc.id
}

####################################################
# Target Group Attachment with Instance
####################################################

resource "aws_alb_target_group_attachment" "tgattachment" {
  count            = length(aws_instance.instance.*.id) == 3 ? 3 : 0
  target_group_arn = aws_lb_target_group.tg.arn
  target_id        = element(aws_instance.instance.*.id, count.index)
}

####################################################
# Application Load balancer
####################################################

resource "aws_lb" "lb" {
  name               = "ALB"
  internal           = false
  load_balancer_type = "application"
  security_groups    = [aws_security_group.sg.id, ]
  subnets            = aws_subnet.public_subnet.*.id
}

####################################################
# Listener
####################################################

resource "aws_lb_listener" "front_end" {
  load_balancer_arn = aws_lb.lb.arn
  port              = "80"
  protocol          = "HTTP"

  default_action {
    type = "redirect"

    redirect {
      port        = "443"
      protocol    = "HTTPS"
      status_code = "HTTP_301"
    }
  }
}


####################################################
# Listener Rule
####################################################

resource "aws_lb_listener_rule" "static" {
  listener_arn = aws_lb_listener.front_end.arn
  priority     = 100

  action {
    type             = "forward"
    target_group_arn = aws_lb_target_group.tg.arn

  }

  condition {
    path_pattern {
      values = ["/var/www/html/index.html"]
    }
  }
}
Step 8: Create a Shell Script for Bootstrapping Few Tasks
- Create a bash file userdata.sh and paste the below commands:
#!/bin/bash
sudo su
yum update -y
yum install httpd -y
systemctl start httpd
systemctl enable httpd
echo 'Welcome to Instance' >> /var/www/html/index.html
sed -i 's/^PasswordAuthentication no/PasswordAuthentication yes/' /etc/ssh/sshd_config
systemctl restart sshd
Step 9: Provide a Few Required Outputs
- Create Output.tf file and put below codes:
output "private_ip" {
  value = zipmap(aws_instance.instance.*.tags.Name, aws_instance.instance.*.private_ip)
}

output "public_ip" {
  value = zipmap(aws_instance.instance.*.tags.Name, aws_eip.eip.*.public_ip)
}

output "public_dns" {
  value = zipmap(aws_instance.instance.*.tags.Name, aws_eip.eip.*.public_dns)
}

output "private_dns" {
  value = zipmap(aws_instance.instance.*.tags.Name, aws_instance.instance.*.private_dns)
}

output "alb_id" {
  value = aws_lb.lb.dns_name
}
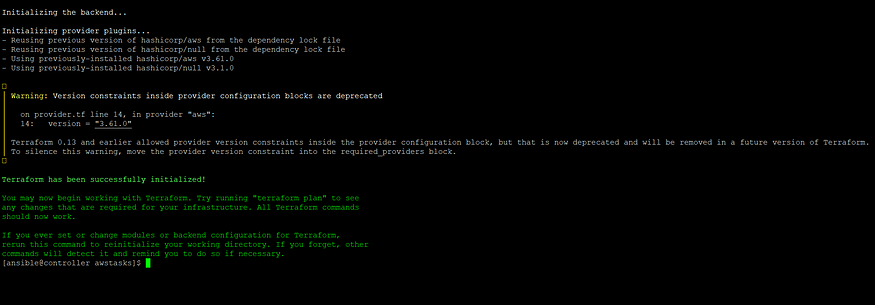
After creating all required tf files now it’s time to initiate terraform itself so that any modules or providers can be downloaded. Before doing that we can format all tf files to make this more understandable.
terraform fmt: Use this command to make all files understandable to all. It can detect whether any piece of code is serialized or not and if yes, then it removes that deserialization and gets this more standard.
terraform validate: This command is used to validate the codes which are written. If there is any syntax mismatching, then it will throw an error to get this fixed. Otherwise, it will show like the below screenshot.

terraform init: This command is used to initialize modules or providers mentioned in the script, which means by doing that terraform simply downloads all APIs based on the cloud provider and which can take forward remaining operations.
terraform plan: Once we initialize, then we need to know the plan how to terraform will proceed with other operations or which resources should be created first or when, everything will be visible by using terraform plan command.
terraform apply: After the terraforming plan, we need to apply the configuration, so that it will be deployed in the AWS environment.
After deploying infrastructure elements, now I’m going to show you how it looks like in the AWS console. Let’s take a look!


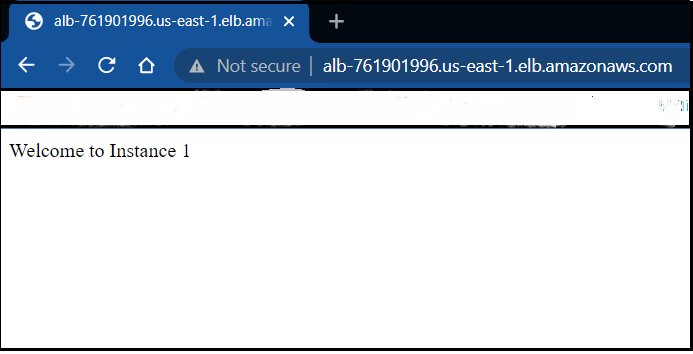
Now, we have come to an end, we have seen that using ALB endpoint we’re able to browse instances, so what our motive was has been successful. Going forward we can deploy an application as well instead of a sample statement.
Hope you’ve liked this blog. Thank you for reading.
Please like it, follow me for more information and comment if you have any suggestions or improvement plans. Also, you can follow this repo. Here I will update all the scripts of Terraform!
Comments
Loading comments…