You’ve developed a backend server and wanted to deploy it, but the main question is to keep it scalable and responsive. This is when AWS, the leader in software scalability, might come to your mind.
One of the deployment services of AWS is EC2 (Elastic Compute Cloud), it’s a scalable and easy to use container instance that you use to smoothly start, restart, and stop any time you want.
In our case, we’ll deploy a sample Node.js server. So let’s get started.
Create a Sample Node.js Server
To create our Node.js server, we’ll use Express as a fast Node.js micro-framework.
Start by creating a folder and name it sample_nodejs_server.
As given in the code below:
mkdir sample_nodejs_server
Then let’s create our root file index.js. If you’re on Linux or macOS, you can do this by typing the following in the terminal:
touch index.js
Once you create the repo and the root file, go and initialize it with npm as an npm project:
npm init -y
Now let’s install express as shown below:
npm install express
Then we’ll create a sample API service that says “Hello World”
const express = require("express");

const app = express();

const PORT = 4000;

app.get("/", (req, res) => {
  res.send("Hello world, let's go Cloud");
});

app.listen(process.env.PORT || PORT, () => console.log(`Listening on ${PORT}`));
That’s all for our server, now let’s go create our AWS EC2 instance.
First, go to your AWS Management Console, then find and click on the EC2 service:

And click on Instances:

Click on Launch instances:

Next, choose your Amazon Machine Image, it’s your VM based core image.
In our case we’ll go for Ubuntu as our AMI (Amazon Machine Image) :

The next step is to choose our Instance Type, it’s about the Instance capacities such as CPU, Memory and Instance data I/O Storage, be careful here because it depends on your need. All are not included in the free tier and you might need more capacities.

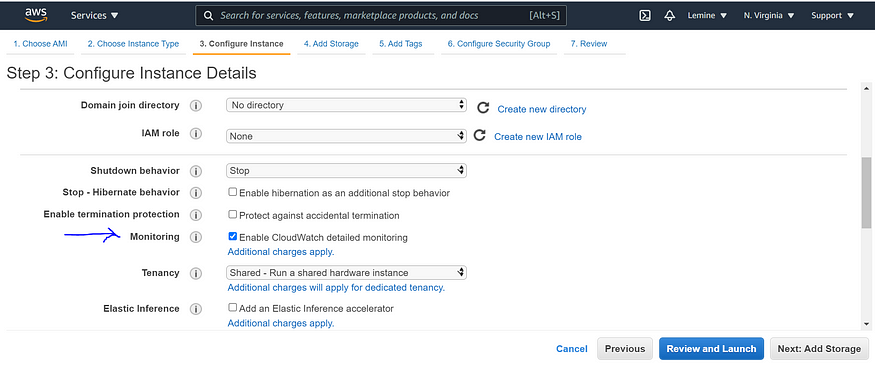
Then you’ll need to configure the rest of your Instance details like the number of instances, subnet and IAM role (you’ll need this one if you want to add some specific access privileges for your users), you can keep all of this as default but one option is important that you’ll need later is Enable CloudWatch detailed monitoring, this will give you all the details of your instance further state.


Next, you can add more storage to your instance and device settings, but we’ll leave by default 8GB with SSD and no encryption:

Then, if you want to add tags to your instance to identify it, go ahead; but we’ll skip it.

The next step is the most important because here we’ll define your security group i.e., the access types to your instance like if the access is public or has been routed with a specific configuration:

As you can see above, we’ve added the HTTP and HTTPS access, and at the last line, custom access from anywhere on port 4000 because our server will be running on this port.
At last, review and launch your Instance :


Once you click on the Launch button, a pop-up will show up to ask you to create a key-pair, you’ll need this one to access your instance later, so just choose create a new key-pair option, download it, and then click on Launch Instances.
This will just take a few seconds to create your instance:

Now just click on your Instance ID as in the image below to see your instance running:


Now you need to connect remotely to your instance to deploy your server, navigate to your instance summary, and click on Connect.

Then just follow the instructions given below:

In our case we’ll just open the terminal and type:
ssh -i “medium_art_test.pem” ubuntu@ec2–3–90–17–45.compute-1.amazonaws.com
where medium_art_test.pem is the key-pair that we generated, so be sure you put the right path to the file, and ubuntu@ec2–3–90–17–45.compute-1.amazonaws.com is our instance:

Now let’s bring in our Node.js server repo, so as you might guess our repo has to be somewhere remotely accessible like on GitHub, so let’s just clone it:

After this, you’ll need to install Node.js on this instance to be able to run your server, but before this, you’ll need to update the AMI Ubuntu packages (this would be instinctive if you’re a Linux user), so just type:
sudo apt update
Then you can install Node.js:
sudo apt install nodejs
Be sure that npm was installed, otherwise, you’ll have to do it as well :
sudo apt install npm

Now just navigate to your folder and type:
npm i

Finally, start your server with the legendary command:
node index.js

To check if your server is well deployed, go to your AWS console, then to Connect to instance section and copy your Instance’s public IP address:

And paste it in a new browser tab with the port that you defined in your security group (in our case, it was port 4000). As shown below:
[3.90.17.45:4000](http://3.90.17.45:4000/)
Voilà

Finally, our server is running, but it’s not permanent. Once we close the SSH connection, the server will stop, so if you want to keep it running permanently then you have to use pm2 which is a JavaScript process manager for Node.js. You can install it with the following code:
sudo npm i -g pm2
Then run your project with pm2 start index.js instead of node index.js as shown below:

With that done, our server is up and present permanently on our Instance. You can stop it with the following code:
pm2 stop index.js
As you might have noticed, AWS EC2 works as a VM, you can deploy servers as long as your Instance performs.
To stop it all, you only have to stop your Instance:

Note: Remember, every time you stop and restart your Instance, its public IP address changes, so be sure to have the right connection.
That’s all folks, hope you enjoyed it, keep discovering!
