Application Load Balancer offers various routing options tailored to your specific requirements. Among these options is the ability to establish rules that direct incoming traffic based on the domain name indicated in the Host header. This feature allows us to route traffic from one.example.com to one target group and from two.example.com to another target group. Let’s get hands-on with this feature.
Step 1 : Configuring the EC2 Instances:
First, let’s create a Virtual Private Cloud (VPC) that will host our resources. We will create private and public subnets in two availability zones and host our websites on the private subnets.
The first EC2 instance is an Amazon Linux AMI2 , and the webserver (Apache) displays the message “Hello World from ip-10–0–2–169.us-west-1.compute.internal”. It has the hostname poojaghimire.com.np
The second EC2 instance is an Amazon Linux AMI2 , and the webserver (Apache) displays the message “Hello World from ip-10–0–4–196.us-west-1.compute.internal”. It has the hostname ghimirepooja.com.np .
Step 2 : Setting up the Target Groups:
Two target groups were created and instances with our web server were registered to the target groups.
Fig. Registering one Instance to the target group:
Fig. Registering second Instance to the second target group:
Step 3 : Creating the Load Balancer
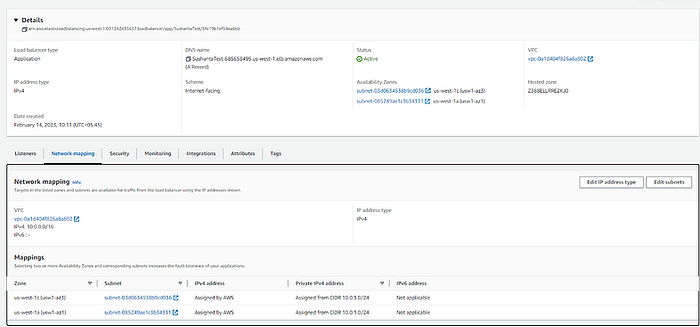
We now provision an Application Load Balancer. In the ALB creation window, make sure to choose the VPC and the two availability zones that host our target EC2 instances . A security group also needs to be created to allow communication through the target port (port 80).
Fig Creating the Application Load Balancer:
Step 4 : Configuring the Routing and Listener Segment
Now, we need to set up a listener by selecting a protocol (in this case, HTTP) and specifying a port. As the default action, a Lambda function was activated.
From the “Load Balancers” page, select the load balancer and then further move to the Listeners tab:
Navigate to the Listeners tab and under the “Rules” column, click on the “View/Edit rules” link. A new page appears here first; click on the “+” icon, then click on the “Insert Rule” link.
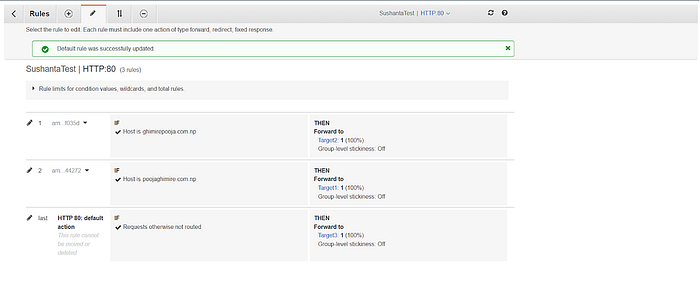
We added rules that forwarded different Host header to different web servers.
Fig. Setting up Listener Rules:
Step 5: Registering the Domain
For the host-based routing to function over the internet, we have to register the hostnames with Route 53 and map them with the load balancer DNS. Chose “Create hosted zone” in the Route53 dashboard.
Next, our domain name to where traffic will be routed to was entered. For the “type” field, “Public hosted zone” was set.
In the “Records” section, choose “Create record”.
On the “Choose routing policy” page, simple routing was chosen then following configuration for Value/Route traffic to was set:
- “Alias to Application and Classic Load Balancer” was chosen.
- The region where the load balancer is deployed was chosen.
- Then our Load Balancer was chosen.
Fig. Route53 records for the first domain:
Fig. Route53 records for the second domain:
Step 6: Testing the Setup
After completing these steps , we can test to see if our implementation is working.
As we can see , when poojaghimire.com.np is the domain entered, the ALB redirects to the webserver hosted in the instance in the target group ‘Target1’.
Fig. Message in our first webserver:
Similarly, when ghimirepooja.com.np is the domain entered, the ALB redirects to the webserver hosted in the instance in the target group ‘Target2’.
Fig. Message in our second webserver:
Step 7: Adding SSL certificates to the Load Balancer
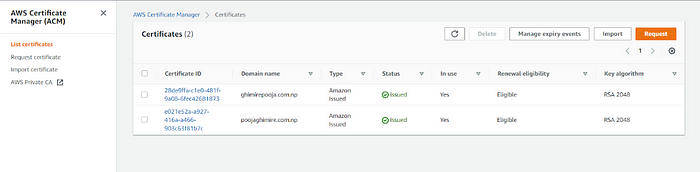
We can now create SSL certificates for both the domains using AWS Certificate Manager (ACM).
Fig. Provisioning SSL certificates for our domains:
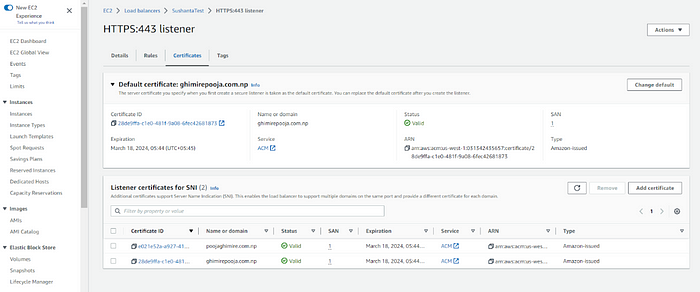
Let us now include the certificates in our load balancer. Application Load Balancers (ALB) supports the use of multiple TLS/SSL certificates through Server Name Indication (SNI). This means that you can host multiple TLS-secured applications, each with its own TLS certificate, behind a single load balancer. To utilize SNI, all that’s required is to associate multiple certificates with the same secure listener on your load balancer. ALB will automatically select the most suitable TLS certificate for each client.
Fig. Adding SSL certificates to the Load Balancer:
Voila! Host Based Routing in AWS Application Load Balancer is now achieved.
Comments
Loading comments…