
The official version of Vue 3 will release in Q3 2020. It is currently in the release candidate stage that means that the APIs, core, structures are stable and able to become a production release unless significant bugs emerge. Therefore, it’s an appropriate time to figure out which programming differences between Vue 3 and Vue 2 and make the necessary adaptation.
Vue 3 does not change absolutely with Vue 2 but when completed rewriting it from Vue 2, some expected upgrades turn into a reality. The expected means that it makes our application smaller, faster, and more powerful.
This article is for those who have experience with Vue 2.
The Essentials
Creating App
Firstly, looking at the way to create an app, you will see the difference in syntax. Not only syntax but also essence is changed.
Vue 2
import Vue from "vue";
import App from "./App.vue";

Vue.config.productionTip = false;

new Vue({
  render: (h) => h(App),
}).$mount("#app");
Vue 3
import { createApp } from "vue";
import App from "./App.vue";
import "./index.css";

createApp(App).mount("#app");
Reason for change
-
Global configurations make issues during testing in unit tests because test cases can affect each other by global configuration. All of those effects are pollution.
-
Vue 3 provides different global configurations but it makes it difficult to share a copy of configuration to multiple apps.
Example:
- Vue 2
// this mixin affects both below instances
Vue.mixin({
  /* ... */
});

const app1 = new Vue({ el: "#app-1" });
const app2 = new Vue({ el: "#app-2" });
- Vue 3
const app = createApp(App);
// This configuration effect only 1 instance
app.mixin(/* ... */);
app.mount("#app");
Multiple Root
In Vue 2, you implement only one single root node in the template but Vue 3 no longer requires a single root node for components that means it provides developer multiple root in the template.

This message never appears in Vue 3.
Vue 2
<template>
  <div>
    <h1>{{ msg }}</h1>
    <button @click="count++">count is: {{ count }}</button>
    <p>Edit <code>components/HelloWorld.vue</code> to test hot module replacement.</p>
  </div>
</template>
Vue 3
<template>
  <h1>{{ msg }}</h1>
  <button @click="count++">count is: {{ count }}</button>
  <p>Edit <code>components/HelloWorld.vue</code> to test hot module replacement.</p>
</template>
Composition API
The reasons for creating the composition API are:
-
Large components become difficult to read and maintain.
-
Managing and maintaining logic between components is a big problem (mixins).
Therefore, the appearance of the composition API will solve the above issues.
The features of composition API includes:
-
Optimal TypeScript support.
-
A component is too large and a good code organization is mandatory.
-
Reusable code is required.
Note: If you want to use composition API in Vue 2, you can use this plugin.
Setup
To use Composition API, we should start with the setup() method.
<template>
  <!-- your template code -->
</template>
<script>
export default {
  setup() {
    // more code to write
  }
};
</script>
In Vue 3, you can replace the setup() method by some following options:
-
Components
-
Props
-
Data
-
Methods
-
Computed Properties
-
Lifecycle methods
Note: Vue 3 development can use all of the above normally in the same way of Vue 2 without the setup() method.
<template>
  <!-- template code -->
</template>
<script>
export default {
  name: "App",
  props: {
    /*...*/
  }
  components: {
    /*...*/
  },
  data(){
    return {
      /*...*/
    }
  },
  computed:{
    /*...*/
  },
  watch:{
    /*...*/
  },
  methods: {
    /*...*/
  },
  created(){
    /*...*/
  },
  mounted(){
    /*...*/
  }
};
</script>
Reactive References
The ref is “Reactive Reference” which wraps primitive data to allow us to track change. Don’t forget that we use data() to wrap the primitive inside object in Vue 2.
Vue 2
<template>
  <div id="app">
    <div>Name: {{ name }}</div>
  </div>
</template>

<script>
export default {
  name: "App",
  data(){
    return {
      name: "Name"
    }
  }
};
</script>
Vue 3
<template>
  <div>Name: {{ name }}</div>
</template>
<script>
import { ref } from "vue";
export default {
  setup() {
    const name = ref('Name');
    return { name };
  }
};
</script>
Methods
Vue 2 has a separate section for methods but in Vue 3, you can define methods in setup()method. This is an example of creating methods using the setup() method.
Vue 2
<template>
  <div>
    <div>Amount: {{ amount }}</div>
    <button @click="increaseAmount()">Increase Capacity</button>
  </div>
</template>

<script>
export default {
  data(){
    return {
      amount: 3,
    }
  },
  methods: {
    increaseAmount() {
      this.amount+=1
    }
  }
};
</script>
Vue 3
<template>
  <div>
    <div>Amount: {{ amount }}</div>
    <button @click="increaseAmount()">Increase Capacity</button>
  </div>
</template>

<script>
import { ref } from "vue";
export default {
  setup() {
    const amount = ref(3);
    function increaseAmount() {
      amount.value+=1
    }
    return { amount, increaseAmount };
  }
};
</script>
Computed
Vue 2 has a separate section for computed but you can define a function in the setup()method. Let me show you how to implement computed in the setup() method.
Vue 2
<template>
  <div id="app">
    <p>Upper: {{ upperName }} out of {{ name }}</p>
  </div>
</template>
<script>
export default {
  data(){
    return {
      name: "author",
    }
  },
  computed: {
    upperName(){
      return this.name.toUpperCase() + "VUE_3";
    }
  }
};
</script>
Vue 3
<template>
  <div id="app">
    <p>Upper: {{ upperName }} out of {{ name }}</p>
  </div>
</template>
<script>
import { ref, computed } from "vue";
export default {
  setup() {
    const name = ref("author");
    const upperName = computed(() => {
      return name.value.toUpperCase() + "VUE_3";
    });
    return { name, upperName };
  }
};
</script>
Watch
Vue 2 provides a way which to observe and react to data changes, is the watch properties but Vue 3 provides something new to do that.
Vue 2
<template>
  <div>
    <input type="text" v-model="name" />
  </div>
</template>

<script>
export default {
  data(){
    return {
      name: null,
    }
  },
  watch: {
    name(newVal, oldVal){
      console.log(`${newVal} ${oldVal}`);
    }
  }
};
</script>
Vue 3
The new version provides a new thing for reactive observing the change of data called watchEffect(). It will re-run when their dependencies change.
<template>
  <div>
    <input type="text" v-model="name" />
  </div>
</template>

<script>
import { ref, watchEffect } from "vue";
export default {
  setup() {
    const name = ref('');
    watchEffect(() => {
      console.log(name.value);
    })
    return { name };
  }
};
</script>
Or you can use the watch function that is familiar with Vue 2.
<template>
  <div>
    <input type="text" v-model="name" />
  </div>
</template>

<script>
import { ref, watch } from "vue";
export default {
  setup() {
    const name = ref('');
    watch(name, (newVal, oldVal) => {
      console.log(`${newVal} ${oldVal}`);
    })
    return { name };
  }
};
</script>
Props
You can access props in setup without this like that:
  setup(props) {
    watch(() => {
      console.log(props.name);
    });
  }
Remove Vue filter
Filter which is deprecated in Vue 3, can be used to apply common text formatting.
Example of a filter in Vue 2:
<template>
  <div id="app">
    <img alt="Vue logo" src="./assets/logo.png" />
    <HelloWorld msg="Welcome to Your Vue.js App" />
    {{ new Date() | formatUnix}}
  </div>
</template>

<script>
import HelloWorld from "./components/HelloWorld.vue";
import moment from "moment";
export default {
  name: "App",
  components: {
    HelloWorld,
  },
  filters: {
    formatUnix(value) {
      if (value) {
        return moment(value).format("DD/MM/YYYY");
      }
    },
  },
};
</script>

<style>
#app {
  font-family: Avenir, Helvetica, Arial, sans-serif;
  -webkit-font-smoothing: antialiased;
  -moz-osx-font-smoothing: grayscale;
  text-align: center;
  color: #2c3e50;
  margin-top: 60px;
}
</style>
This is an example of a local filter declaration.
  filters: {
    formatUnix(value) {
      if (value) {
        return moment(value).format("DD/MM/YYYY");
      }
    },
  },
How to use this filter (format date).
{
  {
    new Date() | formatUnix;
  }
}
The goal of making the Vue filter beautify templates and is the ability to reuse in multiple components but it can be replaceable by methods because there is no difference in terms of performance. The other reason Vue writer decide on removing the filter is syntax, {{ new Date() | formatUnix}} is so weird with | which made the developer confused. The ultimate reason for removing the filter is that it will encourage the developer to create more consistent functions to reuse or established explicit methods in each component.
Example:
import moment from "moment";
const format = function formatUnix(value) {
  if (value) {
    return moment(value).format("DD/MM/YYYY");
  }
};
export default format;
<template>
  <div id="app">
    <div>{{formatUnix(new Date())}}</div>
  </div>
</template>

<script>
import formatUnix from "./Utils/DateFormat.js";
export default {
  name: "App",
  components: {
  },
  setup() {
    return {
      formatUnix
    };
  },
};
</script>

<style>
#app {
  font-family: Avenir, Helvetica, Arial, sans-serif;
  -webkit-font-smoothing: antialiased;
  -moz-osx-font-smoothing: grayscale;
  text-align: center;
  color: #2c3e50;
  margin-top: 60px;
}
</style>
Multiple v-models
As we have known about Vue 2, the v-model is two-way binding on a given component but we can use a single v-model in Vue 2. For those who do not know anything about two-way binding which makes user input value synchronization between the parent component and child component, and v-model is a shortcut for passing value property and listening to the input event.
Vue 2
This is a simple v-model in Vue 2.
<input v-model="property" />
We can write the above example in another way but will have the same effect as the following code:
  <input
    :value="property"
    @input="property = $event.target.value"
  />
Vue 3
<template>
  <form>
    <div>
      <label for="name">Name</label>
      <input type="text" :value="name" @input="updateName($event.target.value)" />
    </div>
    <div>
      <label for="email">Email</label>
      <input type="email" :value="email" @input="updateEmail($event.target.value)" />
    </div>
  </form>
</template>
<script>
export default {
  props: {
    name: String,
    email: String,
  },
  setup(props, { emit }) {
    const updateName = (value) => {
      emit("update:name", value);
    };
    const updateEmail = (value) => {
      emit("update:email", value);
    };
    return { updateName, updateEmail };
  },
};
</script>
<template>
  <div id="app">
    <InviteForm v-model:name="inviteName" v-model:email="inviteEmail" />
    <div>
      <div>{{ inviteName }}</div>
      <div>{{ inviteEmail }}</div>
    </div>
  </div>
</template>

<script>
import InviteForm from "./components/InviteForm.vue";
import { ref } from "vue";
export default {
  name: "App",
  components: {
    InviteForm,
  },
  setup() {
    const inviteName = ref("name");
    const inviteEmail = ref("invite");
    return {
      inviteName,
      inviteEmail,
    };
  },
};
</script>

<style>
#app {
  font-family: Avenir, Helvetica, Arial, sans-serif;
  -webkit-font-smoothing: antialiased;
  -moz-osx-font-smoothing: grayscale;
  text-align: center;
  color: #2c3e50;
  margin-top: 60px;
}
</style>
A component can handle multiple v-model like that:
<InviteForm v-model:name=”inviteName” v-model:email=”inviteEmail” />
In component, we have 2 props which are name and email have the String type. To update the value to the parent component we use emit an event to handle props like:
-
Update value of name emit(“update:name”, value);
-
Update value of email emit(“update:email”, value);
So it is simpler and easier to use than Vue 2 which has at least 2 events to synchronize each value from child component to parent component in multi-value handling.
Modular
You should make your code modular that can be organized by feature and reusable across other components. In this part, I will introduce another way to do that, not mixins.
We separate any things inside the setup() to another function called the composition function and we should save it in a JavaScript file to reuse.
import { ref } from "vue";
export default function download() {
  const filePath = ref(null);
  function downloadBlob() {
    // any code here
  }
  function downloadJSON() {
    // any code here
  }
  return { filePath, downloadBlob, downloadJSON };
}
And this is how to reuse composition functions.
<template>
  <!-- template code -->
</template>
<script>
import download from "@/use/download";
import upload from "@/use/upload";
export default {
  setup(){
    return { ...download(), ...upload() }
  }
}
</script>
As you can see above, we use the setup() method to implement 2 composition functions, then we can use normally all of the inside functions.
Portal
Portal has the other name which is a **teleport component. **Portal allows us to specify template HTML we can bring to other parts of DOM even if it does not belong to the app.
<div id="app"></div>
<div id="out-side-app"></div>
DOM with id out-side-app is the outside app, we can interact with it by using the portal.
<template>
  <teleport to="#out-side-app"> This is teleport </teleport>
  <div>APP</div>
</template>
To use the teleport component we need to define the “to” attribute which takes a DOM query selector.
<teleport to="”#out-side-app”"></teleport>
We are using id to select DOM and we also can use a class to select DOM like that:
<teleport to="”.anyClass”"></teleport>
Suspense
**Suspense **is a special component that renders fallback content instead of your component until a condition is met such as a loaded backend API. The below code is an example of using suspense to callback API.
There is a composition function for calling API.
import Axios from "axios";

export default function locale() {
  async function getLocales() {
    return await Axios.get("...url...").then((response) => {
      return response.data;
    });
  }
  return { getLocales };
}
There is a simple component for demo.
<template>
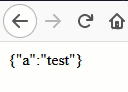
<div>{{JSON.stringify(dataLocale)}}</div>
</template>
<script>
import locale from "@/composables/locale";
export default {
async setup() {
const { getLocales } = await locale();
const dataLocale = await getLocales();
return { dataLocale };
},
};
</script>
There is an example of a Suspense component.
<template>
  <Suspense>
    <template #default>
      <Locale />
    </template>
    <template #fallback>Loading...</template>
  </Suspense>
</template>

<script>
import Locale from "@/components/Locale.vue";
export default {
  components: {
    Locale,
  },
};
</script>
Inside <template #default>, we put components here which have the setup() method that returns Promise or asynchronous components.
Inside <template #fallback>, we put what display when loading such as spinner, icon, or something like that.
 Suspense demo
Lifecycle hooks
Vue 2 lifecycle methods:
-
beforeCreate()
-
created()
-
beforeMount()
-
mounted()
-
beforeUpdate()
-
updated()
-
beforeDestroy()
There are some new hooks in Vue 3 lifecycle:
-
beforeDestroy() become beforeUnmount()
-
destroyed() become unmounted()
-
onRenderTracked is called when a reactive dependency is first being accessed in the render function.
-
onRenderTriggered() is called when a new render is triggered which allows you to inspect what and when a component re-render.
We can callback hook inside setup() methods.
import { onBeforeMount, onMounted } from "vue";

export default {
  setup() {
    onBeforeMount(() => {
      console.log("Before mount");
    });
    onMounted(() => {
      console.log("Mounted");
    });
  },
};
We can do the same with the other hooks inside setup() method such as onBeforeUpdate() , onUpdated() and so on.
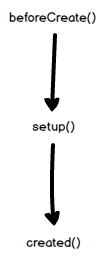
The beforeCreate() method and the create() method are unnecessary when using the composition API because the app will call beforeCreate() hook before setup() hook and created() hook is called immediately after setup(). Therefore we can use setup() to handle what we need in beforeCreate() and create().
Performance improvements
The Vue 3.0 focus on performance improvements:

Conclusion
Vue 3 is the turning point of Vue, I am a huge fan of Vue, therefore I have no reason to ignore it.
Although Vue 3 has many changes to Vue 2 which makes developers who are familiar with Vue 2 have to spend time learning new things, in my opinion, it is valuable. Maybe this article still has some shortcomings so that I always welcome feedback from all of you. Thanks for reading.
Comments
Loading comments…