Photo by Hans McMurdy on — ©JavaScript-First: HTTP
JavaScript is one of the versatile language in the world. It allow us developers to build websites, servers, mobile apps, hardware and even AI. So it's not a surprise that it's one of the most popular programming languages in the world.
In this article, we'll discuss what HTTP is, and learn JavaScript by building an HTTP server, rather than by learning HTML and CSS first. The image above is an example of what we'll be building.
Please note: The breaking bad part is intentionally left out of this article in order to drive curiosity and encourage you to build something on your own, rather than facilitating tutorial hell. All the code can be found and much more can found on the JavaScript First Repository and is part of an open source book you learn in a remote development environment with GitPod.
Introduction to JavaScript & Node
If you are new to JavaScript or the Node.js ecosystem, I wrote an article about it. Feel free to check it the link below:
Terminal Basics and Installing NVM & Node.Js
If you don't know JavaScript or are still new, please note that our examples use ES6 features and features that are behind the experimental flag in node. These were not available when Node.js first launched with the ES 5 standard.
HTTP: Understand HTTP and HTML
Before we begin coding lets quickly go over what HTTP is by viewing the content of the slide. The terms in this slide are intended to help explain HTTP methods we'll use.
Photo by Hans McMurdy — ©JavaScript-First: HTTP Slides are accessible for the blind here
Put even more simply:
“When you, the reader are viewing this article, the browser (client) is making the request to the server. The server then sends a response (200 HTTP) as HTML, displaying the page with its content which is set to HTML”
Next, we'll build a simple HTTP server that sends HTML to the client (browser).
What is HTML
HTML is not a programming language despite what you read about on twitter, or what company those people work for, etc. It stands for Hyper Text Markup Language, because it's a markup language. The short version of why it was created, was to allow academics to share documents with hyper text / hyper links across geographic space. 99% of the HTML you need to know to do this project or do web development can be explained in 1 minute, or one GIF. The other 1% comes down to project requirement research & practical experience.
 Photo by Hans McMurdy — ©JavaScript-First: Explain HTML
About the project:
The first example we'll go over is how to read an HTML file with the fs module and send it to the client with the http module. Both are built into node's core API. We'll then refactor multiple times to enable ESM module instead of using require.
**Objectives of this article: **By the end of this article readers should be able to:
-
Distinguish between the client and the server.
-
Describe what HTTP is and how to use node's http method.
-
Explain what HTML is and how to use it in template strings.
-
Identify HTML basic syntax and how to check it.
-
Explain how HTML is sent from a server to the browser using HTTP
-
Demonstrate how to use the
fsmethod of Node.js to read HTML andhttpmethod to create a server. -
Create simple functions that uses template literals to compose html layouts and components using bootstrap 5 and vanilla JavaScript in a react-like way on the server-side.
Final directory should look like.
The first example we'll go over is how to read an html file with the fs module and send it to the client with the http module. Both are built into node's core API.
Create an index.html file and fill it with any valid html. Then create a file called index.js and put the code below inside it run it with npx nodemon index.js.
Simply put, we are importing or “requiring” the built-in http method I mentioned way back. Then we are using it to create a basic server and using a callback function. We'll then check the request object url to make sure if it's to the home page with ‘/'. If that's true, we'll read the html file, write the http headers, write the data and end the response. The server is running on port 7000.
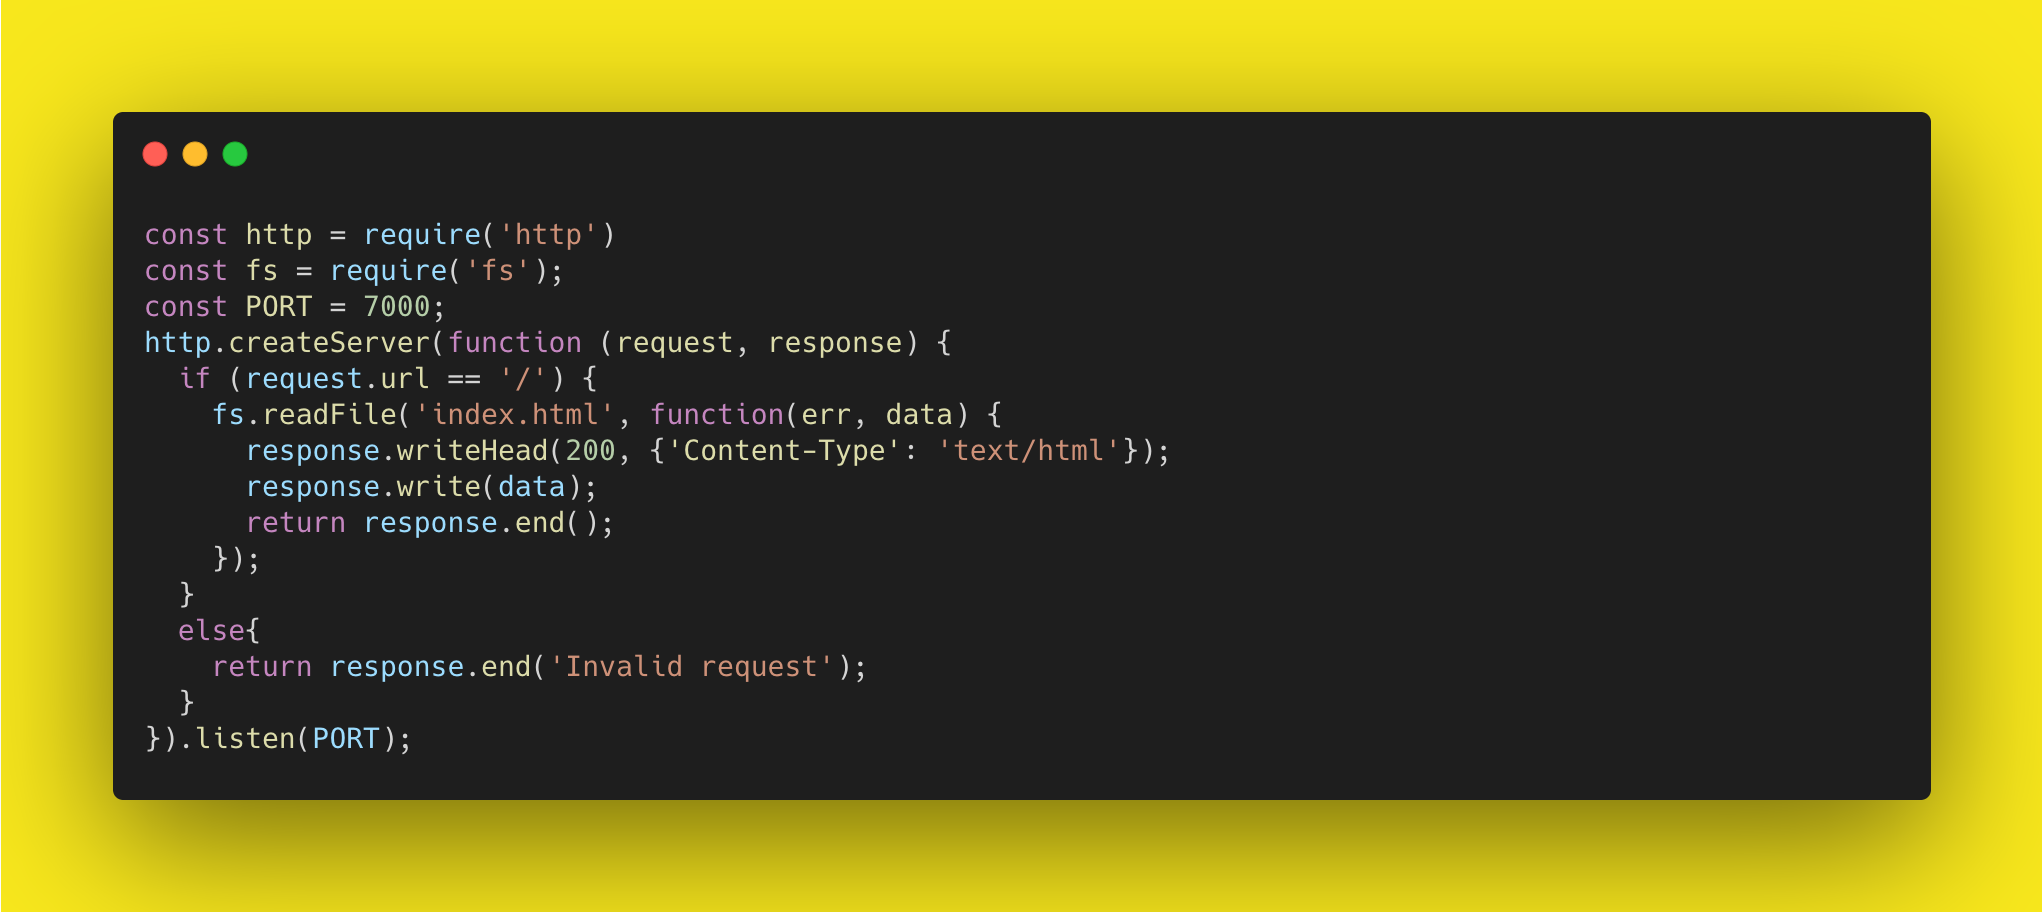
Photo by Hans McMurdy — ©JavaScript-First:
After you got it working, we'll rename it to index.mjs and delete that html file because we'll never use it.
What your final directory should look like.
As you can see there are no HTML or CSS files. That's because all the html will be generated on the server-side with vanilla JavaScript and basic Node API methods. Any css or client side JavaScript will either be inside a template strings or served by a CDN.
.
├── readme.md
├── index.mjs
├── package.json
├── layout/
│   ├── main.mjs
│   ├── template.mjs
├── pages/
│   ├── home.mjs
│   ├── about.mjs
├── components/
│   ├── nav.mjs
├── util/
│   ├── helpers.mjs
Step 1: Use NPM scripts with package.json to run ESM modules.
We'll add a start script that runs the index.mjs file with nodemon to watch for changes and reload, add the experimental-modules.
"scripts": {
    "start": "npx nodemon --experimental-modules index.mjs"
},
Next, we'll add the following code in index.mjs. The code can be found here.
Now, to explain what is going on here. We are importing or “requiring” the built-in http. We'll later refactor this to use ESM imports. Then we are using it to create a basic server and using a callback function to set the server's response to the browser's request. The server is running on port 8080.
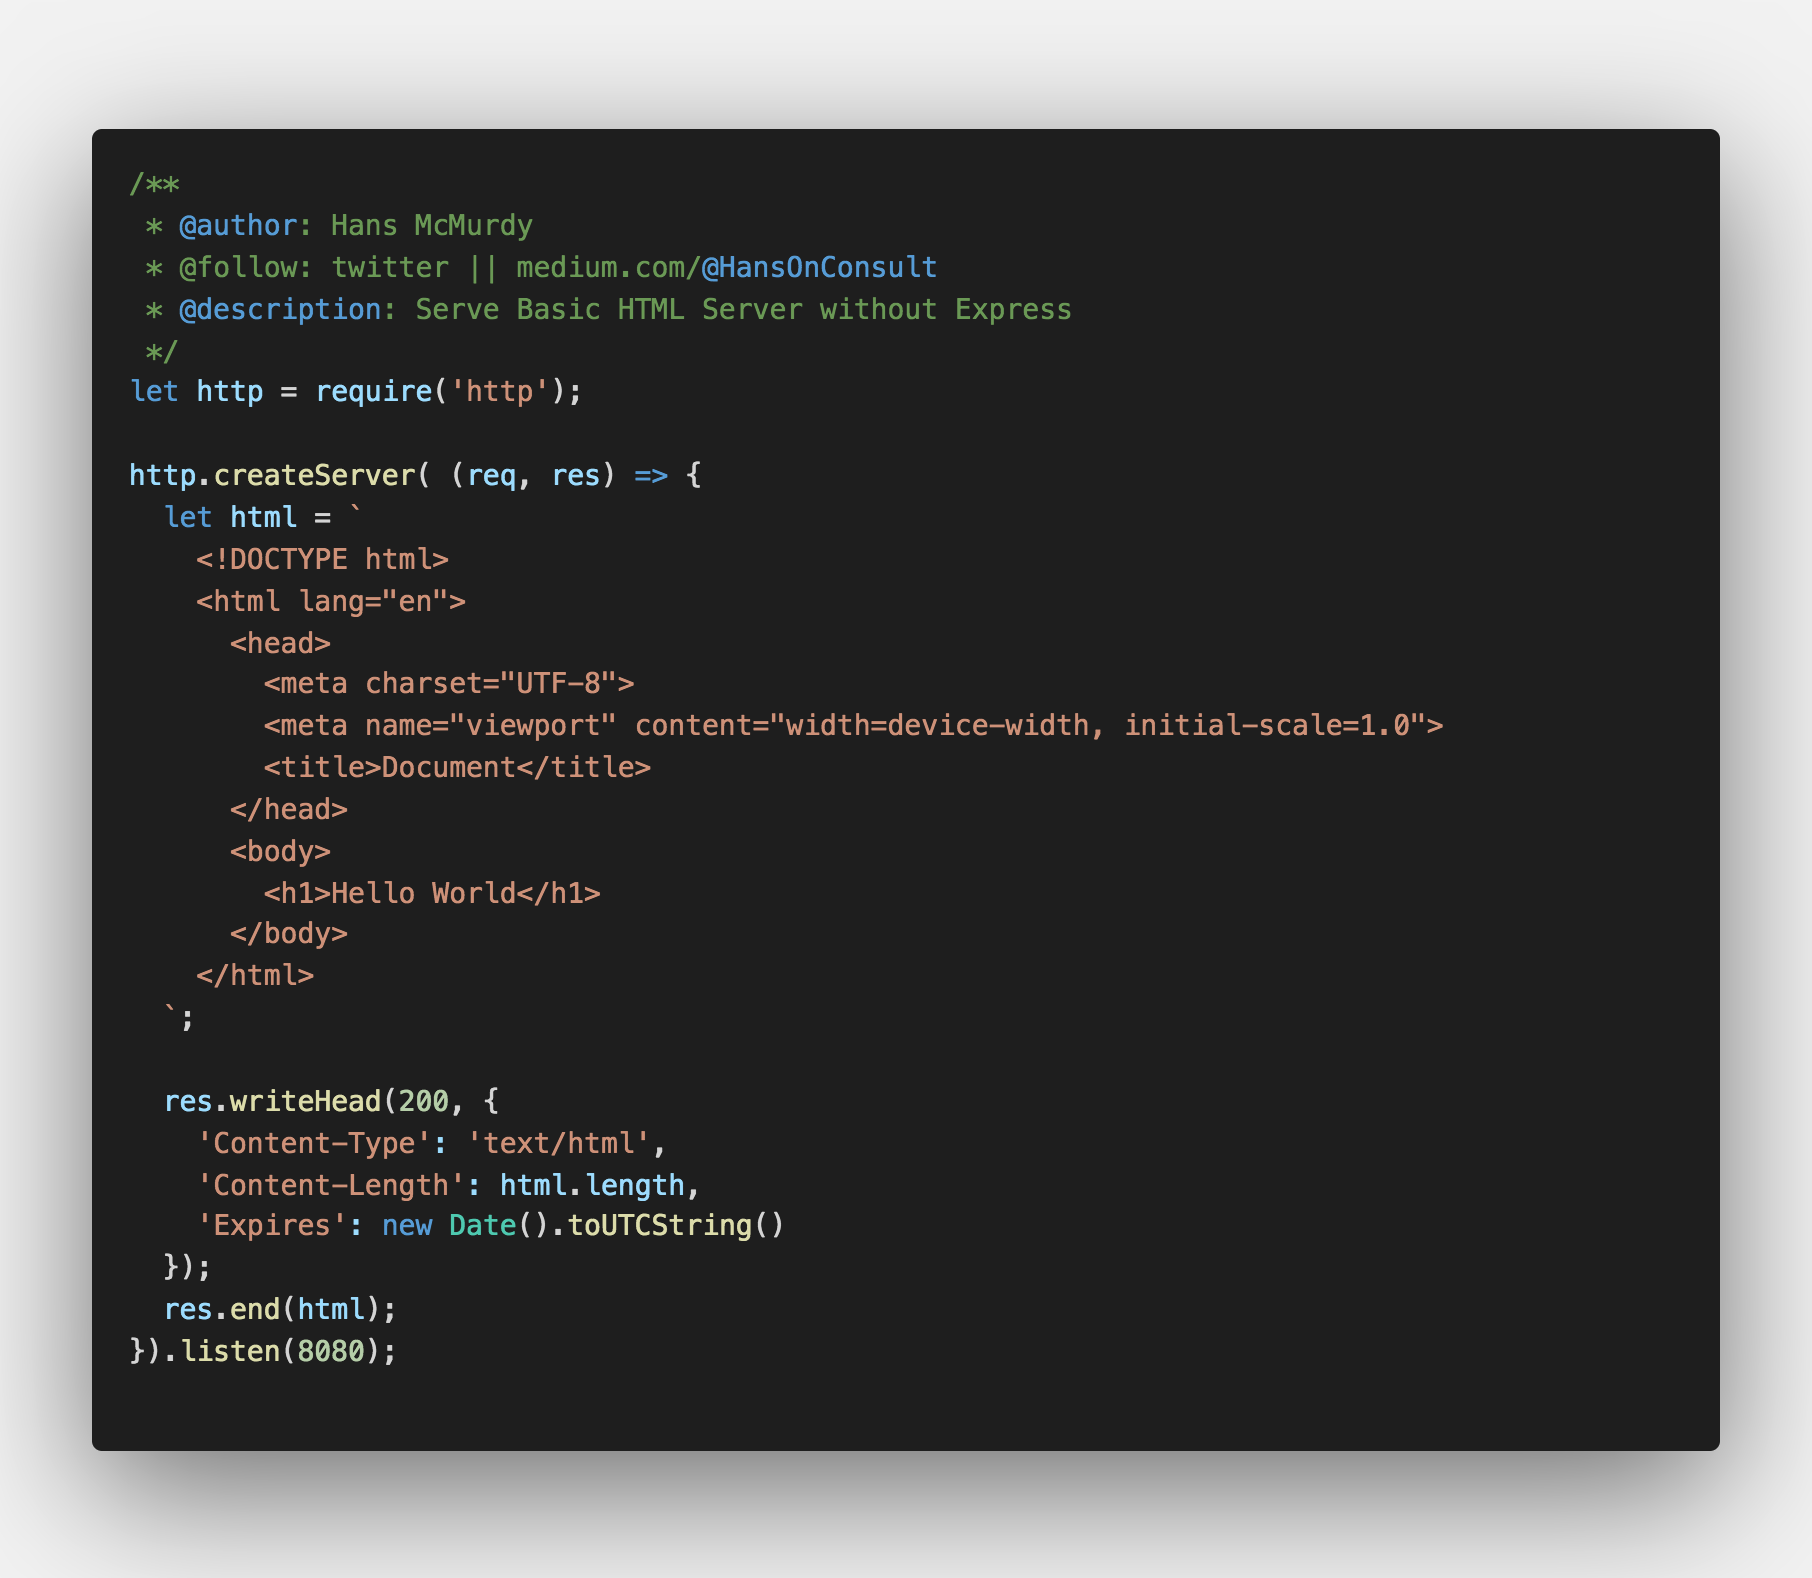
Photo by Hans McMurdy — Simple vanilla JavaScript Server
Why not use a Template Engine?
Here's the thing. We don't really need them. Plus, in many ways, this is actually more powerful, faster and less of a learning curve because no new syntax is introduced.
In terms of security, there are drawbacks regardless of which direction you take only, templates engines add another dependency, whereas this will force you to maintain a small string library to sanitize and validate the html output, which we won't cover in this article.
Step 1: Use NPM scripts with package.json to run ESM modules.
We'll add a start script that runs the index.mjs file with nodemon to watch for changes and reload, add the experimental-modules.
"scripts": {
    "start": "npx nodemon --experimental-modules index.mjs"
},
To run the project, we'll simply run npm start and open a browser to localhost:8000.
Step 2: Server-side layouts with functions & template literals
What if I told you, you don't really need react either?
What if I said we could just refactor the above by wrapping template string with a function that returns HTML based on the parameters we defined?
In the GIF we do exactly that by creating a function called HtmlTemplateString().
We'll use this function to create a basic layout generator. All we do is simply pass the relevant HTML for the header, body and footer on a page by calling this function with values as arguments and storing the result in some variable.
Photo by Hans McMurdy — Simple vanilla JavaScript Server
We can even pass functions into these argument and create react-like components on the server without any major frameworks.
Step 3: Refactoring with utilities
In order to make this code more reusable, we'll have to refactor it again for various utility functions. In this case, we'll create a function that writes the HTTP headers and sends the final HTML with a little less boilerplate.
Instead of writing the following for example page:
res.writeHead(200, {
'Content-Type': 'text/html',
'Content-Length': page1.length,
'Expires': new Date().toUTCString()
})
res.end(page1);
We'll wrap it all in a function that inherits the response object and make page1 a parameter that can either be used directly or used as a callback that validates our HTML. Then finally, we'll save this function in util/helpers.mjs. If you chose to go down this route, this will be useful for adding other utility functions.
export const headers = (data,response) => {
  **response**.writeHead(200,{
    'Content-Type': 'text/html',
    'Content-Length': **data**.length,
    'Expires': new Date().toUTCString()
  })
  **response**.end(**data**)
}
Next, we'll go back to index.mjs and wrap our server code in an async IIFE and use a switch statement for each page and call the header function inside. We haven't defined the about page yet… So this will obviously error out. But that's why you wanna read this fully before mindlessly copying code.
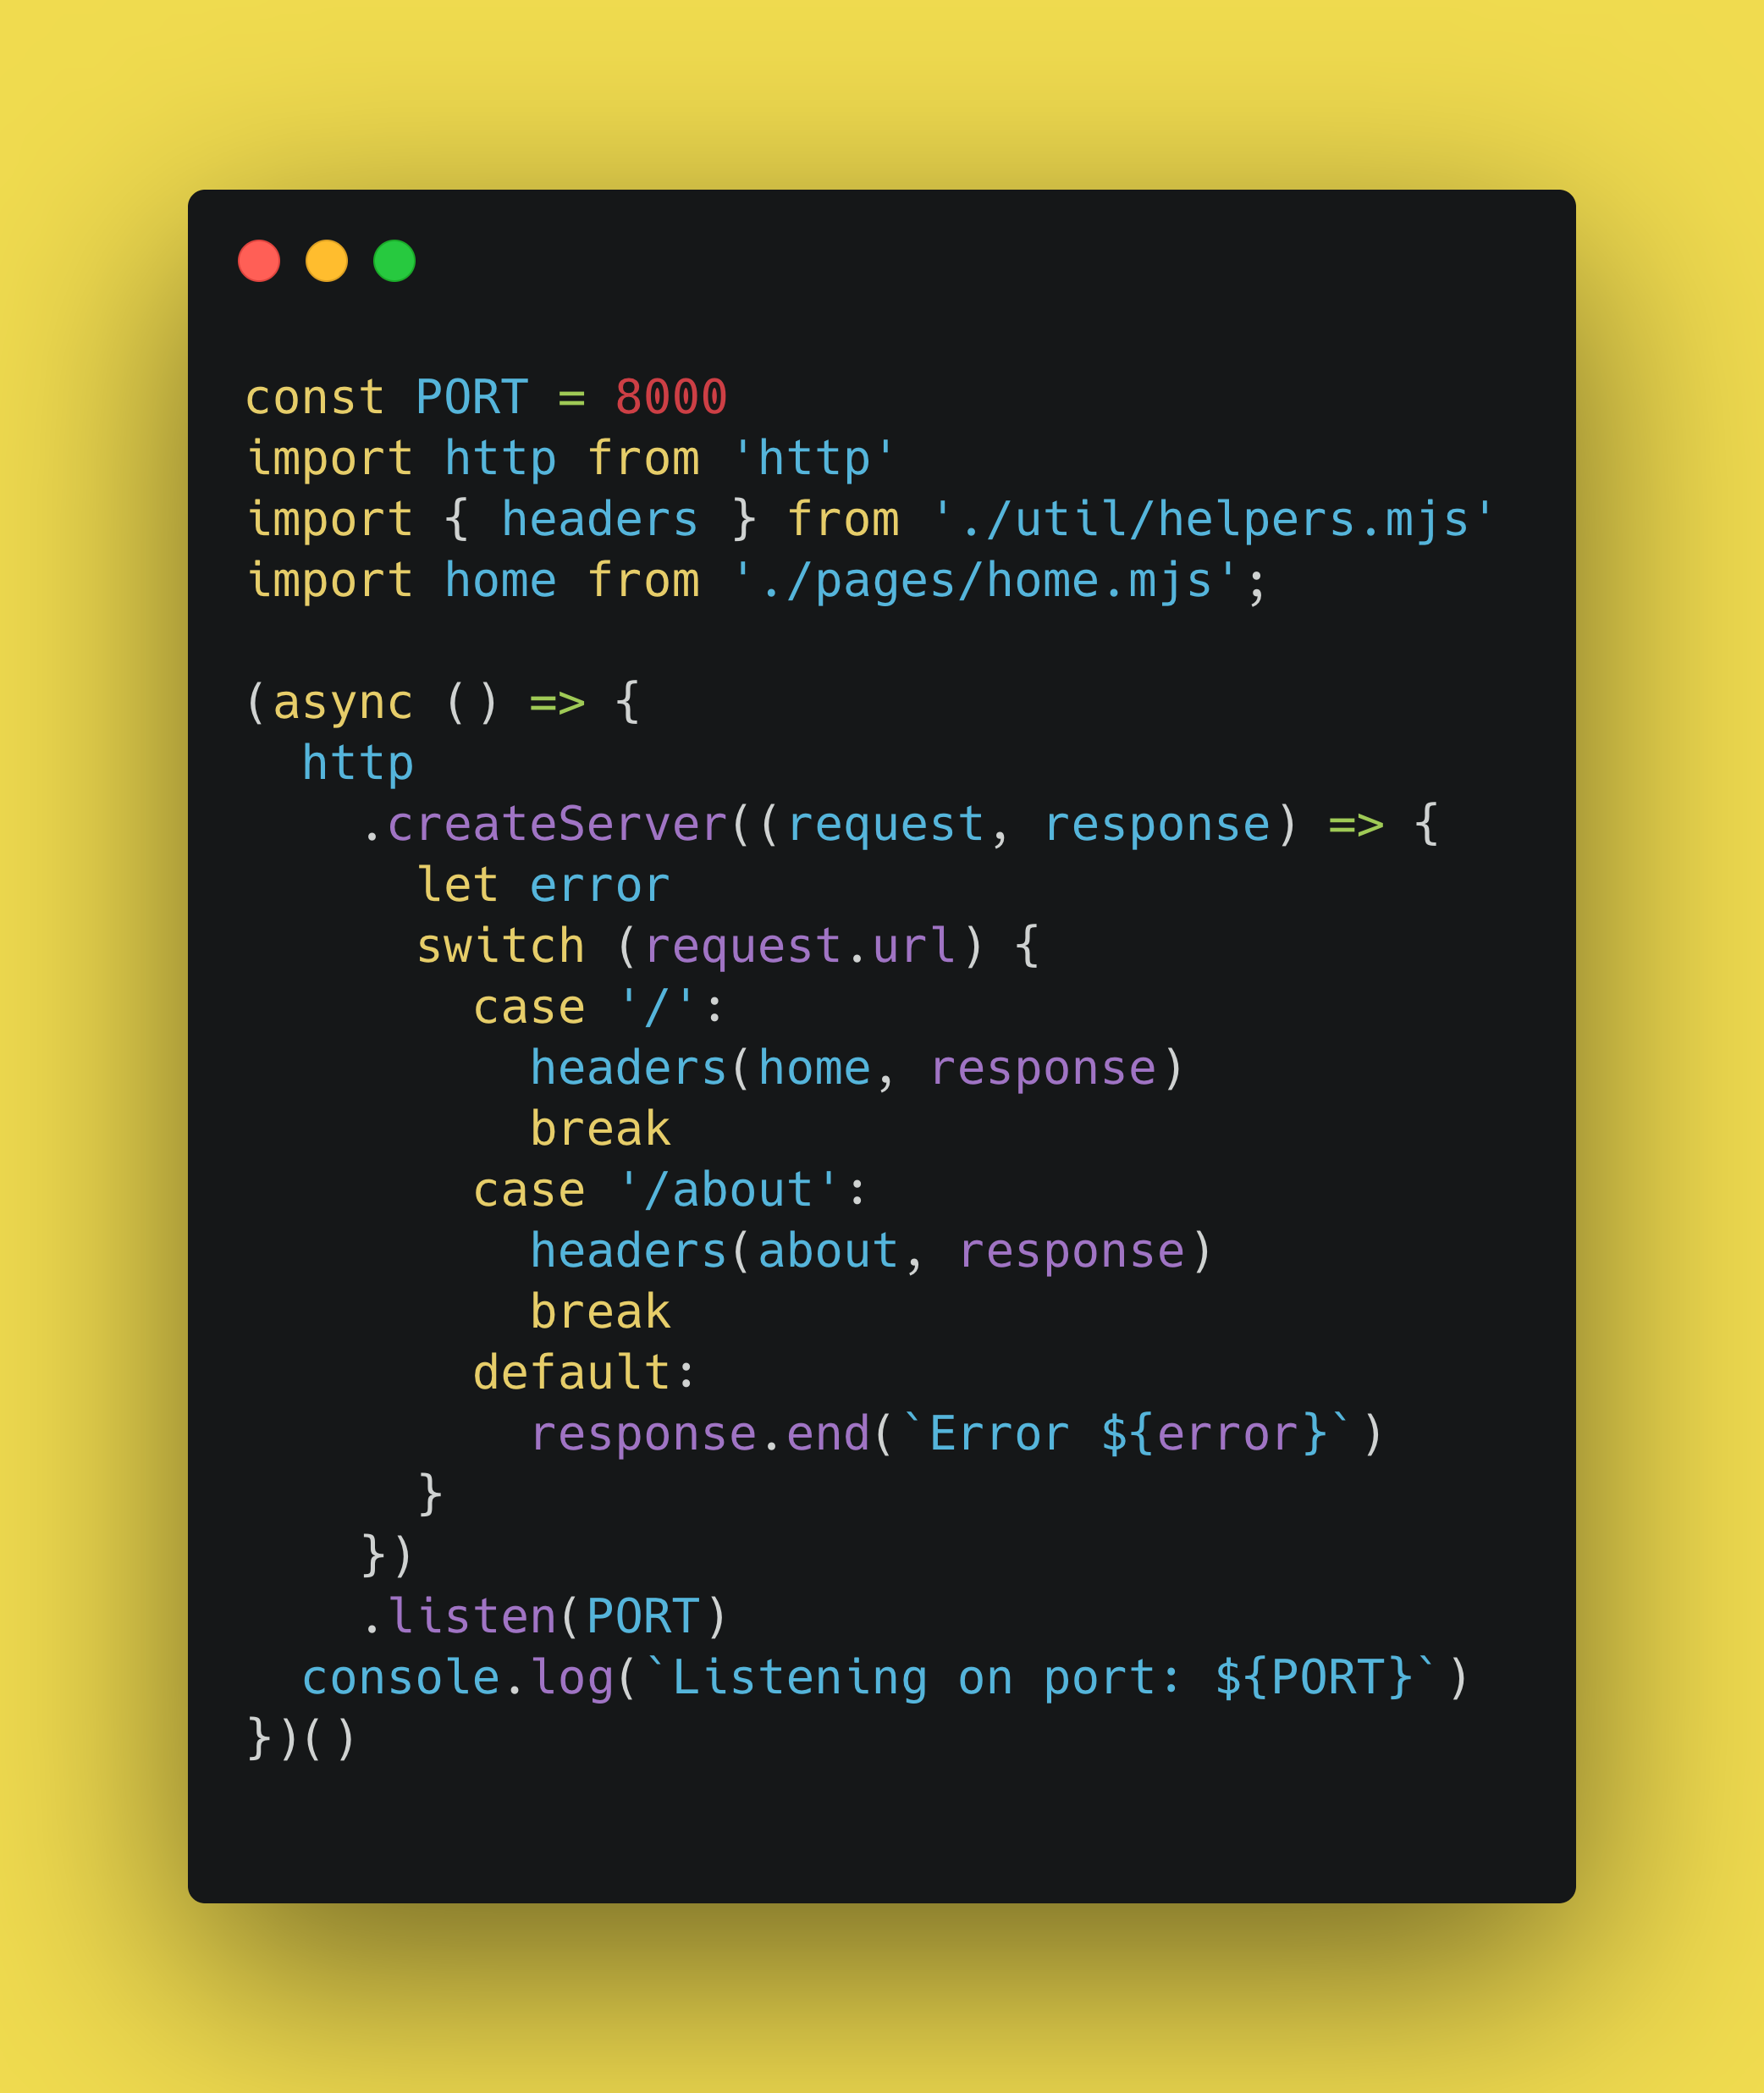
Photo by Hans McMurdy — Simple vanilla JavaScript Server
Step 4: Creating reusable layouts with template strings
Next we'll use the Bootstrap 5 extension to quickly scaffold out a reusable template using the command !b5-$ and then press tab to build out the template, complete with a cdn for the framework's css and zero JavaScript dependencies and custom styles, there are also other templates available such as masonry but we'll keep it simple here.
Finally we'll edit the html however we want.
In my case, I'm keeping it simple by adding a header, nav, body and footer, parameters, we'll pass other functional component into these as arguments later. We'll store this code in layout/main.mjs.
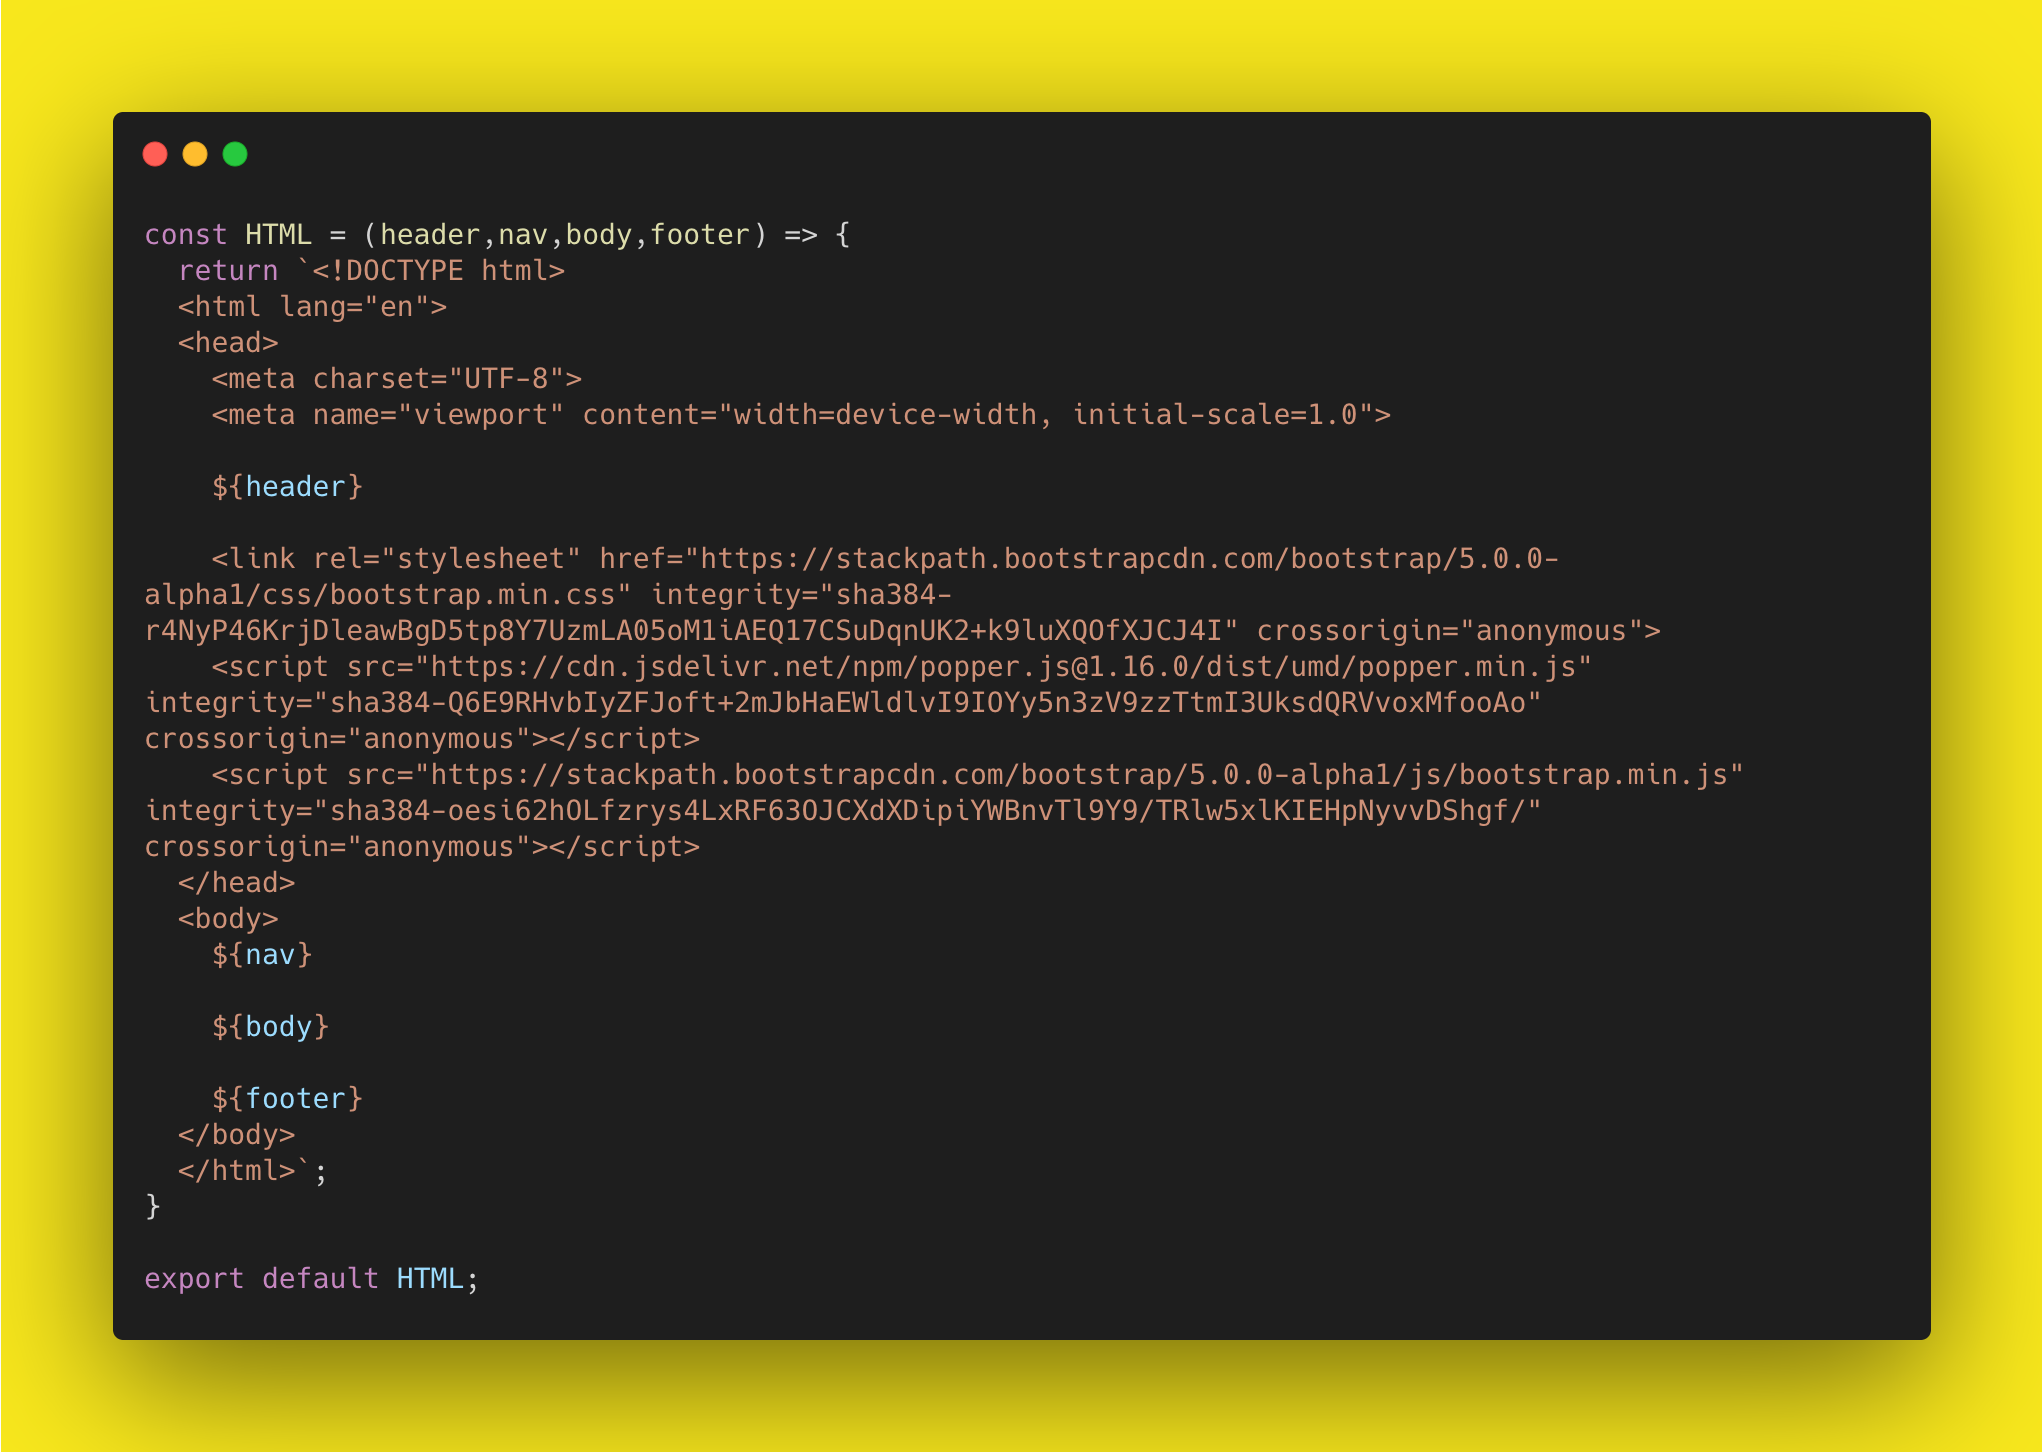
Photo by Hans McMurdy — Simple vanilla JavaScript Server
Step 5: Create Server-side NavLinks Component
The first thing we are going to do is create reusable component to generate page likes from an array of object (data). We'll put this code in components/nav.mjs. The HTML generated by this function will be passed into the next component we create.

Photo by Hans McMurdy — Simple vanilla JavaScript Server
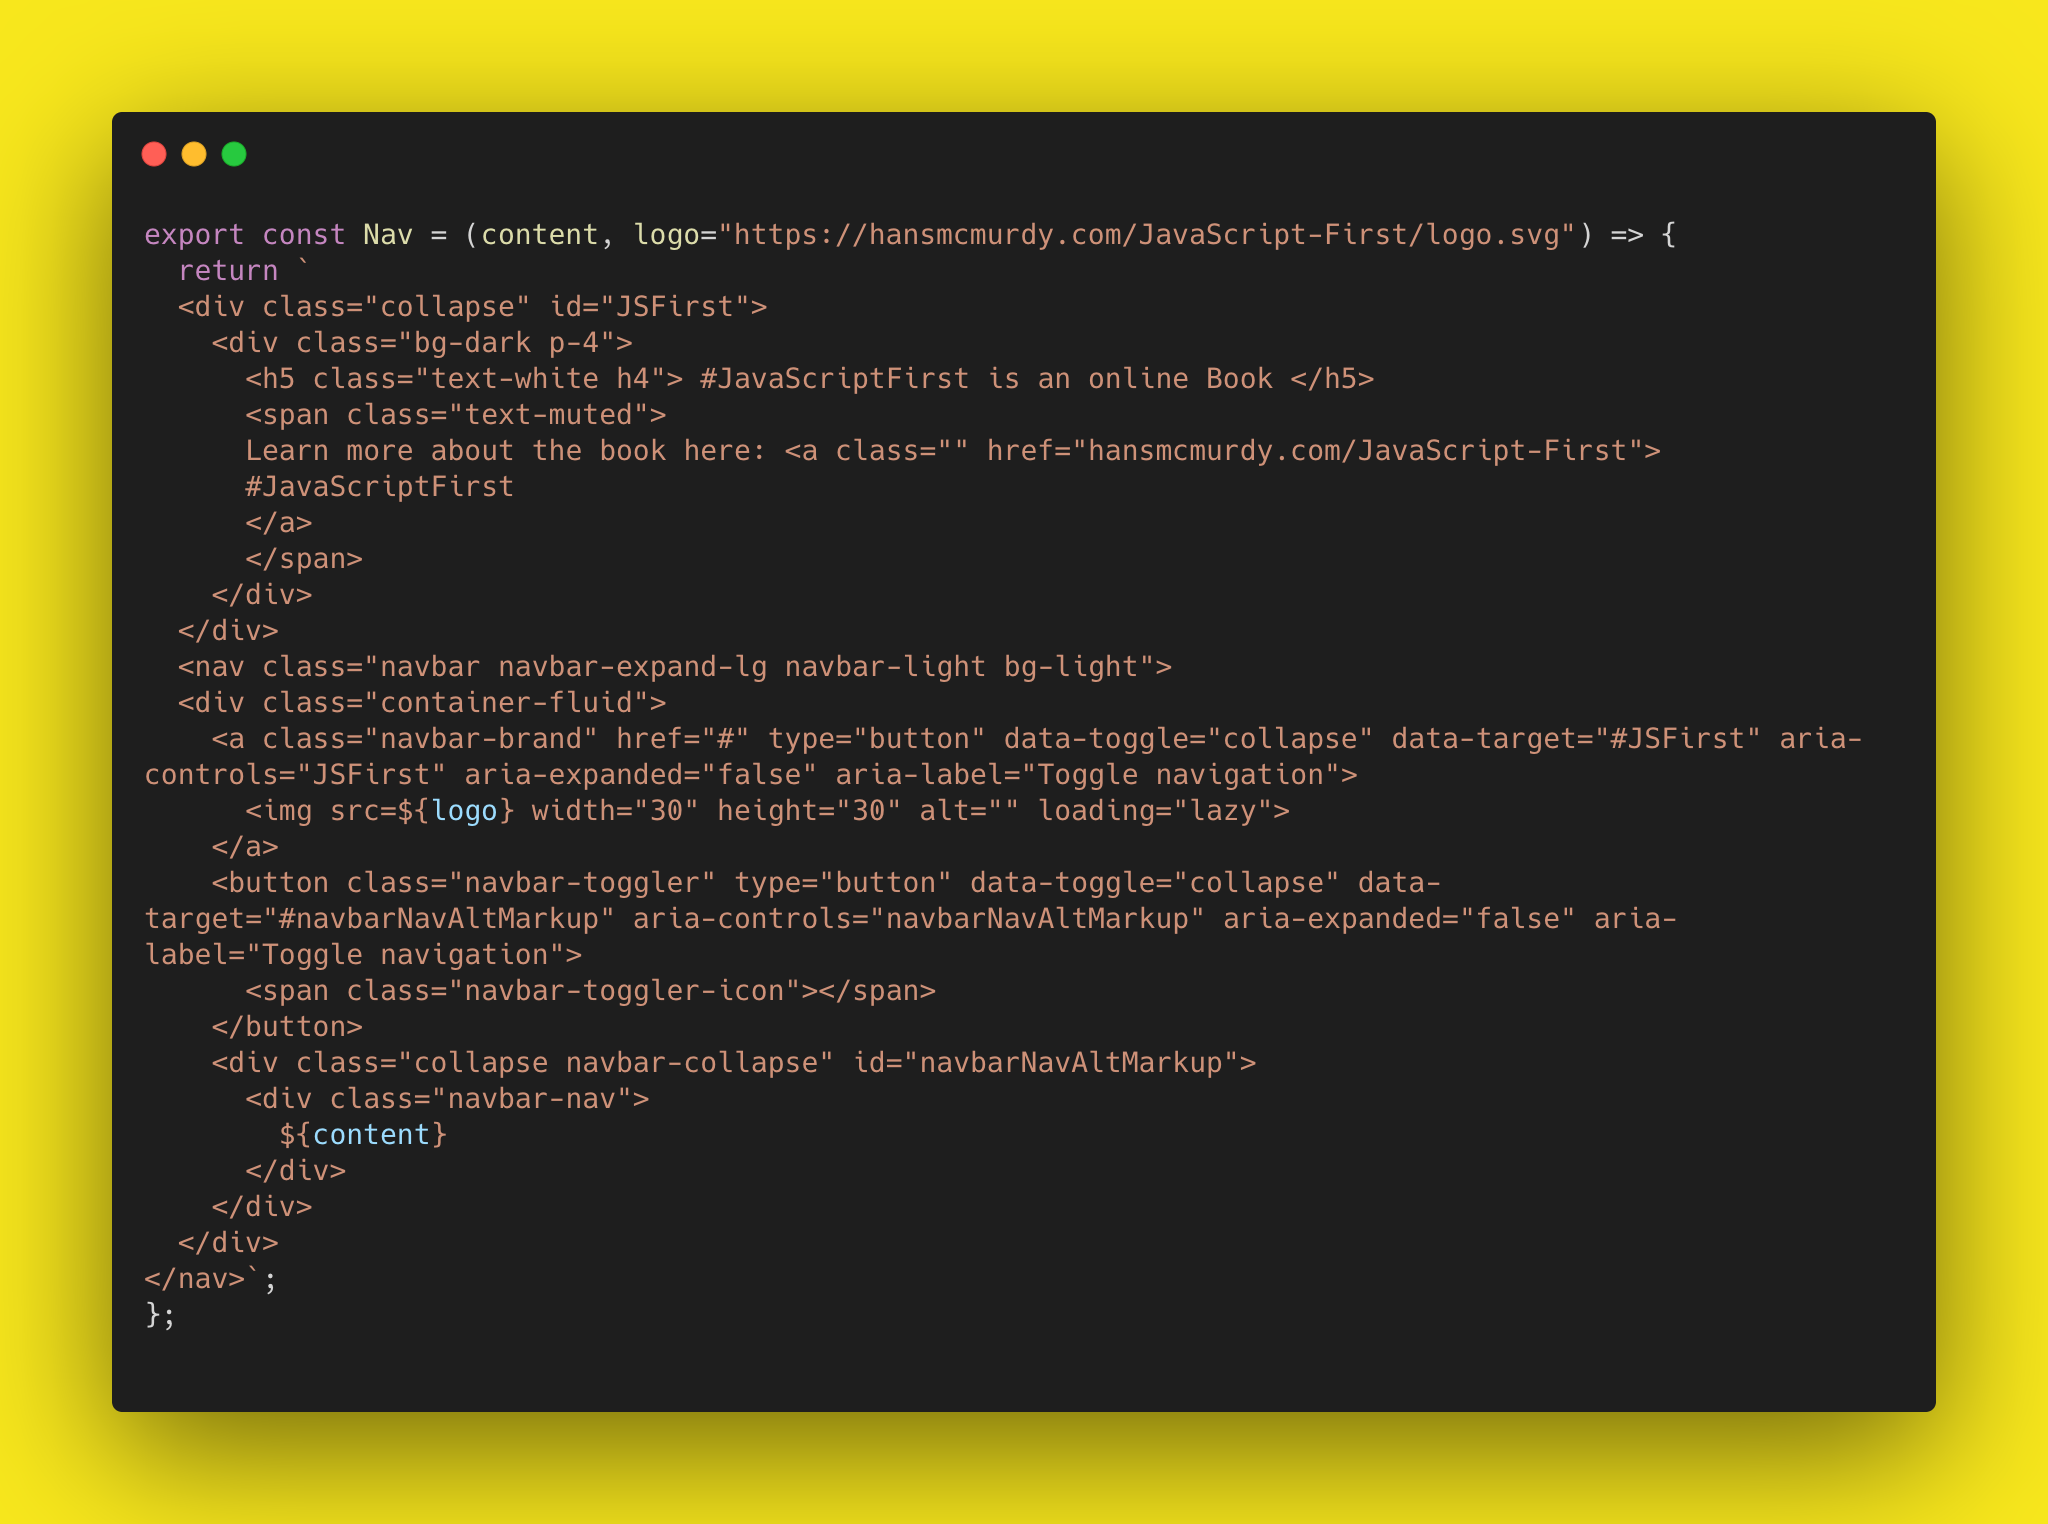
Step 6: Create Server-side Nav Component
On a new line below the previous component, in the same file components/nav.mjs, we'll create a new component. It'll be a simple function that returns html, rather than the previous one that iterates over an array. Inside the return statement we'll add `` and inside the template strings we'll type b5-navbar-default and hit tab. This will generate the needed HTML for our main Nav component and we'll simply edit it appropriately.
The final reusable Nav(), accepts a two arguments, content and logo. Content is the argument we use to pass the previous component into. Logo is just used for shameless brand promotion.
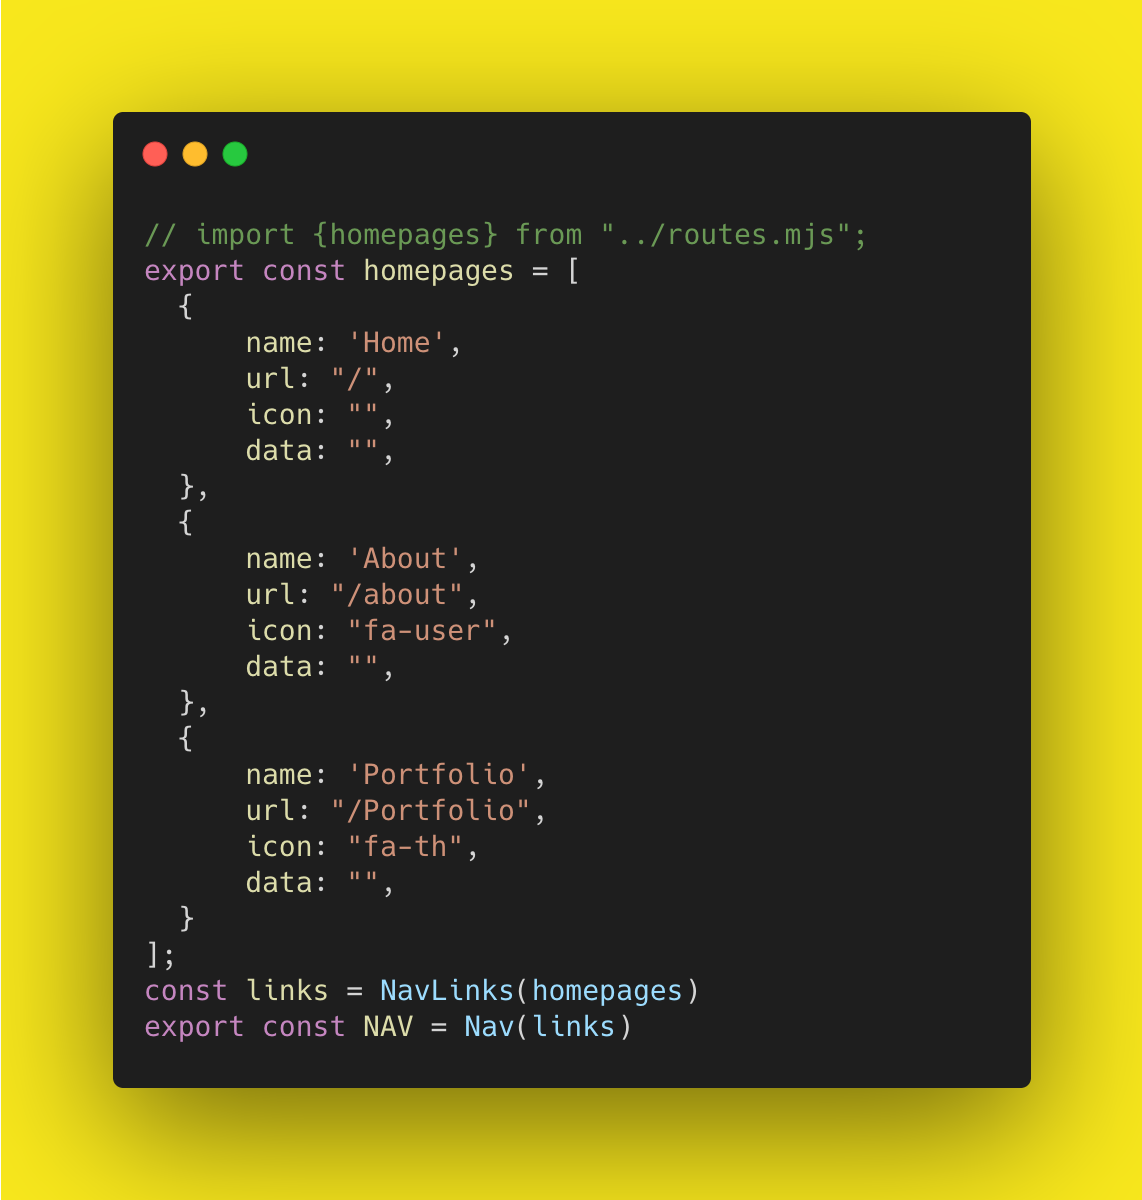
Step 7: Building our Navbar
Now we'll put both of these together then use that in a reusable nav that accepts a two arguments, content and logo. In the same file components/nav.mjs. Ideally you want the data from the pages to be pulled from a database but we'll keep it simple and build it all in the same file.
First we create an array of objects with a name & url, if you want you can also add info for icons and data, etc but we wont cover that here. Then we'll create a links variable to store the html of each NavLink and pass homepages as an argument for the data. Finally, we'll pass that variable into our Nav() component and store the final HTML inside a variable called NAV. We'll export that variable and reuse it on each page.
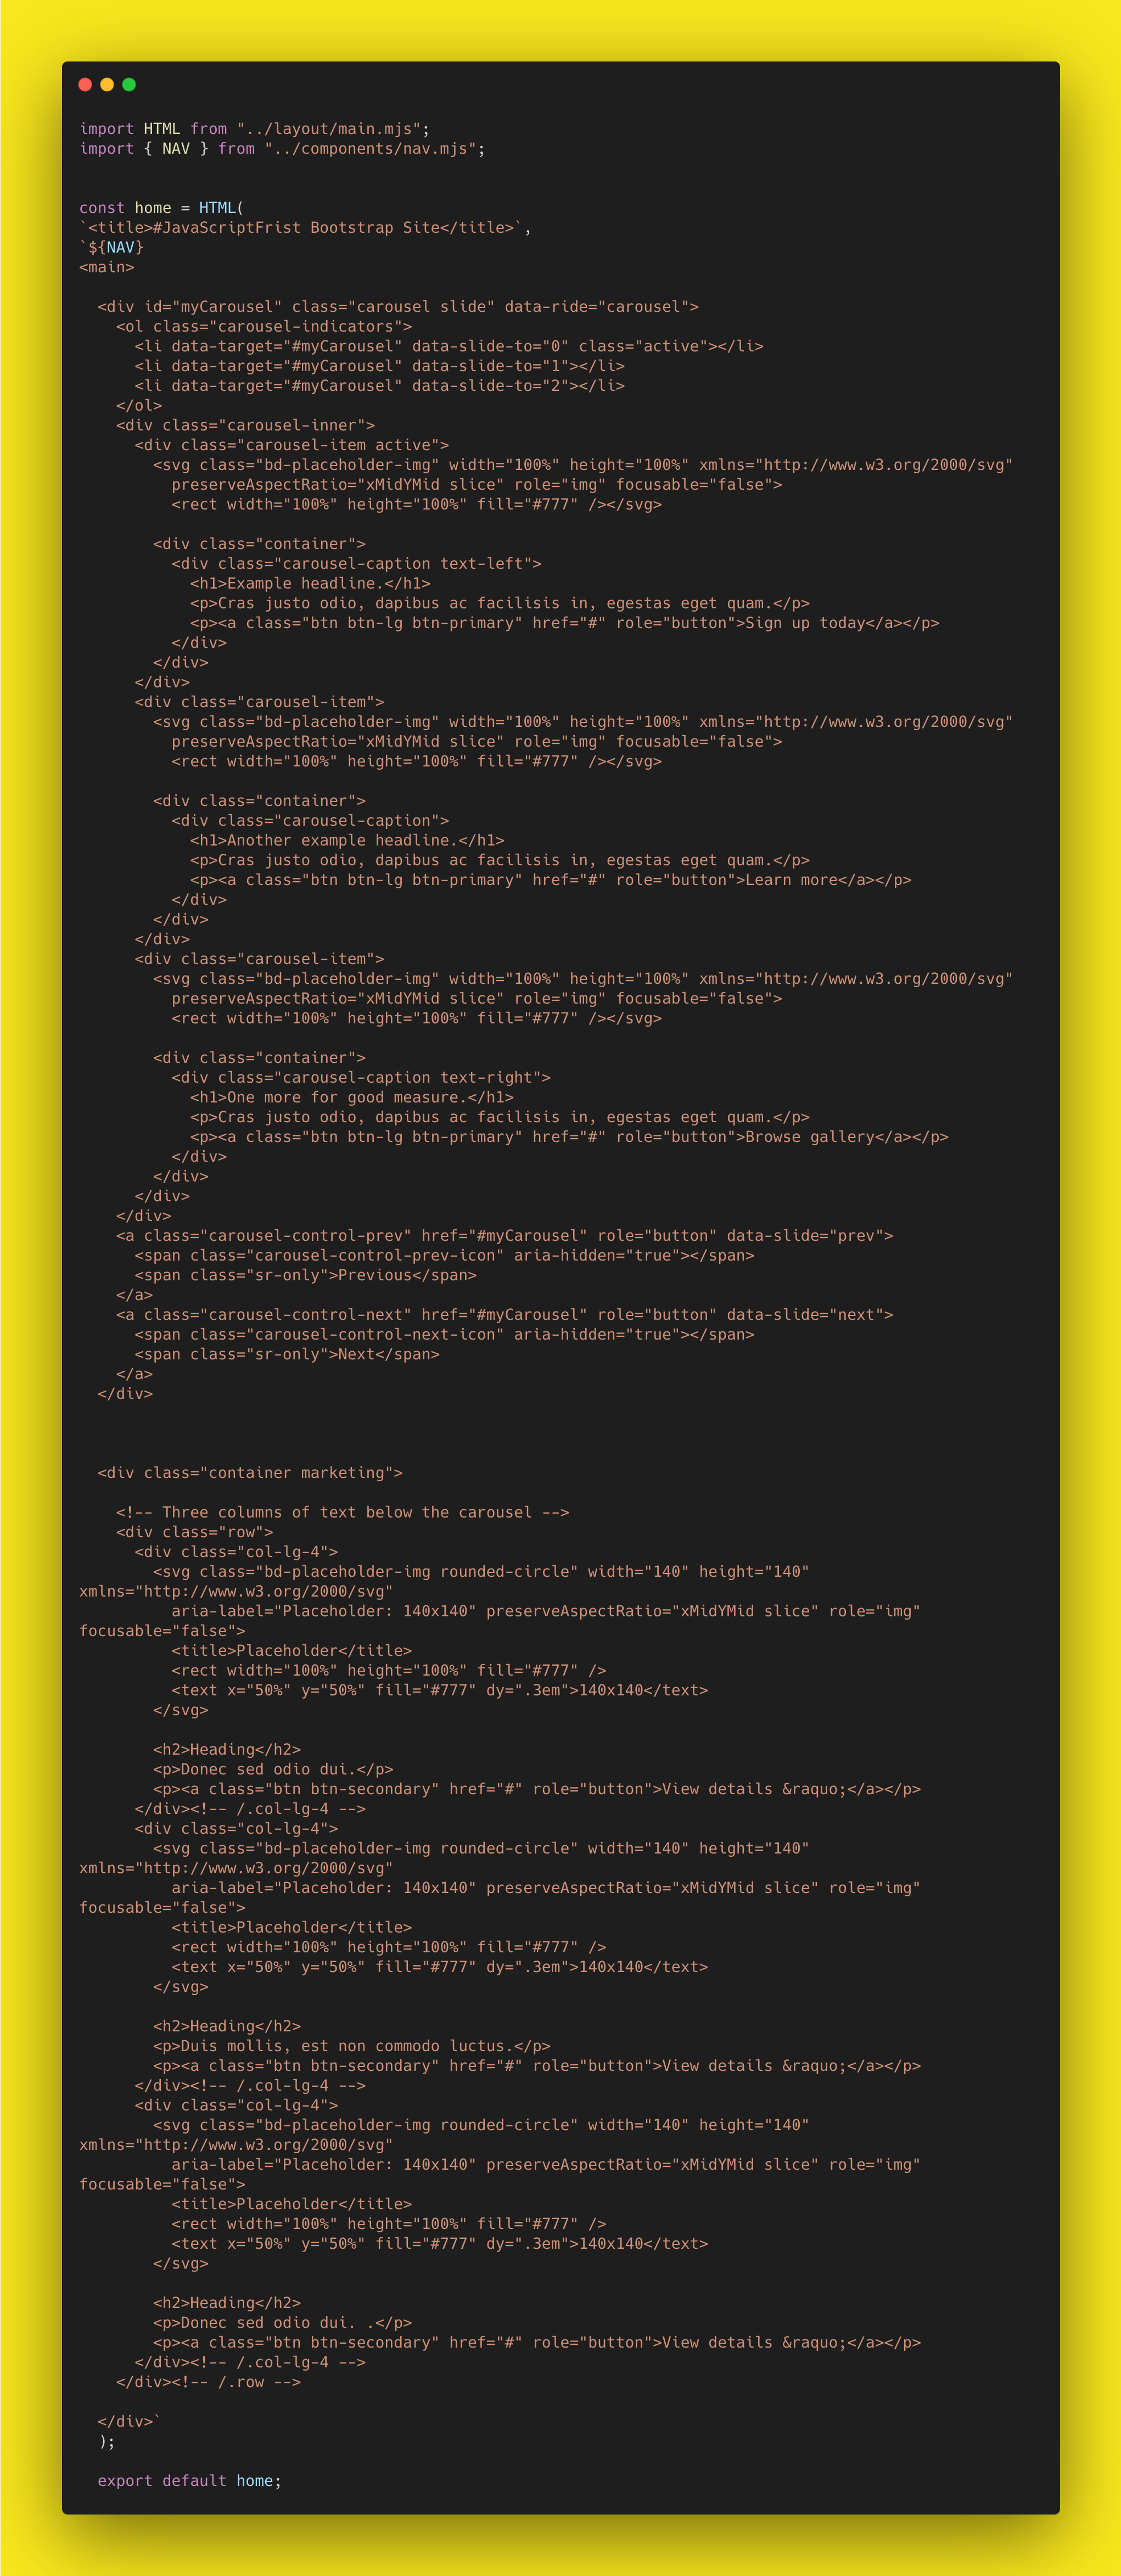
Step 8: Building our Pages
Next we'll build our home page inside pages/home.mjs. We'll start by importing our layout, HTML() and our reusable NAV(). Then add our meta data in the first argument with <title>#JavaScriptFrist Bootstrap Site</title>. Then we'll only use the body argument of our template. We aren't building anything complex enough to use the footer argument for our layout function, HTML().
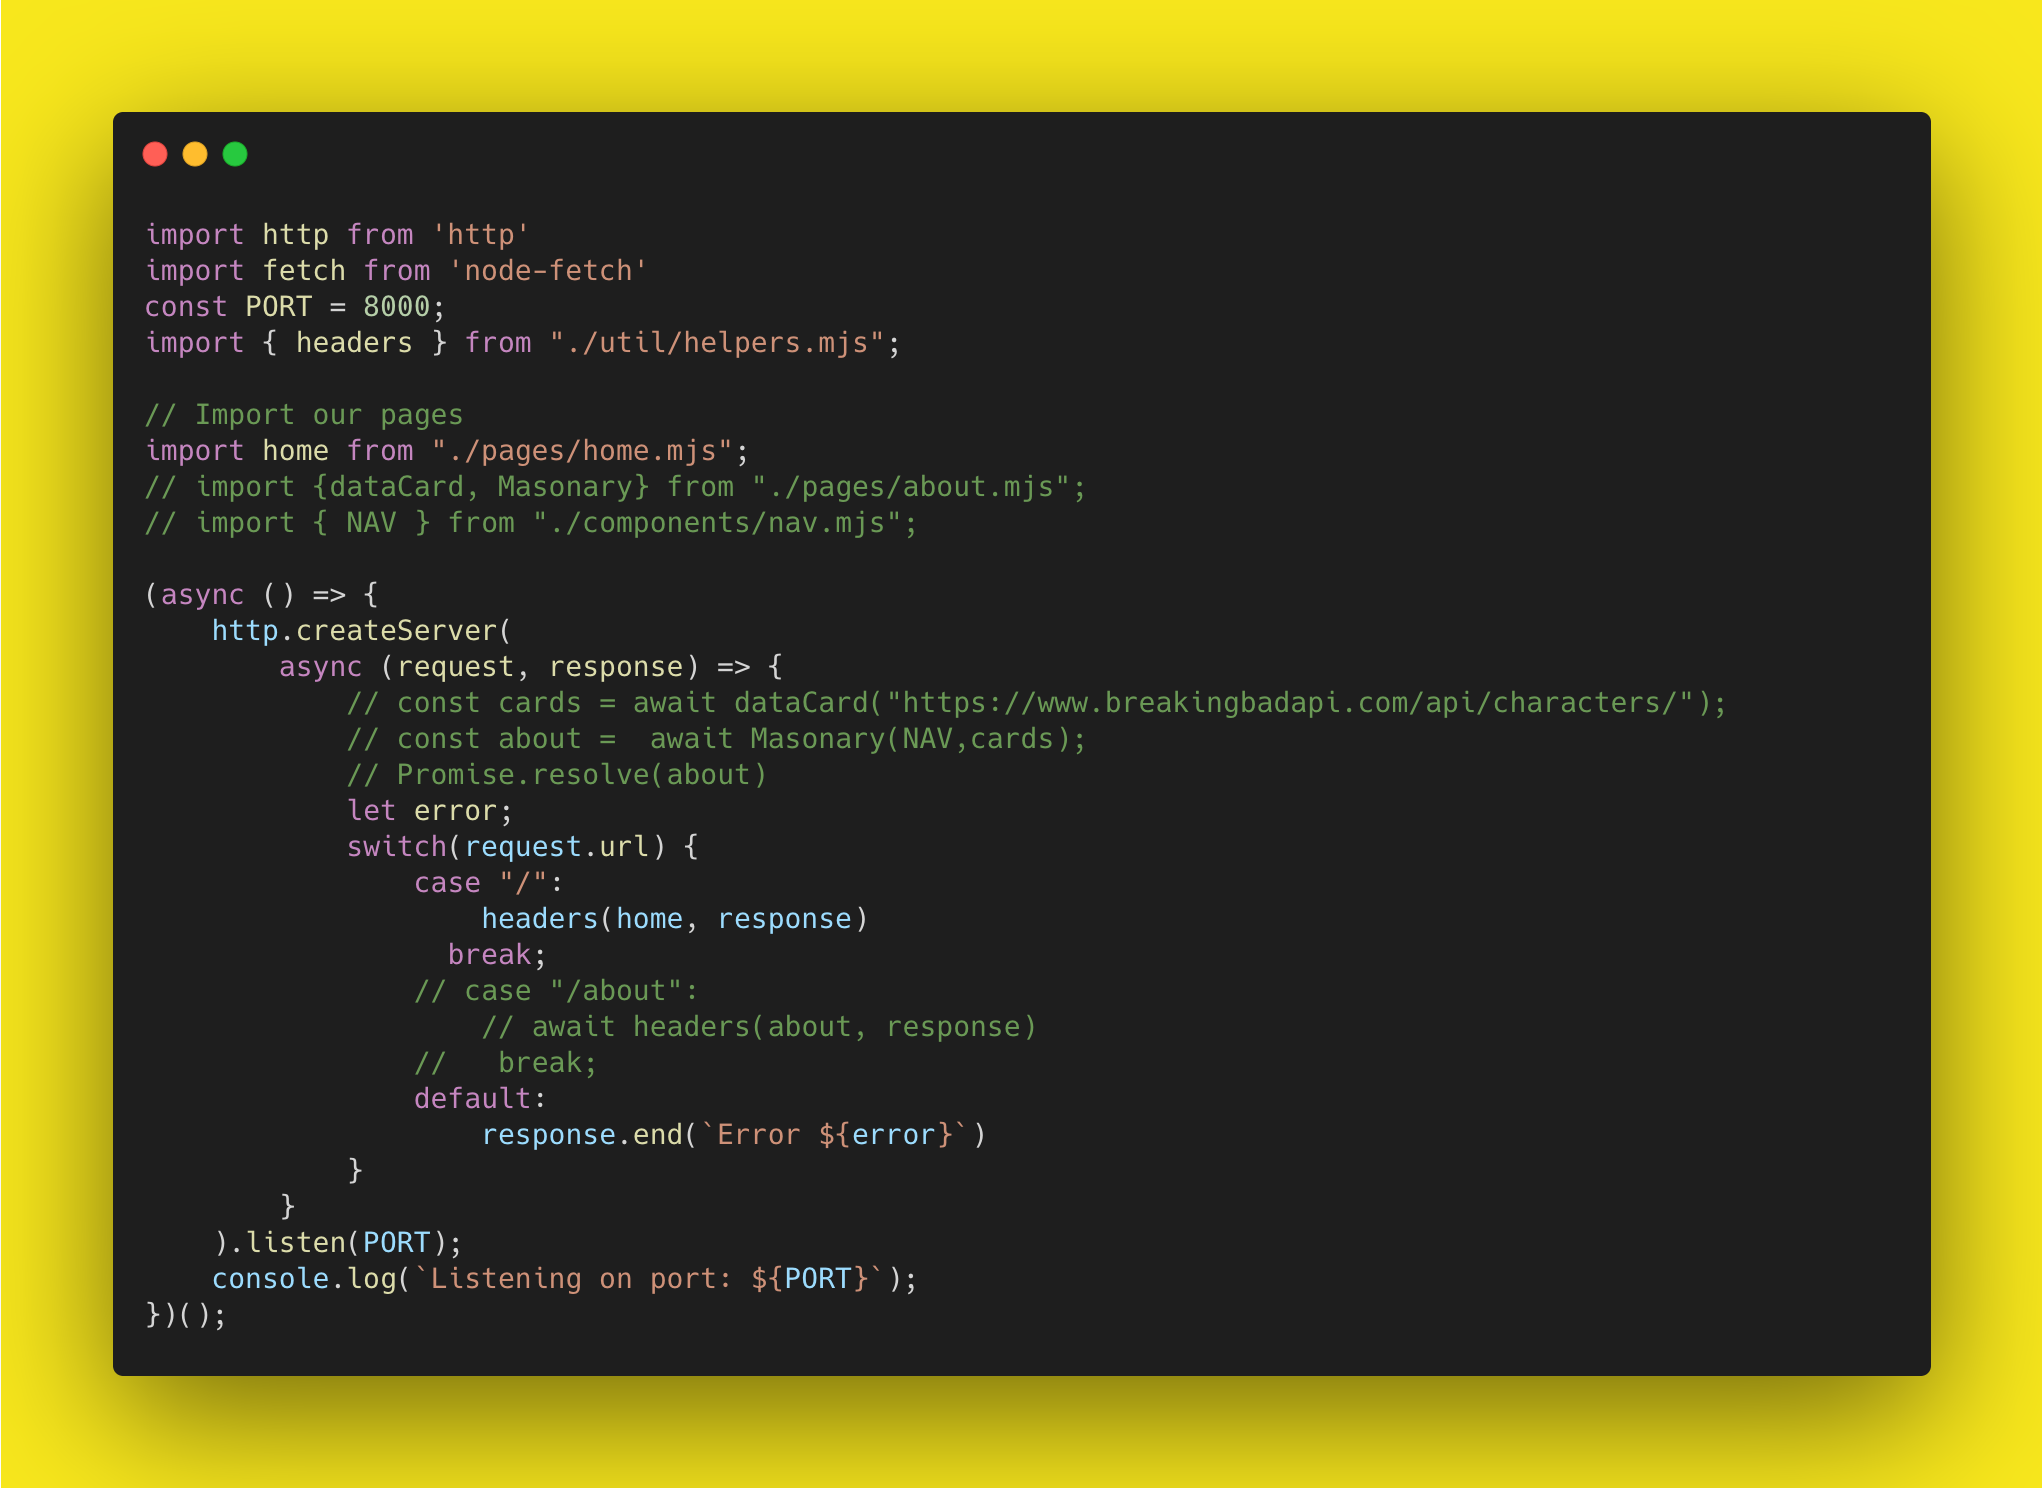
Step 9: Putting it all together
Now we'll go back to ./index.mjs and put it all together.
You'll notice I commented out some code.
That's an example that uses fetch on the server-side to generate dynamic masonry layout on the about page. I wont cover that in this article because I want to leave something for you to think about and research on your own, or a reason to join my twitch classes.
For now, I'll just import the home page and call it in headers(). That way when we goto something.com/ it will render out our page.
Comments
Loading comments…