Whether it’s capturing user details, login credentials, or search queries, forms serve as the gateway for user input in many applications. However, building a performance-optimized form in React Native can sometimes be daunting.
Moreover, it can be more difficult to validate forms to ensure data integrity on the front end.
Currently, there are two major ways I’ve observed many developers handle forms:
- Creating individual states for each form input.
- Using Formik
Option 1 isn’t so great of an option because the larger the form, the more useState hooks you’ll need to define, and it can make your code messy (not to mention of rerenders).
Using Formik
Formik is a great way to easily handle form validation, but it introduces a lot of unnecessary rerenders into your form as every change to any input rerenders your whole form.
A more flexible and performant approach I’ve found to handling forms is React Hook Form (RHF).
Why React Hook Form?
React Hook Form is a lightweight and performant form management library.
React Hook Form provides you with the ability to create flexible and extensible forms with easy-to-use validation.
It keeps your app up to speed by reducing the number of rerenders when compared to Formik.
Let’s look at how we can integrate React Hook Form into a React native app. For this example, we would make use of Expo to quickly spin up a React native app.
Initialize a new Expo app.
Details on Setting up an Expo project locally are all covered in detail in the Expo documentation.
But here’s a brief guide:
- Create a New React Native Project: create-expo-app is the command line tool for quickly creating a new React Native project with the expo package installed. Run the following command in your terminal:
// using npm
npx create-expo-app

// or

// using yarn
yarn create expo-app
You’d be presented with an input for your project name. Type in the name of your choice and hit Enter
This will create a new directory for the project with the project name you chose.
2. Navigate to your project folder
You can do this by using:
cd <project name>
3. Start the development server
Use the command:
npx expo start
This command will start a development server for you.
You now have a basic React Native application setup quickly using Expo. Open your project on your Android emulator, iOS simulator or a physical device to see the app running.
To help you set up your development devices for development with Expo, you can follow these guides:
- Using Expo Go App: This app is available for both iOS and Android devices.
- Creating a Build for Emulator/Simulator: This guide will help you create a build specifically for an emulator or simulator.
Once done, you can proceed with installing the project dependencies.
Installing Dependencies
Install the required dependencies by running the following command:
yarn add react-hook-form zod @hookform/resolvers
- React-hook-form: Form management library.
- Zod: Schema validation library; this will be used to validate our form.
- @hookform/resolvers: React Hook Form plugin that connects React Hook Form and Zod
Creating a simple login form
With the dependencies installed, we can create a simple login form by using the useForm hook provided by React Hook Form.
To do this, you can open App.jsx in the root directory, clear the default code provided by create-expo-app and type in the following code:
import { Button, StyleSheet, Text, TextInput, View } from 'react-native';

export default function App() {
return (
<View style={styles.container}>
  <Text style={styles.heading}>Simple Login Form</Text>
  <TextInput
    placeholder='email'
    style={styles.input}
  />
  <TextInput
    placeholder='full name'
    style={styles.input}
  />
  <TextInput
    placeholder='password'
    style={styles.input}
    secureTextEntry
  />
  <Button
    title='Submit'
  />
</View>
);
}
// … styles
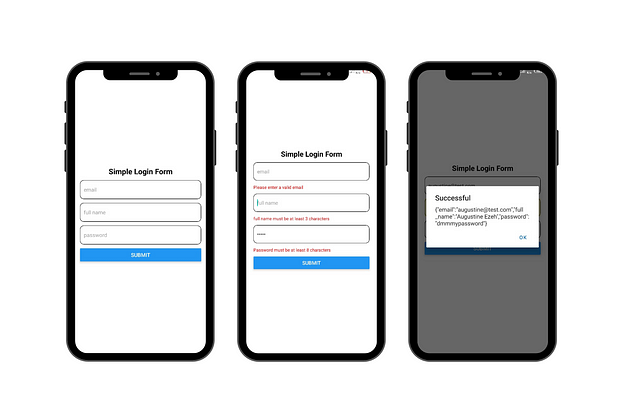
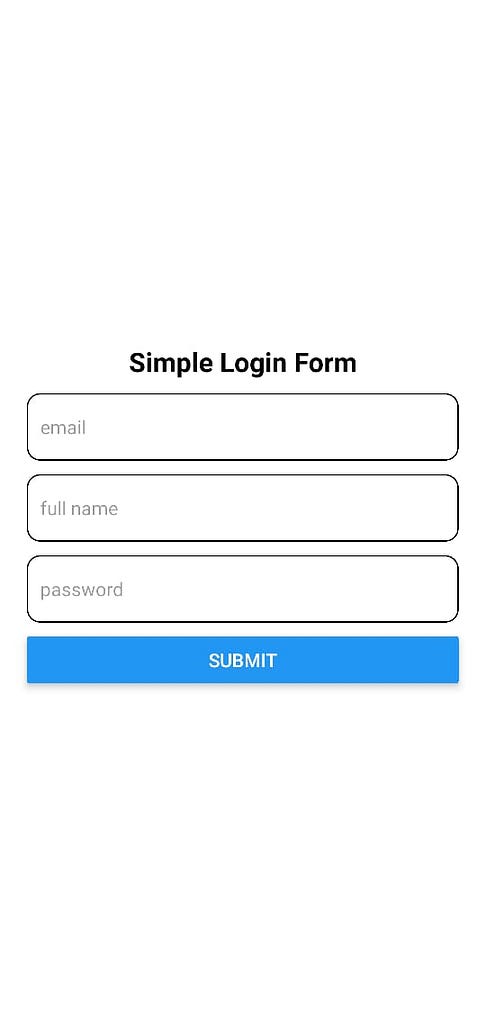
The above code creates a simple form with three fields: email, full name and password.
For simplicity, the styles for the code above were intentionally omitted, the complete working code and the styles can be found on this GitHub repository.
Image of form:
Managing form with React Hook Form
To manage the form with React Hook Form, we make use of the useForm hook and Controller component provided by React Hook Form.
Use the following to manage the form with React Hook Form:
import { Controller, useForm } from 'react-hook-form';
import { Alert, Button, StyleSheet, Text, TextInput, View } from 'react-native';
export default function App() {
const { control, handleSubmit } = useForm({
defaultValues: {
email: '',
full_name: '',
password: '',
}
});
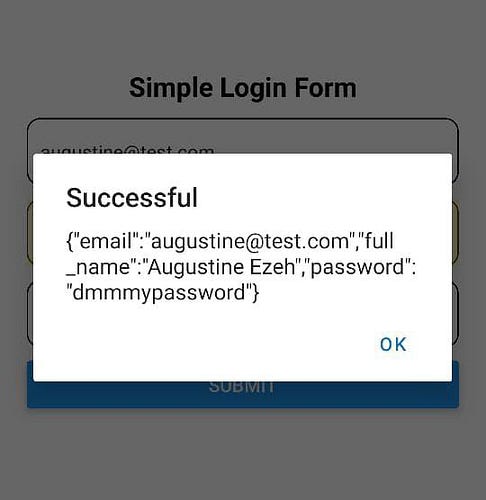
const onSubmit = (data)=>{
Alert.alert("Successful", JSON.stringify(data))
}
return (
<View style={styles.container}>
<Text style={styles.heading}>Simple Login Form</Text>
<Controller
control={control}
name={'email'}
render={({ field: { value, onChange, onBlur }})=>(
<TextInput
placeholder='email'
style={styles.input}
value={value}
onChangeText={onChange}
onBlur={onBlur}
/>
)}
/>
<Controller
control={control}
name={'full_name'}
render={({ field: { value, onChange, onBlur }})=>(
<TextInput
placeholder='full name'
style={styles.input}
value={value}
onChangeText={onChange}
onBlur={onBlur}
/>
)}
/>
<Controller
control={control}
name={'password'}
render={({ field: { value, onChange, onBlur }})=>(
<TextInput
placeholder='password'
style={styles.input}
secureTextEntry
value={value}
onChangeText={onChange}
onBlur={onBlur}
/>
)}
/>
<Button
title='Submit'
onPress={handleSubmit(onSubmit)}
/>
</View>
);
}
// …Styles below
From the code above, we used JavaScript’s destructuring assignment to get the control object and the handleSubmit function of the useForm hook and passed in an object with the defaultValues key to specify the form’s default values in an object.
The control object contains methods for registering components into React Hook Form. We then pass the control object to the control prop of the Controller component for each input.
The Controller component is a wrapper component used to simplify the technical aspects of adding controlled inputs to React Hook Form, using the render prop we destructure the prop to get the onChange and OnBlur callback functions as well as the value argument which we can pass to the TextInput component, which will allow React Hook Form to manage the form.
We also passed in the name prop as the key of the defaultValue object passed into the useForm hook.
We’ve defined the onSubmit function to handle the form data when it is successfully validated, we accept a data argument that would contain the form values when called.
To submit the form, the onPress props trigger the form submission, invoking the handleSubmit function from React Hook Form while passing the onSubmit function as a callback function, which is called if the form validation is successful.
With the above code, when you type in a value and submit, we get an alert with the details of the form.
Alert on form submit:
Let’s validate the form.
💡 If you’re looking to extend form-handling capabilities into PDF workflows, Apryse Form Builder offers seamless integration for filling, extracting, and processing PDF forms.
PDF Form Filler SDK: Interactive Form Filling
Validating the form
React Hook Form has a default validator, but for easy and advanced validation, Zod is the recommended validation library.
We use the ‘@hookform/resolvers’ library to connect and validate forms managed by React Hook Forms with Zod.
To add validation, we first need to define the schema for the form (a schema describes what values the fields of the form should contain).
import {z} from 'zod'
// …
const formSchema = z.object({
  email: z.string().email('Please enter a valid email'),
  full_name: z.string().min(3, 'full name must be at least 3 characters'),
  password: z.string().min(8, 'Password must be at least 8 characters'),
});
Notice how it is the same as the defaultValue passed as an object in the useForm hook and the name prop of the name prop for each controller?
We must use the assigned name for each value because that is how React Hook Form tracks the values in the form.
Within the formSchema, we have defined three items:
- email: checks if the value of the email field is an email.
- full_name: checks the value of the full_name field if it is a string with a minimum of 3 characters.
- password: checks the value of the password field if it is a string with a minimum of 8 characters.
We then need to pass the schema to React Hook Form by doing the following:
import { Controller, useForm } from 'react-hook-form';
import { Alert, Button, StyleSheet, Text, TextInput, View } from 'react-native';
import { zodResolver } from '@hookform/resolvers/zod';
import {z} from 'Zod'

const formSchema = z.object({
email: z.string().email('Please enter a valid email'),
full_name: z.string().min(3, 'full name must be at least 3 characters'),
password: z.string().min(8, 'Password must be at least 8 characters'),
});

export default function App() {
const { control, handleSubmit } = useForm({
  defaultValues: {
  email: '',
  full_name: '',
  password: '',
  },
  resolver: zodResolver(formSchema),
});

const onSubmit = (data)=>{
Alert.alert("Successful", JSON.stringify(data))
}

return (
<View style={styles.container}>
  <Text style={styles.heading}>Simple Login Form</Text>
  <Controller
    control={control}
    name={'email'}
    render={({ field: { value, onChange, onBlur }})=>(
      <TextInput
      placeholder='email'
      style={styles.input}
      value={value}
      onChangeText={onChange}
      onBlur={onBlur}
      />
    )}
  />
  <Controller
    control={control}
    name={'full_name'}
    render={({ field: { value, onChange, onBlur }})=>(
      <TextInput
      placeholder='full name'
      style={styles.input}
      value={value}
      onChangeText={onChange}
      onBlur={onBlur}
      />
    )}
  />
  <Controller
    control={control}
    name={'password'}
    render={({ field: { value, onChange, onBlur }})=>(
      <TextInput
      placeholder='password'
      style={styles.input}
      secureTextEntry
      value={value}
      onChangeText={onChange}
      onBlur={onBlur}
      />
    )}
  />
  <Button
    title='Submit'
    onPress={handleSubmit(onSubmit)}
  />
</View>
);

}
// …Styles below
From the code above, we passed the zodResolver function to the useForm hook object with the formSchema passed as an argument.
With the zodResolver, React Hook Form can know if an input is valid and what error to display when it is invalid.
If the fields are empty and you press the button, nothing happens.
This is because the form is invalid and onSubmit is only executed when the form is valid.
However, we need to provide users with feedback to tell them when or why their input is wrong. To do this, we will have to display error messages.
Displaying Error messages
To display error messages, we would first abstract the TextInput component to make a component that would display the error message as text underneath the input component.
First, create a component folder in your project’s root directory and create the formInput.jsx file.
Then add the following code:
// components/formInput.jsx
import React from 'react'
import { StyleSheet, Text, TextInput } from 'react-native'
import { Controller } from 'react-hook-form';

const FormInput = ({control, name, …otherProps}) => {
  return (
    <Controller
      control={control}
      name={name}
      render={({ field: { value, onChange, onBlur }, fieldState: { error }})=>(
      <>
        <TextInput
        style={styles.input}
        value={value}
        onChangeText={onChange}
        onBlur={onBlur}
        {…otherProps}
        />
        {error && <Text style={styles.errorMessage}>
                  {error.message}
                  </Text>
        }
      </>
      )}
    />
  )
}
export default FormInput;
// …Styles below
In the formInput component, we take in three props ‘name’ and ‘control’ as well as a third prop ‘…otherProps’.
…otherProps uses javascript’s spread operator to get any other prop that is passed into the component. With this, we can pass endless props to the TextInput. This is important as it helps us with the password field (we would be able to pass in secureTextEntry prop to hide password input).
The Controller render function also provides the fieldState object which contains the state of each input. we can destructure further to access the error object.
We then conditionally display the Error message using a Text component only when an error is present.
Moving forward we refactor the App.jsx component to use the FormInput component.
import { Controller, useForm } from 'react-hook-form';
import { Alert, Button, StyleSheet, Text, TextInput, View } from 'react-native';
import { zodResolver } from '@hookform/resolvers/zod';
import {z} from 'zod'
import FormInput from './components/formInput';

const formSchema = z.object({
email: z.string().email('Please enter a valid email'),
full_name: z.string().min(3, 'full name must be at least 3 characters'),
password: z.string().min(8, 'Password must be at least 8 characters'),
});

export default function App() {
const { control, handleSubmit } = useForm({
  defaultValues: {
  email: '',
  full_name: '',
  password: '',
  },
  resolver: zodResolver(formSchema),
});

const onSubmit = (data)=>{
Alert.alert("Successful", JSON.stringify(data))
}

return (
<View style={styles.container}>
  <Text style={styles.heading}>Simple Login Form</Text>
  <FormInput
    control={control}
    name={'email'}
    placeholder="email"
  />
  <FormInput
    control={control}
    name={'full_name'}
    placeholder='full name'
  />
  <FormInput
    control={control}
    name={'password'}
    placeholder='password'
    secureTextEntry
  />
  <Button
    title='Submit'
    onPress={handleSubmit(onSubmit)}
  />
</View>
);
}

// …Styles below
With the FormInput component, we only need to pass values to the control and the name prop as well as any other value we want the TextInput to contain as we did for the password field.
Form with error message:
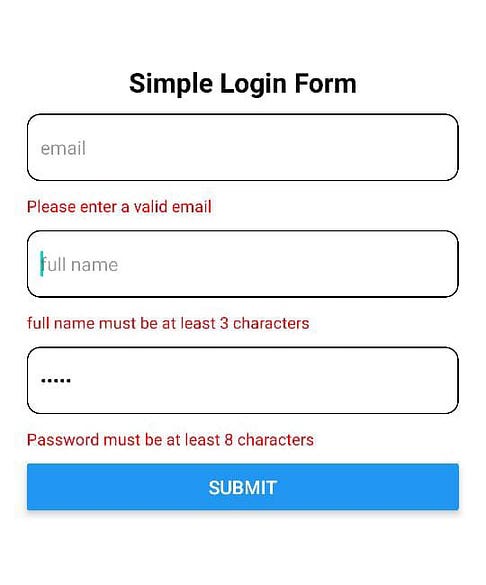
Now, when the submit button is pressed and the form has an invalid field, it displays the error associated with the field and only disappears when the field is valid.
Cons of React Hook Form
So far, the only con of React Hook Form is that it relies on React hooks. As a result, it cannot be used directly in class components.
If you’re looking to extend form-handling workflows, tools like Digital Signature for secure signing, and Document Generation for dynamic document creation provide powerful integrations.
Conclusion
The combination of Zod and React Hook Form is like teaming up two superheroes for React Native forms. Zod’s strong validation and React Hook Form’s easy and flexible form handling make the process of integrating forms into React Native applications smoother. Together, they simplify making sure users enter the right info and help build apps that work great and feel easy to use.
References
API Documentation (react-hook-form.com)API Documentation (react-hook-form.com)
Comments
Loading comments…