Here I am with a new problem statement for us to go through with today. We are all working on highly complex designs in our day-to-day lives, but surprisingly, we tend to get stuck in building the simplest of designs when a clock is ticking on the side, a person is constantly staring at our code and everything we have always known suddenly decides to take a stroll in the black hole. 🤭
So that’s the problem. But the solution is what we are interested in here.
The solution is a quite well-known, commonly preached concept — PRACTICE!
Let’s follow up on the next problem. Where do we practice from? Because the internet is an endless pool of knowledge and it is a heavy task to find the right and the most useful sources to study from. Given that I have suffered from this trivia, I would like to share some important problem statements and the way one should approach them. Remember that one doesn’t get better by solving a 1000 similar problems, but 10 different ones! I will present before you a few different problem cases in a series of articles, which if practised can improve your machine/live coding skills by a valuable margin.
Problem Statement of the Day:
I hope you have used Bookmyshow. Try to make a ticket booking interface considering the same as your reference.
The first step you should take if in an interview is to tell the interviewer about the things you already can assume about this interface. It doesn’t really matter if you have used this particular app/website or not. As a UI Developer, you should be capable of imagining any interface you are asked to (plus points for presenting your assumptions before you jump into asking questions for further clarity).
ASPECTS WE CAN EASILY ASSUME ABOUT THIS INTERFACE :
-
The seat numbers will keep incrementing.
-
The seat numbers are same across a row, keep incrementing across columns, and are appended with incrementing alphabets in each row.
-
Certain seats will be unavailable, certain will be available and the user can only select from the available list of seats.
-
Once booked, the selected seats will become unavailable too.
I think we already have a good couple of observations we have presented to our interviewer. Now, let’s request for further clarity or any requirements he would like us to add to the list.
ADDITIONAL REQUIREMENT —
Let’s say, that the user should first be prompted to enter the number of seats he would like to select. If his selection goes beyond the total number of seats he had asked for, we will unselect the first selected seat and select the newly selected one. For example: Let’s say the user wanted to select 2 seats. He has already selected 2E and 2F. Now if he goes ahead and selects 2G as well, then 2E should automatically be deselected and the new set of selected seats are 2F and 2G.
Now always, divide your problem into subsets. Then pick each subset one by one.
-
2 sections of seats(for simplicity)
-
Available and unavailable seats with some differentiation between the two
-
A handler to select seats
-
A handler to book seats
We have now identified our subsets. Let’s solve them one by one.
2 sections of seats —
We know that these sections are going to be exactly similar to each other except for the number of seats in each section. We can hence, create one component for seats which can generate both the sections. With React, comes the feature of creating reusable components and we must use it to make our code compact and utilize the strength of the library.
const Seats = (props) => {
  return (
      <div>
          {props.values.map(seat => {
             return <div key={seat}>{seat}</div>;
          })}
      </div>
    );
}
export default Seats;
This is how our Seats component can look like. A simple component, which generates divs for all the values we pass to it. Each div resembles a seat. So the next step is to pass the seat values to this component and generate the two sections that we want. Also, with this approach your code is a scalable snippet. You can add a gazillion number sections in your interface by calling this component multiple times.
const createSeats = (rows, startIndex) => {
    let i = 0;
    let j = startIndex;
    let k = 'A';
    const section = [];
    while(i < 6 && j <= rows) {
        if(k > 'F') {
            k = 'A';
            j++;
        }
        if(j < rows + 1) {
            section.push(j + k);
            k = String.fromCharCode(k.charCodeAt(0) + 1);
        }
    }
    return section;

}
const BookMySeats = () => {
  const premiumSeats = createSeats(2, '1');
  const normalSeats = createSeats(10, '3');
  return (
        <React.Fragment>
          <Seats values={premiumSeats}/>
          <Seats values={normalSeats}/>
        </React.Fragment>

    );
}

export default BookMySeats;
Make your code as reusable and compact as possible. Keeping this in mind, I created one function which takes in certain arguments and generates the seats in each section. The function createSeats() accepts two arguments which are the number of rows you would want to create in a section and the startIndex of the first row in that section. The seats generated are then passed as a prop to the Seats component which then runs a loop on all the generated seats and creates a div for each seat.
To arrange the seats in a grid like structure, just set the display type of the parent section as grid and add the number of columns you would like for it to have—
.section {
    margin-top: 20px;
    display: grid;
    grid-template-columns: repeat(6, 1fr);
}
Available and unavailable seats with some differentiation between the two
To implement this, you can maintain an array of available seats. To add the separation, you can set the background color of the seats accordingly.
const BookMySeats = () => {
  const premiumSeats = createSeats(2, '1');
  const normalSeats = createSeats(10, '3');
  const [availableSeats, setAvailableSeats] = useState(['1A', '1B', '2A', '2B', '10A', '10B']);
  const [bookedSeats, setBookedSeats] = useState([]);
  const [bookedStatus, setBookedStatus] = useState('');
  const [numberOfSeats, setNumberOfSeats] = useState(0);

  return (
        <React.Fragment>
            <p>How many seats would you like to book?</p>
            <input value={numberOfSeats} onChange={(ev) => setNumberOfSeats(ev.target.value)}/>
            <Seats values={premiumSeats}
                   availableSeats={availableSeats}
                   bookedSeats={bookedSeats}/>
            <Seats values={normalSeats}
                   availableSeats={availableSeats}
                   bookedSeats={bookedSeats}/>
       </React.Fragment>

    );
}

export default BookMySeats;
I have now added a couple of states in the BookMySeats component which is the parent of the Seats component. An array to hold the available seats, another array to hold the booked seats. I have also added an input to accept the number of seats the user would like to book. The value of the input is governed by a state value, which is numberOfSeats. We then pass the available and booked seats array to both our seats components to add the styling in the components based on this.
import React from 'react';
import classes from './BookMySeats.css';

const Seats = (props) => {

    return (
      <div className={classes.section}>
          {props.values.map(seat => {
              const isAvailable =   props.availableSeats.includes(seat);
              const isBooked = props.bookedSeats.includes(seat);
              let seatClass;
              if(!isAvailable) {
                  seatClass = classes.disabled;
              }
              if(isBooked) {
                  seatClass = classes.booked;
              }
              return <div className={seatClass}key={seat}>{seat}  </div>;
          })}
      </div>
    );
}
export default Seats;
This is how our Seats component looks like after accepting the props. Based on the props value, we append different classes to each seat div. The classes hold certain background colors which will imply the separation.
A handler to select seats
Selection will only be allowed for the available seats. So remember to disable the selection for unavailable seats.
.section > div:hover {
    cursor: pointer;
}
.section .disabled:hover {
    cursor: not-allowed;
}
Given that we are appending the disabled class to all our disabled divs, we can rely on the class selector combined with the pseudo-class :hover for disabling the cursor.
The next step is to add a function to select the seats.
const addSeat = (ev) => {
    if(numberOfSeats && !ev.target.className.includes('disabled')) {
        const seatsToBook = parseInt(numberOfSeats, 10);
      if(bookedSeats.length <= seatsToBook) {
          if (bookedSeats.includes(ev.target.innerText)) {
              const newAvailable = bookedSeats.filter(seat => seat !== ev.target.innerText);
              setBookedSeats(newAvailable);
          } else if(bookedSeats.length < numberOfSeats) {
              setBookedSeats([...bookedSeats, ev.target.innerText]);

          } else if (bookedSeats.length === seatsToBook) {
              bookedSeats.shift();
              setBookedSeats([...bookedSeats, ev.target.innerText]);
          }
      }
    }
  };
I have covered all the cases in here.
The selection is allowed only if the user has entered the number of seats he has booked and the target does not have the className disabled.
When the booked seats are lesser than the number of seats that the user wants to select —
-
If the user is clicking on this div for the first time (it’s not already a part of bookedSeats), add it to the bookedSeats array.
-
If the user is clicking on the selected div again, he is trying to deselect it. So remove it from the bookedSeats array.
When the booked seats is equal to the number of seats that the user wants to select, remove the first seat from the array and push the newly selected seat.
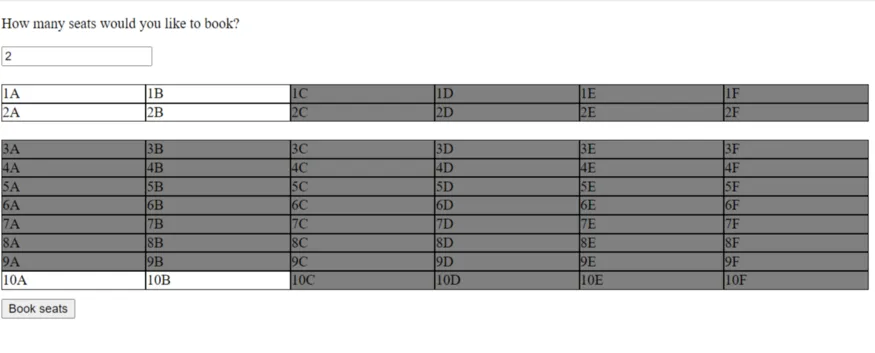
Screen post selection of seats

A handler to book seats
It’s the final step now. The seats have been selected. The booking must be confirmed.
Add a button to take the confirmation and on click of the button, something of this sort should happen —
const confirmBooking = () => {
    setBookedStatus('You have successfully booked the following seats:');
    bookedSeats.forEach(seat => {
         setBookedStatus(prevState => {
             return prevState + seat + ' ';
         })
    });
    const newAvailableSeats = availableSeats.filter(seat => !bookedSeats.includes(seat));
    setAvailableSeats(newAvailableSeats);
    setBookedSeats([]);
    setNumberOfSeats(0);
};
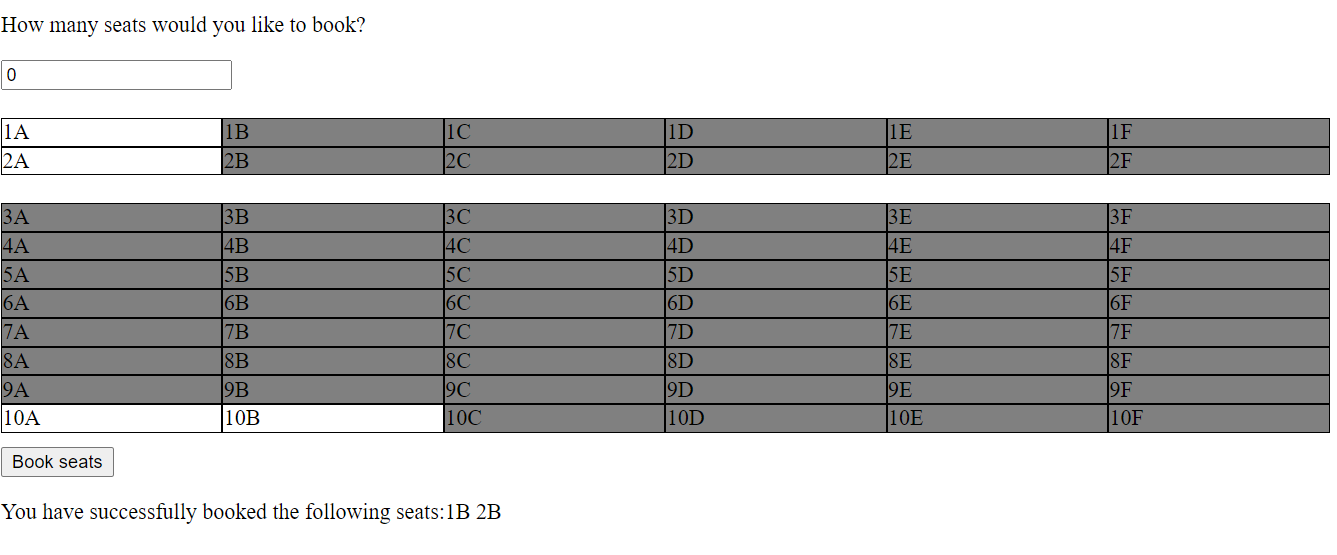
I have also created an extra state to show the bookedStatus at the bottom. Once the user confirms the booking, we add all the seats from the bookedSeats array to the bookedStatus string. The bookedStatus array and the numberOfSeats should both be re-initialized to [] and 0 for a new selection to happen next. The newly selected seats must be removed from the list of available seats.
And that is it! You have your fully functional ticket booking interface!
Seats booked and unavailable for the next user
So let’s revise the steps once —
-
Multiple sections on the screen held a strong resemblance with each other, hence we decided to create one re-usable component for this.
-
We created an array of seats for each section in the parent component.
-
We created a mock array of available seats, an empty array of booked seats and a click handler for the seats, passed all these values down to the seats component as props.
-
In the seats component, we checked the availability of each seat in the available/booked seats array and attached styles respectively.
-
We created a handler to manage the click of each div and added all the edge cases in the same.
-
We created a final handler to manage the click of the Confirm Booking button and re-initialized the booked seats and number of seats to be selected to their initial values, removed the newly selected seats from the list of available seats.
There definitely are modifications that you can make to this project —
-
A better styling, of course! Currently all the elements are left-aligned which can be improved. The sections can have headers indicating the name of the section.Add some gap between the seats.
-
The selected seats after each selection can be saved in the browser’s localStorage. When the page is re-rendered the previous selection will be persisted.
-
A message saying “Full House” when all the seats are selected.
-
An error message around the input box if the user is trying to select seats without providing the number of seats.
-
Disable further selections once the booking is confirmed.
-
useEffect() hook can be used to re-render the components only when the effective state is changed. useCallBack() can be added around the functions to hinder the re-creation of the functions on each re-render.
Think about these modifications, add them to your project, practice well, and keep making your code better.
To get access to the full code, visit the GitHub link:
Comments
Loading comments…