
Photo by Joshua Reddekopp on Unsplash
In this tutorial, you'll learn how to set up and code a TCP client/server application with Node.js, explained using simple words and with a step-by-step approach from scratch!
After following this tutorial, you'll understand how it works and be able to set up a TCP server and TCP client and exchange data between them using Node.js.
(The example is based on Windows, but it will be the same thing for Linux)

Photo by Arnold Francisca on Unsplash
What is TCP?
TCP stands for Transmission Control Protocol and is one of the TCP/IP internet protocols.
Using TCP, you can exchange data between a client and server in a reliable way.
What you have to remember is:
-
TCP is a connection-oriented protocol: it means that the client has to establish a connection with a server before exchanging data with it
-
TCP is reliable: it means that the sender is notified when its message is received by the receiver
-
The data is re-transmitted if the receiver didn't receive the message, so no data is lost
-
Your data is delivered in order, which means that the receiver will receive packets in the same order in which the sender has sent them
-
Error detection
But in some applications, TCP may not be the right choice because it can be slow compared to other protocols and it can be heavy for some applications like video streaming.

Photo by Jordan Harrison on Unsplash
What is Node.js?
Node.js is defined as:
“As an asynchronous event-driven JavaScript runtime, Node.js is designed to build scalable network applications. In the following “hello world” example, many connections can be handled concurrently. Upon each connection, the callback is fired, but if there is no work to be done, Node.js will sleep” (*)
(*) https://nodejs.org/en/about/
How to install Node.js?
To install Node.js, it is recommended to download a pre-built one available in the download section:
https://nodejs.org/en/download/
Make sure to install the LTS version which is stable and has “long-term support”.
In order to check if it was installed properly, open the command line (cmd) and execute the following command (the command checks the version of Node.js):
node -v
The output will be the Node.js version, for example, like :
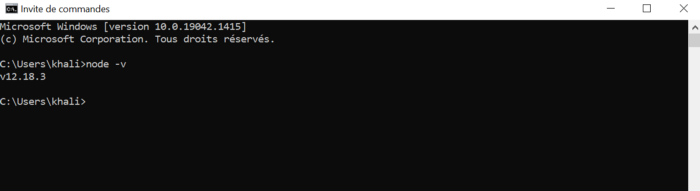
check nodeJS version
If it is okay, so we can start coding!

Photo by Caspar Camille Rubin on Unsplash
Let's start coding!
1. Our application architecture
For this tutorial, it will be a simple TCP client/server architecture:
-
The server: it will listen on a specific port in which the client messages will come and will send a response to the client request.
-
The client will send to a server a message and wait for a response to its request
Note: I'm trying to keep it really easy for you so you can learn and it is up to you to use it for your real application. :)
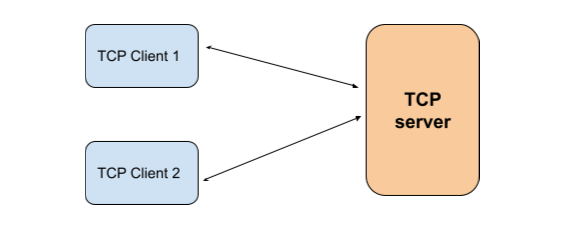
Our application architecture
2. The TCP clients
In this section, we will create two TCP clients using the “net” module.
“The
netmodule provides an asynchronous network API for creating stream-based TCP” . https://nodejs.org/api/net.html#net
and then, each client will:
-
connect to the server
-
send a message
-
wait for server response
Here is the complete code for this example:
TCP client code in NodeJS
Some explanations:
First, you need to get the “net” module by calling:
const net = require('net');
then you need to create the socket in order to connect to the server:
const client1 = new net.Socket();
Now we can connect to the server using the appropriate port (8888 in this example) using this function:
client1.connect(.....)
after the connection is established, you can send a message using:
client1.write('Hi from the client 1')
to handle events like data reception, errors, connection close, you can use:
client1.on('x',function(x){
   // you function code
});
-
xis the event to handle, it can be 'data', 'close' … -
function(){}: is the callback called when the event occurs
Now we can launch our client code in the command line using this command:
node tcp_client.js
3. The TCP server
Like the TCP client, to set up the TCP server, we will use the “net” module.
After starting it, the server will listen on a specific port (8888 in this example) and will:
-
wait for a client connection
-
receive data from each connected client
-
send back a response to each connected client
Here is the complete code for the server:
TCP server code in NodeJS
Some explanations:
First, you have to create the server using:
const server = net.createServer(onClientConnection);
Note that onClientConnection is a callback function which will be called each time a client is connected to the server.
Then we have to start the server listening using:
server.listen(....)
As we said earlier, each time a client is connected to the server, onClientConnection will be called so let's take a look inside this function:
You can notice that inside onClientConnection we are setting up callback to be called when some events occurs (as we explained in the client section above).
In this example, we have set up a callback when a data is received:
sock.on('data',function(data){....})
and another function to be called when the connection is closed:
sock.on('close',function(){....})
and a callback for errors:
sock.on('error',function(error){...})
We can use sock.write(…) to send a message to the client and we can close a client connection using sock.end().
Now with that being said, let's launch our server code using the command line:
node tcp_server.js
4. Results
And now, the results:
For the client's side, here are the results:
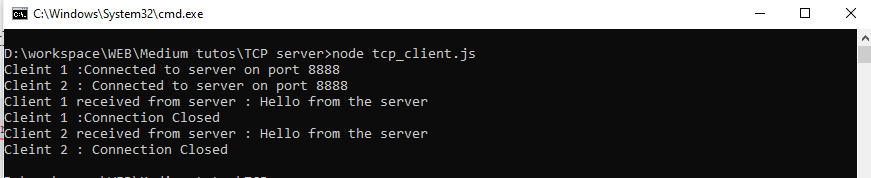
TCP clients using NodeJS
You can see that the two clients were launched successfully, send messages to the server, receive messages from the server and finally the connection is closed.
Now the server side:
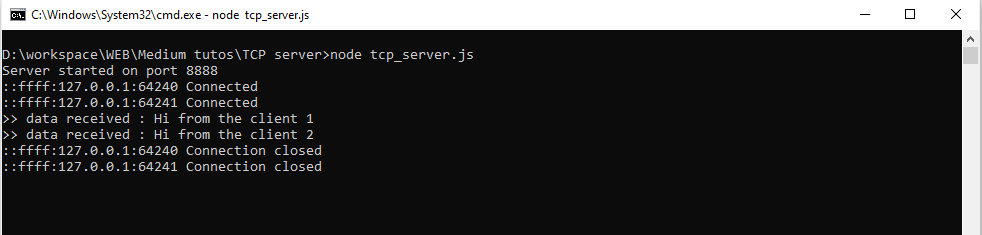
TCP server using NodeJS
We can see that two clients were connected to the server(their IP addresses were logged and you can notice that there are 2 different IP addresses one for each client). Then the server received a message from each client and send back a response and finally closes the connection for each client.
And that's it!
Conclusion
By the end of this tutorial:
-
You have a basic understanding of TCP
-
You have installed Node.js on your computer
-
Set up a TCP server that receives data from clients and sends back responses
-
Set up TCP clients to connect to a TCP server, send messages and receive data from a server
Hope this tutorial was clear for you and helped you to build your own TCP client/server application using Node.js.
Please don't forget to hit the “follow” button and leave a comment!
Thanks! And stay tuned for more tutorials.
Comments
Loading comments…