Unit testing is not the answer to everything, but it sure as hell does prevent a few embarrassing and mind numbing situations. Sometimes, no matter how careful you are when programming, some bugs go unnoticed and the simplest way to catch them before anyone else is unit testing.
In this guide, I will show you how to unit test your MERN stack's backend using Jest. Specifically, Node.js and Mongoose.
If you're experienced with Node.js then you can skip to Step 2 which details how to test your functions.
Step 1. Set up express backend
This step should be pretty straight forward for most people. All you really need to do is set up npm, install a few packages and make sure you can start your server successfully. I'm using nodemon but feel free to use npm as well.
npm init -y
npm i express mongoose nodemon
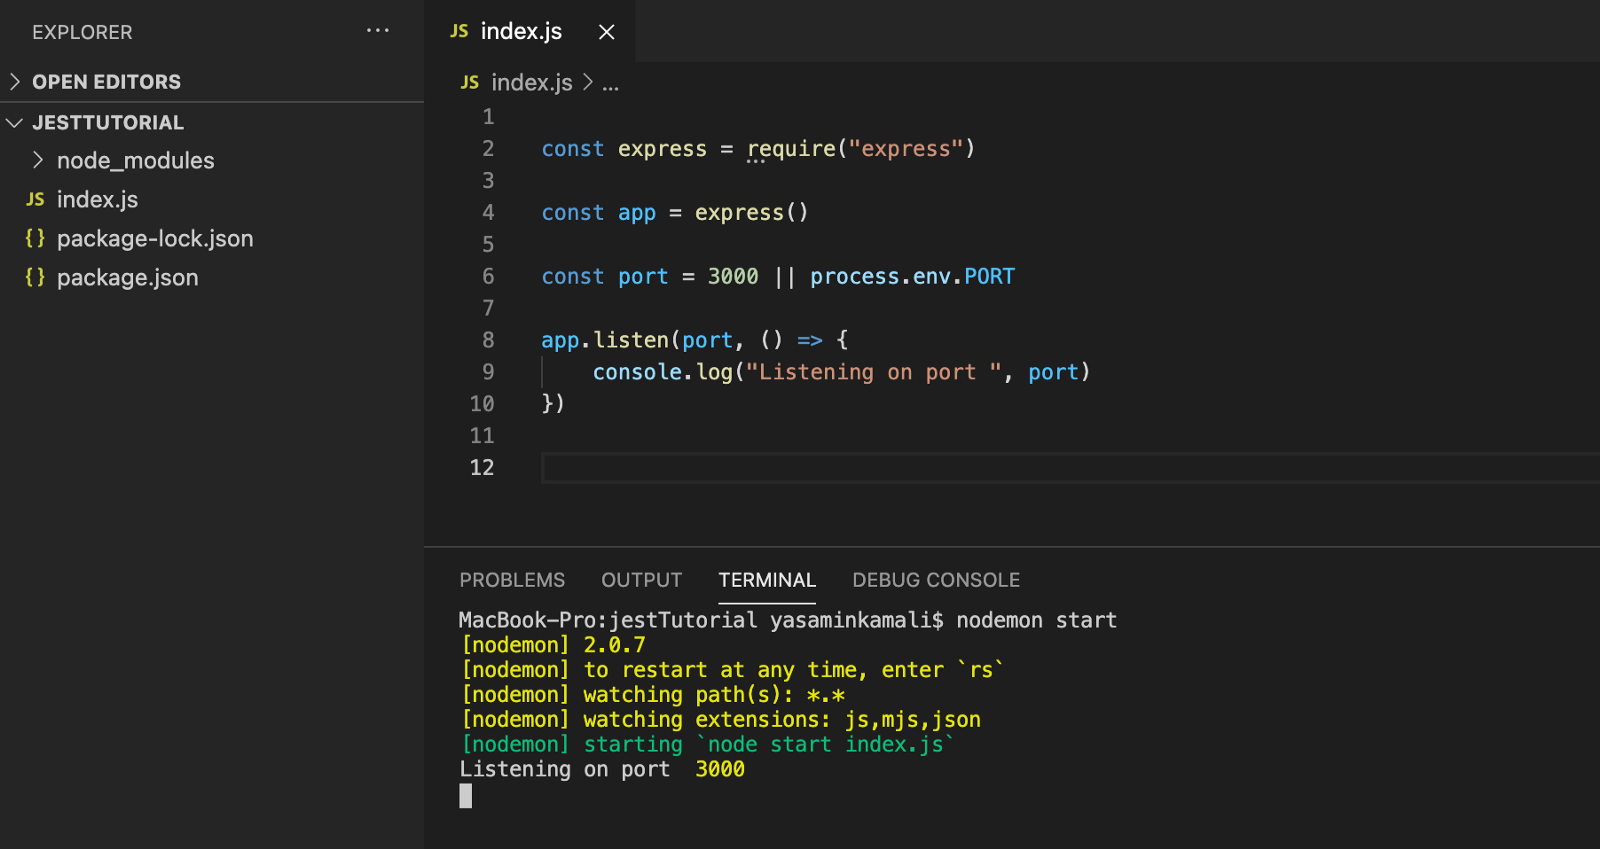
This is what your project should be looking like by this point:
basic set up in index.js
As we're only concerned with testing the application, we only need a very simple API and since everyone likes food, I thought why not make another Restaurant API!
The Restaurant Schema
Restaurant model in model/Restaurant.js
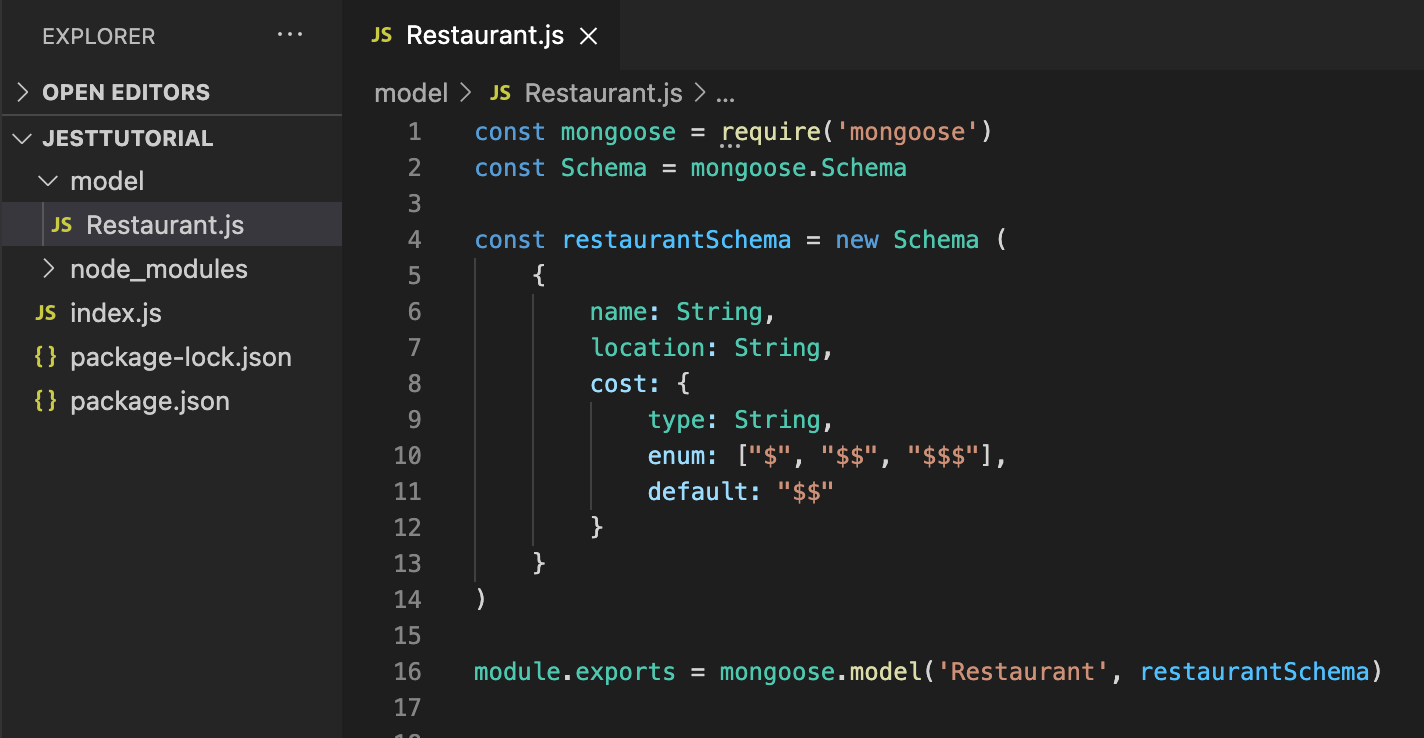
Nothing about this should be new, but the enum for cost may be confusing to some people.
The enum is simply set up to add an extra step of validation to each restaurant object, with regards to their cost property. What this means is “A restaurant's cost has to be a string and can only be one of the values '$', '$$', '$$$'. If no value is provided then give the restaurant a cost of '$$'.” Pretty simple, right?
One of our tests will cover a case where the string passed in for cost is not one of the strings in the enum. At this point the database will fail to save the new object and we will see how to handle that kind of error.
Create Restaurant Function
Our first function will be to create a restaurant given a name, location and budget.
The only reason why it should fail to create a restaurant other than a database error, is if another restaurant already has the given name (see lines 10-11), or, if the restaurant's cost is not one of the strings in the enum mentioned earlier (see model/Restaurant.js).
helper function to create a new restaurant in controller/createRestaurant.js
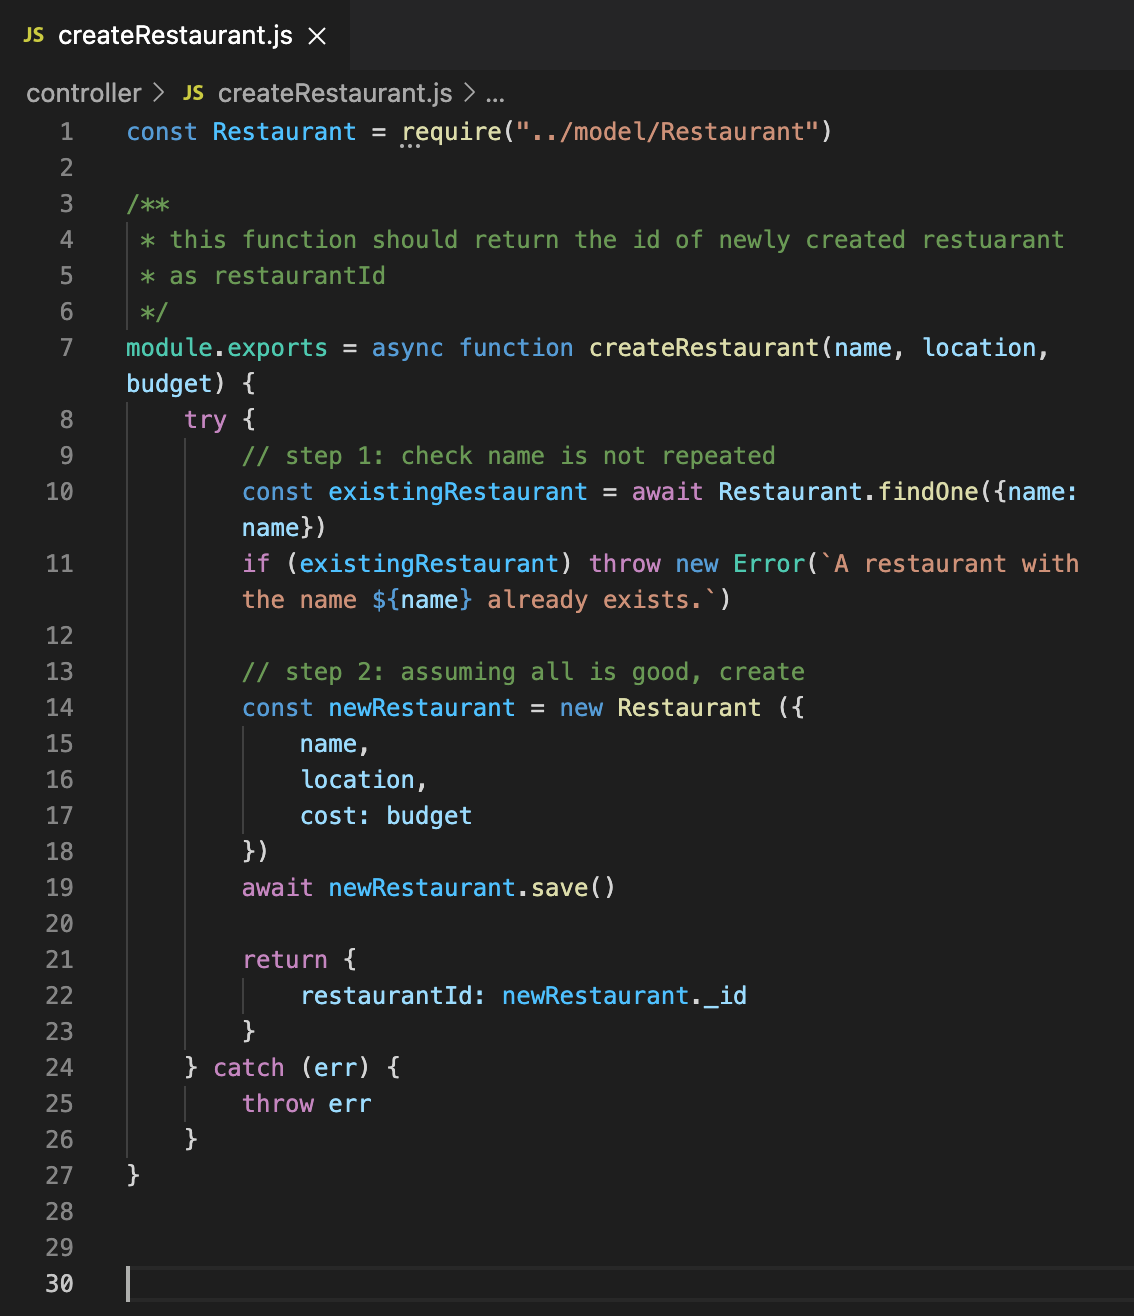
If it succeeds, it will return the id of the newly created restaurant.
Create Restaurant Post Method
This step is not necessary for testing but just incase you're not used to using helper functions, I wanted to include how you could incorprate them into your code.
controller/index.js
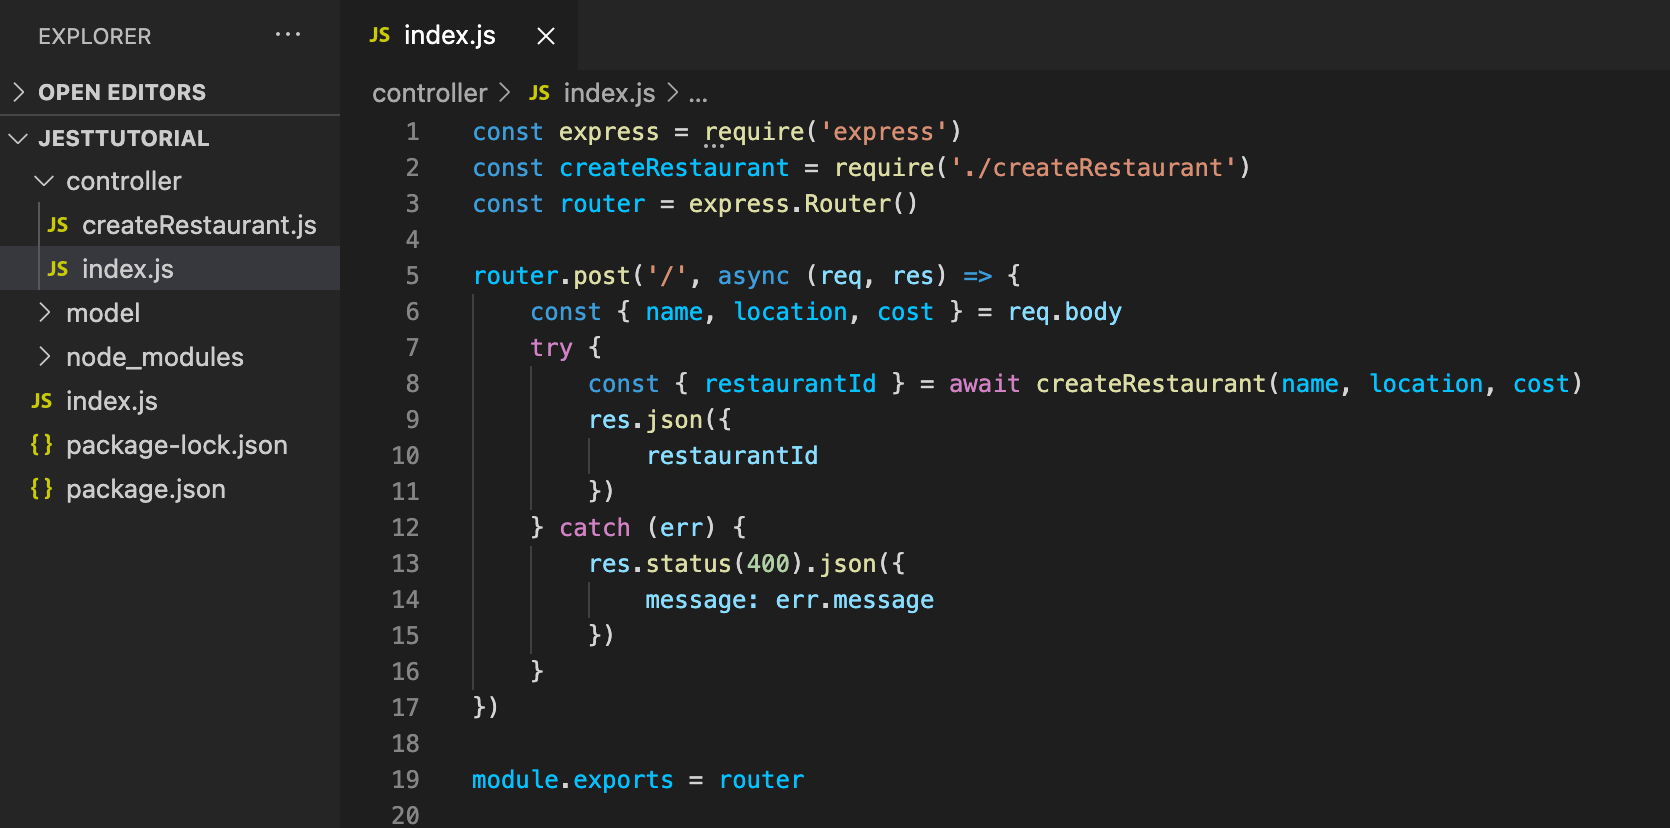
As you can see in the image above, createRestaurant(name, loc, cost) that we created earlier is being called in the post request and all of this is wrapped in a try catch statement so that if an error arises (eg. same name used twice) we are handling it.
Step 2. Install Jest and mongodb-memory-server
As mentioned in the article title, we will be using Jest to run our tests.
Jest provides methods to create, organise and run your tests. It is one of the most popular testing frameworks as it focuses on simplicity so that you can focus on the logic behind the tests.
“Jest is a delightful JavaScript Testing Framework with a focus on simplicity.”
The second package we must install is mongodb-memory-server. If you're already familiar with how mongo works, you'll know that you create a cluster that stores all of you app's data. Most applications will be writing/querying/updating the database somewhat regularly and therefore, it is important to ensure that your interactions with the database are producing the desired outcome.
The mongodb-memory server creates a 'cluster' which only exists in your device's main memory and is not physically stored to disk.
Therefore, once your application terminates, the database instance will no longer exist. This method will also be faster than if you were to mock the interactions with the database.
Now that we have the theory covered, let's install both packages:
npm i mongodb-memory-server jest
Step 3. Handle in-memory Server
To make sure we're not repeating code and keeping good style, it's good to create and then export functions for handling the in-memory database and then call on these exported functions as they're required throughout the rest of the project.
The mongodb-memory-server package we installed earlier has a very helpful github page that explains how to connect and create a db instance:
If you don't want to read through the documentation, then the following code will be enough for you to get started with your unit testing.
Special thanks to Paula Santamaría for her article where she provides this module. I will link to her article at the end of this tutorial.
Handling interactions with in-memory database: tests/db.js
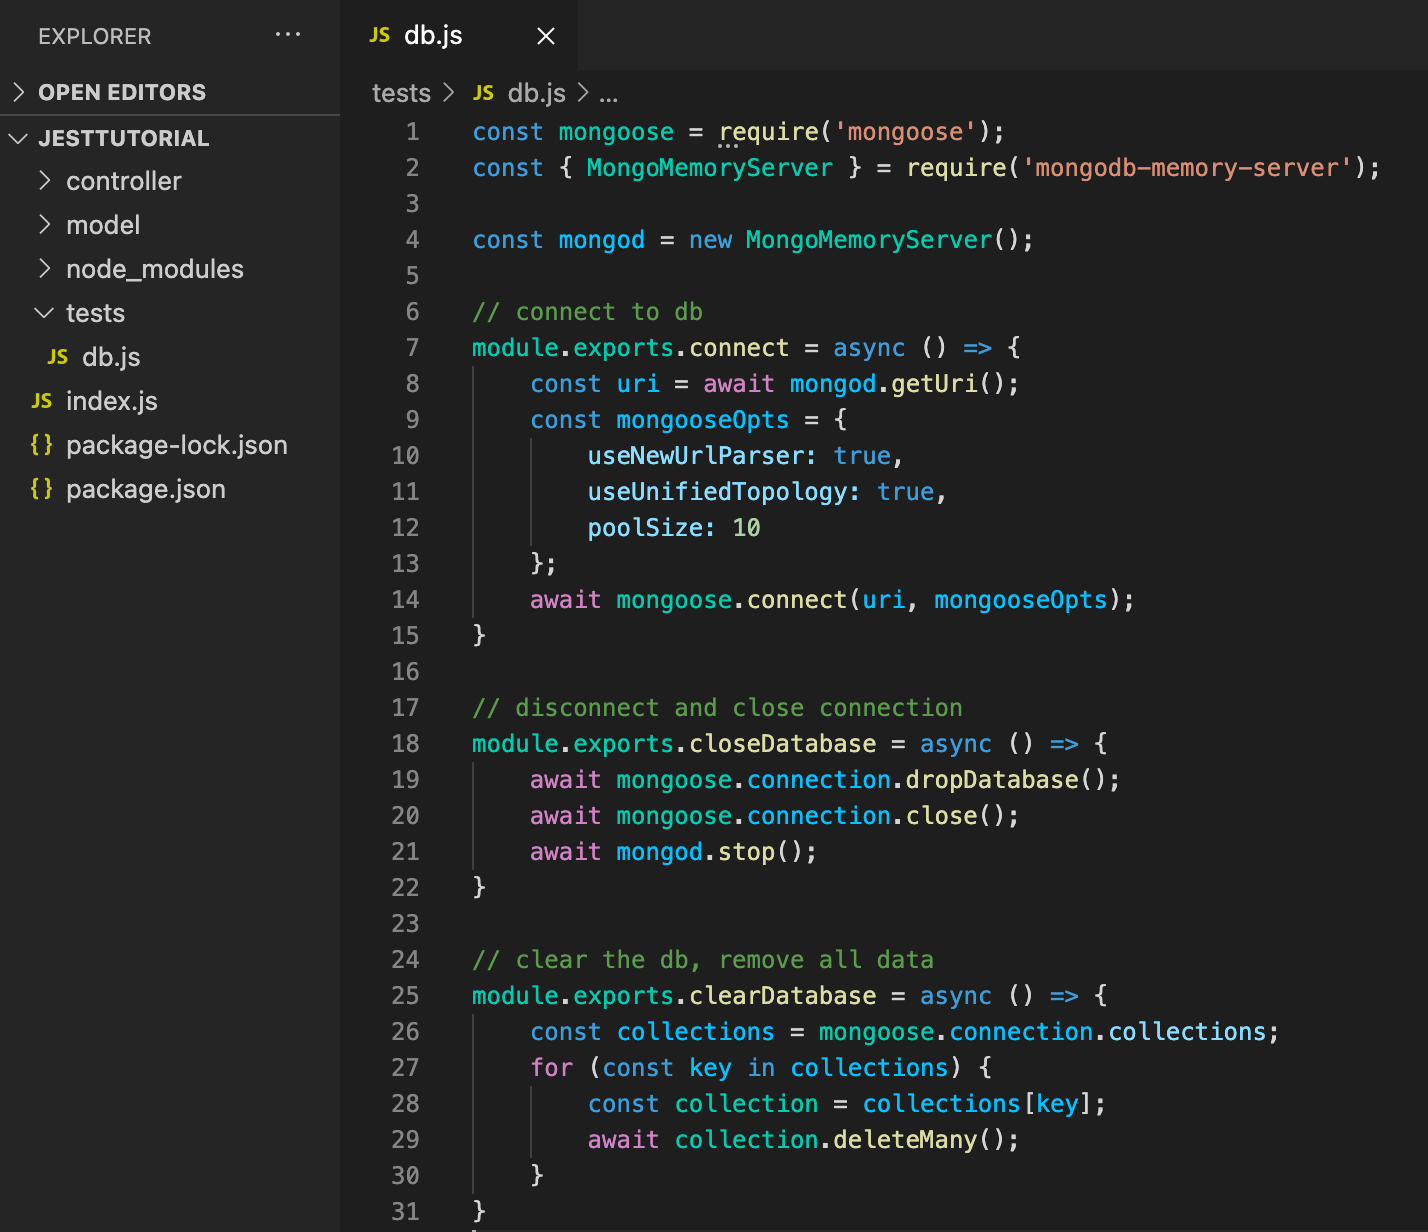
The connect and closeDatabase methods should be pretty self explainable, however, you may be wondering why we need a clearDatabase function as well.
When it comes to unit testing, each test should start on a blank canvas, which means that there should be no existing data in the database when we start a new test. Therefore, every time a test ends, we will call the clearDatabase function.
Step 4. Set up the test file
First, in our tests folder we will be keeping all the files which includes tests. It is important when it comes to naming the files to ensure that they're done in this manner: fileName.test.js
Before any of the tests are run, we will need to connect to the in-memory database. Lucky for us, we have already created and exported a method to do that in tests/db.js. Similarly, we need to disconnect and drop the database once all tests are run. Finally, after each individual test, we must clear the database.
Now all we need to do is add this to the top of every test file:
const db = require('./db')

beforeAll(async () => await db.connect())

afterEach(async () => await db.clearDatabase())

afterAll(async () => await db.closeDatabase())
Step 5. Anatomy of a Test in Jest
With everything set up, we can now focus on our first test for the createRestaurant function.
Jest offers a way to organise our tests. Consider the following example for testing an asynchronous function that takes in an integer and returns the number as an integer and a string:
describe('First Group Of Tests', () => {

    it('First Test', async done => {
        const result = await numberFunc(10)
        expect(result.word).toBe("ten")
        expect(result.number).toBeGreaterThan(10)
        done()

    })
    it('Second Test', async done => {
        const result = await numberFunc()
        expect(result).toBeNull()
        done()

    })

})
Key points of this are:
-
The describeblock is a way to place similar tests together. For example, if you're testing the createRestaurant function and want to make sure it can handle various name lengths, you can place all those tests into the same describe block.
-
The it block represents each individual test.
-
The most important part of an it block for an asynchronous test is to ensure you include the done() at the end of the test. If you don't, the test will be finished before any asynchronous call completes and your tests will fail. The way that Jest explains the importance of done()in an async function is:
“Jest will wait until the done callback is called before finishing the test.”
-
expect is very similar to assert in other languages. It is the way we can check to ensure that our functions are retrieving/creating the objects we want them to. Whilst there are many different ways to use expect , I have only shown 3 options here. For more, check out https://jestjs.io/docs/en/expect
Step 6. Testing createRestaurant()
As the tests are run from top down, it's good to keep the most simple/basic test at the top of the file. What I mean by this is the following:
example test suite to show order of tests running in Jest
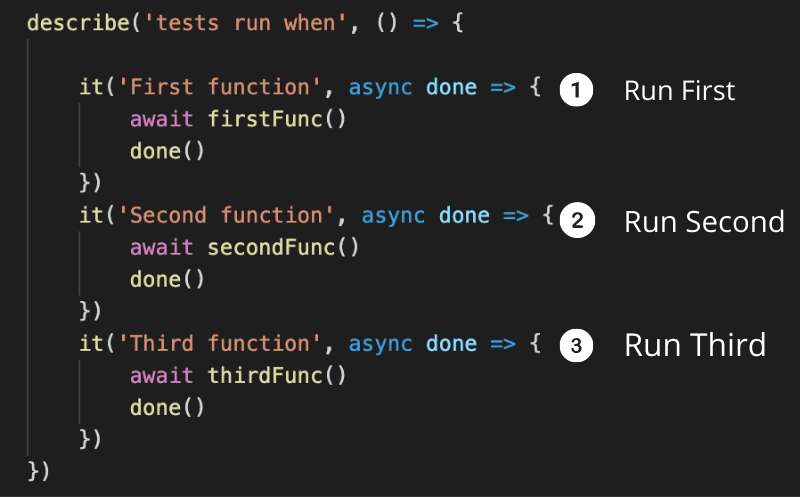
Basically, the order of the tests in a file will matter.
So it's good to start with a test for the most basic requirement of a function to make sure it works before moving on to more complicated cases.
So going back to testing createRestaurant() , the most basic test case would be creating one restaurant with a valid name, location and budget.
example unit test for a success case in tests/createRestaurant.test.js
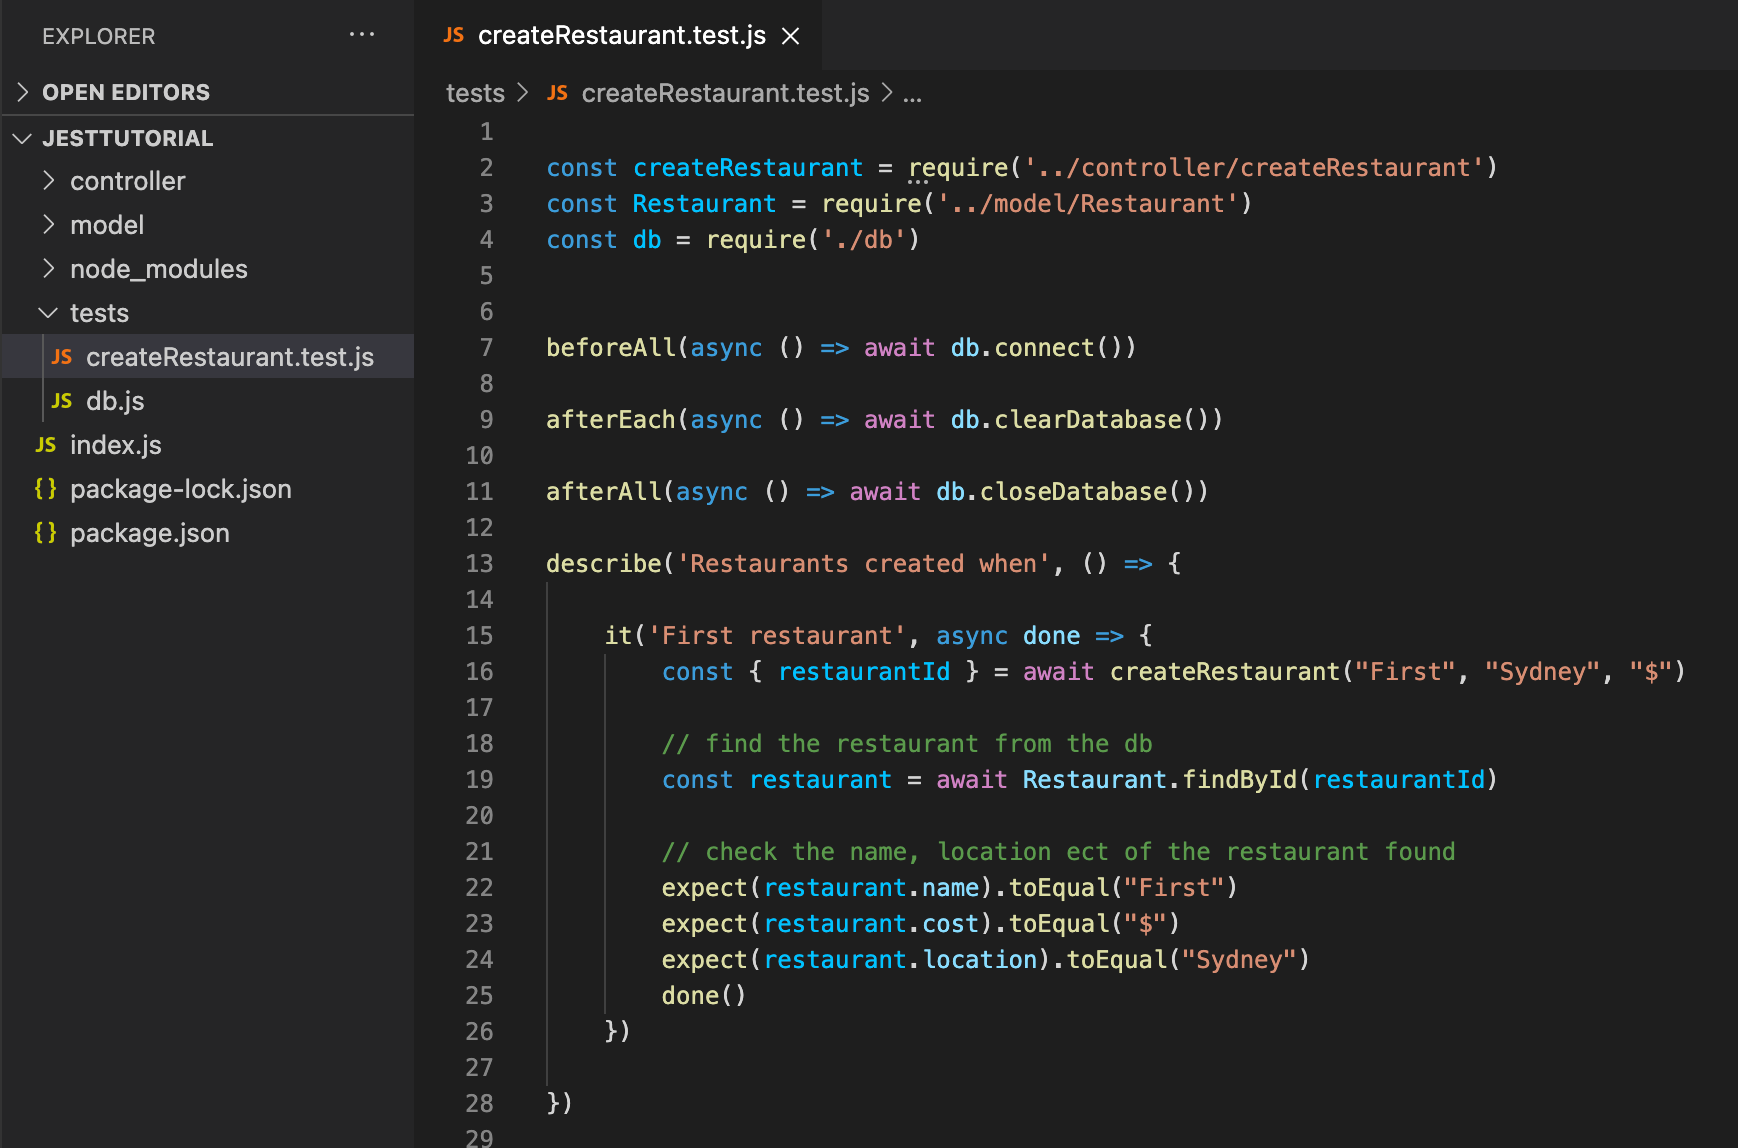
Here is the our test file with it's first test! If any of the three except() fail, then the test will fail and we will know something in our function is broken. For now, let's run the test and see if it will work.
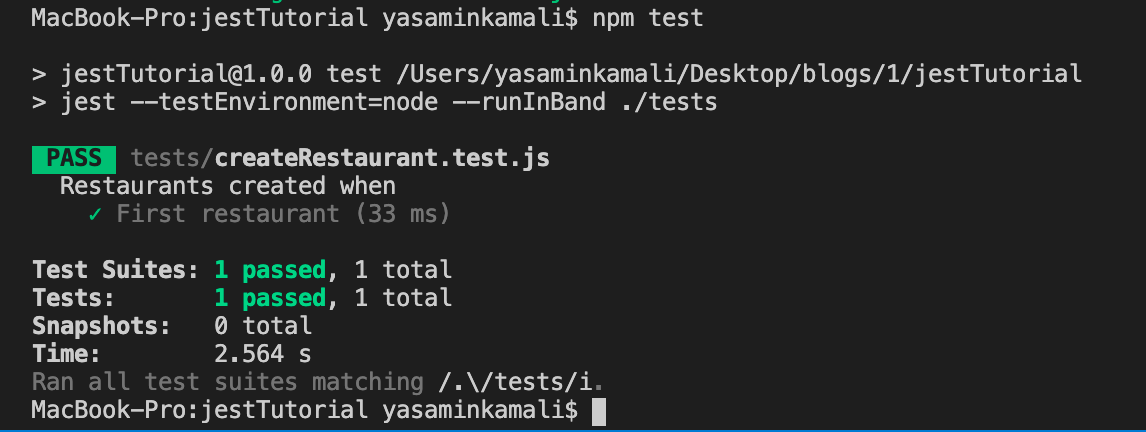
Step 7. Running Tests
In your package.json , add a test script:
"scripts": {
    "test": "jest --testEnvironment=node --runInBand ./tests"
}
The --runInBand is there to get the tests to run one after another.
The --testEnvironment=node is there as we're in a node environment.
What's really important here is to give the correct file path to your test folder. For me that was ./tests .
Now when you run npm test in the terminal, you should see something like this:
Successful jest test
Now this was an example of a success test case. I will show you how to write tests for errors.
Error Testing
In the same file, you can create a new describe block for cases where we fail to create a new restaurant. Looking back at our Schema and function, the only times it should fail is if a name has been repeated or if the cost associated with a restaurant is not one of the values in the enum.
example testing for exceptions in tests/createRestaurant.js
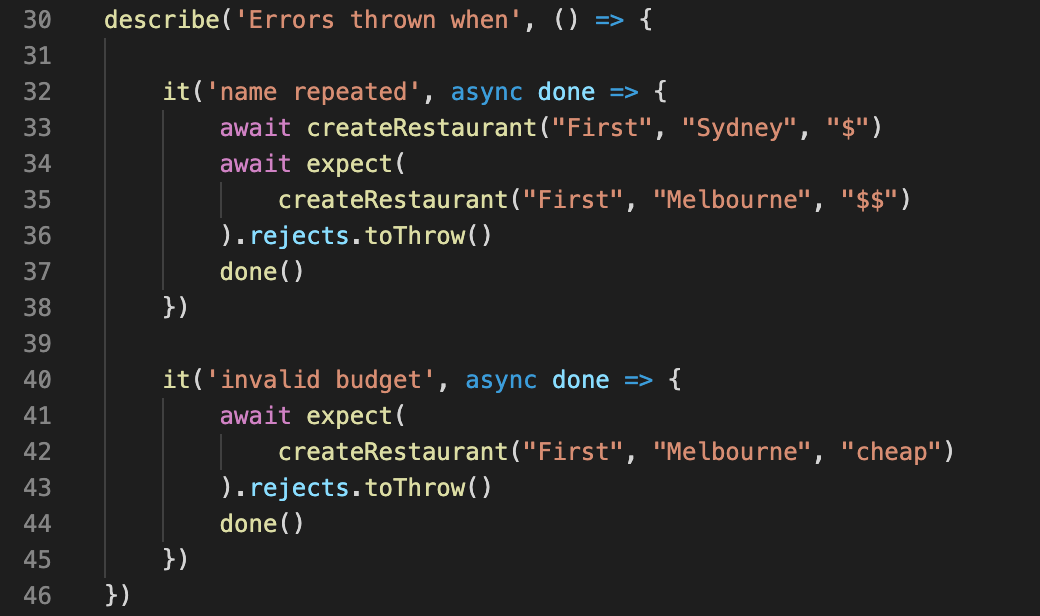
In the first test, we're checking that an error will be thrown if a name is repeated. We have already tested for the case of one restaurant being made successfully so we can be rest assured that line 33 will run smoothly.
However, line 35 should throw an error since the name “First” already belongs to another restaurant. As this is an asynchronous function that is meant to throw an error, we need to add rejects.toThrow() after our expect.
In the second test, we're checking that an error is thrown when the third argument of createRestaurant() is not a string value in the cost enum.
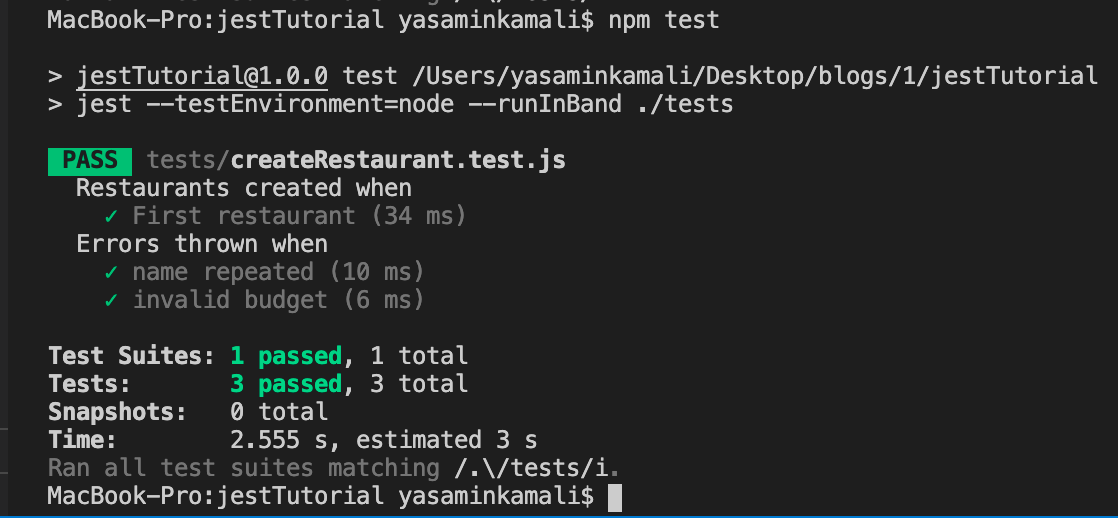
If you run your tests again you should see this:
Running all tests successfully
Congratulations! You have successfully unit tested your Node.js and Mongoose backend using Jest.
Thanks for reading and please leave a comment if you're unsure about anything. This is my first article so chances are I've not done a perfect job so please let me know if you spot any problems 😌
If you want to do more with jest like using mocks to 'mock' the behaviour of external functions, read this blog 🥳
References
https://dev.to/paulasantamaria/testing-node-js-mongoose-with-an-in-memory-database-32np
Comments
Loading comments…