If you've ever wondered, “Should my app be cloud native?”, looked up the term online right after, only to end up on that infamous CNCF Landscape, your reaction was probably like “NOPE. I can go without learning whatever that is for another week, thank you very much.”
I don't blame you.
It's a shame; the advantages of cloud computing would benefit anyone — from large companies to hobby developers. But the learning curve here is more of a wall that has scared away too many devs who could've been the next cloud native success story à la Frame.io, Slack, or Pinterest.
And that is exactly the problem that Klotho — a tool and a development model spearheading the Infrafree paradigm — solves for you, with a shift away from a tech-first culture to a user-first one. Knowing cloud platforms/stacks top-to-bottom is no longer table stakes if you can just...add a few lines of annotations to your existing code, run it through a compiler, and within minutes, get a production-ready cloud native version of your app, that you can then deploy using industry-standard Infrastructure-as-Code (IaC) tools — AWS CDK, Pulumi, or Terraform.
Interested? Read on.
Whose cloud is it anyway?
Before we get into Klotho, let's quickly TL;DR the term “cloud native”. You can technically be “in the cloud” if you take any legacy app that runs on-prem and hosts it on AWS EC2 instead. But a cloud native app is designed specifically to take advantage of the feature set of modern clouds; usually, the goal is to have:
-
HIGH SCALABILITY — Low config, with a sort of “crank for more performance” dial that will easily scale up or down by spinning up/destroying copies of your app. So, on-demand compute resources that you manage as an amorphous blob of servers (instead of bare metal) — while caring about nothing other than resource constraints.
-
HIGH AVAILABILITY / DURABILITY — The application is designed under the assumption that anything can and will fail at some point, and can handle the loss of some percentage of compute resources and not bat an eye. So for storage, as an example, you'd be using solutions that let you easily flip to a secondary database if a primary dies; a data center can be wiped out in a hurricane, and you'd replace them in minutes from your dashboard.
Right now, if you want to build a fullstack app for the cloud (on AWS, for example), it has to be (re)designed bottom-up as a bunch of stateless event/request handlers that use an API gateway, load balancers, RDS or DynamoDB for storage, standardized logging, alerts… and more. If you're not a cloud architect yourself or have professional help, simply figuring out which parts your app will need will be overwhelming.
Not to mention how for many apps/organizations, this redesign will either be not optimal or straight-up not possible.
Which brings us to…
Klotho.
Klotho helps you win this battle by enabling you to simply not play by the existing rules.
With Klotho's development model, you keep your existing code. That bottom-up redesign we just talked about? Forget it. Whether a project is greenfield or brownfield, you can keep your existing architecture (monoliths, microservices, serverless — or any combination of the three) and all the benefits that brings your org, keep all of your existing toolings, and all of your accumulated experience. You won't need to learn an entire cloud stack or hire a new team of cloud experts.
All you have to do is:
a. build the app you know how to build,
b. make it work locally,
c. and then, via comments, declaratively tell Klotho which resource you intend each part of your code to use (a database, a publicly accessible endpoint, a subscription, an object storage, whatever).
Klotho will then adapt it for the cloud.
“Tell Klotho what I need”? An example is worth a thousand words. Let's convert a run-of-the-mill Express API to a cloud-native version to show just how easy this can be.
💡 DISCLAIMER: Klotho is currently in closed beta, and only supports JavaScript (and TypeScript, by operating on compiled JS) code for now, with support for Java/Go/Python on the way. Also, AWS is currently the only provider, and Pulumi the only IaC tool. Again, with more on the way.
Transforming an Express API to cloud native
Step 0: Prerequisites
First of all, make sure the Klotho CLI (if you're on Windows, you're better off using WSL2) and NodeJS 16.x (and up) are installed.
Then, the usual: create a directory, cd into it, npm init -y it, and npm install express because we're going to build this API server first.
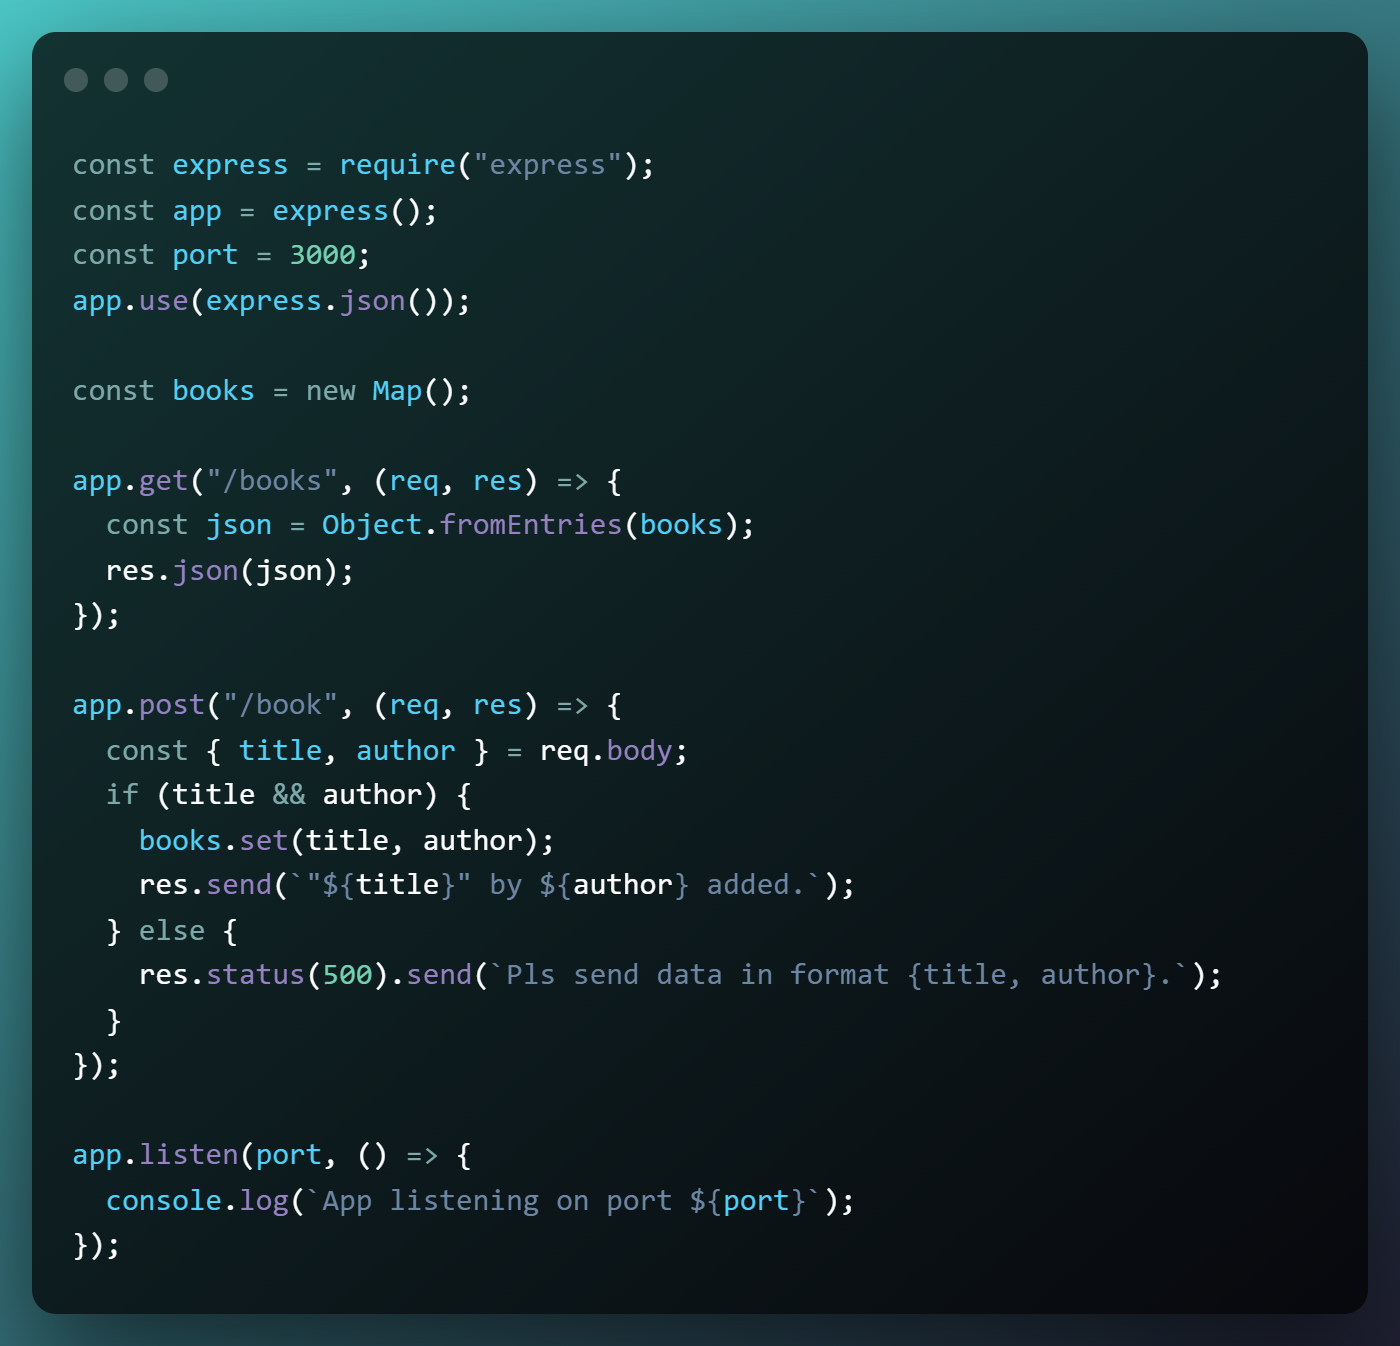
Does it work locally? Let's find out.
$ curl “localhost:3000/books”

{}
That's fine since we start off with the map empty.
$ curl -X POST “localhost:3000/book” -H 'Content-Type: application/json' -d '{“title”:”Hollow Pursuits”, “author”:”Sally Caves”}'

“Hollow Pursuits” by Sally Caves added.
About what we expect. And finally…
$ curl “localhost:3000/books”

{“Hollow Pursuits”:”Sally Caves”}
Great! Our API works fine locally. Let's get on with it.
Step 1: Add instructions for Klotho
Now to get a cloud version of this, just add the @klotho::persist annotation to tell Klotho, “Hey, for the cloud version of my app, I need some kind of persistent storage (database) for this Map right here, because I don't want it disappearing every time the server restarts.”
/* @klotho::persist {

* id = “books”

* }

*/

const books = new Map();
Similarly, for the conventional listen parts of server code — use @klotho::expose to say “Hey, this is my entry point, I want it public, exposed to HTTP requests.”
/*

* @klotho::expose {

* id = “books-api”

* target = “public”

* description = “exposes my API to the internet”

* }

*/

app.listen(port, () => {

console.log(`App listening on port ${port}`);

});
And so on. It's literally that simple. You use these high-level comments — Capabilities; instructions to the Klotho compiler — to describe what your requirements are for specific parts of your code. Other capabilities right now include @klotho::pubsub for subscriptions, and @klotho::execution_unit (on a file level, to separate your lambdas if you had multiple), with more in development.
That's pretty much all we'll need for this example in terms of code.
Step 2: Use the Klotho cloud compiler
First,
> klotho — login <your email here>
This requires you to have signed up for the closed beta. If you haven't and don't want support, use:
> klotho — login local
Then, use it to compile your code:
> klotho . — app books-api
You should see a bunch of stuff pop up:

Adding resource input_file_dependencies:
Adding resource exec_unit:main
Found 3 route(s) on server 'app'
Adding resource gateway:books-api
Adding resource persist_kv:books
Adding resource topology:books-api
Adding resource infra_as_code:Pulumi (AWS)
Pulumi.books-api.yaml: Make sure to run pulumi config set aws:region YOUR_REGION — cwd 'compiled/' -s 'books-api' to configure the target AWS region.
💡 If the compiler cannot determine which resource should be provisioned, it'll skip it and tell you. If you used a regular array for the books instead of a Map, for example, Klotho knows of no cloud resource that can store raw one-dimensional arrays so it'll throw an error for the persist part. Change your array to a Map instead, recompile, and you're good to go.
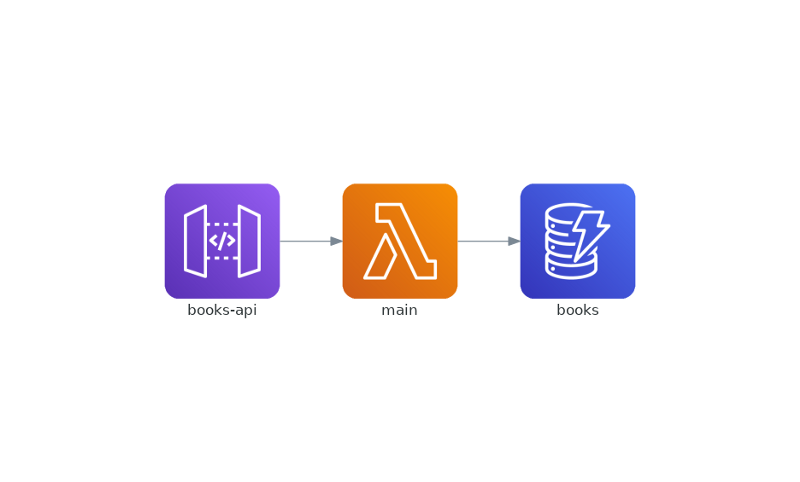
Klotho has intelligently architected a cloud-native version of your app (by default in the ./compiled directory, as IaC files for Pulumi with AWS as the provider, ready to be deployed), based on your declarations and requirements. In this instance, it determined the best way to go about having a cloud-native version of your Express server was to mark for provisioning:
a. an API Gateway to receive GET/POST requests, to invoke…
b. a Lambda with your business logic in it, with…
c. a DynamoDB storage attached, to persist the books Key-Value Map.
Step 3: Deploy!
Klotho is done at this point, and the actual act of AWS provisioning will be done by running the Infrastructure-as-Code (IaC).
If you've worked with tools like AWS CDK, Terraform, or Pulumi and know what you're doing, you could inspect the Pulumi IaC blueprint generated in the compiled directory, make changes if you want to, and upload it yourself.
If not, here's a quick rundown on how to upload this with Pulumi.
💡 DISCLAIMER: Reading up on the Pulumi docs is recommended as this is not a tutorial for Pulumi.
Step 3A: Make sure you have Pulumi's dependencies:
-
Docker installed, with the daemon up and running.
-
An AWS account, set up with either: The AWS_ACCESS_KEY_ID & AWS_SECRET_ACCESS_KEY environment variables for a user, or $HOME/.aws/credentials (eg. via AWS CLI: > aws configure) set up.
-
Pulumi CLI installed.
Step 3B: Set up Pulumi for local usage.
> pulumi login — local

> export PULUMI_CONFIG_PASSPHRASE=””

> pulumi config set aws:region <region> — cwd 'compiled/' -s books-api
Where <region> is your AWS region, as a string, like us-east-1.
Also, keep in mind this sets up your Pulumi local password to be blank. Just hit Enter whenever you're prompted for it in the future.
Step 3C: More Pulumi stuff
For the first run, Pulumi will prompt you to create a “stack” here. This is just something Pulumi needs internally; press Enter and it'll be created for you.
The stack 'books-api' does not exist.
If you would like to create this stack now, please press <ENTER>, otherwise press ^C:
Step 3D: Home stretch!
CD into the ./compiled directory, install the dependencies, and deploy.
> cd compiled

> npm install

> pulumi up
You'll see a preview of the resources to be provisioned for your AWS account. (Don't worry about hidden charges; you can un-provision/delete all of this with > pulumi destroy whenever you want.) Say Yes when ready.
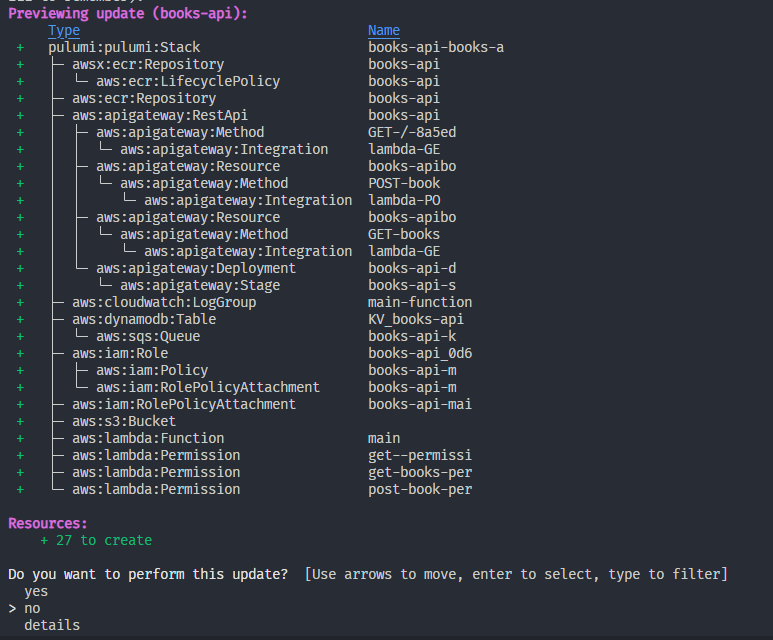
Keep in mind this process will fail if the Docker daemon isn't currently up and running. Just start Docker if you see something like “Error: No 'docker' command available on PATH: Please install to use container 'build' mode.”
Outputs:

apiUrls : [

[0]: “[https://qxy99avspl.execute-api.us-east-1.amazonaws.com/stage/](https://qxy99avspl.execute-api.us-east-1.amazonaws.com/stage/)"

]
With the deployment done, you have your Express API server — a proper cloud native version of it — at that Amazon-provided URL. Just as you tested your API locally, with cURL or Postman, you can do so with this URL.
$ curl “https://qxy99avspl.execute-api.us-east-1.amazonaws.com/stage/books"

{}

$ curl -X POST “https://qxy99avspl.execute-api.us-east-1.amazonaws.com/stage/book" -H 'Content-Type: application/json' -d '{“title”:”Hollow Pursuits”, “author”:”Sally Caves”}'

“Hollow Pursuits” by Sally Caves added.

$ curl “https://qxy99avspl.execute-api.us-east-1.amazonaws.com/stage/books"

{“Hollow Pursuits”:”Sally Caves”}
3 for 3. A rousing success. Congratulations!.
Klotho Enables Code Before Infrastructure.
Not once did your application code have to radically change. You didn't have to abandon your instincts and years of experience as a dev, to break down this simple Express API server into nonstandard, discrete, decoupled functions — architect it entirely different than what you're used to — just to run it as a cloud native app.
Your infra didn't drive your code. Your code served as requirements and constraints for your provisioned infra. In other words…you followed a code-first approach to build a cloud native app.
Moreover, your application code is still intact after running it through the compiler. Virtually nothing was changed; you can still update index.js if you want to, even in production. Add more routes, define more resources, and go nuts. Run the compiler again when done, and according to the Cattle, Not Pets methodology, your existing infra will just be destroyed and replaced with a new one.
Abstract, Adapt. Don't Replace.
With Klotho, you've accomplished two major things today :
-
You've converted an existing app to a cloud native version, while having all of your code, architecture, and tooling intact — and changeable/patchable whenever you want.
-
Decoupling your app code from all of the abstracted cloud native stuff means that now, your app doesn't really care about the underlying cloud environment/infrastructure (or updates/changes to it), making it not only durable, but 100% adaptable to future changes in technical requirements, or entirely new paradigms.
Klotho makes cloud development take seconds instead of days and weeks…but it's important to know that all Klotho does is generate blueprints — in the form of Terraform, Pulumi, or AWS CDK files — for you based on your specified feature and performance requirements. It does not automagically act as your agent with powers of attorney and go provision resources from these vendors (which would be incredibly scary).
Nor does it replace your existing infrastructure-as-code (if you're already doing cloud native in some form), as Klotho is not a completely new way to do cloud native or IaC — anything it generates is compatible with existing code, and is using industry-standard tools. Integration will be seamless.
Comments
Loading comments…