Many of us work for companies where the PC environment is restricted, limiting what we can do. I often hear from people who would love to explore using Python to improve their workflows and productivity in Excel but are having trouble getting Python installed on their work PC.
This video will take you through the same processes described in this post [credit: author's own]:
In this article, I will show a couple of methods that you can use to install Python without needing local admin access to your PC. The second method will even work if you are blocked from downloading .exe or .msi files from the internet and are not able to run an installer.
Before you continue you should check your company's IT policies to make sure that installing Python on your work PC is not in violation of any of those policies. If you are not sure you should double-check with one of your IT administrators first; they might even be able to install Python for you if you ask!
Method 1: Using the python.org installer without user admin access
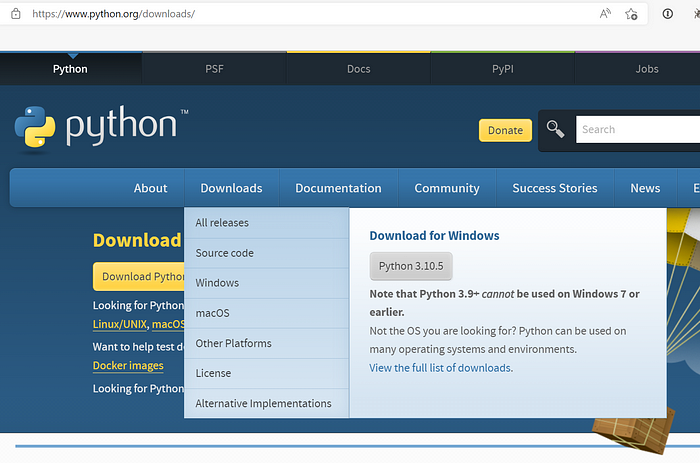
Many people don't know that even if you don't have local admin access you may still be able to install Python using the official installer from https://python.org. If this works for you then this will be the simplest way to get Python onto your PC.

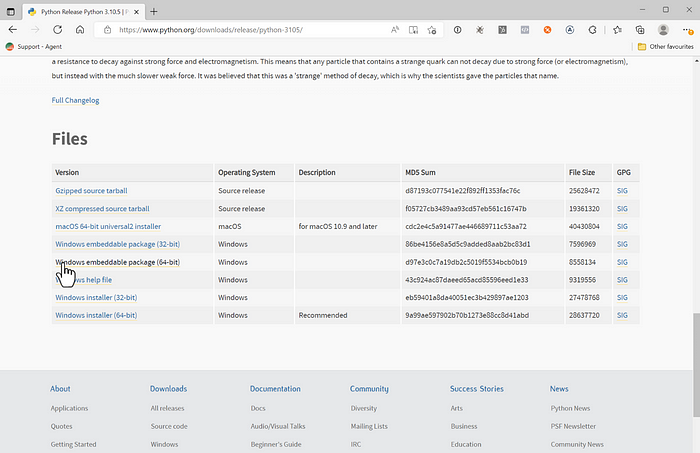
Simply go to https://python.org and download the installer for the version of Python you want. When you have selected the version of Python you want, scroll down and you will see a section labeled “Files”, and from there select either the “Windows installer (32-bit)” or “Windows installer (64-bit)” depending on whether you want the 64 bit or 32-bit version of Python. Typically most people will want to choose the 64-bit version.
Starting the install process:

After you have downloaded the installer run it to start the installation process. If you are blocked from downloading or running the install don't give up! Below you will find another method to try.
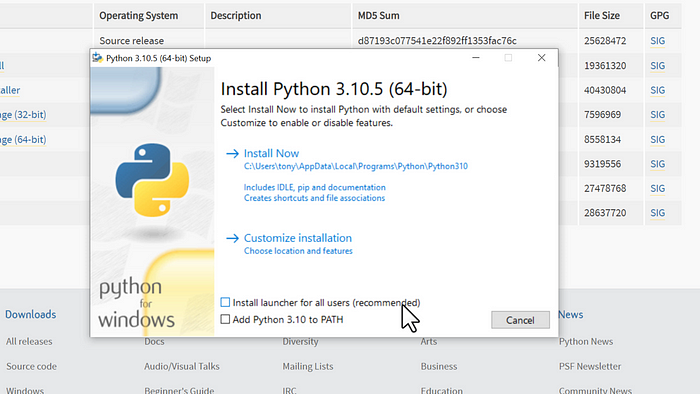
When you run the installer you will see the option “Install launcher for all users (recommended)”. Make sure this option is not selected as this will require local admin access.
Now you can try “Install Now” and see if that just works. If it does, great! You can now use Python :) If it doesn't, try again but this time choose “Customize Installation”. There are some options there that you can try changing to allow you to install Python.
If you have selected “Customize Installation” after having problems with the default install, try de-selecting the following options:
- “Add Python to PATH”
- “py launcher” and “for all users (requires evaluation)”
- “Install for all users”
- “Create shortcuts for installed applications”
- “Add Python environment variables”
Finally, check the “Customize install location” option. Usually this defaults to somewhere you should have access to write files, but you can change this to somewhere that you know you can write files to.
Python is installed but it's not working!
If you've run the installer as above but with options like “py launcher”, “Add Python to PATH”, and “Create shortcuts for installed applications” de-selected then even though the installer succeeded you may now be struggling to figure out how to actually run Python.
Note: Some versions of Windows come with a “python” command that opens the Windows Store and prompts you to install Python as a Windows Store App. If this happens, you are not running the Python we just installed above — keep reading!
You might expect to be able to type “python” into a command prompt window and have the Python interpreter start. Windows uses something called the “PATH” to determine what to run when you type a command into a command prompt, and if you do not have access to update the PATH then Windows will not know how to find Python (or it may find a different command to the one you have just installed).
Instead, you can run Python by first cd'ing into the folder where you just installed Python. In your command prompt type “cd” followed by a space and then the full path to where Python was installed. You can copy and paste this from Explorer. The folder where Python was installed will contain a file named “python.exe” and that's what we want to run.
Rather than cd'ing into the folder, you can also use the full path of the “python.exe” file. A quick way to do that is to drag and drop the “python.exe” file onto the command prompt window.

Python's working, but what about pip?
The “pip” command is the Python package manager and it's what you will need to use to install third-party Python packages into your Python environment.
It is installed by the installer in the “Scripts” folder, along with some other utilities like “venv”. Like “python.exe”, these utilities are also not on your PATH. To run them you will need to either add the folder to your PATH or use the full path, for example, “Scripts\pip.exe”.
Most utilities can be run using “python -m
Tip: Check the video at the top of this post at around 5:15 for how to change your system PATH (if you are able to).
Method 2: Using the relocatable Python zip file; no installer required!
In many enterprise environments downloading .exe and .msi files like the installer above is blocked and so you will not be able to install Python that way. There is another way though that doesn't require you to download an installer!
Head back to https://python.org but this time instead of going straight for the main download button, go to “All Releases” and select the Python version you want (or the latest if you don't have a preference) under “Looking for a specific release?”. Scroll down to where it says “Files” and you'll see “Windows embeddable package (32-bit)” and “Windows embeddable package (64-bit)”. Download the one corresponding to which bitness you require (most people will want the 64-bit option).

Once that file is downloaded, simply extract or un-zip the zip file wherever you want Python to be installed to. This must be somewhere you have access to write files to, such as your “Documents” folder. See the video linked at the top of this article starting from 8:30 if you're not sure how to do that.
Inside the folder, you extracted from the zip file you will see the file “python.exe”. There's no need to install anything, you can simply run that from the command line!

As in Method 1, the Python executable isn't on the system PATH and so Windows won't be able to find it if you just type “python”. Instead, you can cd to the folder containing the “python.exe” file and then run “python” from that folder. Alternatively, you can type the entire path to your “python.exe” file, or a shortcut to do that is to drag and drop the file from Explorer onto the command prompt window.
Tip: To open a command prompt click in the search bar on your Windows desktop taskbar and enter “Command Prompt”.
If you see the Python interactive prompt (or Python REPL as it's sometimes called) then congratulations! You have successfully run Python without the need for an installer!
How can I install other packages?
One of the first things you are likely to want to do now you are able to run Python is to install third-party Python packages. This is done using the “pip” command, but if you try that you will see that this command is not recognised. That's because “pip” is not included in the zip file we extracted and so we have to install that as a separate step.
Getting pip
To install Pip into our new Python environment all we need is to download the “get-pip.py” script from https://bootstrap.pypa.io/. Download the “get-pip.py” file and save it somewhere on your PC.
Next, run the “get-pip.py” script using the Python command from the previous section. You can run this on the command line, for example, “C:\Where\you\installed\Python\python.exe C:\where\you\downloaded\get-pip.py”.
Once that has been completed successfully you will see a new “Lib” folder in the folder where you extracted Python. Inside this “Lib” folder is another folder called “site-packages”, and that is where your packages will be installed using pip.
Running pip
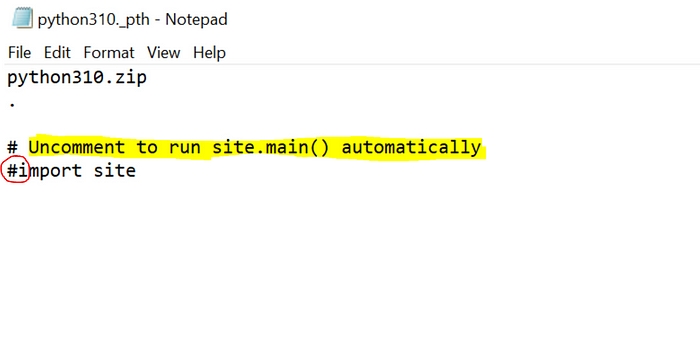
Before you can run pip there is a small configuration change you need to make. In your Python folder, you will see a file called “pythonXX._pth” (where XX is the version of Python you downloaded).
This is a plain text file and you can open it with any text editor, such as notepad.

Inside this file, you will see a line that says “#import site” and a comment above it that says “# Uncomment to run site.main() automatically”. Uncomment the “#import site” line by removing the “#”. This will change the behaviour when Python starts so that it can import the modules in the “site-packages” folder we saw a moment ago.
Now you can run pip using the “-m” option to Python, which runs a module as a script. This is the same as running the “pip” command but it lets us do it without having to know where the “pip” command is located. For example, the following command will try to install the Python package numpy: “C:\Where\You\Extracted\Python\python.exe -m pip install numpy”.
Wrapping Up
In this article, we've presented two different ways that may help you get Python running on your work PC, even if you don't have local admin access or if you are blocked from downloading and running installers.
If installing Python is against your company's IT policies, it should go without saying that you should seek approval before installing Python using these methods!
I remember once in a previous role a colleague was getting quite frustrated and exclaimed “I just want to type Python!”. Well, don't we all :) Understanding a little about how Python works and how it can be installed will help and will set you up for other tasks like configuring your IDE or deploying Python scripts elsewhere.