When it comes to user authentication we need to make sure our application is secured from any potential threats. To implement such type of authentication the biggest issue we face is while storing JWT token. Our JWT token must persist to prevent user for signing in again and again.
The easiest way to achieve this is by storing it in local storage or simple cookie, But it's the most unsecured way to handle user authentication. Local storage is not made for storing such sensitive informations and its prone to cross-site scripting attacks (XSS), Any attacker can inject a js script to retrieve all the information from local storage, which includes JWT token and can make anonymous requests from their server. Which means our session data can be compromised.
Please Stop Using Local Storage
How http-only cookie can make authentication secure?
That's a valid question, http-only cookie are stored in browser but it prevents any code running on it to directly access it, even our own code can't access it directly. The server sends these cookies along with its response, the browser stores it and sends it along with the request.

In this figure you can see a HttpOnly cookie, (HttpOnly marked as true)
That means in order to perform authentication using http-only cookie we need a proxy server, which can create http-only cookie. But we don't need to worry about it because we already have a server while using next js (SSR). Next js provides API routes they are server-side only bundles and can be used as API routes. We will use Next js routes as a proxy server for our http-only cookie.
In this article i will explain with code how to secure your user authentication using http-only cookie, if you don't want to compromise your user data you must not skip this.
1. Saving tokens in http-only cookie
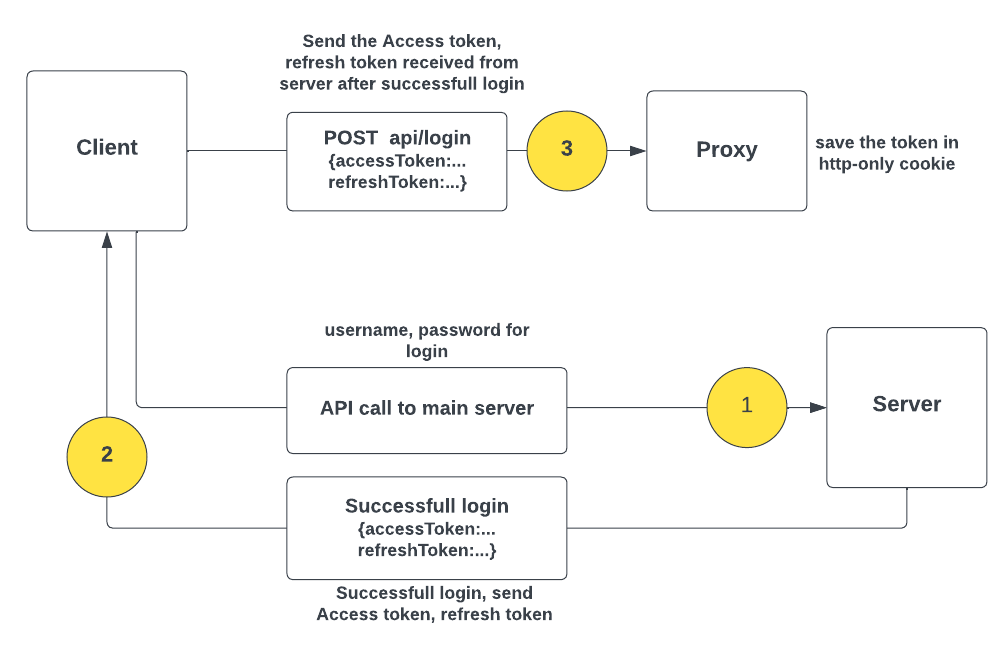
After the user successfully login, we need to store access-token, refresh-token in http-only cookie in order to persist it, for this we will make a POST request to our proxy server passing access-token, refresh-token achieved from our main server.

login flow chart 1 -> 2 -> 3
First we will create a next js route for saving http-only cookie, create a file pages/api/login.js, this will serve as our proxy server
import cookie from "cookie";
import { TOKEN_NAME } from "...";

export default (req, res) => {
  const { expiresIn, accessToken, refreshToken } = req.body;

  const cookieObj = {
    expiresIn,
    accessToken,
    refreshToken,
  };

  res.setHeader(
    "Set-Cookie",
    cookie.serialize(TOKEN_NAME, JSON.stringify(cookieObj), {
      httpOnly: true,
      secure: process.env.NODE_ENV !== "development",
      maxAge: expiresIn,
      sameSite: "strict",
      path: "/",
    })
  );
  res.status(200).json({ success: true });
};
This will save the access and refresh token in http-only cookie, but for this to work we need to make a POST request by passing expiresIn, accessToken, refreshToken as body fields.
Write a function to make a API call the to pages/api/login route
export const setTokenCookie = (expiresIn, accessToken, refreshToken) => {
  return fetch("/api/login", {
    method: "post",
    headers: {
      "Content-Type": "application/json",
    },
    body: JSON.stringify({ expiresIn, accessToken, refreshToken }),
  });
};
Now we will write a function for our main server login, after the login is successful we will make a POST request to our proxy server pages/api/login with { expiresIn, accessToken, refreshToken }.
// Import {setTokenCookie} from "..."

const handleSubmit = async (values) => {
  try {
    const { data } = await login({
      variables: {
        Username: SOME_NAME,
        Password: SOME_PASSWORD,
      },
    });

    const { AccessToken, ExpiresIn, RefreshToken } = data;
    /**
     * Setting http-only cookie
     * */
    await setTokenCookie(ExpiresIn, AccessToken, RefreshToken);
  } catch (error) {
    console.log("errror :", error);
  }
};
This completes our login procedure
2. Accessing access-token from http-only cookie
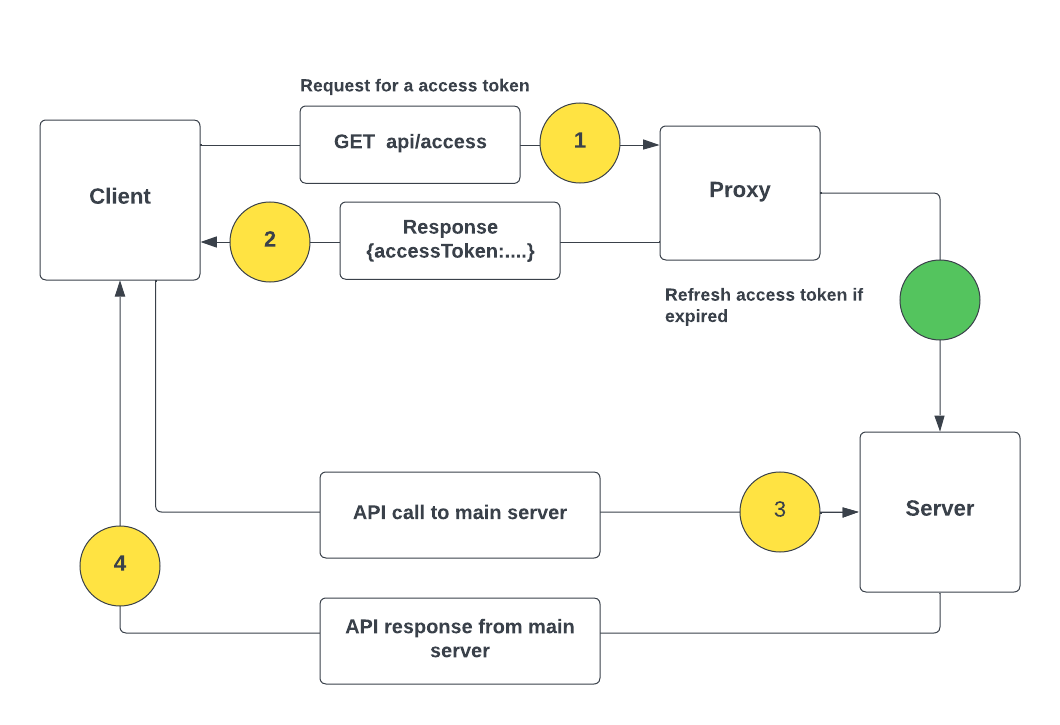
As i earlier mentioned although http-only cookie are stored in browser we can't access them directly. To access the access-token we need to make a API call to our proxy server which in response will send the token, the proxy server will also handle refresh token logic for us. It will check for the validity of access-token, if it expires it will fetch a new access-token using refresh-token.

retrieve access-token flow chart 1 -> 2 -> 3 -> 4
First we will create a route pages/api/access.js, to which client can make a request to get access-token. Which will also fetch new access-token in case it expires.
import cookie from "cookie";
import jwt_decode from "jwt-decode";
import { TOKEN_NAME } from "...";

export default async (req, res) => {
  const cookies = cookie.parse(req.headers?.cookie ?? "");
  const appCookie = cookies?.[TOKEN_NAME] ?? "";
  const parsedCookies = appCookie ? JSON.parse(appCookie) : {};
  const accessToken = parsedCookies?.accessToken ?? null;

  if (!accessToken) {
    res.status(200).json({ success: true, token: null });
  }

  const { exp } = jwt_decode(accessToken);
  const isAccessTokenExpired = Date.now() / 1000 > exp;

  const refreshToken = parsedCookies?.refreshToken;

  // - Fetch new access token if it expires
  if (isAccessTokenExpired) {
    try {
      //  It can be REST API or GraphQL

      const data = await getNewAccessToken({ refreshToken: refreshToken });

      const cookieObj = {
        expiresIn: data.ExpiresIn,
        accessToken: data.AccessToken,
        refreshToken,
      };

      res.setHeader(
        "Set-Cookie",
        cookie.serialize(TOKEN_NAME, JSON.stringify(cookieObj), {
          httpOnly: true,
          secure: process.env.NODE_ENV !== "development",
          maxAge: data.ExpiresIn,
          sameSite: "strict",
          path: "/",
        })
      );
    } catch (error) {
      // if refresh token fails to get new access token
      res.status(400).json({
        success: false,
        message: "Please logout user or push user to login route",
      });
    }
  }

  res
    .status(200)
    .json({ success: true, token: parsedCookies?.accessToken ?? null });
};
Now we can make a API call to pages/api/access route to get access-token to add it to our API headers for server side authorisation . For these we can use Axios request interceptor or Apollo middleware
Add a function to make API call to pages/api/access route
export const getTokenCookie = () => {
  return fetch("/api/access", {
    method: "post",
    headers: {
      "Content-Type": "application/json",
    },
  });
};
How to use with Apollo client?
You can specify the names and values of custom headers to include in every HTTP request to a GraphQL server. To do so, we concat a authMiddleware which provides the headers parameter to the ApolloClient constructor, like so:
https://www.apollographql.com/docs/react/networking/basic-http-networking
const authMiddleware = new ApolloLink(async (operation, forward) => {
  let token;
  try {
    const response = await getTokenCookie();
    const jsonData = await response.json();
    token = jsonData.token;
  } catch (error) {
    console.log("CANNOT GET HTTP ACCESS TOKEN");
  }

  operation.setContext(({ headers = {} }) => ({
    headers: {
      ...headers,
      Authorization: token || null,
    },
  }));

  return forward(operation);
});

function createApolloClient() {
  return new ApolloClient({
    ssrMode: typeof window === "undefined",
    link: concat(authMiddleware, httpLink),
  });
}
How to use with Axios?
We can use axios request interceptors, to attach access-token in headers before making any API call to our main server
axios.interceptors.request.use(function (config) {

let token;
try {
const response = await getTokenCookie();
const jsonData = await response.json();
token = jsonData.token
} catch (error) {
console.log("CANNOT GET HHTP ACCESS TOKEN");
}

    config.headers.Authorization =  token;

    return config;

});
How to logout user?
Well it's pretty simple just create a new route in pages/api and make a API call to clear the cookie, I will leave that part for you
Happy coding!
The architecture shown above will not make your application 100% secure from attackers, but its surely a big improvement by adding a extra layer of security than using local storage or simple cookie.