
For the last week or so, I’ve been learning Next.js 13 to complete a take-home assessment given to me by a potential employer. The gist of the project was to create a mock e-commerce site with items and a cart. I would need to build a basic API that returns hardcoded data for the products. They stated that I didn’t need to create a database, but if I wanted to, I could use SQLite. That’s what I was going to do because, apparently, just learning Next.js in a week wasn’t enough for me.
The Issue
To preface, I’m a React lover through and through, and I’m not ashamed of that. I learned about Next from a buddy at coding meetups in Los Angeles. He convinced me that Next was the way to go; it solved many of my problems in React. This particular piece of information excited me to learn, but I was disappointed with the lack of clarity in the documentation on the newest version. This could be because I’m a noob, but some of my peers were aligned with my frustrations.
Anywho, I got through the basics of Next, and it was time for me to spin up a database with SQLite. Off to the web I went… only to then quickly fall into a state of frustration with the lack of readily available resources.
This now brings me here - the reason for this blog post. I hope this helps another naive Next.js noob out there; if not, thanks for letting me rant.
Alright, now let’s get down to the good stuff.
Dependencies and Links
I figured I’d start by letting you know what I’m working with for this blog. Below are my dependencies:
"dependencies": {
  "@emotion/react": "^11.11.1",
  "@emotion/styled": "^11.11.0",
  "@mui/material": "^5.14.3",
  "next": "13.4.12",
  "react": "18.2.0",
  "react-dom": "18.2.0",
  "sqlite": "^5.0.1",
  "sqlite3": "^5.1.6"
}
NOTE: It’s not recommended to use MUI with Next. I’m only using it here because it’s what I’m most familiar with, and it would allow me to whip up a project for this blog post easily. Here’s a better alternative:
And here are some helpful link:
Create a new Next.js application with create-next-app.
The Good Stuff
At this point, you should have all of the dependencies and packages needed for your project before proceeding.
In the root directory of your project, you’ll want to create a file called connect.js. We’ll run this file to create the database table and insert our initial data.
Here is the commented code. For now, I’m storing the image links in the database and keeping the images locally nested in a collection folder inside the public folder.
const sqlite3 = require("sqlite3").verbose();

// Connecting to or creating a new SQLite database file
const db = new sqlite3.Database(
  "./collection.db",
  sqlite3.OPEN_READWRITE | sqlite3.OPEN_CREATE,
  (err) => {
    if (err) {
      return console.error(err.message);
    }
    console.log("Connected to the SQlite database.");
  }
);

// Serialize method ensures that database queries are executed sequentially
db.serialize(() => {
  // Create the items table if it doesn't exist
  db.run(
    `CREATE TABLE IF NOT EXISTS items (
        id INTEGER PRIMARY KEY,
        name TEXT,
        description TEXT,
        img TEXT
      )`,
    (err) => {
      if (err) {
        return console.error(err.message);
      }
      console.log("Created items table.");

      // Clear the existing data in the products table
      db.run(`DELETE FROM items`, (err) => {
        if (err) {
          return console.error(err.message);
        }
        console.log("All rows deleted from items");

        // Insert new data into the products table
        const values1 = [
          "Oshawott",
          "Basic Pokemon. HP 60. Surprise Attack 20. Flip a coin. If heads, this attack does 10 more damage. Water Gun 30. Weakness: Lightning x2. Resistance: none. Retreat Cost: 1.",
          "/collection/item1.png",
        ];
        const values2 = [
          "Riolu",
          "Basic Pokemon. HP 60. Quick Attack 10. Flip a coin. If heads, this attack does 10 more damage. Weakness: Fighting x2. Resistance: none. Retreat Cost: 1.",
          "/collection/item2.png",
        ];

        const values3 = [
          "Snivy",
          "Basic Pokemon. HP 60. Slam 20. Weakness: Fire x2. Resistance: Water -20. Retreat Cost: 1.",
          "/collection/item3.png",
        ];

        const values4 = [
          "Zorua",
          "Basic Pokemon. HP 60. Stampede 10. Ram 20. Weakness: Fighting x2, Resistance: Psychic -20. Retreat Cost: 1.",
          "/collection/item4.png",
        ];

        const insertSql = `INSERT INTO items(name, description, img) VALUES(?, ?, ?)`;

        db.run(insertSql, values1, function (err) {
          if (err) {
            return console.error(err.message);
          }
          const id = this.lastID; // get the id of the last inserted row
          console.log(`Rows inserted, ID ${id}`);
        });

        db.run(insertSql, values2, function (err) {
          if (err) {
            return console.error(err.message);
          }
          const id = this.lastID; // get the id of the last inserted row
          console.log(`Rows inserted, ID ${id}`);
        });

        db.run(insertSql, values3, function (err) {
          if (err) {
            return console.error(err.message);
          }
          const id = this.lastID; // get the id of the last inserted row
          console.log(`Rows inserted, ID ${id}`);
        });

        db.run(insertSql, values4, function (err) {
          if (err) {
            return console.error(err.message);
          }
          const id = this.lastID; // get the id of the last inserted row
          console.log(`Rows inserted, ID ${id}`);
        });

        //   Close the database connection after all insertions are done
        db.close((err) => {
          if (err) {
            return console.error(err.message);
          }
          console.log("Closed the database connection.");
        });
      });
    }
  );
});
Now to run the file, enter the following into your CLI:
node connect.js
If successful, you should see the following in your CLI:
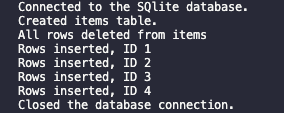
As well as a newly created database file called collection.db.
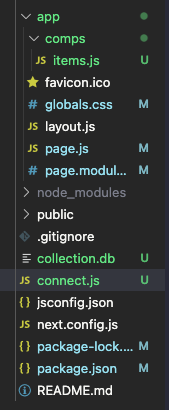
File Structure:
If you have the SQLite Explorer extension installed, you should be able to open the database file and see your data inside. If you ever make a mistake with your data, you can delete the database file and rerun your connect.js file.
SQLite Database File:

API Connection
Great, now we have a database to work with. The next step is to create our API.
First, we will create a folder inside of our app named api. Inside that folder, we will make a file named route.js. The file structure should look like this:
app / api / route.js;
Inside the route.js file, you should have the following:
import sqlite3 from "sqlite3";
import { open, Database } from "sqlite";

// Let's initialize it as null initially, and we will assign the actual database instance later.
let db = null;

// Define the GET request handler function
export async function GET(req, res) {
  // Check if the database instance has been initialized
  if (!db) {
    // If the database instance is not initialized, open the database connection
    db = await open({
      filename: "./collection.db", // Specify the database file path
      driver: sqlite3.Database, // Specify the database driver (sqlite3 in this case)
    });
  }

  // Perform a database query to retrieve all items from the "items" table
  const items = await db.all("SELECT * FROM items");

  // Return the items as a JSON response with status 200
  return new Response(JSON.stringify(items), {
    headers: { "Content-Type": "application/json" },
    status: 200,
  });
}
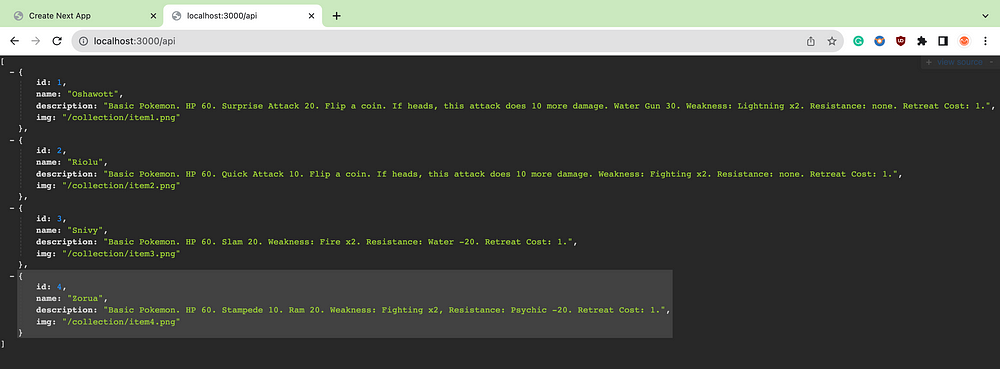
You should see your data if you navigate to your localhost/api. For me, it’s localhost:3000/api.
Let’s get the data by its id, just in case. You’ll need to create a folder in your api folder named [id]. The brackets surrounding the word “id” tell Next that this will be a dynamic api route. It expects something after the URL’s /api/. Inside the id folder, create a file again named route.js. This is where we will make the connection to the database. See the commented code below for what should be in this file.
import sqlite3 from "sqlite3";
import { open, Database } from "sqlite";

// Let's initialize it as null initially, and we will assign the actual database instance later.
let db = null;

// Define the GET request handler function
export async function GET(req, res) {
  // Extract the "id" from the URL by splitting the URL and taking the last element
  const id = req.url.split("/").pop();

  // Log the extracted "id" to the console (for debugging purposes)
  console.log(id);

  // Check if the database instance has been initialized
  if (!db) {
    // If the database instance is not initialized, open the database connection
    db = await open({
      filename: "./collection.db", // Specify the database file path
      driver: sqlite3.Database, // Specify the database driver (sqlite3 in this case)
    });
  }

  // Perform a database query to retrieve an item based on the id
  const item = await db.get("SELECT * FROM items WHERE id = ?", id);

  // Return the items as a JSON response with status 200
  return new Response(JSON.stringify(item), {
    headers: { "Content-Type": "application/json" },
    status: 200,
  });
}
This time, in this example, if you go to the URL localhost:3000/api/1 you should see the first item in your database.

Last Steps
Lastly, let’s get the data to render on our page. Here’s the commented code in my items.js file:
"use client";
import React from "react";
import Grid from "@mui/material/Unstable_Grid2"; // Grid version 2
import styles from "../page.module.css";
import { useState, useEffect } from "react";
import Image from "next/image";

const items = () => {
  // Define a state variable "items" and a function "setItems" to update the state
  const [items, setItems] = useState([]);

  // Use the useEffect hook to fetch data from the API endpoint when the component mounts
  useEffect(() => {
    fetch("http://localhost:3000/api", {
      method: "GET",
      headers: {
        "Content-Type": "application/json", // Set the request headers to indicate JSON format
      },
    })
      .then((res) => res.json()) // Parse the response data as JSON
      .then((data) => setItems(data)); // Update the state with the fetched data
  }, []);

  // Create a collection of JSX elements based on the fetched "items" data
  const collection = items.map((item) => {
    return (
      // Use the Material-UI Grid component to display each item in a grid layout
      <Grid key={item.id} id={item.id} xs={3}>
        {/* Use the Next.js Image component to display the item image */}
        <Image src={item.img} alt="pokemon card" width={245} height={342} />
        {/* Display the item name and description */}
        <h2>{item.name}</h2>
        <p>{item.description}</p>
      </Grid>
    );
  });

  // Return the JSX elements wrapped in a Material-UI Grid container
  return (
    <Grid
      container
      rowSpacing={1}
      columnSpacing={{ xs: 1, sm: 2, md: 3 }}
      className={styles.grid}
    >
      {collection} {/* Render the collection of items */}
    </Grid>
  );
};

export default items;
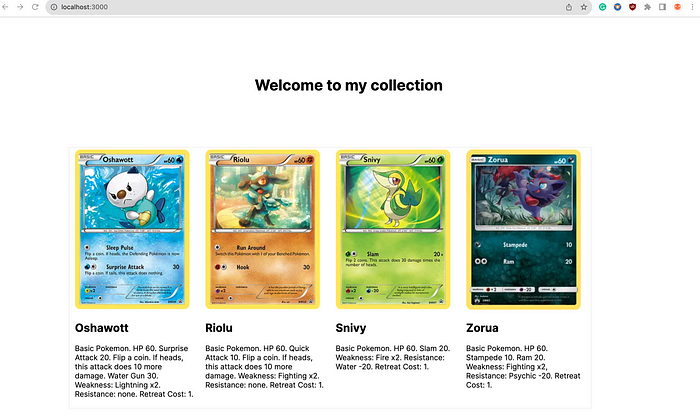
Now, on your localhost, you should see your data rendered.
localhost:3000 with rendered data:
Thanks for reading my blog! I hope it helped.
Comments
Loading comments…