Vercel's making quite the push for serverless, lately. It announced a whole fleet of services at its Vercel Ship virtual event, with the biggest bombshell being storage - Postgres, KV, and Blob - all "re-imagined from the perspective of a frontend developer," and critically, all serverless.
Here's the TL;DR of what that means:
- Vercel Postgres - A PostgreSQL database powered by Neon, that's easy to set up, easy to integrate with any Postgres client (automatically generates environment variables in the Vercel dashboard), that you can write SQL (as strings) for, and can make work with just HTTP. No TCP connections required, and it's managed, scalable (even to zero when not used), and fault-tolerant to boot.
- Vercel KV - a Redis compatible Key-Value store, powered by Upstash, available at Vercel Edge locations, and usable with any Redis client.
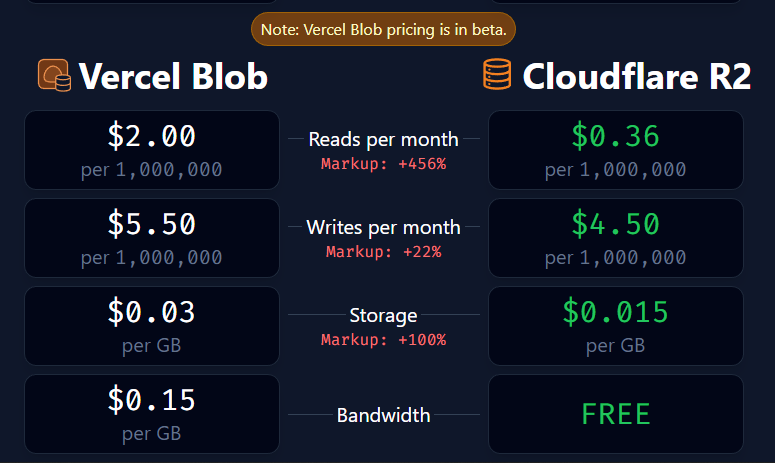
- Vercel Blob - An accessible, streamlined Amazon S3-compatible solution to upload, store, and serve binary files, powered by Cloudflare R2, but without the complexity of configuring buckets, permissions, or fiddling with SDKs. Has a REST API.
This wasn't a complete shocker - Vercel has bet big on being strictly serverless, and storage (or, statefulness at any rate) solutions that work serverless/on the edge are still a bit of a wild west scenario. What Vercel is doing here is wrapping existing service providers (NeonDB, Upstash, and Cloudflare R2) with an easy to use API, offering a 'best practices-as-a-service' solution for frontend devs in terms of DX, like they did with NextJS for React.
On one hand, I get it. I get the appeal of a no-ops, DX-enhanced workflow for frontend developers, and how it is beneficial to distill down the process of deploying a website/webapp (complete with storage and security) into a few clicks.
On the other...these markups are rather bad, and the added DX is not all that much considering how easy all three of these services were to integrate to begin with.
So what's the alternative? Because AWS Amplify sure ain't it.
Let's talk about it, taking a look at some alternatives, and maybe also about how you could make DX easier while doing it for free - or very close to it.
The Tale of the Tape
First of all, let's look at how bad this premium you're paying really is.
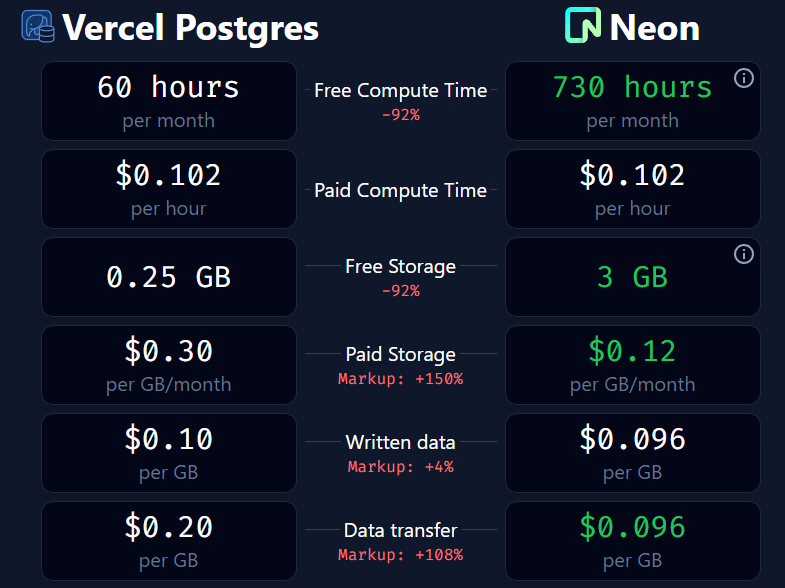

[Source: service-markup.vercel.app]
The problem is laid bare in numbers, but here are some key things you need to know.
- For Vercel Postgres, you're charged by compute time, not requests made (like many other providers). They also charge for actual data transfer per month! (this would be SQL query data, so not an insane volume, but it's there.)
- For Vercel KV, you're again charged for actual data transfer, but mercifully not compute time.
- Vercel Blob pricing is currently in beta, but as it stands right now, you'll be charged $0.15/GB for egress (after the 1 GB you get free), while R2 charges nothing. Also, the storage cost (per GB) is doubled on Vercel.
I understand not wanting to set up all infrastructure including CDNs and CI/CD pipelines on your own... but all three of these services are SaaS providers that were designed to be easy enough to integrate on your own to begin with, whether you're using Next.js/React or not.
So why pay the premium? Let's see how you could use these same services - serverless - and in a type-safe, DX enhanced flavor, using WunderGraph to implement them all with :
- No vendor lock-in,
- No markup cost,
- Type-safe, enhanced DX
- Easy local dev, with any framework of choice.
WunderGraph - A Quick Primer
WunderGraph is a free and open-source (Apache 2.0 license) full stack dev tool, allowing you to declaratively turn your data dependencies - microservices, databases, and 3rd party APIs - into a secure, unified, and extensible API exposed over JSON-RPC.
But data isn't the only kind of dependency your project will have to deal with, and that's why WunderGraph can also integrate S3-compatible storage for file uploads, OIDC/non-OIDC compatible auth providers, and more.
It then aggregates and abstracts all of this into a namespaced virtual graph - and then you can define operations on them using GraphQL or TypeScript, and access them from the frontend via typesafe data fetching hooks (if using a React-based framework) or just by calling the JSON-RPC endpoints.
Finally, WunderGraph can be run as a standalone server, or together with your framework of choice (Next.js, Remix, Nuxt, SvelteKit, and more). WunderGraph's primary server (the WunderNode) needs to be deployed to a platform that supports Dockerized images, like Fly.io, or just take their fully managed option - WunderGraph Cloud.
GitHub - wundergraph/wundergraph: WunderGraph is a Backend for Frontend Framework to optimize...
Using WunderGraph as an Alternative to Vercel Storage
Let's use WunderGraph to craft our own alternative to Vercel Storage, using the exact same providers - Neon for PostgreSQL, Upstash for Redis, and Cloudflare R2 for blob storage.
Prerequisites
First, we'll set up WunderGraph, using its Next.js quickstart template:
npx create-wundergraph-app my-project -E nextjs
Then, cd into my-project (or whichever name you used), and:
npm i && npm start
If you see http://localhost:3000 open on your browser, with the results of a sample query, you're all set!
1. Postgres with Neon
First of all, set up a Neon database:
- Sign in to Neon, or sign up if you do not yet have an account.
- From the Console, create a project.
- Create a database, and use the seed SQL to populate it. Or, use the default neondb database (we'll use the latter, specifically, its Customer table).
Then, as with any Postgres provider, you'll need a TCP connection string, copy that out from the Connection Details widget (Direct Connection, but it's advised to use Pooled Connections if accessing from a cloud deployment) on your Neon Dashboard.
Neon provisions access via roles. Create one, and note down the password. Now, your connection string is going to look something like postgres://ROLE:PASSWORD@ep-dawn-rain-071323.REGION.aws.neon.tech/neondb
Now, we'll have to add this as a dependency to our WunderGraph config (don't forget the namespace!), and include it in the apis dependency array.
./.wundergraph/operations/wundergraph.config.ts
const neondb = introspect.postgresql({
  apiNamespace: "neondb",
  databaseURL:
    "postgres://ROLE:PASSWORD@ep-dawn-rain-071323.REGION.aws.neon.tech/neondb",
});

configureWunderGraphApplication({
  apis: [neondb],
  // ...
});
Now, when we save, WunderGraph's server (WunderNode) will introspect this data source, and generate all data operations we can define on it, including all type definitions needed. To get the data we want, we'll have to write a simple GraphQL operation for this.
./.wundergraph/operations/AllCustomers.graphql
query AllCustomers {
  customers: neondb_findManycustomer {
    id
    first_name
    last_name
    email
    phone
    ip_address
    username
  }
}
You'll notice we have autocomplete for all fields here, now that WunderGraph has introspected it. Neat DX win!
Once you hit save on this, WunderGraph will get to work once again, generating typesafe data fetching hooks we can use on the frontend.
./pages/index.tsx
import {
  useQuery,
  withWunderGraph,
} from "../components/generated/nextjs";

const Home: NextPage = () => {
  // postgres from Neon
  const { data: customerData, isLoading } = useQuery({
    operationName: "AllCustomers",
  });

  return (
  // ...
  {!isLoading && <pre>
      {JSON.stringify(customerData, null, 2)}
    </pre>
    }
    // ...
  )
}

export default withWunderGraph(Home);
Being lazy and just printing out the JSON response here, but you can visualize this data however you like. Put it into <Card>'s, if you want!
But that's not all.
Vercel's Postgres client has this nifty feature where it actually lets you write SQL queries as strings.
import { sql } from "@vercel/postgres";
import { redirect } from "next/navigation";

async function create(formData: FormData) {
  "use server";
  const { rows } = await sql`  INSERT INTO products (name)
    VALUES (${formData.get("name")})`;
  redirect(`/product/${rows[0].slug}`);
}
Want that same developer experience? Let's make it happen!
Neon supports making SQL queries on your database(s), and we can make use of it, just like Vercel. WunderGraph's introspection on our database reveals that we can use the queryRawJSON query for this (and you can check out the generated virtual graph's schema in the wundergraph.schema.graphql file).
To do this, first, create a GraphQL operation to execute a raw SQL query.
./.wundergraph/operations/AllCustomersSQL.graphql
query AllCustomers($query: String!) {
  customers: neondb_queryRawJSON(query: $query)
}
Dead simple - takes in a SQL string, spits out data as JSON. Of course, we can't really trust this to run clientside, so take this to the server instead.
Enter TypeScript operations! Using these, you can write custom TypeScript functions - async resolvers, essentially - to perform data operations. These run entirely on the server and are never exposed clientside, so your app stays safe. Plus, you can even use existing GraphQL operations within them - which is exactly what we'll be doing.
What do these TypeScript operations look like? They're just namespaced .ts files within the operations directory, same as GraphQL operations. Here, I'm creating a .ts file within a 'neon' directory, but naming is up to you. Just make sure you stick to it.
./.wundergraph/operations/neon/get.ts
import { createOperation } from "../../generated/wundergraph.factory";

export default createOperation.query({
  handler: async ({ operations }) => {
    const customers = await operations.query({
      operationName: "AllCustomersSQL",
      input: {
        query: "SELECT * FROM CUSTOMER",
      },
    });
    return {
      customers: customers?.data?.customers,
    };
  },
});
Note how we're referencing the AllCustomersSQL.graphql file here.
💡 If you don't want to write GraphQL at all, you could just import and use any postgres client here, await a SQL operation (just as you would in API handlers or server functions), then return data as needed.
And then, we can use it clientside via hooks, just like before, with GraphQL operations.
./pages/index.tsx
// ...
const { data: customerData, isLoading: pgIsLoading } = useQuery({
  operationName: "neon/get",
});
// ...
2. Redis with Upstash
Using Upstash with WunderGraph is more or less the same, except we'll rely entirely on serverland TypeScript operations for it, using the @upstash/redis library.
The setup is fairly simple - much like Redis itself. Sign in/Sign up using your Amazon, Github or Google accounts....or just a regular email/password combination.
Then, create a database, type in a name for it, and select the region where your database will run. For best performance, choose the Region which your applications are closer to - though you can also go Global and choose a combination of primary writes + primary reads regions.
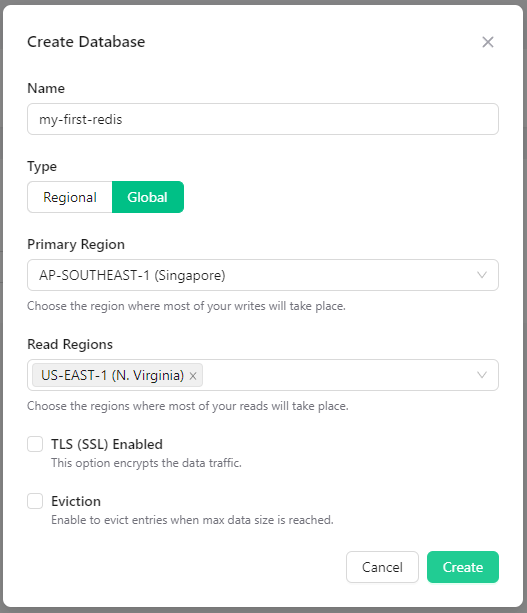
Once you click on the Create button, your cluster should be up and running, and you can connect to your database with any Redis client. As mentioned before, for simplicity, we will use Upstash's own @upstash/redis library.
npm i @upstash/redis
For reusability, let's create and export a Redis client instance.
./lib/redis.ts
import { Redis } from "@upstash/redis";

export const redis = new Redis({
  url: "https://YOUR_REGION_ID.upstash.io",
  token: "YOUR_REDIS_TOKEN",
});
We'll use this client entirely serverside, so TypeScript Operations is going to be our go-to for this.
Let's assume we've already set a key-value pair, and are just retrieving it here. Setting a key is easy, too, you'd do something like - await redis.set('key', 'value') --- just exercise common sense; be wary of passing in KV pairs from the client.
./.wundergraph/operations/redis/get.ts
import { redis } from "../../../lib/redis";

import { createOperation } from "../../generated/wundergraph.factory";

export default createOperation.query({
  handler: async () => {
    const data = await redis.get("A_REDIS_KEY_HERE");
    return {
      data,
    };
  },
});
Use hooks to access that data clientside, as usual.
./pages/index.tsx
import {
  useQuery,
  withWunderGraph,
} from "../components/generated/nextjs";

const Home: NextPage = () => {
 // redis from Upstash
  const { data: redisData, isLoading } = useQuery({
    operationName: "redis/get",
  });


return (
  // ...
  {!isLoading &&
  <pre>
      {JSON.stringify(redisData, null, 2)}
  </pre>
  }
  // ...
  )
}

export default withWunderGraph(Home);
3. Blob Storage with Cloudflare R2
Finally, for binary storage, using WunderGraph you can upload files to any S3 compatible storage provider, e.g. AWS S3, Minio, DigitalOcean Spaces or - what we're using here - Cloudflare R2.
First, sign in/sign up to Cloudflare, set up an R2 plan on your account, and create a bucket. Copy out your Access Key ID and your Secret, and then back in WunderGraph config, you'll need to define a provider via config-as-code.
./.wundergraph//wundergraph.config.ts
const cloudflareR2 = {
  name: "cloudflareR2",
  endpoint: "YOUR_CLOUDFLARE_USER_ID.r2.cloudflarestorage.com",
  accessKeyID: "YOUR_ACCESS_KEY_ID",
  secretAccessKey: "YOUR_SECRET_ACCESS_KEY",
  bucketLocation: "", // not all S3 providers require this
  bucketName: "YOUR_BUCKET_NAME",
  useSSL: true, // you'll always want SSL enabled for cloud storage
  uploadProfiles: {
    // profile for a user's 'avatar' picture
    avatar: {
      maxAllowedUploadSizeBytes: 1024 * 1024 * 10, // 10 MB, optional, defaults to 25 MB
      maxAllowedFiles: 1, // limit the number of files to 1, leave undefined for unlimited files
      allowedMimeTypes: ["image/png", "image/jpeg"], // wildcard is supported, e.g. 'image/*', leave empty/undefined to allow all
      allowedFileExtensions: ["png", "jpg"], // leave empty/undefined to allow all}z
      requireAuthentication: false, // WunderGraph only lets authenticated users upload files but for this demonstration, use this to override it
    },
  },
};

configureWunderGraphApplication({
  //  ...
  s3UploadProvider: [cloudflareR2],
  // ...
});
Creating S3 profiles for your uploads (like one specifically meant for uploading avatar images, here) is technically optional, but I'm including it here anyway as it's very useful in defining rules (and limits) for what can and cannot be uploaded.
On the client, we can use the useFileUpload hook to handle uploads to our defined provider. In the code below, we're storing the list of attached files in files, and on submit, we're creating a FormData object with all the files submitted, and uploading them to the S3 provider (and bucket) we've configured, with a given profile name of avatar, making sure that specific profile gets used.
./pages/index.tsx
Let's build a quick upload form for this example.
import { useState } from "react";
import { useFileUpload, withWunderGraph } from "../components/generated/nextjs";

const Home: NextPage = () => {
  // s3 compatible blob via cloudflare r2
  const [files, setFiles] = useState<FileList>(); // list of files that were attached
  const [uploadData, setUploadData] = useState<string[]>([]); // an array to keep track of uploaded file names
  const { upload } = useFileUpload(); // WunderGraph autogenerated hook for file uploads

  // handle files being added via input on form
  const onFileChange = (e: React.ChangeEvent<HTMLInputElement>) => {
    if (e.target.files) setFiles(e.target.files);
  };

  // handle form submission
  const onSubmit = async (e: React.FormEvent<Element>) => {
    e.preventDefault();
    // if no files were attached.
    if (!files) {
      alert("No files!");
      return;
    }
    // otherwise, handle upload
    try {
      const result = await upload({
        provider: "cloudflareR2", // specify name of S3 provider
        profile: "avatar", // specify which S3 profile we want
        files, // files attached
      });
      result && setUploadData(result); // set data with array of uploaded filenames if successful
    } catch (e) {
      // if unsuccessful, show error messages
      const msg = e instanceof Error ? e.message : "Upload failed!";
      alert(msg);
      console.error("Couldn't upload files : ", msg);
    }
  };

  return (
    {/*... */}
      <form onSubmit={onSubmit}>
        <input
          id="multiple_files"
          type="file"
          multiple
          onChange={onFileChange}
        />
        <button name="avatar" type="submit">
          Upload
        </button>
      </form>
      <span> Files uploaded : </span>
      <pre>{JSON.stringify(uploadData, null, 2)}</pre>
    {/*... */}
  );
};
export default withWunderGraph(Home);
And that's all, folks!
Conclusion
The thing nobody warns you about modern web development? You have to wear many, many hats. Project management, UI/UX design, frontend + backend logic, infra, testing, security, and, yes, setting up and managing persistent storage.
For anyone but enterprise developers, wearing all these hats and trying to make a living off of your projects is going to be difficult to balance. DX that streamlines fullstack development like Vercel's offerings is a godsend, and I'm glad it exists - I just wish it didn't have to come at such a premium.
Will they revise this pricing soon? That seems to be the industry sentiment.
But in the meantime, if you can get great DX with WunderGraph as an API Gateway/BFF server, that:
- Integrates these services for you in a painless, declarative, typesafe manner with auto-generated hooks to query/mutate data from the frontend,
- Provides all the DX wins while dealing with base Neon/Upstash/Cloudflare R2 pricing with no markup,
- Is compatible with more than just Next.js/React,
- And all using open-source technology, with no vendor lock-in,
Why pay the Vercel tax?
Comments
Loading comments…