
Redux is a state manager for JavaScript Applications. Mostly used with React. Most of the large-scale react apps include redux for managing the global state. But does all the redux based application follows the standard approach?
Redux needs to be implemented in a standard and optimal way to avoid issues in your React App. When we start to develop a redux-based app, We will lead to decision fatigue on searching which the best practice. To avoid that kind of confusion. I will share the standard way to implement redux in your React App and also how you structure your react-redux app. Let’s dispatch
Redux Toolkit
Redux Toolkit is a redux official package to implement redux logic in a standard and minimalized way. Let’s quickly see, What does Redux Toolkit address
-
Configure the redux store with a single function!
-
Not required to add additional packages to implement redux.
-
No more Boilerplate codes.
-
In build thunk async handler.
-
Mutation helpers with inbuild immerjs.
Let's move to the code part and see how this package standardizes reducers.
Add Redux Toolkit to your project by using the below command
yarn add @reduxjs/toolkit
Redux Store
Creating a store using the redux toolkit is super simple! Check the below code
import { configureStore } from "@reduxjs/toolkit";
import counterReducer from "./counterSlice";

export const store = configureStore({
  reducer: counterReducer,
});
configureStore enables redux-thunk and redux dev tools by default. Not required to configure it manually by using middleware. But if you plan to use redux-saga or any other side effects manager, You can configure through the middleware as below
import { configureStore } from "@reduxjs/toolkit";
import createSagaMiddleware from "redux-saga";
import counterReducer from "./counterSlice";
import rootSaga from "./sagas";

const sagaMiddleware = createSagaMiddleware();

export default configureStore({
  reducer: counterReducer,
  middleware: (getDefaultMiddleware) =>
    getDefaultMiddleware().concat(sagaMiddleware),
});

sagaMiddleware.run(rootSaga);
Now your redux store is ready for action. Next, add it to the
import React from "react";
import ReactDOM from "react-dom";
import "./index.css";
import App from "./App";
import { store } from "./app/store";
import { Provider } from "react-redux";

ReactDOM.render(
  <Provider store={store}>
    <App />
  </Provider>,
  document.getElementById("root")
);
Next reducer setup? No !!. It's time to Slice.
Create Slice API
Redux Toolkit provides an API called createSlice. Which handles the initial state, automatically creates action types and creators. And no **more switch cases. **We are also not required to write action types and creators manually. Check the below code for the new slice reducer
import { createSlice } from "@reduxjs/toolkit";

const initialState = { value: 0 };

const counterSlice = createSlice({
  name: "counter",
  initialState,
  reducers: {
    increment(state) {
      state.value++;
    },
    decrement(state) {
      state.value--;
    },
  },
});

export const { increment, decrement } = counterSlice.actions;
export default counterSlice.reducer;
Let’s breakdown each createSlice options
initialState: Initial state of the slice
name: Name of the slice. (Reducer Name)
**reducers: **Handles the action type, Like the switch case which we have used in reducers.
createSlice also have extraReducer. This option is to handle actions types that are not generated by the current slice.
Now you can interact with the redux store and slice from React Components as below
import React from "react";
import { useSelector, useDispatch } from "react-redux";
import { decrement, increment } from "./counterSlice";

export function Counter() {
  const count = useSelector((state) => state.counter.value);
  const dispatch = useDispatch();

  return (
    <div>
      <div>
        <button
          aria-label="Increment value"
          onClick={() => dispatch(increment())}
        >
          Increment
        </button>
        <span>{count}</span>
        <button
          aria-label="Decrement value"
          onClick={() => dispatch(decrement())}
        >
          Decrement
        </button>
      </div>
    </div>
  );
}
Feature Folders
Feature Folder is not related to the redux toolkit. But this is also a recommended way by redux to structure your React Redux App. The feature Folder approach is grouping your features in a single folder.
The feature folder includes components and a single file for the redux toolkit createSlice API for the particular feature. Redux related action creators, types need to add in a single file, not in multiple files.
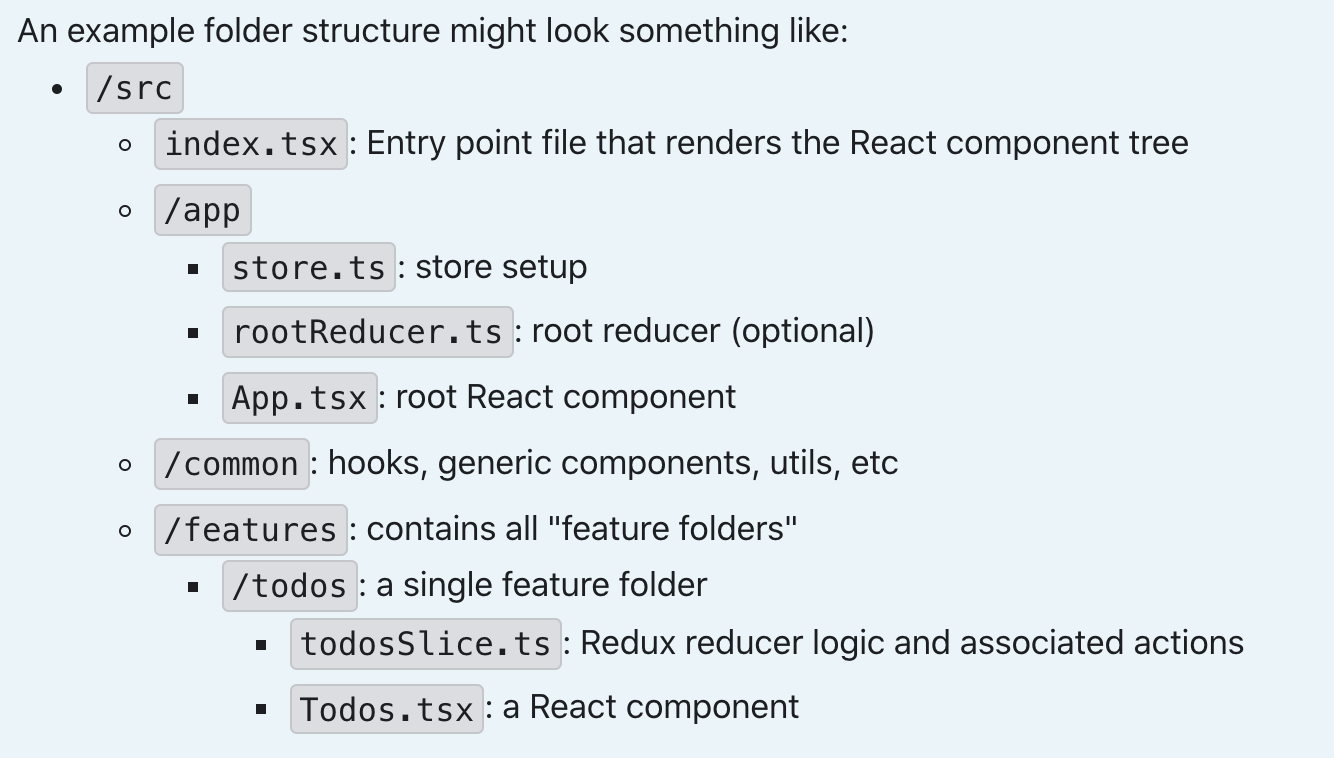 sample folder structure
**/app **Global app setup and Layout configuration used by the entire app.
/common Reusable helpers and components
/features Components related to the specific feature and its slice logic.
Resources
Redux Toolkit GitHub repository
Conclusion
Redux toolkit provides a convenient and standard way of writing reducers. I hope you have found this useful. Thank you for reading.
Comments
Loading comments…