
Why Pritunl VPN?
As a best practice of security we all keep our backend logic layer and database layer in private subnets with Natgatway or without Natgatway, but at times developer or DB admin, needs to log in to DB for manual querying. It is at times like this we require a Bastion host or a VPN help. If you are using this bastion host for more computing/memory power then that itself is good architecture, But if you are just logging into the Bastion host to connect to the DB then I would recommend using VPN. There are ways to set up a VPN in AWS like site-to-site tunnelling from the customer firewall and AWS ClientVPN. AWS Site-to-Site VPN would cost $36.5 monthly and AWS Client VPN would price around $73 monthly plus a connection hour of $0.05 per hour for client connection. For a Pritunl VPN setup, we can make use of the EC2 instance. Even if we use a t3a.medium instance it would just cost $27.44 and it would be more than enough for a small company. Here in this tutorial, we make use of the t3a.micro instance and it would cost around $6.86 for a month. So now you might have understood that using Pritunl is really cost-efficient. We can also get docs from Pritunl for any errors and support. They also have an enterprise edition as well.
Note: All the prices from North Virgina region
Getting started
Prerequisite
- A VPC with public and private subnets
- A privately launched instance just to verify the connection
- Access to launch EC2 and with keypair, and to edit the security group
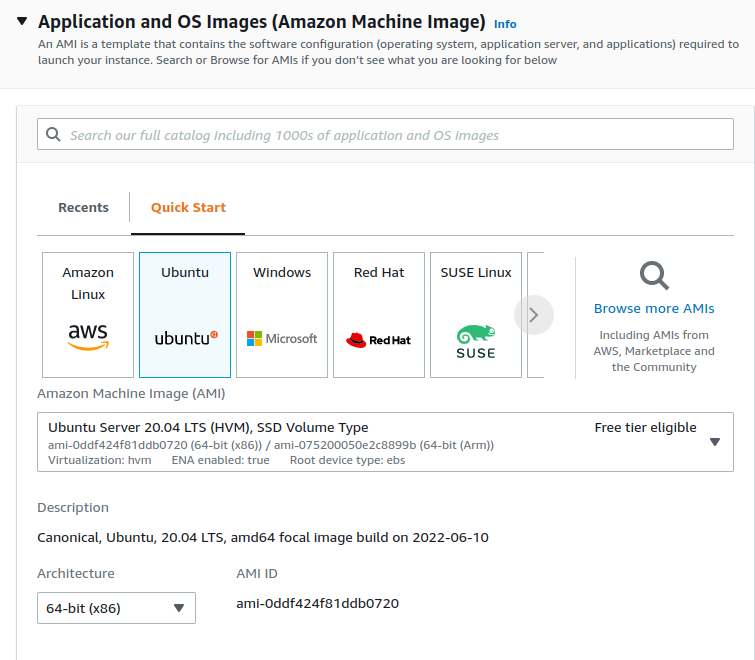
Step 1: Launching an Ubuntu 20 instance
For this setup, we are launching an Ubuntu 20.04 LTS AMI
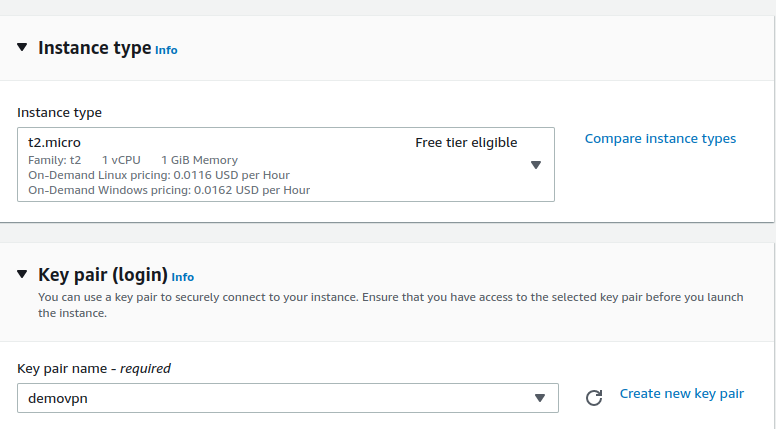
Step 1.1: Selecting instance type and key pair
Next, we select the instance type. Here I am using t2.micro for the free tier eligibility. Also, select a key pair if you have access to the listed keypair otherwise choose Create new keypair.
Step 1.2: Choosing VPC
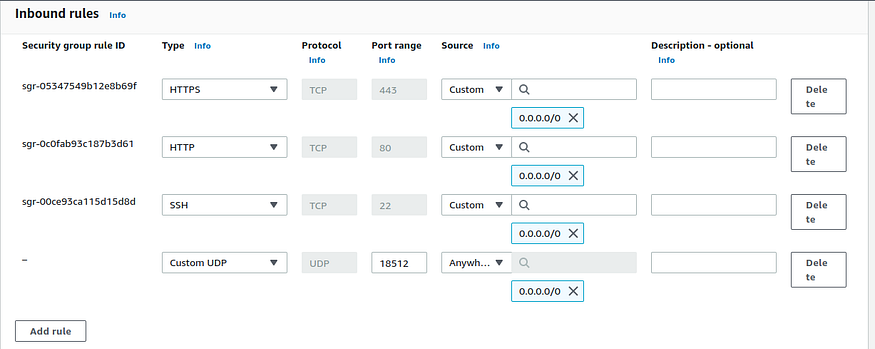
We now choose our VPC and public subnet also remember to enable Auto-assign public IP. Create a security group for VPN in which we will open SSH, HTTP and HTTPS ports.

Step 1.3: Setting root volume size
A 30GB would be enough for this installation.

Step 1.4: Setting User data for Ec2
In Advanced section we can add a user data so that with initializing the instance this would be installed. If you don't want this to be done via user data then copy this script and create a script file and run the script. Incase this installation did it work running the script manually would help you figure what went wrong.
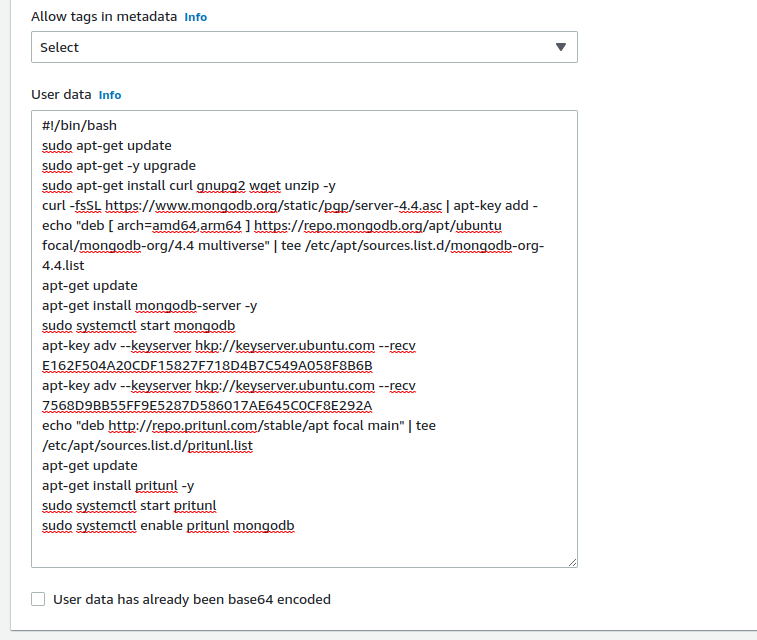
#!/bin/bash
sudo apt-get update
sudo apt-get -y upgrade
sudo apt-get install curl gnupg2 wget unzip -y
curl -fsSL [https://www.mongodb.org/static/pgp/server-4.4.asc](https://www.mongodb.org/static/pgp/server-4.4.asc) | apt-key add -
echo "deb [ arch=amd64,arm64 ] [https://repo.mongodb.org/apt/ubuntu](https://repo.mongodb.org/apt/ubuntu) focal/mongodb-org/4.4 multiverse" | tee /etc/apt/sources.list.d/mongodb-org-4.4.list
apt-get update
apt-get install mongodb-server -y
sudo systemctl start mongodb
apt-key adv --keyserver hkp://keyserver.ubuntu.com --recv E162F504A20CDF15827F718D4B7C549A058F8B6B
apt-key adv --keyserver hkp://keyserver.ubuntu.com --recv 7568D9BB55FF9E5287D586017AE645C0CF8E292A
echo "deb [http://repo.pritunl.com/stable/apt](http://repo.pritunl.com/stable/apt) focal main" | tee /etc/apt/sources.list.d/pritunl.list
apt-get update
apt-get install pritunl -y
sudo systemctl start pritunl
sudo systemctl enable pritunl mongodb
After adding user data you may launch this instance.
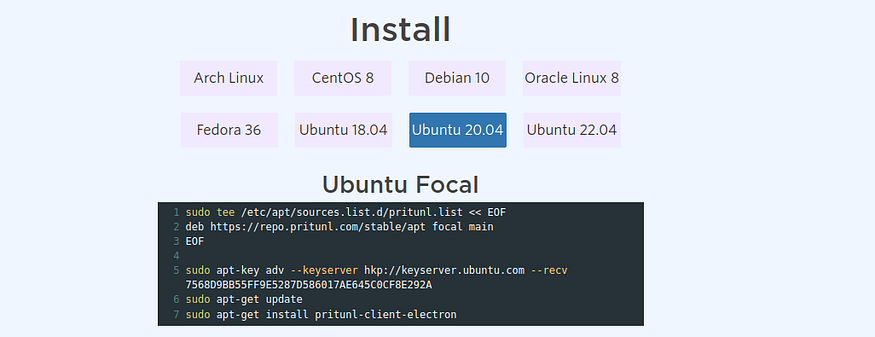
Note if you are using Ubuntu 22.04 or any other OS you can find the script here
Step 2: Configuring the Pritunl VPN server
Now within 5 mins or less in this instance, 80 port will be running the initial setup page. So call the public IP in the browser and see.
Note: If you’re getting a site not reachable check if 80 port is opened in inbound of the security group. Also you may check the ports that are up in instance with netstat -tunlp and see if 80 port is up. If 80 port is not up within 10mins then u may run the script manually and see what went wrong or follow this doc.
The server will be requesting setup-key you can copy that command and run in the server to get setup-key
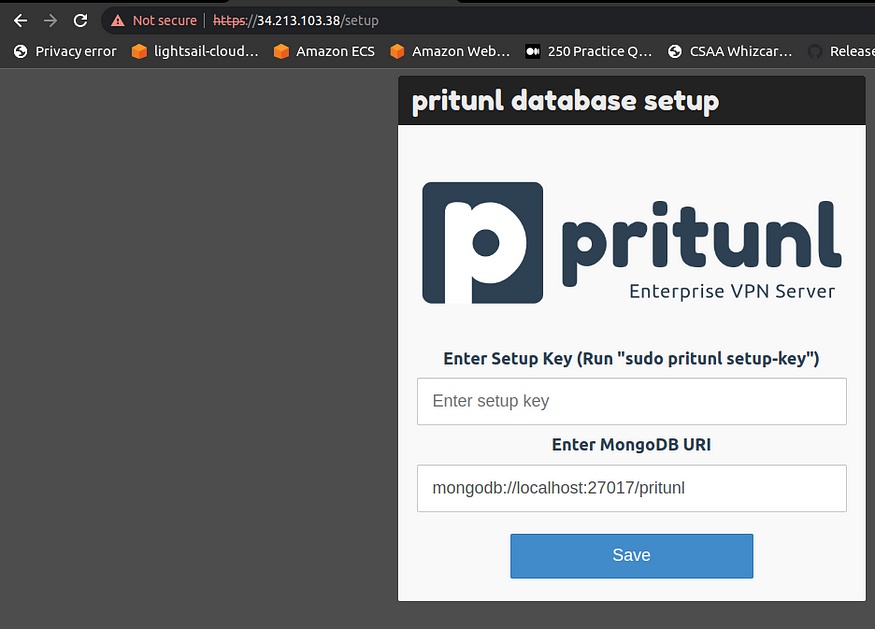
Now we ssh to the instance and run sudo pritunl setup-key

Once you copy the key to the browser click on Save and move to the next step
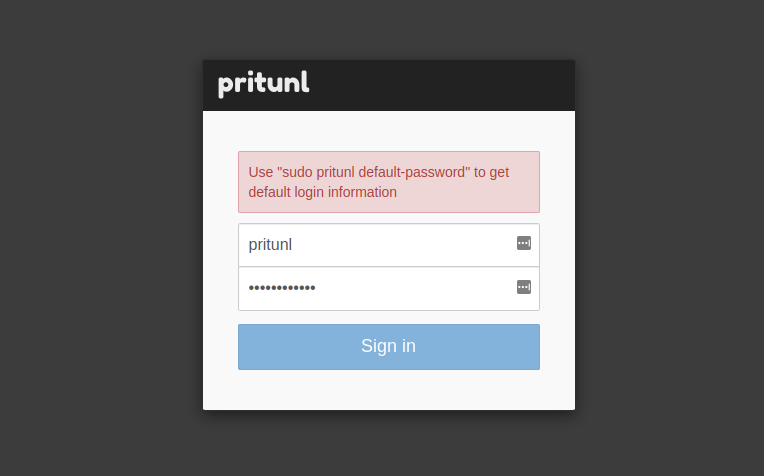
Step 2.1: Generating default credentials
In this step we generate the default credentials with the following command
sudo pritunl default-password

Now copy the username and password to the browser and click on Sign in
Step 2.2: VPN initial setup
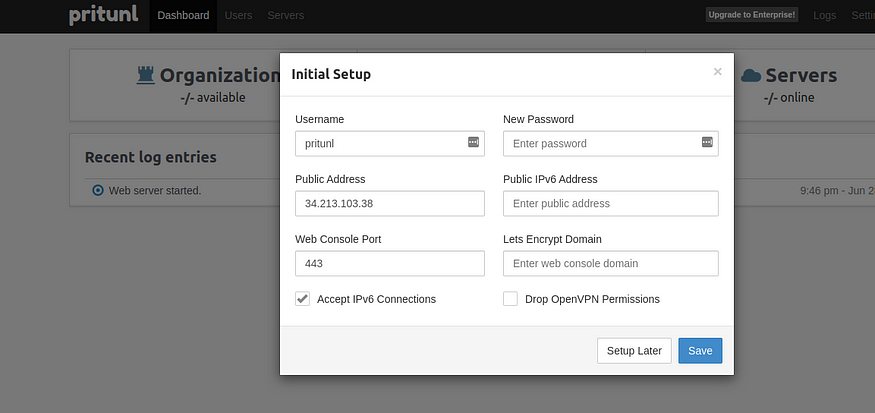
We can change our username and password here. In the Public Address column the EC2 instance’s public IP is fetched automatically. Instead of public IP if you are planning to use this server with FQDN, use that URL here. That way in case IP changes it won't affect. It will be to this IP our VPN client will be connecting. Also in the Lets Encrypt Domain column, you can provide the URL. This will generate an SSL certificate for your VPN server web console. Before Clicking save make sure your URL points to the IP of this machine. Add the rest all you can keep it as default
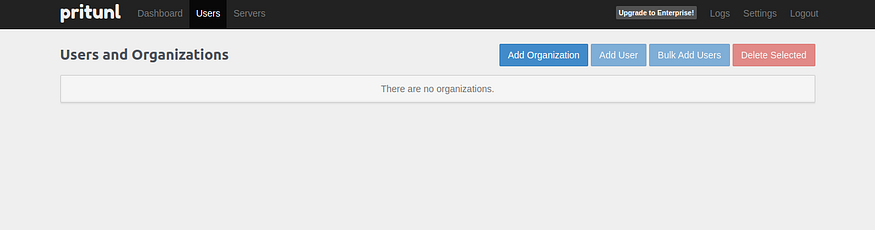
Step 2.3 Create an organization
We need to create an organization before adding servers and users to it. From the console choose the Users tab then click on Add Organization
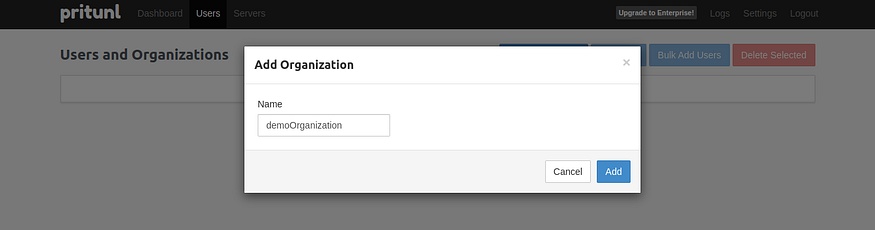
Here we provide an Organization name
Step 2.3 Create a Server

We need to create a server before adding users to it. From the console choose the Servers tab then click on Add Servers.
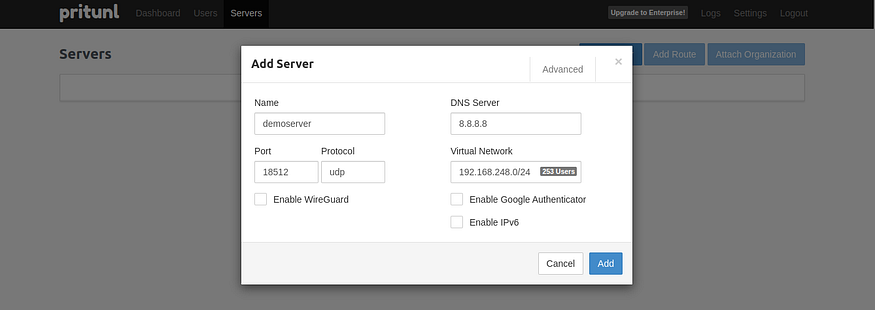
In the adding server pop-up, we are required to provide a Server name, Port and Protocol. You can edit this Port and protocol if it is required. For this demo purpose, we just provide the server name and then keep all other options as default, and click Add.
The VPN client will be connecting to the UDP port in the server. So we need to add the UDP port to the security group
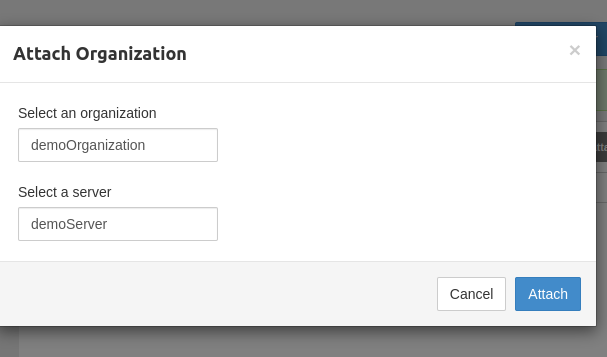
Step 2.4 Attach Organization and Server
In the Servers tab click on Attach Organization and attach our server and organization
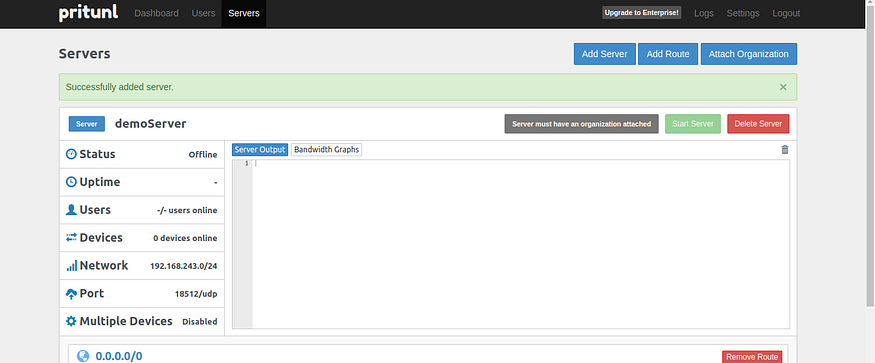
Step 2.5 Start the server
Now you may click on Start server. This will start the server and some logs will be printed
Step 2.6 Adding users
In the Users tab of the Pritunl console Click on Add User to create a user profile. Provide a name and PIN and Click Add
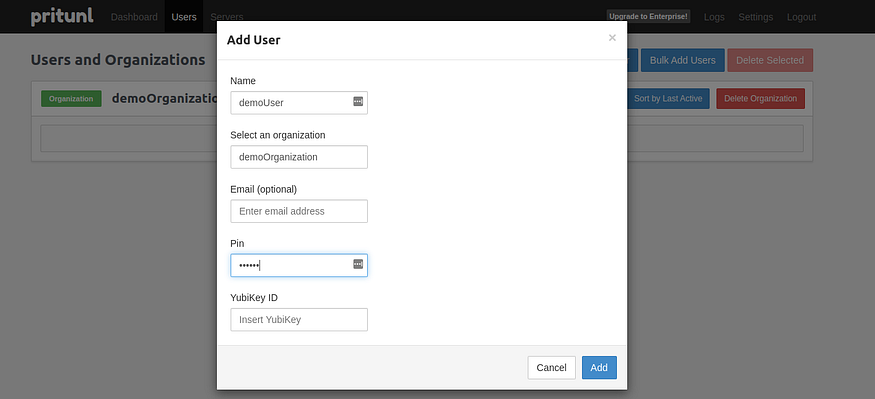
Once the user is added you can click on the Download button to download the .ovpn file. The file Downloaded will be in .tar format and you will not need to extract that.
Step 3: Connecting VPN with Pritunl client
We can make use of any OpenVPN client to connect but here we use Pritunl VPN client to connect.
Step 3.1: Download Pritunl VPN Client
Based on OS you can download VPN client from Pritunl Website.
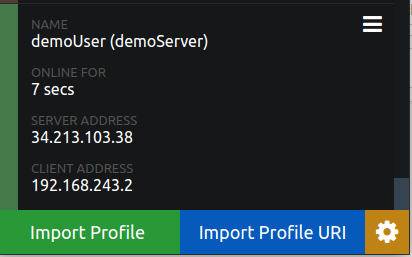
Step 3.2: Connecting to Pritunl VPN with Pritunl VPN Client
Once the Pritunl VPN Client is downloaded you can import the .tar file to the client and connect. While connecting there will be a pop-up for the PIN. Provide the PIN and you will be connected successfully.
Note : Incase its not connecting check the server logs it could help. Make sure your PIN is right if getting any Authentication Error. At times during the initial connection, there might be issue to get internet access, to fix this I usually restart the server from the Pritunl web console and its fixed. Also make sure you have added all ports in the security group
Step 4: (Optional) Verifying connection
To verify VPN works fine I launched a private instance in the private subnet.
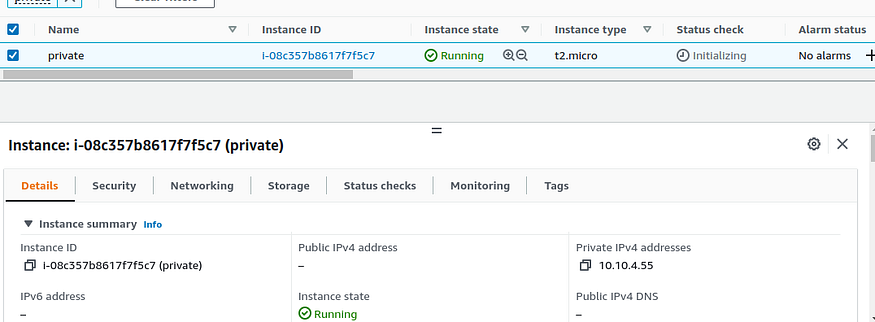
After Launching the private instance we try the connection to 22 port with Netcat command
nc -vz <private ip> 22

If you’re getting connection succeeded your configuration is perfect.
Note : if no response after running Netcat means there is some connection issue. Check the security group of the private instances and verify it's open to Pritunl server IP. Also, make sure VPN is not disconnected.
That's it folks..! We have successfully created a Pritunl VPN.
Conclusion
VPN is an essential part of an organization to encrypt our data in transit and restrict everything to this static IP. Nowadays we are mostly working from remote spaces and at home, we may not be having static IP or secured connections. With this VPN we could obtain IP masking and encrypted connection to our infrastructure. One of the major issues that we face while subscribing to a VPN is the cost factor and reliability of service. Even though AWS provided managed services like Site-to-Site tunnelling, Customer gateway and AWS ClientVPN its expensive and for most use cases of start-ups this Pritunl VPN configuration is enough.
Reference
- Pritunl in AWS: https://docs.pritunl.com/docs/installation#aws-oracle-linux-install
- Client installation: https://docs.pritunl.com/docs/installation-client
Comments
Loading comments…