In this article, we’ll create a simple React application where we’ll use redux for state management. The final look of this application is shown below —
In this exercise, we’ll use combineReducers() of the redux library which combines multiple reducers into a single reducer.
According to the official documentation, As our application grows and becomes more complex, we can have multiple reducers each managing independent parts of the state. The combineReducers() helper function turns an object whose values are different reducing functions into a single reducing function that we can pass to createStore().
Initial setup
First of all, we have make sure that Node.js is installed in our system. If so, we’ll create a directory with name React_Projects and then, we’ll open the terminal and navigate into that directory. There, we’ll run the following command —
npx create-react-app myapp
Then we’ll run the run the following command to install redux and react-redux.
npm install redux react-redux
redux is a state management library.
And, react-redux helps to connect react with redux.
Procedure
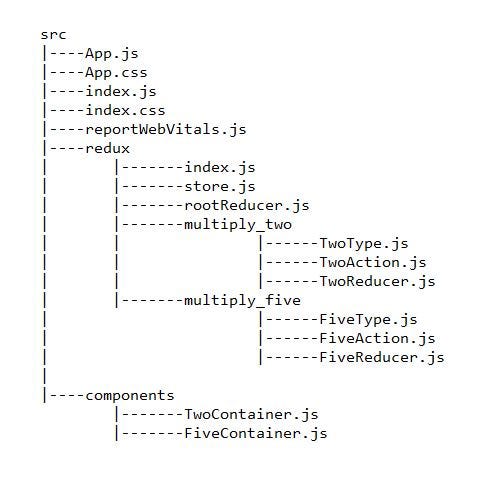
The src directory for this project will look like the following —

Step 1
First of all, we’ll set up the redux store for our application. For that we’ll create a directory named redux inside src.
Since, we’ll have two reducers for handling both the states, that’s why we’ll create two directories inside the redux directory.
Step 2
The first directory inside the redux directory will be multiply_two. In this directory, there will be three files which are given below —
export const MULTIPLY_TWO = "MULTIPLY_TWO";
import { MULTIPLY_TWO } from "./TwoType";

export const multiplyTwo = () => {
  return {
    type: MULTIPLY_TWO,
  };
};
import { MULTIPLY_TWO } from "./TwoType";

const initialState = {
  val_two: 1,
};

const TwoReducer = (state = initialState, action) => {
  switch (action.type) {
    case MULTIPLY_TWO:
      return {
        ...state,
        val_two: state.val_two * 2,
      };

    default:
      return state;
  }
};

export default TwoReducer;
Step 3
The second directory inside the redux directory will be multiply_five. In this directory also, there will be three files which are given below —
export const MULTIPLY_FIVE = "MULTIPLY_FIVE";
import { MULTIPLY_FIVE } from "./FiveType";

export const multiplyFive = () => {
  return {
    type: MULTIPLY_FIVE,
  };
};
import { MULTIPLY_FIVE } from "./FiveType";

const initialState = {
  val_five: 1,
};

const FiveReducer = (state = initialState, action) => {
  switch (action.type) {
    case MULTIPLY_FIVE:
      return {
        ...state,
        val_five: state.val_five * 5,
      };

    default:
      return state;
  }
};

export default FiveReducer;
Step 4
Now, we’ll combine both the reducers in rootReducer.js file.
import { combineReducers } from "redux";
import TwoReducer from "./multiply_two/TwoReducer";
import FiveReducer from "./multiply_five/FiveReducer";

const rootReducer = combineReducers({
  two: TwoReducer,
  five: FiveReducer,
});

export default rootReducer;
In the above code, the combineReducers() method accepts an object whose keys can be any name that we want to provide and the value are the reducer functions.
Step 5
Now, we’ll create the redux store in store.js file.
import { createStore } from "redux";
import rootReducer from "./rootReducer";

const store = createStore(rootReducer);

export default store;
Step 6
In this step, we’ll create a file index.js which will export both the action creator functions, viz. multiplyTwo and multiplyFive.
export { multiplyTwo } from "./multiply_two/TwoAction";

export { multiplyFive } from "./multiply_five/FiveAction";
Step 7
Now, we’ll create a components directory inside src directory, which will contain two components that will be rendered.
The first component will be TwoContainer.js, whose code is given below —
import React from "react";
import { connect } from "react-redux";
import { multiplyTwo } from "../redux";

function TwoContainer(props) {
  return (
    <div className="TwoContainer">
      <h1>{props.val_two}</h1>
      <h3>Click the button to multiply the above number by 2</h3>
      <button onClick={props.multiplyTwo}>Multiply by 2</button>
    </div>
  );
}

const mapStateToProps = (state) => {
  return {
    val_two: state.two.val_two,
  };
};

const mapDispatchToProps = (dispatch) => {
  return {
    multiplyTwo: () => dispatch(multiplyTwo()),
  };
};

export default connect(mapStateToProps, mapDispatchToProps)(TwoContainer);
The second component will be FiveContainer.js, whose code is given below —
import React from "react";
import { connect } from "react-redux";
import { multiplyFive } from "../redux";

function FiveContainer(props) {
  return (
    <div className="FiveContainer">
      <h1>{props.val_five}</h1>
      <h3>Click the button to multiply the above number by 5</h3>
      <button onClick={props.multiplyFive}>Multiply by 5</button>
    </div>
  );
}

const mapStateToProps = (state) => {
  return {
    val_five: state.five.val_five,
  };
};

const mapDispatchToProps = (dispatch) => {
  return {
    multiplyFive: () => dispatch(multiplyFive()),
  };
};

export default connect(mapStateToProps, mapDispatchToProps)(FiveContainer);
In the above codes, the mapStateToProps function has the following statements —
val_two: state.two.val_two and val_five: state.five.val_five.
Both the above statements are a key-value pair and the values are referring to the state’s keys two and five, defined in rootReducer.js.
Step 8
Finally, we’ll modify the App.js file into the following —
import React from "react";
import { Provider } from "react-redux";
import store from "./redux/store";
import TwoContainer from "./components/TwoContainer";
import FiveContainer from "./components/FiveContainer";
import "./App.css";

function App() {
  return (
    <Provider store={store}>
      <div className="App">
        <TwoContainer />
        <br />
        <FiveContainer />
      </div>
    </Provider>
  );
}

export default App;
Now, our exercise is complete and we can run the development server and check the result.
All the codes are also available in my GitHub repository which can be accessed using the following link —
souvik-pl/react_redux_combineReducers
References
https://redux.js.org/api/combinereducers
Documentation — Combine Reducers