Session Based Authentication
Session based authentication is the traditional way that websites keep track of logged in users and any data that is to be associated with the user''s current session.
When you send a login request to a website which uses session based authentication, the website verifies your login request, creates a unique identifier for your login session on their databases, and sends you the identifier. Any other relevant information needed for authentication, like the expiration date of the session is stored in the database as well.
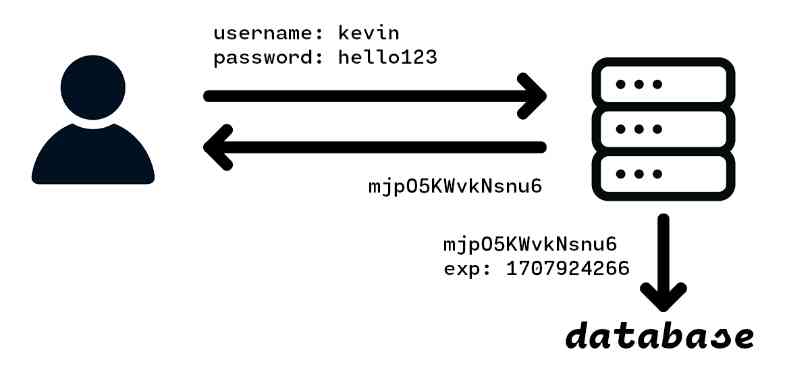
Now every time you make a request, the identifier is sent back to the server, which the server can compare to existing identifiers in their database to verify that you are logged in and able to make the request.
It''s a simple concept, and it does its job of identifying and authenticating specific users very well. The biggest problem for session based authentication is the usage of a database for storing identifiers: for each session that each user creates, an identifier will have to be created and inserted into a database on the backend. This poses a problem for both small and large scale projects.
In smaller scale projects, the developers will want to save on costs as much as possible, and will thus seek to minimize their usage of a database, which is usually provided by an external service like MongoDB or AWS DynamoDB.
For larger scale projects, the sheer amounts of users and sessions that are being created daily poses some very real concerns in terms of costs if an external database service is used, or scalability if an in-house database is used.
Token Based Authentication
In token based authentication, a token is created, signed by the server, and sent to the user, with the user being the sole party responsible for storing the token.
When you send a login request to a website which uses token based authentication, the website verifies your login request, creates a token which contains information on your identity along with a signature of that information, and sends you the token. No copy of the token is stored on the server.
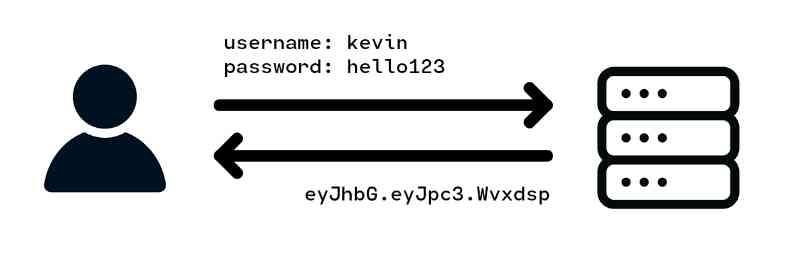
Now every time you make a request, the token is sent back to the server, which the server will verify based on the token''s information and signature in order to prove that the token is legitimate, and you are able to make the request.
Let''s dig deeper into the details of how token based authentication works, specifically using JSON Web Tokens.
JSON Web Tokens
JSON Web Tokens (JWTs) are comprised of three parts:
- The header, a JavaScript object which stores some information on the overall nature of the token and algorithm used to generate the signature.
- The payload, a JavaScript object which contains information relevant for authentication, like your username, and other information relevant for authentication, like the issuing date and expiration date of the token.
- The signature, which is a string that the server will generate based on the header and payload using a private key which only the server has access to.
The Header
The header of a JWT is an object which stores information on the overall nature of the token. A typical header looks like this:
const header = {
  alg: "HS256",
  typ: "JWT",
};
It''s not very important, and in almost all cases should be set to a default value and ignored.
In fact, if you trust the header too much and use information from the header, it may actually lead to a vulnerability where an attacker changes the signature algorithm to "no signature" (alg: "none"), in which case any token generated by the attacker without a signature attached will be considered valid.
The Payload
The payload of a JWT is an object which contains a variety of claims made by the server about the user, like the user''s username or some other identifier, as well as other information relevant for the use of the token, most importantly the expiration date (exp).
const payload = {
  iss: "liao.gg", // The issuer of the token, usually the website''s domain
  iat: 1704855890, // The issuing date in unix time
  exp: 1704859490, // The expiration date in unix time
  username: "kevin",
  permissions: ["admin"],
};
The Signature
The signature is the most important part of the token. It is created by encoding the header and payload in base64url form, concatenating with a dot ".", and then hashing or encrypting the resulting string with a secret key which only the server has access to.
The signature is integral for proving the authenticity of the token.
When you send the token back to the server, the first thing that the server will do is create a new signature based on the header and payload, and verify that the signature is the same as the one on the token. This proves to the server that the token is legitimate, as only the server has access to the private key and can generate the exact same signature as on the token.
If an attacker tries changing the header or payload, then the new signature generated by the server will be different than the one on the token. If the attacker tries changing the signature, they wouldn''t know what to change the signature to, as they do not have access to the private key.
The Token
The actual token is created by encoding the header and payload in base64url form, concatenating with a dot ".", generating the signature, and then concatenating the signature with the encoded header and payload with a dot ".".
If this sound a bit confusing to you, perhaps some code may help. This is how the .getToken() method is implemented in my jwt-km JSON Web Token library:

No worries if this is still a bit confusing as quite a bit of context is lacking; you can view the entire implementation in this 200 line file here. We''ll talk more about jwt-km later.
An example JWT looks like this:
eyJhbGciOiJIUzI1NiIsInR5cCI6IkpXVCJ9.eyJpc3MiOiJsaWFvLmdnIiwiZXhwIjoxNzA0NzY0Mzc2LCJpYXQiOjE3MDQ3NjA3NzYsInVzZXJuYW1lIjoia2V2aW4ifQ.Wvxdsp-ftlv9R97BELDBwwVN0H7rbN8P1JH9dBVzES8
Note that since the header and payload are JSON objects encoded in base64url form, this means that the contents of the header and payload are visible to anyone who has access to the token. For this reason, it is not recommended to put any private information in the header or payload.
For those who would like to keep the contents of their tokens a secret, they can choose to symmetrically encrypt the token using an algorithm like AES before sending the token to the user. However, for most use cases, this is unnecessary.
Advantages of Token Based Authentication
Token based authentication offer many advantages, most notably in database costs and in speed.
First and foremost, there is no need to use a database to keep track of sessions anymore when using token based authentication. The self-contained nature of JWTs means that the token can just be handed to the user without needing to store any other information. The days where billions of sessions will have to be stored on a database are now gone.
In addition, the lack of a database means using JWTs is faster than using session based authentication, especially if the website is using an external database as the server will no longer have to make a request to the database in order to verify the user''s identity.
Disadvantages of Token Based Authentication
The biggest disadvantage posed by token based authentication is the lack of a "logout" functionality. In a typical JWT based authentication implementation, once a token is issued, it will remain valid up until its expiration date.
This poses some security concerns: what if a user gets hacked and has their token stolen? When using session based authentication, the user can send a logout request to the server or change their password and have their session identifiers deleted from the server''s databases. However, with token based authentication, this is now impossible.
One solution is to store a "last password changed time" with each user''s account. Every time the user changes their password, the number will be set to the current time, and every time a user performs an action using their token, the issuing date will be checked to make sure that it is issued after the "last password changed time".
The obvious problem here is that we are once again leveraging the use of a database. However, one can argue that storing an additional "last password changed time" with each user in the credentials database is much less expensive than storing dozens of sessions that each user may create.
Create JSON Web Tokens using the jwt-km Library
So how does one get started with using JSON Web Tokens in their next project?
Luckily for you, I''ve created my own simple and modern JWT library called jwt-km which you can use.
But why jwt-km? Well, there are actually a lot of libraries for JWTs out there, but all of them are libraries which were written years ago, and are now full of slow, outdated, and complex code. I wasn''t happy with any of the current libraries available, so I decided to write my own.
jwt-km is built upon the principles of simplicity and ease of use. The library has zero external dependencies, zero bloat, and in fact, the entire library is self contained inside a 200 line TypeScript file. In addition, there is no error handling, native TypeScript support, and lots of detailed documentation.
To get started, install jwt-km using npm:
npm install jwt-km
Create a new file, and import the JWT class and optionally the unixTime() helper function from jwt-km. Then, to create your first token, simply call the JWT constructor with the issuer name (iss) and expiration date (exp). In this case, the token is set to expire 1 hour, or 60 * 60 seconds from now.
import JWT, { unixTime } from jwt-km;

const jwt = new JWT("your.website.url", unixTime() + 60 * 60);
To add additional claims to the payload of the token, use the .addClaim() method. To get claims, use the .getClaim() method.
jwt.addClaim("username", "kevin");
jwt.addClaim("permissions", ["view", "comment"]);
assert(jwt.getClaim("username") === "kevin");
Finally, to get the actual token, use the .getToken() method along with a secret key. For optimal security, the secret key should be a hex string at least 64 characters long. Read more about how to choose a secret key in the repository page.
const secret = "AE58E5F3DD99579B"; // Use a longer secret in your project

const token = jwt.getToken(secret);
console.log(token);
Now that you''ve successfully generated a token, you can send it to the user.
To get a JWT object back from a user provided token, use the JWT.fromToken() static method. If the token is inconsistent with our secret, then null will be returned. Otherwise, you will receive back a JWT object with identical claims to that of the token.
const userJwt = JWT.fromToken(token, secret);
if(userJwt === null) {
  console.log("Invalid token!");
} else {
  console.log(userJwt.getClaim("username"));
}
There are several other methods in the JWT class, like the JWT.expired() static method which you can use to quickly check if a token is valid and unexpired. If you would like to learn more about the jwt-km library, please checkout the repository page here:
https://github.com/kevinMEH/jwt-km
And that''s it for today! I hope you enjoyed this simple and comprehensive introduction to token based authentication and JWTs.
If you enjoyed this tutorial, consider following me on GitHub and Medium. Until next time!
Comments
Loading comments…