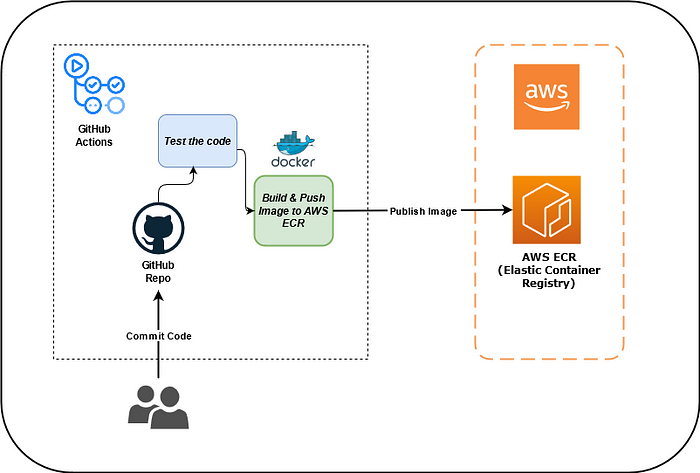
In this blog post, I'll explain to you how to build & push docker images to AWS ECR (Elastic Container Registry) using GitHub Actions.
Pre-Requisites
- Must have AWS Account (Free tier/AWS Educate)
- Must have prior knowledge of Docker and building docker image.
- Basic knowledge of GitHub Actions, CI/CD, YAML format, and remote environment.
- Must have prior knowledge of GitHub and commands of Git.
Getting Started
First of all, build the application on your local environment and then create a repository in GitHub or you may also use your old repository.
Make Docker File
Now, you've to make a docker file for your application, so that you can use it to build the docker image.
Configuring the GitHub Actions
Now, it's time to configure the GitHub Actions. For the Image building and pushing it to AWS ECR, we are going to use a great tool from GitHub called GitHub Actions. But before directly get started with the actual configuration I'll explain to you a little bit about workflow and job.
So, A workflow is a collection of job definitions that will be executed concurrently as well as sequentially. A job consists of several steps of instructions that the remote system follows for performing the action. In this pipeline services, whenever an action is triggered, a temporary machine is allotted to the specific build task which works as per the instructions/steps mentioned in your workflow file.
In this project, the workflow actions are supposed to build the image of my application on my behalf using Dockerfile and push that image into the remote registry i.e AWS ECR.
Steps to configure the GitHub Actions are as follows:
Step:1 Go to your GitHub repository and click on the 'Actions' menu.
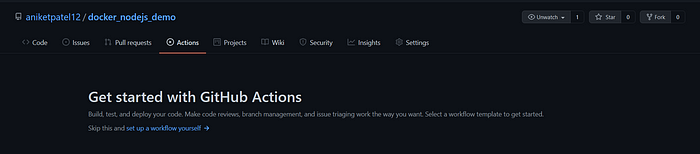
Step:2 Here you can use pre-written workflow templates or you can create your custom workflow. Now, Click on the set-up a workflow yourself (As I'm going to create my own custom workflow)
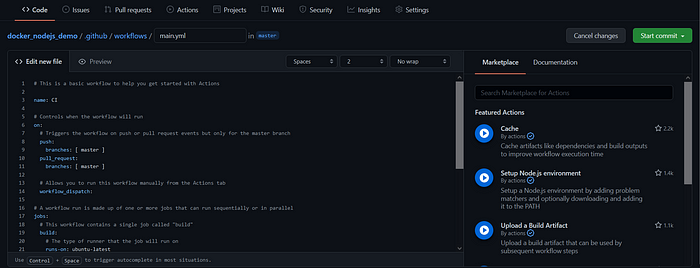
Step:3 Write the file name in the input box and then click on the 'start commit' and make a successful commit.
Now, you've .github/workflow/your_file_name.yml inside your repository. This your_file_name.yml contains the set of instructions that the Workflow will execute. Here deploy.yml is the file that you need:
name: Deploy to ECR

# Controls when the workflow will run

on:

# Triggers the workflow on push or pull request events but only for the master branch

#workflow_dispatch
push:
branches: [main]

jobs:

build:
  name: Build Image
  runs-on: ubuntu-latest

  # Steps represent a sequence of tasks that will be executed as part of the job
  steps:
    - name: Check out code
      uses: actions/checkout@v2

    - name: Configure AWS credentials
      uses: aws-actions/configure-aws-credentials@v1
      with:
        aws-access-key-id: ${{ secrets.AWS_ACCESS_KEY_ID }}
        aws-secret-access-key: ${{ secrets.AWS_SECRET_ACCESS_KEY }}
        aws-region: eu-central-1

    - name: Login to Amazon ECR
      id: login-ecr
      uses: aws-actions/amazon-ecr-login@v1

    - name: Build, tag, and push image to Amazon ECR
      env:
        ECR_REGISTRY: ${{ steps.login-ecr.outputs.registry }}
        ECR_REPOSITORY: opencms
        IMAGE_TAG: latest
      run: |
        docker build -t $ECR_REGISTRY/$ECR_REPOSITORY:$IMAGE_TAG .
        docker push $ECR_REGISTRY/$ECR_REPOSITORY:$IMAGE_TAG
(Note: This deploy.yml must have a proper indentation and you can make changes according to your choice)
Let's understand this file first.
Steps: Steps represent a sequence of tasks that will be executed as part of the job steps
Job-1: Create a Ubuntu remote environment/Runner where the workflow can run and build the Image.
##Only execute the github actions when main branch has a new release.
push:
branches: [ main ]
##It's the "manual execution" This command show a button to execute the github action manually.
workflow_dispatch
Job-2: Name: Check out code
Log in to the Remote Machine via SSH using the pre-written workflow by Official GitHub Actions i.e Checkout. It simply checks out our GitHub repository for 'Dockerfile' to build the docker image.
Job-3: Name: Configure AWS Credentials
Setting up AWS CLI/SDK on Remote Host and Configuring AWS Login Credentials and Assuming Roles using the pre-written workflow by Official AWS Teams i.e Configure AWS Credentials. For accessing the AWS ECR we need to define a custom Role in later steps.
Job-4: Name: Build, tag, and push the image to Amazon ECR
Building the Docker Image by copying using the Code in our Repository (Dockerfile), Tagging the Image with a version, and Pushing it to an Elastic Container Registry (Private ECR). (Will make in later steps). The commands to do the above-mentioned tasks are written in the RUN which will be executed in the bash of Remote Machine.
Step:4 Create one AWS ECR repository
First all of go to the AWS Management Console and search "ECR" in the search menu and click on the "Elastic Container Registry". Then click on create a repository and choose private and then write your repository name into the given input field and create a repository.

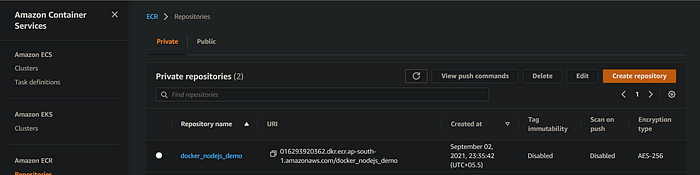
After creating your ECR repository, go back to your deploy.yml file and edit the field 'ECR_REPOSITORY', and enter the name of your ECR_REPOSITORY.
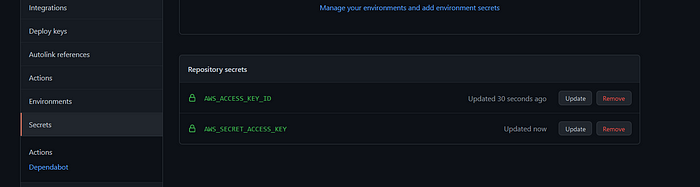
Step: 5 Add your AWS secrets to GitHub secrets.
In order to access your AWS ECR registry, you've to add your AWS secrets (AWS_ACCESS_KEY_ID and AWS_SECRET_ACCESS_KEY).
Since these are credentials we can't reveal them in public hence need to set them as Environment Variables which are hidden and secured in the environment. So, go to the setting menu of your repository and in that click on 'secrets'.
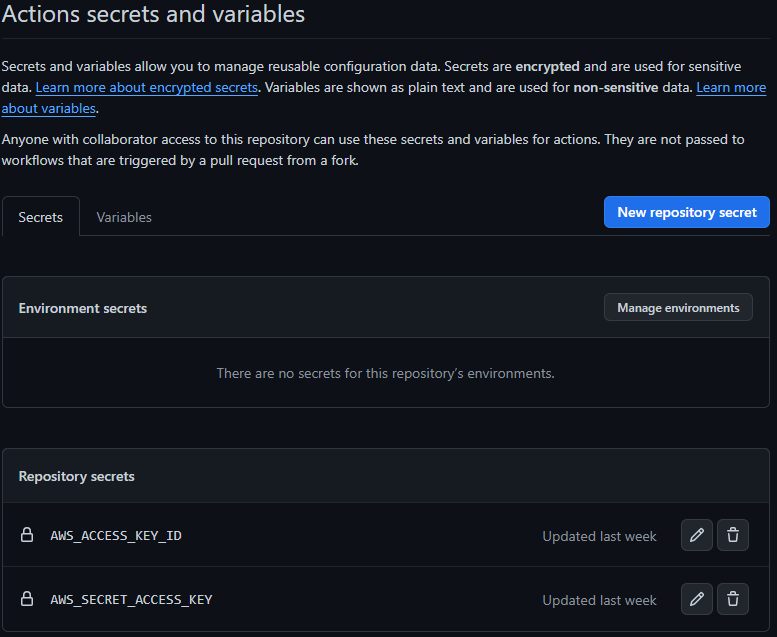
Then simply add AWS_ACCESS_KEY_ID and AWS_SECRET_ACCESS_KEY to your IAM user.
(Note: Make sure that your IAM user has proper valid IAM permissions. Your IAM user must have "AmazonEC2ContainerRegistryFullAccess" IAM permissions.)
Step: 6 Monitoring, Building, and Pushing
We've almost completed all the steps. Now,
- Make a commitment to your repository.
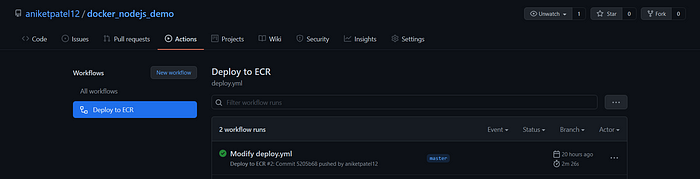
- Once the changes are pushed to the repository, check out the 'Actions' tab in your repository.
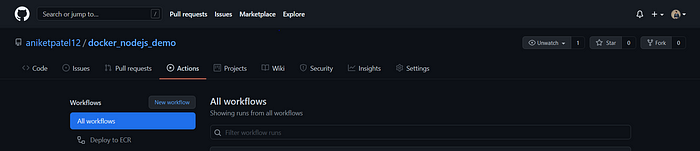
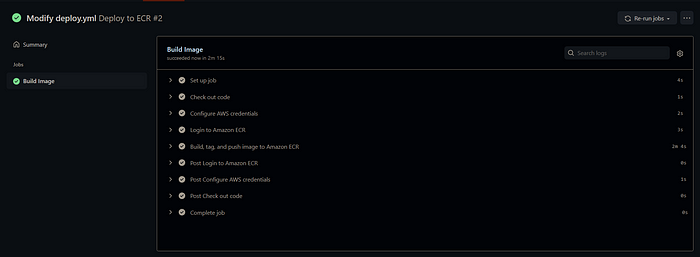
- Here you can see that new action has started which is indicated by the yellow color indicator. Here you can see the build logs where each tab shows the current task and on expanding each tab you can see its logs.
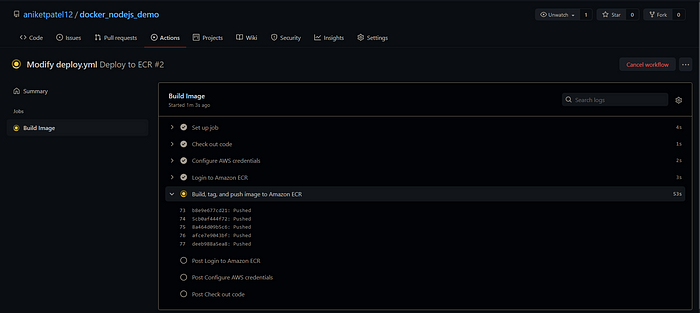
- Now you have to wait until the whole process completely and make sure no errors occur in-between. (If you get an error in the 5th task, in all probability you've made a mistake in AWS ECR User Account Creation/Credentials Setup. Make sure you check the job logs by clicking on them.)
And in case if you get an error in the 5th task, you might have probably messed up in the AWS ECR User Account creation setting.
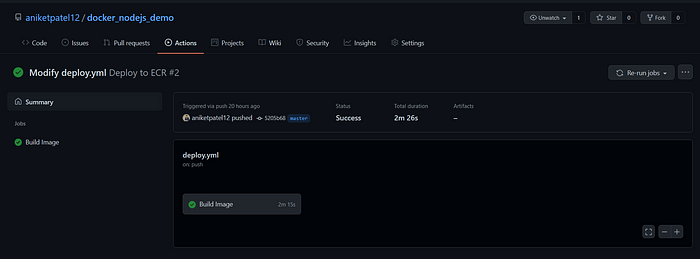
¡All it's done! Enjoy your new deployment and save time with this automation 🏗.
Comments
Loading comments…