
Introduction:
Blockchain technology has revolutionized the way we think about data management and security. Originally created for the digital currency Bitcoin, blockchain has evolved into a technology with far-reaching applications across various industries. In this blog post, we will delve into the fundamentals of blockchain, its underlying principles, and its potential implications for the future.
What is Blockchain? At its core, a blockchain is a decentralized, distributed ledger that records transactions across a network of computers. Each transaction is stored in a “block,” which is then added to a chain of blocks, creating a chronological record of transactions. This chain is maintained by a network of nodes, or computers, that validate and record transactions through a consensus mechanism.
Key Features of Blockchain:
- Decentralization: Unlike traditional centralized systems, blockchain operates on a decentralized network, eliminating the need for a central authority to validate transactions.
- Transparency: Transactions on a blockchain are transparent and can be viewed by all participants, ensuring accountability and trust.
- Security: Blockchain uses cryptographic techniques to secure transactions, making it virtually impossible to alter or tamper with the data.
- Immutability: Once a transaction is recorded on the blockchain, it cannot be changed or deleted, ensuring the integrity of the data.
Let’s Build Application:
Blockchain technology has captured the imagination of tech enthusiasts and innovators worldwide, promising a decentralized and transparent future. One of the most exciting applications of blockchain is in certificate issuance and verification. Imagine a world where academic credentials, professional certifications, and other important documents are securely stored and easily verifiable without the need for intermediaries. In this tutorial, we will embark on a journey to build a basic blockchain application using Node.js, bringing us one step closer to realizing this vision.
Setting Up Your Environment:
Before we begin, make sure you have Node.js installed on your machine. You can download it from the official Node.js website (https://nodejs.org/).
- Create a new directory for your project and navigate into it.
- Initialize a new Node.js project by running
npm init -yin the terminal. - Install necessary dependencies:
npm install express crypto-js body-parser ejs
Create Your Blockchain Class:
- Create a new file named
blockchain.jsand define yourBlockandBlockchainclasses:
const SHA256 = require("crypto-js/sha256");

class Block {
  constructor(index, timestamp, data, previousHash = "") {
    this.index = index;
    this.timestamp = timestamp;
    this.data = data;
    this.previousHash = previousHash;
    this.hash = this.calculateHash();
  }

  calculateHash() {
    return SHA256(
      this.index +
        this.previousHash +
        this.timestamp +
        JSON.stringify(this.data)
    ).toString();
  }
}

class Blockchain {
  constructor() {
    this.chain = [this.createGenesisBlock()];
  }

  createGenesisBlock() {
    return new Block(0, new Date().toString(), "Genesis Block", "0");
  }

  getLatestBlock() {
    return this.chain[this.chain.length - 1];
  }

  addBlock(newBlock) {
    newBlock.previousHash = this.getLatestBlock().hash;
    newBlock.hash = newBlock.calculateHash();
    this.chain.push(newBlock);
  }

  isChainValid() {
    for (let i = 1; i < this.chain.length; i++) {
      const currentBlock = this.chain[i];
      const previousBlock = this.chain[i - 1];

      if (currentBlock.hash !== currentBlock.calculateHash()) {
        return false;
      }

      if (currentBlock.previousHash !== previousBlock.hash) {
        return false;
      }
    }
    return true;
  }
}

module.exports.Blockchain = Blockchain;
module.exports.Block = Block;
Create Your Express Application:
- Create a new file named
index.jsand set up your Express application:
const express = require("express");
const bodyParser = require("body-parser");
const { Blockchain, Block } = require("./blockchain");

const app = express();
const port = 3000;

app.use(express.static(__dirname + "/public"));
app.set("view engine", "ejs");
app.use(bodyParser.urlencoded({ extended: true }));
app.use(express.static("public"));

let blockchain = new Blockchain();

app.get("/", (req, res) => {
  res.render("index", { certificateId: null });
});

app.post("/issue-certificate", (req, res) => {
  const { recipient, certificateName } = req.body;
  const certificateId = generateCertificateId();
  const newBlock = new Block(blockchain.chain.length, new Date().toString(), {
    certificateId,
    recipient,
    certificateName,
  });
  blockchain.addBlock(newBlock);
  console.log(newBlock);
  res.render("index", { certificateId });
});

app.get("/verify-certificate/", (req, res) => {
  res.render("verify", { isValid: null });
});

app.get("/blocks", (req, res) => {
  res.json(blockchain.chain);
});

app.post("/verify-certificate", (req, res) => {
  const { certificateId } = req.body;
  const block = blockchain.chain.find(
    (block) => block.data.certificateId === certificateId
  );
  const isValid = block !== undefined;
  res.render("verify", { certificateId, isValid });
});

function generateCertificateId() {
  return Math.random().toString(36).substring(2, 10);
}

app.listen(port, () => {
  console.log(`App listening at http://localhost:${port}`);
});
Create Your EJS Views:
- Create a
viewsdirectory and within it, createindex.ejs.
<!DOCTYPE html>
<html lang="en">

<head>
  <meta charset="UTF-8" />
  <meta http-equiv="X-UA-Compatible" content="IE=edge" />
  <meta name="viewport" content="width=device-width, initial-scale=1.0" />
  <title>Certification Platform</title>
  <link rel="stylesheet" href="style.css">
</head>

<body>
  <form method="post" action="/issue-certificate" id="form" class="validate form">
    <h2>Certification Platform</h2>
    <p>Enter Details to issue certificate</p>
    <div class="form-field">
      <label for="recipient">Recipient Name:</label>
      <input type="text" id="recipient" name="recipient" required />
    </div>
    <div class="form-field">
      <label for="certificateName">Certificate Name:</label>
      <input type="text" id="certificateName" name="certificateName" required />
    </div>
    <div class="form-field">
      <input type="submit" value="Issue Certificate" />
    </div>
    <div class="crtid">
      <% if (certificateId) { %>
        <p class="btn">Certificate Id: <%= certificateId %>
        </p>
        <% } %>
    </div>
    <div class="links">
      <a class="back" href="/verify-certificate">Verify Certificate</a>
    </div>
  </form>

</body>

</html>
- Create a
verify.ejsfile inside views directory.
<!DOCTYPE html>
<html lang="en">

<head>
  <meta charset="UTF-8" />
  <meta http-equiv="X-UA-Compatible" content="IE=edge" />
  <meta name="viewport" content="width=device-width, initial-scale=1.0" />
  <title>Verify Certificate</title>
  <link rel="stylesheet" href="./style.css">
</head>

<body>
  <form method="post" action="/verify-certificate" id="form" class="validate form">
    <h2>Verify Certificate</h2>
    <p>Enter Certificate Id to verify</p>
    <div class="form-field">
      <label for="certificateId">Certificate Id : </label>
      <input type="text" placeholder="Enter certificate Id" id="certificateId" name="certificateId" required />
    </div>
    <div class="form-field">
      <label for=""></label>
      <input type="submit" value="Verify Certificate" />
    </div>
    <div class="crtverify">
      <% if (isValid !=null) { %>
        <p class="<%= isValid ? 'green btn' : 'red btn' %>">Valid: <%= isValid ? 'Yes' : 'No' %>
        </p>
        <% } %>
    </div>
    <div class="links">
      <a class="back" href="/">Back</a>
    </div>
  </form>
</body>

</html>
- Create a
publicdirectory and within it, createstyle.css.
@import url('https://fonts.googleapis.com/css?family=Raleway:400,700');

body {
  background: #c0c0c0;
  font-family: Raleway, sans-serif;
  color: #666;
}

.form {
  margin: 20px auto;
  padding: 40px 50px;
  max-width: 300px;
  border-radius: 5px;
  background: #fff;
  box-shadow: 1px 1px 1px #666;
}

.form input {
  width: 100%;
  display: block;
  box-sizing: border-box;
  margin: 10px 0;
  padding: 14px 12px;
  font-size: 16px;
  border-radius: 2px;
  font-family: Raleway, sans-serif;
}

.form input[type=text],
.form input[type=password] {
  border: 1px solid #c0c0c0;
  transition: .2s;
}

.form input[type=text]:hover {
  border-color: #F44336;
  outline: none;
  transition: all .2s ease-in-out;
}

.form input[type=submit] {
  border: none;
  background: #EF5350;
  color: white;
  font-weight: bold;
  transition: 0.2s;
  margin: 20px 0px;
  cursor: pointer;
}

.form input[type=submit]:hover {
  background: #F44336;
}

.form h2 {
  margin: 20px 0 0;
  color: #EF5350;
  font-size: 28px;
}

.form p {
  margin-bottom: 40px;
}

.links {
  display: table;
  width: 100%;
  box-sizing: border-box;
  border-top: 1px solid #c0c0c0;
  margin-bottom: 10px;
}

.links a {
  display: table-cell;
  padding-top: 10px;
}

.links a:first-child {
  text-align: left;
}

.links a:last-child {
  text-align: right;
}

.form h2,
.form p,
.form a {
  text-align: center;
}

.form a {
  text-decoration: none;
  font-size: .8em;
}

.form a:visited {
  color: inherit;
}

.form a:hover {
  text-decoration: underline;
}


.form .btn {
  border: none;
  background: green;
  color: white;
  font-weight: bold;
  transition: 0.2s;
  margin: 20px 0px;
  width: 100%;
  display: block;
  box-sizing: border-box;
  margin: 10px 0;
  padding: 14px 12px;
  font-size: 16px;
  border-radius: 2px;
  font-family: Raleway, sans-serif;
}

.form .btn:hover {
  background: rgb(71, 150, 71);
}

.red {
  background-color: red !important;
  color: white;
}
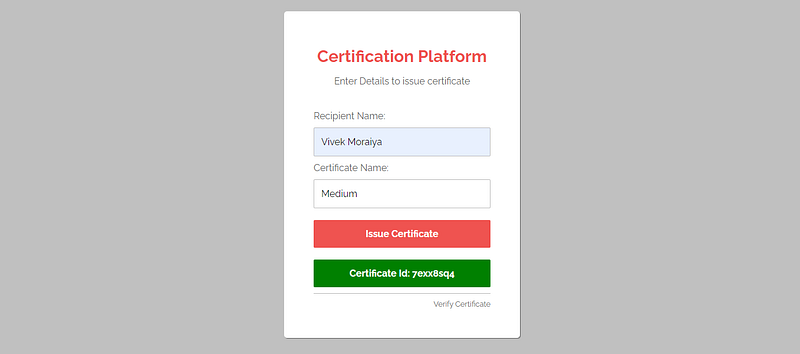
Now let's access the application:
Start the application using node index.js, Enter the recipient name and certificate name, and you will get the certificate id, copy this certificate id.
Paste the copied certificate id in the “/verify-certificate” route, if the certificate is valid then you will get yes otherwise you will get no.

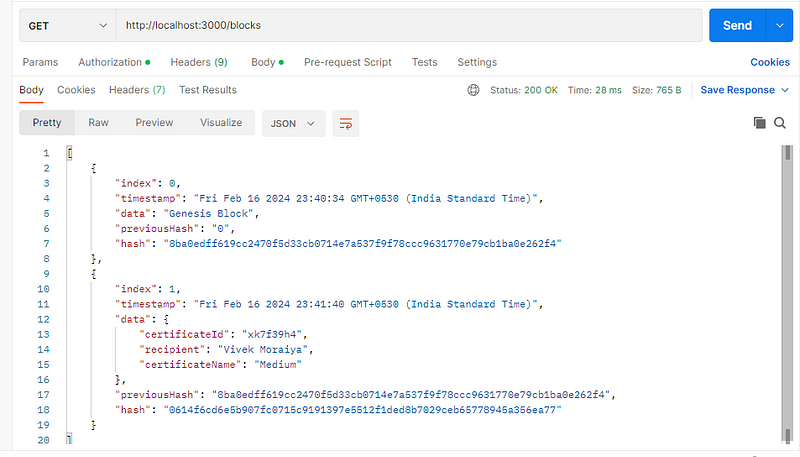
Access the “/blocks” route to check all blocks.
Congratulations! You have successfully created a basic blockchain application using Node.js. You can further expand this application by adding more features and consensus algorithms to make it more robust and secure.
Future Outlook:
Despite these challenges, the potential of blockchain technology is vast. As the technology continues to evolve, we can expect to see more innovative use cases and applications across various industries, revolutionizing the way we interact with data and conduct transactions.
Conclusion:
Blockchain technology has the potential to transform industries and revolutionize the way we think about data and transactions. By providing a secure, transparent, and decentralized way to record and verify transactions, blockchain is paving the way for a more efficient and secure digital future. As the technology continues to evolve, it will be exciting to see how blockchain shapes the world around us.
To access the full code of the certificate issuance application with Node.js code, visit my GitHub repository.
Thank you for reading! We hope this tutorial has been informative and inspiring for your blockchain development journey. please subscribe to me for more such blogs.