In this guide, we’ll walk through the steps to deploy a Node.js application container on Amazon ECS, a managed service by AWS for deploying, managing, and scaling containerized applications.
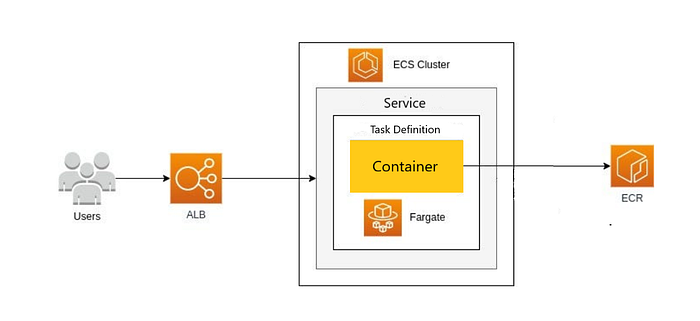
We will be using the hello-world node application available here. Firstly, we will be containerizing our application and creating the Docker images. We will be utilizing Amazon ECR, which is a managed service offered by AWS to store and manage container images in a secure and reliable manner.
Step 1: Create ECR Repo
Begin by navigating to the AWS Management Console and searching for Amazon ECR. Create a new public repository and name it “node-hello-world”. Click “create” while keeping all other settings as default.

Step 2: Download the code and create Docker images
Clone the code from here and run the below command to start building the docker image.
docker build -t node-hello-world:latest .
Login to the ECR repository using the provided login command:
aws ecr-public get-login-password --region us-east-1 | docker login --username AWS --password-stdin public.ecr.aws/m9h7v0h3
Tag the Docker image with the ECR repository image:
docker tag node-hello-world:latest public.ecr.aws/m9h7v0h3/node-hello-world:latest
Finally, push the image to the ECR repository:
docker push public.ecr.aws/m9h7v0h3/node-hello-world:latest
Once the image is successfully pushed, proceed to create a load balancer for the application.
Step 3: Create an Application Load Balancer
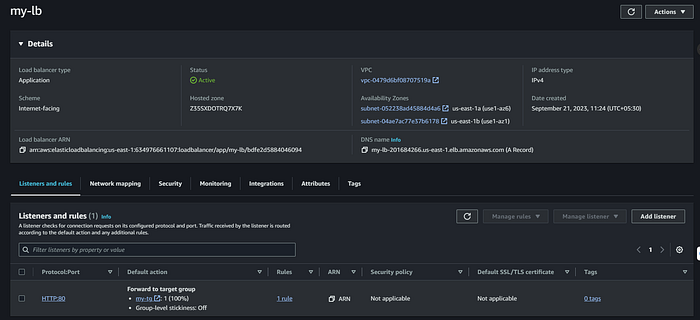
In the AWS console, search for the load balancer and create an application load balancer with the following configurations:
▪ Name: my-lb
▪ Scheme: Internet facing
▪ IP address type: IPV4
▪ Select the VPC and subnet mapping where your load balancer has to route the traffic
▪ Select the security group (Allow the traffic on port 80 or 443 from internet)
▪ Keep the listener on HTTP Port 80 and create a target-group (Where our application will be running)
Creating a target group
▪ Target type: IP address
▪ Target group name: my-tg
▪ Protocol: HTTP on PORT: 3000
▪ IP type: IPv4
▪ Select VPC, Keep everything as default and click next
▪ In register targets screen, we don’t have to do anything as we don’t have targets created as of now.
▪ Create target group
▪ Select the created target group in load balancer screen
▪ Create load balancer
Once load balancer is created, it will give you DNS to access your application via ALB which will balance the traffic across all the targets registered in our target group.

Step 4: Create ECS Cluster
In the AWS console, search for ECS and create a new ECS cluster.
▪ Name: myCluster
▪ Infrastructure: AWS fargate(serverless)

Keep the rest of the thing as it is and click create

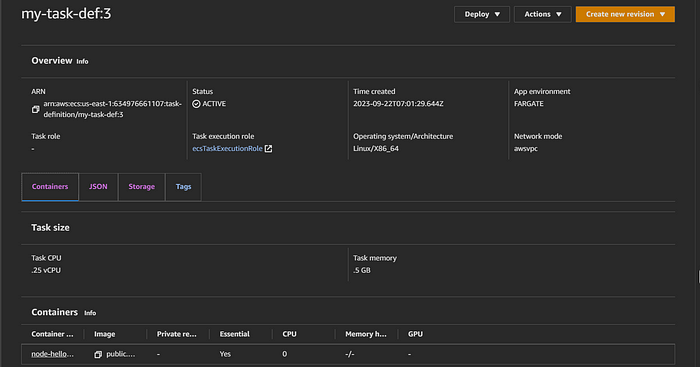
Step 5: Create task-definition
With the ECS cluster ready, create a task definition to use for creating services inside the cluster. From the ECS page, click on task definition from the left panel and create a new task definition with the following details:
Create new task definition with the following details.
- Name: my-task-def
- Launch Type: AWS fargate
- Operating System: Linux/x86_64
- Task size: 0.5 CPU and 1 GB Memory
- Keep task role as it is
- Under container — 1, enter name “node-hello-world” which is a ECR repo name and in image URL enter ECR repo url “public.ecr.aws/m9h7v0h3/node-hello-world”.
- Container port should be 3000 as our application is configured to run on this port.
- Keep rest of the things as it is and click create.
Step 6: Create an ECS service
As our task is created, let’s head over to ECS cluster and create a service from our task definition. Go to your cluster and inside it click on create service and add the following specifications.
- Compute Options: Launch Type
- Lsunch Type: Fargate with version latest
- Application Type: Service
- Under task definition family, select your task definition with latest version
- Service name: my-ecs-service
- Service Type: Replica
- Desired tasks: 1
- Keep deployment options as it is
- Under networking, select the desired VPC and subnets where we want to run our containers. Make sure that subnet you are selecting here was also selected in target group then only load balancer will be able to direct traffic to this service.
Create a new security group which will expose port 3000 of this service and which is accessible only by the load balancer security group.
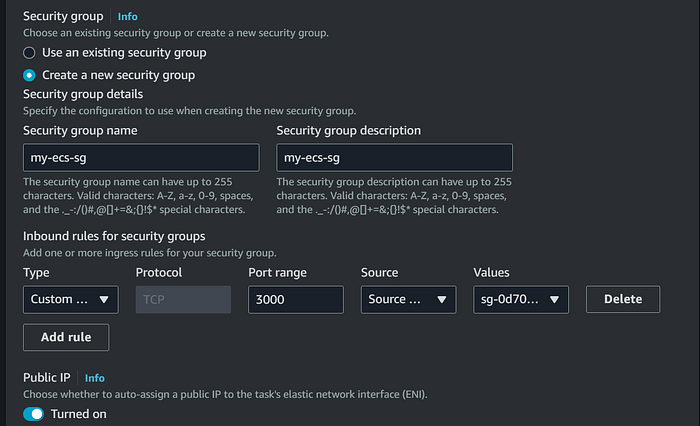
- Enable Public IP
- Under load balancer, select your already created application load balancer, listener and target group.

Keep rest as default, click create, and wait till the service deployment becomes green.

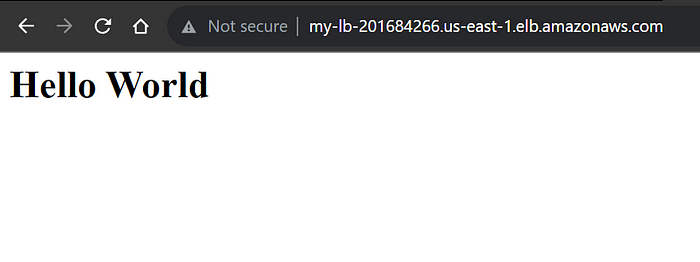
Step 7: Check the application
Open the load balancer and check the application status. Your application is now successfully running and deployed on ECS Fargate.
Conclusion
Congratulations! You’ve successfully deployed a Node.js application container on Amazon ECS and balanced the traffic across your targets using a load balancer. Thanks, and have a great day!
Comments
Loading comments…