Introduction
This story will serve as your trusty companion as we journey through the many facets of container deployment. From the initial steps of installing Docker and Docker Desktop on your Mac to crafting a Node.js application, creating a Dockerfile, and mastering essential Docker commands, we’ll build a robust foundation for your cloud-based aspirations.
But our exploration doesn’t end there. We’ll navigate the AWS realm, guiding you through the process of creating an EC2 instance, establishing a secure connection, installing Docker, and preparing it for the impending deployment. You’ll gain insights into moving your Docker image to Amazon ECR, an AWS-managed container registry, and we’ll demonstrate how to create an Identity and Access Management (IAM) role, attaching it to your EC2 instance for a secure and well-orchestrated operation.
Lastly, we’ll ensure your application finds its way from the repository to your EC2 instance, paving the path for you to execute and manage your application in the AWS cloud environment.
By the end of this journey, you will have the knowledge and expertise to confidently deploy your Node.js application using Docker on AWS, unlocking the true potential of cloud-native development. Let’s dive into the world of Docker deployment, Amazon ECR, and Amazon EC2, and discover the power they offer to your projects.

Install Docker
I will show you how to install Docker on Macbook (My Macbook is M1).
Go here and choose Docker Desktop for Mac with Apple silicon, If you have Intel chip choose Docker Desktop for Mac with Intel chip .
Beginning with Docker Desktop 4.3.0, we have removed the hard requirement to install Rosetta 2. There are a few optional command line tools that still require Rosetta 2 when using Darwin/AMD64. See Known issues. However, to get the best experience, we recommend that you install Rosetta 2. To install Rosetta 2 manually from the command line, run the following command:
softwareupdate --install-rosetta
Install and run Docker Desktop on Mac
- Double-click
Docker.dmgto open the installer, then drag the Docker icon to the Applications folder. - Double-click
Docker.appin the Applications folder to start Docker. - The Docker menu displays the Docker Subscription Service Agreement.
Here’s a summary of the key points:
- Docker Desktop is free for small businesses (fewer than 250 employees AND less than $10 million in annual revenue), personal use, education, and non-commercial open source projects.
- Otherwise, it requires a paid subscription for professional use.
- Paid subscriptions are also required for government entities.
- The Docker Pro, Team, and Business subscriptions include commercial use of Docker Desktop.
4. Select Accept to continue.
Note that Docker Desktop won’t run if you do not agree to the terms. You can choose to accept the terms at a later date by opening Docker Desktop.
For more information, see Docker Desktop Subscription Service Agreement. Recommend that you also read the FAQs.
5. From the installation window, select either:
Use recommended settings (Requires password). This let’s Docker Desktop automatically set the necessary configuration settings. Use advanced settings. You can then set the location of the Docker CLI tools either in the system or user directory, enable the default Docker socket, and enable privileged port mapping. See Settings, for more information and how to set the location of the Docker CLI tools.
6. Select Finish. If you have applied any of the above configurations that require a password in step 5, enter your password to confirm your choice.
Node.js application
I have a simple Node.js application here Go to your terminal and follow these steps:
git clone https://github.com/srebreni3/simple-nodejs-app
Then navigate into the project directory.

Go to your code editor, and you need to see this:
We have app.js, package.json and Dockerfile, it''s all we need.
Dockerfile
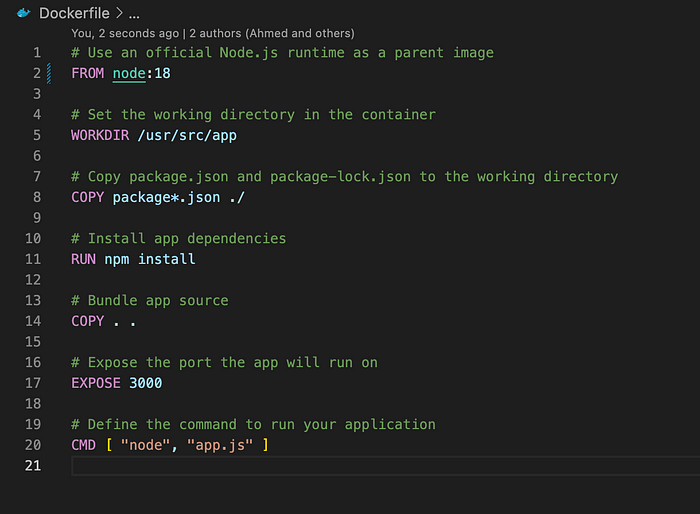
This Dockerfile is used to create a Docker image for a Node.js application.
1. FROM node:18
- This line specifies the base image for your Docker image. It uses an official Node.js image with version 18 as the parent image. This image provides a pre-configured Node.js environment, which is suitable for running Node.js applications.
2. WORKDIR /usr/src/app
- This sets the working directory within the Docker container to
/usr/src/app. All subsequent commands will be executed in this directory.
3. COPY package*.json ./
- This line copies the
package.jsonandpackage-lock.jsonfiles from your host machine (the directory where you rundocker build) to the working directory in the container (/usr/src/app). These files contain information about your Node.js application''s dependencies.
4. RUN npm install
- After copying the package files, this command runs
npm installin the container. It installs the dependencies specified in yourpackage.jsonandpackage-lock.jsonfiles. This step ensures that all the required Node.js modules are installed in the container.
5. COPY . .
- This line copies the rest of the application code from your host machine to the working directory in the container. It includes your application’s source code, such as JavaScript files, HTML, CSS, or any other assets.
6. EXPOSE 3000
- This instruction specifies that the container will expose port 3000. It doesn’t actually publish the port; it’s a documentation step to indicate which port your application listens on. You would still need to publish this port when running the container with the
-poption.
7. CMD [ "node", "app.js" ]
- This is the command that will be executed when a container based on this image is started. It runs the Node.js application by invoking the
nodecommand with the entry point fileapp.js. In this case, it assumes that your application''s entry point is anapp.jsfile.
Once you build an image using this Dockerfile and run a container from it, your Node.js application will be up and running inside the container. The application will listen on port 3000, as specified by the EXPOSE instruction. You can then use Docker to manage and deploy your application in a consistent and isolated environment.
Commands
First of all, you need to run this commands docker images and docker ps.
docker images - If you want to check docker images on your PC docker ps - If you want to check docker containers on your PC

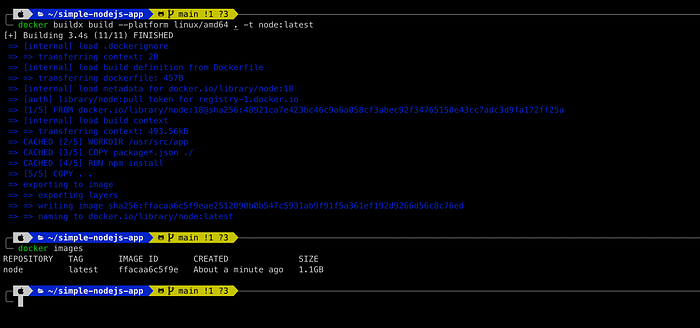
docker buildx build --platform linux/amd64 . -t node:latest This Docker command is used to build a Docker image named "node:latest" for the Linux AMD64 architecture, based on the instructions in a Dockerfile located in the current directory. The resulting image will be tagged as the latest version of a Node.js image.
You can check if we have any docker images with command docker image
The command docker container run -d --name node --publish 3000:3000 node:latest is used to run a Docker container from the "node" image in detached mode.
This Docker command is used to run a Docker container with the following characteristics:
docker container run: This is the main part of the command, instructing Docker to create and run a container based on an image.-d: It''s a flag that runs the container in "detached" mode, which means the container runs in the background, and you get your terminal prompt back for other commands.--name node: This flag sets the name of the container to "node." Containers can be identified by names, making them easier to manage.--publish 3000:3000: This flag is used to publish or map ports from the host to the container. It maps port 3000 on the host to port 3000 in the container, allowing you to access services running inside the container viahttp://localhost:3000on your host machine.node:latest: This is the Docker image to be used for creating the container. In this case, it specifies the "node" image with the "latest" tag.
In summary, this command runs a Docker container based on the “node:latest” image, names the container “node,” runs it in the background, and maps port 3000 on the host to port 3000 in the container for web service access.
You can check if you have any docker containers with command docker ps
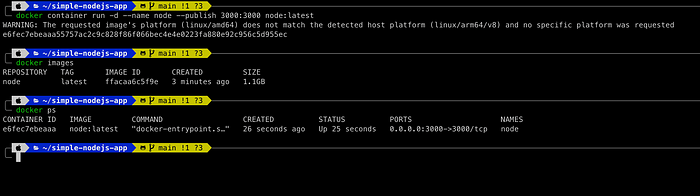
You can see, there is one container with ID e6fec7ebeaaa.
Go to your browser and type localhost:3000, you need to see your application.

Create EC2 instance on AWS
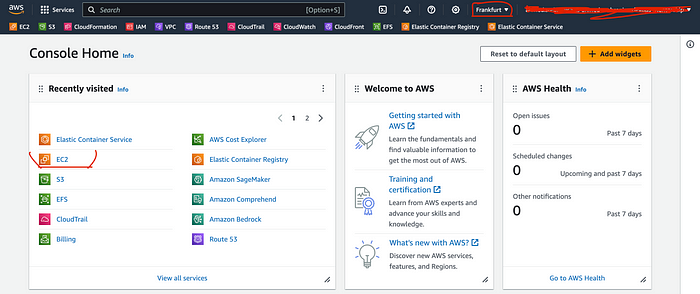
- Choose region, I will use
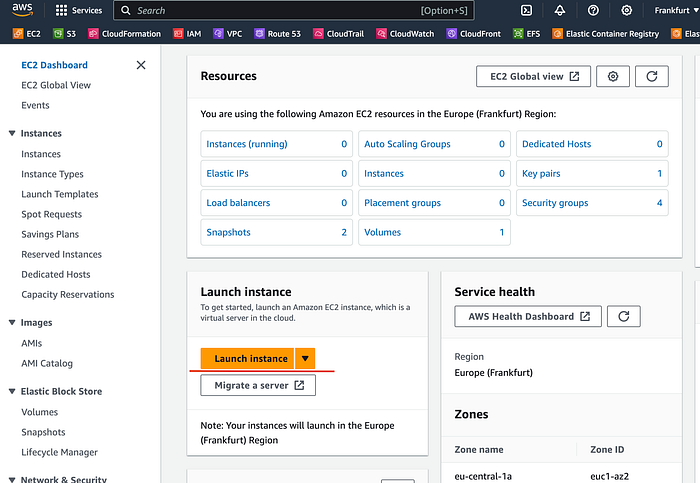
eu-central-1and go toEC2
2. Choose Launch instance
3. Name the instance and choose Amazon Linux 2023 AMI

4. Leave everything default except key pair. We need to create new key pair.
Choose Create new key pair

Name it and leave everything default and create key pair.

Your key pair will be downloaded to your local machine.
5. Now you need to create Security group for our EC2 instance. Go back to EC2 dashboard and choose Security groups.
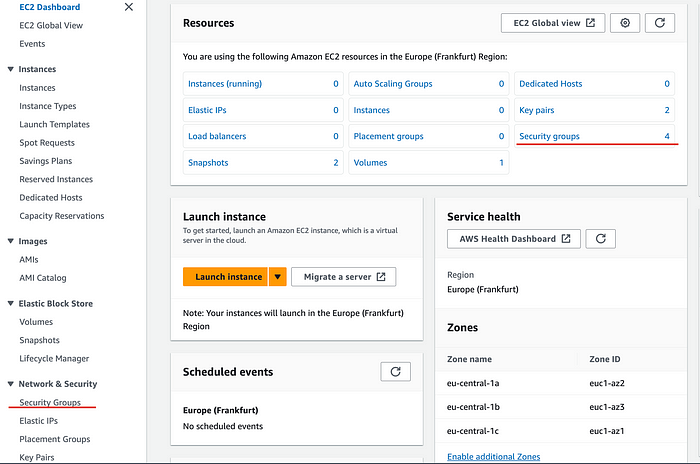
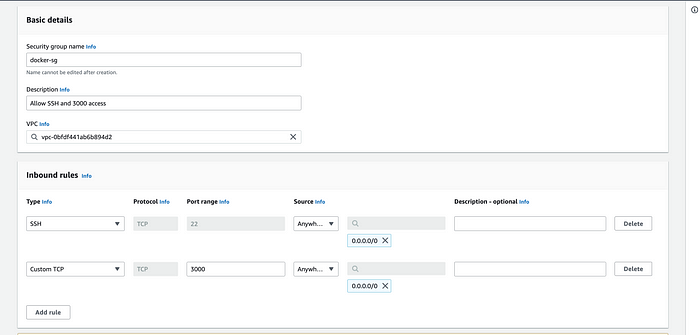
Create new Security group

Go back to your launch an instance and choose Select existing security group then choose your security group.

6. Leave everything default and go to Launch instance.

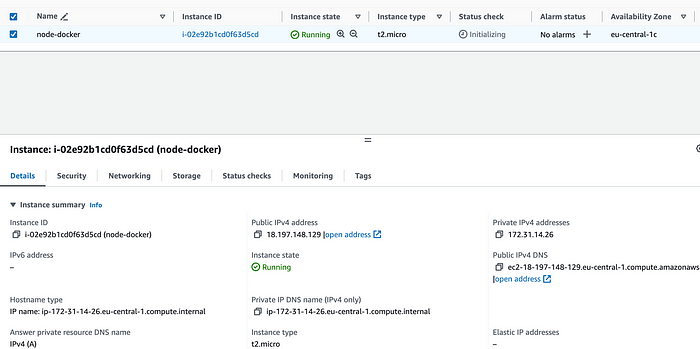
Congratulations! You got your instance!
Connect to your EC2 instance and install docker
- Open new terminal and navigate to your
key pairdir and use this command:
chmod 600 <your-key-pair>
2. Copy Public IP address of your instance and use this command in your terminal:
ssh -i "your-key-pair" ec2-user@your-public-ip-address-of-ec2-instance
If you did everything like me, you need to see something like this:

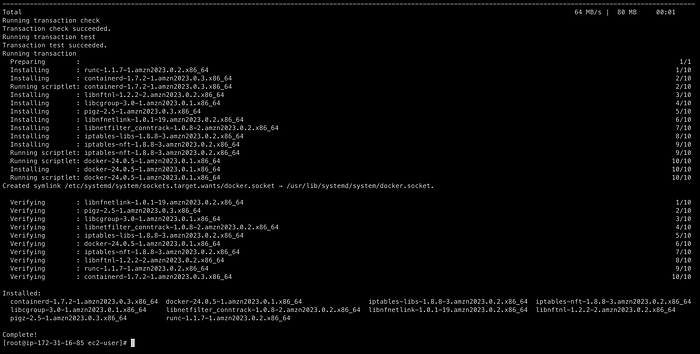
3. Go to the root user with the command sudo su. Install docker with this command:
yum install docker -y
If you did it right, you need to see something like this:
Start your docker and see if it is in active state.
Commands for that:
systemctl start docker
systemctl status docker
You should get output like this:

Move your docker image to ECR
Amazon ECR is a managed container registry service that allows you to store, manage, and deploy Docker container images. Here’s a high-level overview of the process:
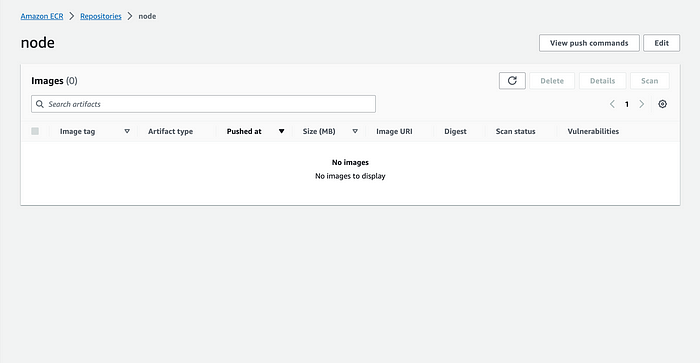
Open ECR in your AWS Console and you will see this screen:

Click on Get Started button and you will see this screen:

Write the name of your repository name, and enable Tag Immutability (Enable tag immutability to prevent image tags from being overwritten by subsequent image pushes using the same tag. Disable tag immutability to allow image tags to be overwritten.)
Go to Create repository button.
Your repository is successfully created. Click on your repository name.

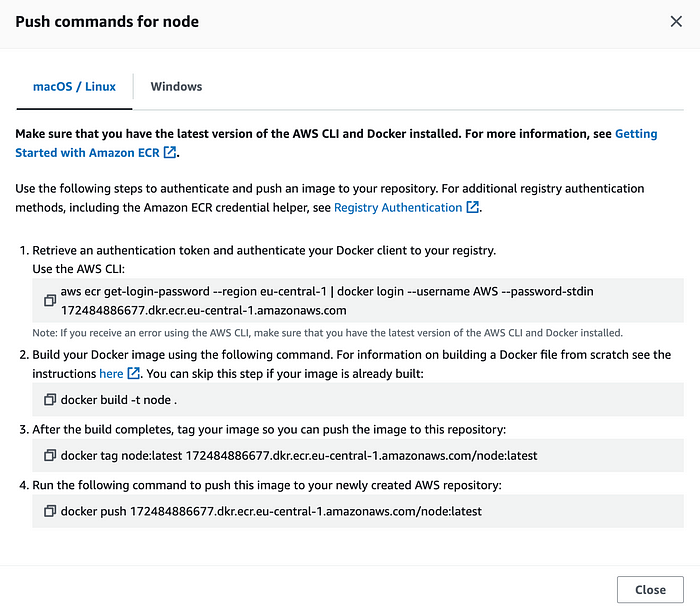
Click on your repository name and go to View push commands .
You can see the commands to push your image to the AWS ECR.
Now you are ready to move our Docker Image to AWS ECR. Let’s do it!
Retrieve an authentication token and authenticate your Docker client to your registry. Use the AWS CLI:
aws ecr get-login-password --region eu-central-1 | docker login --username AWS --password-stdin 172484886677.dkr.ecr.eu-central-1.amazonaws.com
Note: If you receive an error using the AWS CLI, make sure that you have the latest version of the AWS CLI and Docker installed.
Build your Docker image using the following command. For information on building a Docker file from scratch see the instructions here. You can skip this step if your image is already built:
docker build -t node .
After the build completes, tag your image so you can push the image to this repository:
docker tag node:latest 172484886677.dkr.ecr.eu-central-1.amazonaws.com/node:latest
Run the following command to push this image to your newly created AWS repository:
docker push 172484886677.dkr.ecr.eu-central-1.amazonaws.com/node:latest
If you did everything right, you need to see a new image in your terminal:

Let’s go to ECR and see what you have in your repository. Congratulations! You have successfully pushed a NodeJS application into ECR. Now you can use this image:

Create an IAM Role and attach it to the EC2 instance
If we want to pull the Docker image from ECR to EC2, we need to create an IAM Role.
Go to IAM and choose this:

Click on button Create role

Choose EC2

You need to add permissions, add AmazonEC2ContainerRegistryFullAccess

Name your role

Next step is to attach IAM Role to EC2 instance. Go to EC2 dashboard, check your instance, go to Actions > Security and choose Modify IAM Role.

Choose your role and click Update IAM Role

Go back to your EC2 Instance terminal and use this command:
aws sts get-caller-identity
You need to see the credentials of your account.
Pull your docker image from the repository to EC2
In your EC2 Instance terminal, you need to authenticate and log in to ECR from an EC2 instance with this command:
aws ecr get-login-password --region <region> | docker login --username AWS --password-stdin <aws_account_id>.dkr.ecr.<region>.amazonaws.com
Replace with your region, replace <aws_account_id> with your ID and replace again with your region.
You are ready to pull! Use this command to pull your docker image from ECR to EC2:
docker pull <URI-of-your-repository>
If you did everything right, you will see something like this:

Run your app
Check your images on your instance with docker images

Final step, run your container with this command:
docker container run -d --name node --publish 3000:3000 <docker image>
You need to see something like this:

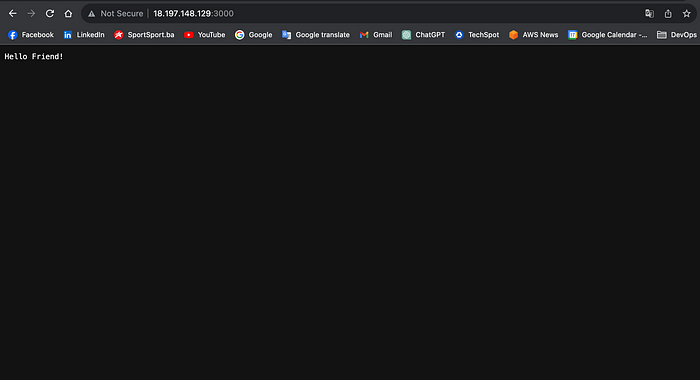
Now go to the browser and type in the address bar http://<EC2-IP-Address>:3000 and if everything is okay, you will see your application.
That''s it for this topic. Thank you for reading!
Comments
Loading comments…