After spending a year as a frontend developer and designer, I figured it was time to dive into the backend side of web development. So, to kick off my backend journey, I decided to build a login system as my first project.
The concept for this login system is pretty straightforward:
- We’ll start by building two pages: a login page and a main page.
- Next, we’ll add some usernames and passwords to our SQL database.
- Then, we’ll write the logic to check the user inputs against the database.
- If the inputs match, we’ll let the user access the main page.
Prerequisites
Before we get started, ensure you have the following:
- A React project set up with 2 folders: backend / frontend
frontend folder
- Tailwind dependencies installed
npm install -D tailwindcss postcss autoprefixer && npx tailwindcss init -p - Install Axios for making HTTP requests from the React frontend
npm install axios
backend folder
- Install Express and Nodemon for setting up the backend server
npm install express && nodemon - Install the CORS middleware to handle Cross-Origin Resource Sharing
npm install cors - Install XAMPP to set up a local MySQL database. XAMPP provides an easy-to-use control panel to manage your database. https://www.apachefriends.org/download.html

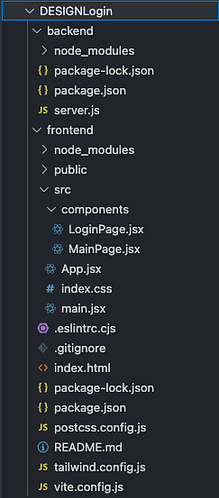
Implementing the Frontend
Step 1: Create a Login Page and a Main Page.
LoginPage.jsx
// Import React and necessary hooks
import React, { useState } from 'react';
import { useNavigate } from 'react-router-dom'; // Import useNavigate hook

function LoginPage(props) {
    // State variables for username, password, and error message
    const [username, setUsername] = useState('');
    const [password, setPassword] = useState('');
    const [errorMessage, setErrorMessage] = useState('');

    // Initialize useNavigate hook for navigation
    const navigate = useNavigate();

    // Function to handle form submission
    const handleSubmit = (e) => {
        e.preventDefault();
        // Navigate to main page
        navigate('/main');
    };

    // JSX structure for login form
    return (
        <div className="flex items-center justify-center min-h-screen">
            <div className="mx-auto p-6 bg-white rounded-md shadow-md">
                <h2 className="text-2xl font-semibold mb-6 text-center">Login</h2>
                <form onSubmit={handleSubmit}>
                    <div className="mb-4">
                        <label htmlFor="username" className="block mb-2">Username:</label>
                        <input
                            type="text"
                            id="username"
                            value={username}
                            onChange={(e) => setUsername(e.target.value)}
                            className="w-full px-4 py-2 border rounded-md focus:outline-none focus:border-blue-500"
                        />
                    </div>
                    <div className="mb-4">
                        <label htmlFor="password" className="block mb-2">Password:</label>
                        <input
                            type="password"
                            id="password"
                            value={password}
                            onChange={(e) => setPassword(e.target.value)}
                            className="w-full px-4 py-2 border rounded-md focus:outline-none focus:border-blue-500"
                        />
                    </div>
                    <button type="submit" className="w-full bg-blue-500 text-white py-2 rounded-md hover:bg-blue-600">Login</button>
                    {errorMessage && <p className="text-red-500 text-sm whitespace-pre-line text-center mt-4 ">{errorMessage}</p>} {/* Display error message if exists */}
                </form>
            </div>
        </div>
    );
}

export default LoginPage;
MainPage.jsx
import React from 'react';
import { useNavigate } from 'react-router-dom'; // Import useNavigate hook

function MainPage(props) {
    const navigate = useNavigate(); // Initialize useNavigate hook

    const handleLogout = () => {
        navigate('/login');
    };

    return (
        <div className={`relative min-h-screen flex`}>
            <div className="container max-w-screen-xl mx-auto flex flex-col justify-center items-center">
                <p className='text-4xl '>Main Page</p>
                <button onClick={handleLogout} className=" bg-blue-500 text-white mt-12 py-2 px-12 rounded-md hover:bg-blue-600">
                    Logout
                </button>
            </div>
        </div>
    );
}

export default MainPage;
App.jsx
import React from 'react';
import { BrowserRouter as Router, Routes, Route, Navigate } from 'react-router-dom';
import LoginPage from "./components/LoginPage.jsx";
import MainPage from "./components/MainPage.jsx";

export default function App() {
  return (
    <Router>
      <Routes>
        <Route path="/" element={<Navigate to="/login" replace />} />
        <Route path="/login" element={<LoginPage />} />
        <Route path="/main" element={<MainPage />} />
      </Routes>
    </Router>
  );
}
With these two components, we create a simple login and main page that navigate between each other with a button click.
Next, we will implement backend logic to conditionally check if the user’s input matches the username and password stored in the MySQL database. This is particularly interesting for me since it’s my first time writing server-side code.
Implementing the Back-End
Step 2: Install the Necessary Packages
Run the following command in your backend directory terminal:
npm install express nodemon cors
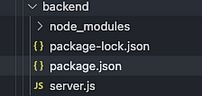
This command will install three packages: express, nodemon, and cors. After running this command, you should see node_modules, package.json, and package-lock.json files appear in your project directory.
- Express handles the server logic and routing.
- Nodemon automatically restarts your server during development.
- CORS enables your server to handle cross-origin requests, which is crucial for many web applications.
Step 3: Opening MySQL Database
- Launch the XAMPP application on your computer.
- In the XAMPP control panel, click the “Start” button next to both “Apache” and “MySQL” to start the web server and database server.
- Once both services are running, click the “Go to Application” button next to Apache. This will open the XAMPP dashboard in your web browser.
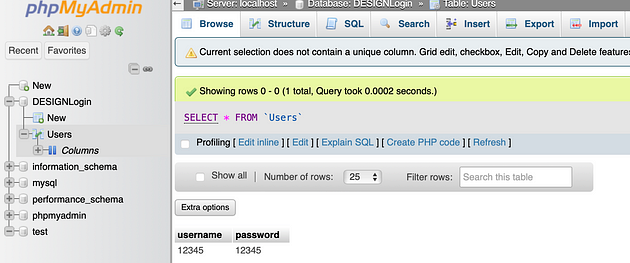
- In the XAMPP dashboard, locate and click the “phpMyAdmin” tab. This will take you to the phpMyAdmin interface where you can manage your MySQL databases.
Step 4: Creating a Database
Now we need to create a database to store our username and password. Follow the steps below and run the SQL script to set up the database.
-- Create DESIGNLogin database
CREATE DATABASE DESIGNLogin;

-- Select the DESIGNLogin database
USE DESIGNLogin;

-- Create Users table
CREATE TABLE Users (
    username VARCHAR(255) NOT NULL,
    password VARCHAR(255) NOT NULL
);

-- Insert a row into Users table
INSERT INTO Users (username, password) VALUES ('12345', '12345');
Keep in mind the names of the variables as we are going to reference them in our server.js backend code:
- Database:
DESIGNLogin - Table:
Users - Columns:
usernamepassword
Step 5: Adding in the Backend Code
To handle the login logic on the server-side, we’ll set up a simple Node.js server using Express and MySQL. Here’s the code for server.js, along with explanations for each part:
server.js
const express = require('express');
const mysql = require('mysql');
const cors = require('cors');

const db = mysql.createPool({
  connectionLimit: 10, // Adjust as needed
  host: 'localhost',
  user: 'root',
  password: '',
  database: 'DESIGNLogin',
  port: 3306,
});

const app = express();

app.use(express.json());
app.use(cors());

app.post('/login', (req, res) => {
  const { username, password } = req.body;

  const sql = 'SELECT * FROM Users WHERE username = ? AND password = ?';
  db.query(sql, [username, password], (err, result) => {
    if (err) {
      res.status(500).json({ message: 'An error occurred while processing your request.' });
    } else {
      if (result.length > 0) {
        res.status(200).json({ message: 'Login successful' });
      } else {
        res.status(401).json({ message: 'Login failed. Invalid username or password.' });
      }
    }
  });
});

const PORT = process.env.PORT || 3000;
app.listen(PORT, () => {
  console.log(`Server is running on port ${PORT}`);
});
Explanation
Import Modules:
express: The Express framework is used to build the web server.mysql: The MySQL module is used to connect to the MySQL database.cors: The CORS module allows cross-origin requests, which is useful for API communication between different domains.
Create MySQL Connection Pool:
- A connection pool is created with a limit on the number of connections to the MySQL database. The pool settings include the database host, user, password, database name, and port.
Initialize Express Application:
- The Express application is initialized, and middleware is added to parse JSON request bodies and enable CORS.
Login Route:
- A POST route
/loginis created to handle login requests. It extracts theusernameandpasswordfrom the request body and executes an SQL query to find a matching user in theUserstable. - If an error occurs during the query, a 500 status code with an error message is returned.
- If a matching user is found, a 200 status code with a success message is returned.
- If no matching user is found, a 401 status code with a failure message is returned.
Start the Server:
- The server is started on port 3000 (or any port specified in the environment variables), and a message is logged to the console indicating that the server is running.
Step 6: Update Login Page to Listen to Server Response
Our login system is almost complete. Now, we need to update our original Login component so that it listens to the server port and responds appropriately if the login is successful (response status 200).
Here is the updated LoginPage.jsx component:
// Import React and necessary hooks
import React, { useState } from 'react';
import axios from 'axios'; // Import Axios
import { useNavigate } from 'react-router-dom'; // Import useNavigate hook

function LoginPage(props) {
    // State variables for username, password, and error message
    const [username, setUsername] = useState('');
    const [password, setPassword] = useState('');
    const [errorMessage, setErrorMessage] = useState('');

    // Initialize useNavigate hook for navigation
    const navigate = useNavigate();

    // Function to handle form submission
    const handleSubmit = async (e) => {
        e.preventDefault();
        try {
            // Clear previous error messages
            setErrorMessage('');

            // Send login request to server
            const response = await axios.post('http://localhost:3000/login', { username, password });

            // If login successful, redirect to MainPage
            if (response.status === 200) {
                navigate('/main');
            }
        } catch (error) {
            console.error('Error:', error);

            // If login failed, display error message
            setErrorMessage('Your Username and\nPassword are incorrect.');
        }
    };

    // JSX structure for login form
    return (
        <div className="flex items-center justify-center min-h-screen">
            <div className="mx-auto p-6 bg-white rounded-md shadow-md">
                <h2 className="text-2xl font-semibold mb-6 text-center">Login</h2>
                <form onSubmit={handleSubmit}>
                    <div className="mb-4">
                        <label htmlFor="username" className="block mb-2">Username:</label>
                        <input
                            type="text"
                            id="username"
                            value={username}
                            onChange={(e) => setUsername(e.target.value)}
                            className="w-full px-4 py-2 border rounded-md focus:outline-none focus:border-blue-500"
                        />
                    </div>
                    <div className="mb-4">
                        <label htmlFor="password" className="block mb-2">Password:</label>
                        <input
                            type="password"
                            id="password"
                            value={password}
                            onChange={(e) => setPassword(e.target.value)}
                            className="w-full px-4 py-2 border rounded-md focus:outline-none focus:border-blue-500"
                        />
                    </div>
                    <button type="submit" className="w-full bg-blue-500 text-white py-2 rounded-md hover:bg-blue-600">Login</button>
                    {errorMessage && <p className="text-red-500 text-sm whitespace-pre-line text-center mt-4 ">{errorMessage}</p>} {/* Display error message if exists */}
                </form>
            </div>
        </div>
    );
}

export default LoginPage;
Explanation:
- When handleSubmit is triggered, this component sends a POST request to the server at
http://localhost:3000/loginwith theusernameandpasswordas the request body. - If the server responds with a status code of 200 (indicating a successful login), the user is redirected to the
/mainpage usingnavigate('/main'). - If there is an error or the login fails, an appropriate error message is set in the
errorMessagestate variable.
Step 7: Run the Project
Navigate to backend directory: npm start
Navigate to frontend directory: npm run dev
And there you have it! A simple login system created by checking the user details with the data from a MySQL database.
Check out my Github for the full code!
Potential Improvements:
Backend:
- Token-based Authentication: This keeps the user logged in and improves security.
- Parameterized Queries or ORM Libraries (like Sequelize): To prevent SQL injection attacks.
- Input Validation and Sanitization: Ensure that user inputs are properly validated and sanitized to prevent XSS attacks.
- Rate Limiting and Throttling: Implement mechanisms to prevent brute force attacks and denial-of-service (DoS) attacks.
Database:
- Encryption: Ensure that sensitive data stored in your database, such as passwords or personal information, is encrypted. MySQL provides various encryption functions that you can use to encrypt data before storing it in the database.
These enhancements will be covered in the next article. Stay tuned!
Comments
Loading comments…