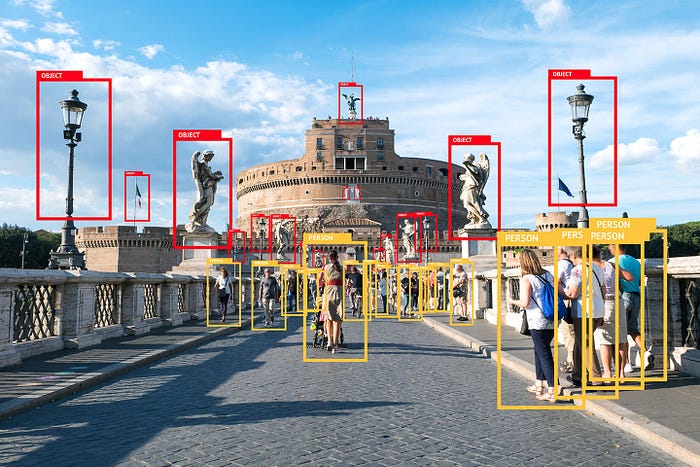
Image Source : UiPath
Object detection is a computer vision technique for locating instances of objects in images or videos. It involves identifying and locating objects within an image or video by drawing a bounding box around each object. Object detection is useful for a wide range of applications, including image and video analysis, self-driving cars, robotics, and security systems.
How does Object Detection work?
A dataset of images or videos that are annotated with bounding boxes and class labels for the objects you want to detect goes hand in hand with a machine learning framework such as TensorFlow, PyTorch, or scikit-learn, to build and train your object detection model. Depending on the size of your dataset and the complexity of your model, you may need a powerful GPU (Graphics Processing Unit) to accelerate training and inference.
The Problem in Building an Object Detection Model
While there are several challenges in Object detection, the following are the most common ones:
- Lack of annotated data: Creating a high-quality dataset of annotated images and videos can be time-consuming and resource-intensive. This can be a challenge, especially if you are working with a specialized or niche object detection task that requires annotating rare or unusual objects(Yes you heard me other than Cats & Dogs 😝). Sometimes even the images are not readily available let alone the annotation part.
- Variability in object appearance: Objects can vary significantly in terms of their appearance, size, shape, and color. This can make it challenging for the object detection model to generalize to new objects or situations.
- Scale and perspective: The size and perspective of objects can vary significantly in different images and videos. This can make it difficult for the object detection model to recognize objects consistently.
Transfer Learning: The Savióur 🦾

Transfer learning is a machine learning technique that involves using pre-trained models as the starting point for a new task. In the context of object detection, transfer learning can be used to save time and resources by using a pre-trained model as the starting point for building a new custom object detection model rather than training a model from scratch thus allowing us to leverage the knowledge learned from a larger dataset and can help improve the performance of the object detection model.
There are a number of pre-trained object detection models available that have been trained on large datasets such as the COCO dataset (Common Objects in Context) and the KITTI dataset (a street view dataset for autonomous driving).
However, transfer learning is not always the best solution for custom object detection. If the new task is significantly different from the original task, or if you have a large dataset that is significantly different from the dataset used to train the pre-trained model, it may be more effective to train a model from scratch.
Pre-trained object detection models are generally trained on a wide range of objects and the context in which they are trained might differ from your context and if the new task is significantly different from the original task, or if you have a large dataset that is significantly different from the dataset used to train the pre-trained model transfer learning might not be the best option there instead it might be more effective to train a model from scratch. Overall, the best approach will depend on the specific characteristics of your dataset and the requirements of your object detection task.
TensorFlow Object Detection
The TensorFlow Object Detection API is an open-source framework built on top of TensorFlow that makes it easy to construct, train, and deploy object detection models. The TFOD API is implemented in Python and uses the TensorFlow library for training and inference. It includes a set of tools and utilities for working with the object detection models, such as the TensorFlow model zoo, which is a collection of pre-trained object detection models that can be downloaded and used for a variety of tasks.

Training a custom object detection model using TensorFlow involves several steps, which can be broken down into six main parts:
Creating Workspace:This involves creating the folder structure to keep files in specific folders aligned with the object detection API.Installation of Object Detection API:This involves downloading /cloning the TensorFlow Models repository and a few other files in respective folders.Preparing the training data:This involves collecting and labeling our target dataset of images that contain the objects we want to detect.Configuring the model:This involves selecting a pre-trained model and configuring it for fine-tuning on our dataset.Training the model:This involves feeding the train-test data to the model and using an optimization algorithm to find the best set of model parameters.Exporting & Evaluating the model:This involves using the trained model to make predictions on a separate dataset and evaluating the performance of the model.
Step 1: Creating the Workspace 🗄️🗄️
To keep things consistent we need to have the following folder structure 📁. There will be one root folder **Tensorflow** inside which we’ll set up the workspace.
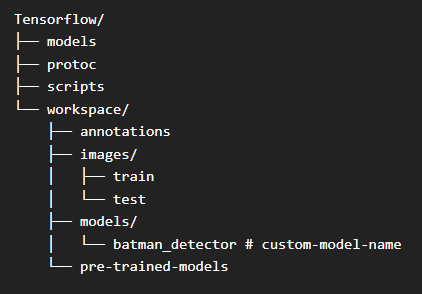
Image by Author
We can either create the above structure manually but why do so when one can do it with few lines of code 😎
Image Source: Here
custom_model_name = 'batman_detector' # Custom model name
pretrained_model = 'ssd_mobilenet_v2_320x320_coco17_tpu-8' # Pre-trained model
tf_record_script = 'generate_tfrecord.py'
label_map = 'label_map.pbtxt'

# Setting up Folder Structure
paths = {
    'tensorflow_path': os.path.join('Tensorflow'),
    'workspace_path': os.path.join('Tensorflow', 'workspace'),
    'scripts_path': os.path.join('Tensorflow','scripts'),
    'api_path': os.path.join('Tensorflow','models'),
    'annotation_path': os.path.join('Tensorflow', 'workspace','annotations'),
    'image_path': os.path.join('Tensorflow', 'workspace','images'),
    'train_image_path': os.path.join('Tensorflow', 'workspace','images','train'),
    'test_image_path': os.path.join('Tensorflow', 'workspace','images','test'),
    'model_path': os.path.join('Tensorflow', 'workspace','models'),
    'pretrained_model_path': os.path.join('Tensorflow', 'workspace','pre-trained-models'),
    'checkpoint_path': os.path.join('Tensorflow', 'workspace','models', custom_model_name),
    'output_path': os.path.join('Tensorflow', 'workspace','models', custom_model_name, 'export'),
    'protoc_path':os.path.join('Tensorflow','protoc')
 }

files = {
    'pipeline_config':os.path.join('Tensorflow', 'workspace','models', custom_model_name, 'pipeline.config'),
    'tf_record_script': os.path.join(paths['scripts_path'], tf_record_script),
    'labelmap': os.path.join(paths['annotation_path'], label_map)
}

# Create Folder Structure
for path in paths.values():
    if not os.path.exists(path):
        os.mkdir(path)
After running this we’ll have our Workspace ready for API installation.
Step 2: Installing TensorFlow Object Detection API 🧑💻
Now it is time to install the TensorFlow Object Detection API. First, we need to download a few files in respective folders:
- The TensorFlow Model garden to our
Tensorflow/modelsdirectory. - Any pre-trained model from TensorFlow Detection Model Zoo in our
Tensorflow/workspace’/pre-trained-modelsdirectory. Here we are taking ssd_mobilenet_v2_320x320 as it has a good balance between speed and precision. You are welcome to try any other depending upon the complexity of the dataset. - Protocol Buffers in the
Tensorflow/protocdirectory.
The TFOD API uses Protobufs to configure model and training parameters, it is a data format used to serialize structured data.
We fetch the files with wget in respective folders. We only need to define the downloading URLs and target file path. Now, once the files are downloaded, we need to extract the files. During extraction, we need to make sure that the file structure is not disturbed and that names are intact.
# urls
download_urls = {
  'protobuff': "https://github.com/protocolbuffers/protobuf/releases/download/v3.19.4/protoc-3.19.4-win64.zip",
  'tensorflow_models': "https://github.com/tensorflow/models/archive/refs/heads/master.zip",
  'pretrained_model': "http://download.tensorflow.org/models/object_detection/tf2/20200711/ssd_mobilenet_v2_320x320_coco17_tpu-8.tar.gz"
  }

 # Download files
 wget.download(download_urls["protobuff"], paths['protoc_path'])
 wget.download(download_urls["tensorflow_models"], paths['api_path'])
 wget.download(download_urls["pretrained_model"], paths['pretrained_model_path'])

 # Extract Files
 !cd {paths['protoc_path']} && tar -xf protoc-3.19.4-win64.zip
 !cd {paths['api_path']} && tar -xf models-master.zip --strip-components 1
 !cd {paths['pretrained_model_path']} && tar -zxvf {pretrained_model + '.tar.gz'}
The above code will make sure that the files are downloaded and extracted in the required manner. Now we need to add the **_protoc/bin_** in our environment path.
# Add protoc/bin to environment path
os.environ['PATH'] += os.pathsep + os.path.abspath(os.path.join(paths['protoc_path'], 'bin'))
Now the final step is to install the package and verify it. We need to run the setup.py script form Tensorflow/models/research/object_detection/packages/tf2/ and then verify the installation of TFOD API by running the script model_builder_tf2_test.py from Tensorflow/models/research/object_detection/builders/ .
!cd Tensorflow/models/research && protoc object_detection/protos/*.proto --python_out=. && copy object_detection\packages\tf2\setup.py setup.py && python setup.py build && python setup.py install
!cd Tensorflow/models/research/slim && pip install -e
verification_script = os.path.join(paths['api_path'], 'research', 'object_detection', 'builders', 'model_builder_tf2_test.py')
!python {verification_script}
Once the above code runs successfully we will observe output something like this: If not our goal is to make output just like this 👾
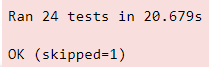
Image by Author
You might get some packages error depending upon your environment but you can install them using pip or using the pipfile/requirements file from the GitHub Repo. To verify the successful installation of TensorFlow Object Detection API we should be able to runimport object_detection without any errors.
Step 3: Preparing the Dataset ✏️
For preparing the images ready to be fed to the model we need to annotate them, for that we’ll use labelImg. LabelImg is a graphical image annotation tool that is written in Python and uses Qt for its graphical interface. It is used to label object bounding boxes in images, and to create training data for object detection models. LabelImg allows you to draw bounding boxes around objects in an image and label them with a class name. We can install it using pip and run it by simply typing labelimg in the terminal.
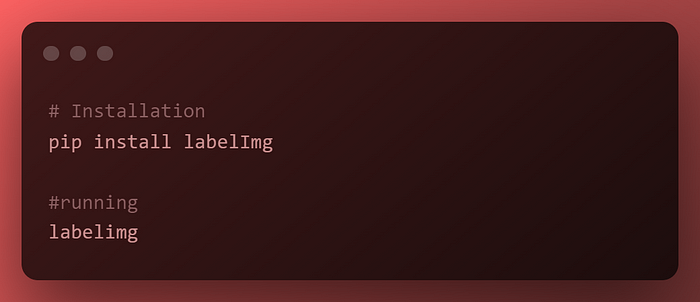
Image By Author
To use LabelImg, you simply open an image and draw bounding boxes around the objects you want to label. You can then enter a class name for each bounding box and save the labels to a file. LabelImg supports a variety of file formats, including JPEG, PNG, and TIFF, and can save labels in standard XML format that is optimized for use with TensorFlow’s object detection API.
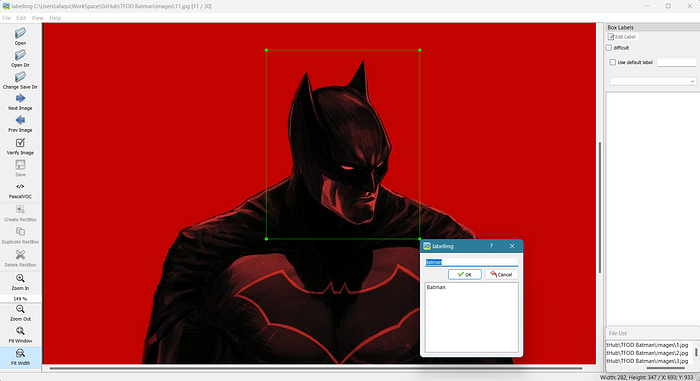
Image by Author
Here, since we are building a batman detector, we will name the label Batman by drawing the box around the mask and save the file in PascalVOC format which is standard XML format. Here I’m training the model with 30 images so after annotation, I'll be having 60 files ( 30 images + 30 XMLs).
Once the image dataset is created we can manually split the data in the training and test folder inside Tensorflow/workspace/images with some ratio let's say 80:20 or 70:30 depending upon the quantity of data you have.
Now we need to create the label map, TensorFlow requires a label map in protobuf format, which namely maps each of the used labels to an integer value. This labeled map is used both by the training and detection processes. For creating a label map simply run the below code:
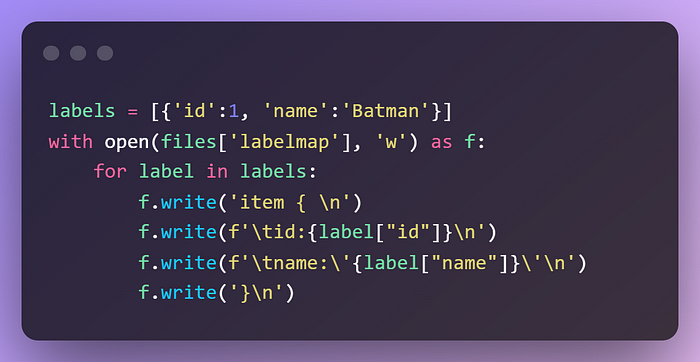
Image by Author
If we have more than one labels in an image we can append those labels to the labels list. This will create the **label_map.pbtxt** file in the desired location.
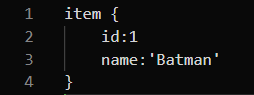
Image by Author
Now that we have generated our annotations and split our dataset into the desired training and testing subsets, it is time to convert our annotations into the so-called tfrecord format. We need to run generate_tfrecord.py script by providing paths to train, test directories for image and XML inputs, and annotation paths for train-test records output.
First, download the script in Tensorflow/scripts folder and then run the following commands:
# Download generate_tfrecord.py
tfrecord_url =
wget.download(tfrecord_url, paths['scripts_path'])

# Generate Records
!python {files['tf_record_script']} -x {os.path.join(paths['image_path'], 'train')} -l {files['labelmap']} -o {os.path.join(paths['annotation_path'], 'train.record')}
!python {files['tf_record_script']} -x {os.path.join(paths['image_path'], 'test')} -l {files['labelmap']} -o {os.path.join(paths['annotation_path'], 'test.record')}
This concludes our Annotation Part 😪.
Step 4: Configuring the Model ⚙️
We have already downloaded the pre-trained model. But it was trained on different datasets and the parameters were different so we need to fine-tune it with respect to our requirements. First, we need to copy **pipeline.config** file from the pre-trained model to our custom model directory.
!copy {os.path.join(paths['pretrained_model_path'], pretrained_model, 'pipeline.config')} {os.path.join(paths['checkpoint_path'])}
Now we need to configure the following things in order to go further for training:
- num_classes: 1 # Set this to the number of different label classes.
- batch_size: 8 # Increase/Decrease this value depending on the available memory (Higher values require more memory and vice-versa).
- total_steps, num_steps: 5000 #Increase/Decrease this value depending on the available data and accuracy achieved.
- fine_tune_checkpoint: “Path to the checkpoint of pre-trained model” # Set this to
“Tensorflow\\workspace\\pre-trained-models\\ssd_mobilenet_v2_320x320_coco17_tpu-8\\checkpoint\\ckpt-0” - fine_tune_checkpoint_type: “detection” # Set this to
‘Detection’ - label_map_path: “Path to label map file” # Set this to
“Tensorflow\\workspace\\annotations\\label_map.pbtxt” - input_path: “Path to training/testing TFRecord file” # Set this to :
“Tensorflow\\workspace\\annotations\\train.record”intrain_input_readerand“Tensorflow\\workspace\\annotations\\test.record”ineval_input_reader

Step 5: Training the model 🤖
Finally, we came to this part so without further ado let’s jump into it. We will need the model_main_tf2.py script from object detection so we will copy a file from TensorFlow/models/research/object_detection/. Let’s create the training command so that we can run it from the new terminal.
training_script = os.path.join(paths['api_path'], 'research', 'object_detection', 'model_main_tf2.py')
training_command = "python {} --model_dir={} --pipeline_config_path={}".format(training_script, paths['checkpoint_path'],files['pipeline_config'])

print(training_script)
print(training_command)

>> Tensorflow\\models\\research\\object_detection\\model_main_tf2.py
>> python Tensorflow\models\research\object_detection\model_main_tf2.py --model_dir=Tensorflow\workspace\models\batman_detector --pipeline_config_path=Tensorflow\workspace\models\batman_detector\pipeline.config
Now, we only need to open cmd in the workspace directory activate the environment, and paste the training command in it.
Step 6: Exporting the Model and Making Detections 🚀
Once the training job is done, we can export the model so that we can load it up anytime & use it for performing object detection. Similar to training command, we need to copy exporter_main_v2.py script from TensorFlow/models/research/object_detection/ to Tensorflow/scripts and run the exporting command from a new terminal or use the command !{exporting_command} from within the Jupyter Notebook.
# Copy exporting script to scripts folder
!copy {os.path.join('TensorFlow','models', 'research', 'object_detection', 'exporter_main_v2.py')} {paths['scripts_path']}

exporting_script = os.path.join(paths['scripts_path'], 'exporter_main_v2.py')
exporting_command = "python {} --input_type image_tensor --pipeline_config_path={} --trained_checkpoint_dir={} --output_directory={}".format(exporting_script, files['pipeline_config'], paths['checkpoint_path'], paths['output_path'])

print(exporting_script)
print(exporting_command)

>> Tensorflow\\scripts\\exporter_main_v2.py
>> python Tensorflow\scripts\exporter_main_v2.py --input_type image_tensor --pipeline_config_path=Tensorflow\workspace\models\batman_detector\pipeline.config --trained_checkpoint_dir=Tensorflow\workspace\models\batman_detector --output_directory=Tensorflow\workspace\models\batman_detector\export
So Finally, our training and exporting job is complete now we just need to load the model and make predictions. We need to import certain methods & functions from object detection API, provide the path to the image being tested, and the models and annotation files that’s it. Here we go ⚡️
# Import the required libraries
import time
import numpy as np
from PIL import Image
from matplotlib import pyplot as plt
%matplotlib inline
from object_detection.utils import label_map_util
from object_detection.utils import visualization_utils as viz_utils
import tensorflow as tf
import numpy as np
%matplotlib inline

# Define the paths
testing_image_path = os.path.join('Tensorflow' , 'workspace', 'images', 'batman', 'jj.jpg')
model_dir = paths["checkpoint_path"]
labels_path = files["labelmap"]
saved_model_path = os.path.join(model_dir ,"export" , "saved_model")

# Load exported model
print('Loading model...', end='')
start_time = time.time()
detect_fn = tf.saved_model.load(saved_model_path)
end_time = time.time()
elapsed_time = end_time - start_time
print('Done! Took {} seconds'.format(elapsed_time))

# Begin Detection
category_index = label_map_util.create_category_index_from_labelmap(labels_path, use_display_name=True)
image_np = np.array(Image.open(testing_image_path))
input_tensor = tf.convert_to_tensor(image_np)
input_tensor = input_tensor[tf.newaxis, ...]
detections = detect_fn(input_tensor)
num_detections = int(detections.pop('num_detections'))
detections = {key: value[0, :num_detections].numpy() for key, value in detections.items()}
detections['num_detections'] = num_detections
detections['detection_classes'] = detections['detection_classes'].astype(np.int64)
image_np_with_detections = image_np.copy()
viz_utils.visualize_boxes_and_labels_on_image_array(
          image_np_with_detections,
          detections['detection_boxes'],
          detections['detection_classes'],
          detections['detection_scores'],
          category_index,
          use_normalized_coordinates=True,
          max_boxes_to_draw=1,
          min_score_thresh=.2,
          agnostic_mode=False)

# Display the image with detected box
plt.imshow(image_np_with_detections)
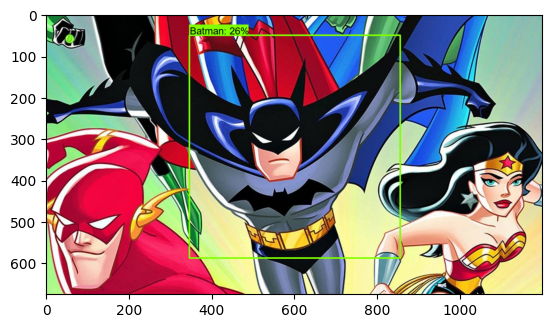
Image By Author
Congratulations !!! We have just now built our first Custom TensorFlow Object Detection model using Transfer Learning 🥳🖐🤘.

I hope you enjoyed this article! You can follow me Afaque Umer for more such articles. Here’s the complete repository 👉 GitHub Repo.
I will try to bring up more Machine learning/Data science concepts and will try to break down fancy-sounding terms and concepts into simpler ones.
Comments
Loading comments…