To build APIs in Node.js we will use Express.js framework. Any other framework can also be used but Express.js is very popular when using Node.
 Download source code: Clone GitHub Repository👆.
What to cover in this Article:
1. Installations.
2. Create new Node.js Project with Express.js
3. Create and Run API endpoints.
4. CRUD Operations and HTTP methods.
5. Testing API with Postman.
6. Fix No ‘Access-Control-Allow-Origin’
1. Installation Required
- Node.js Or NPM (Node Package Manager)
- VS Code (Optional) — A code editor.
To check whether the Node.js is already installed on your computer, open your terminal or CMD and run
node -vcommand. If you see your Node.js version means it's installed. Otherwise go to these links and install:
→ Click here to download and install Node.js (You should choose LTS version).
→ Click here to download VS Code
Express application generator:
To quickly create an application skeleton. You may use this application generator tool (`express-generator`). The application generator uses npx command (available in Node.js newer versions).
→ Click here to know more about Express application generator.
We will not use express-generator in this article, instead we will create everything by ourself to avoid extra files generated from generator and to understand in depth.
2. Create New Project (using Node.js with Express.js)
Create a new folder (at the place you want to keep your project).
Name that folder: node-ex-api
Create two files inside node-ex-api folder:
→ package.json file.
→ server.js file.
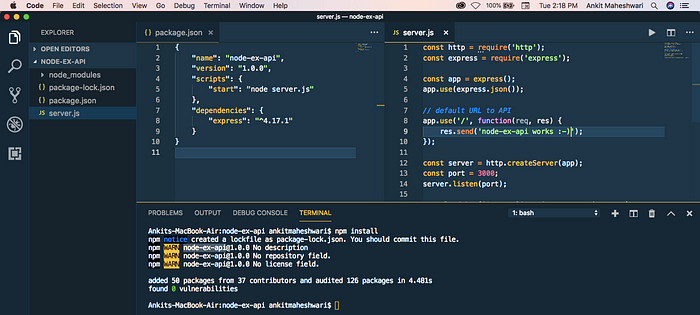
Open up and update your node-ex-api/package.json file with below code:
{
  "name": "node-ex-api",
  "version": "1.0.0",
  "scripts": {
    "start": "node server.js"
  },
  "**dependencies**": {
    "express": "^4.17.1"
  }
}
Open up and update your node-ex-api/server.js file with below code:
const http = require("http");
const express = require("express");

const app = express();
app.use(express.json());

// default URL to API
app.use("/", function (req, res) {
  res.send("node-ex-api works :-)");
});

const server = http.createServer(app);
const port = 3000;
server.listen(port);

console.debug("Server listening on port " + port);
After creating above two files, open your terminal in the "node-ex-api" folder and run this command:
npm install
This command ↑ will install the dependencies defined in "package.json" file.
(You may use VS Code - A code editor↓).
 After dependency installation this will create
 "node_modules" folder at the root of the "node-ex-api" folder.
Run Project
We have just created a Node-Express Project 😍 Let’s start a server.
To start a server run this command:
npm start
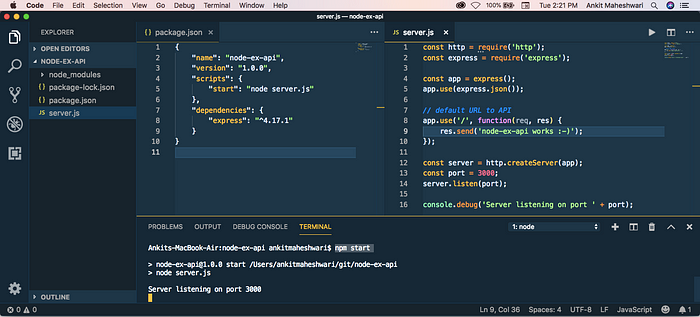 To test this API — Open your web browser and enter this URL → localhost:3000

The localhost:3000 is calling default Server Path. Which returns simple string “node-ex-api works :-)”
3. Create API endpoints
Our default endpoint returns string — we see that above. Now we’ll create another API endpoint, that is another URL which returns some useful data.
Before proceed, let’s do some more exercise:
→ Create a folder inside the project root with name "routes".
→ Then create a file inside this "routes" folder with name "items.js".
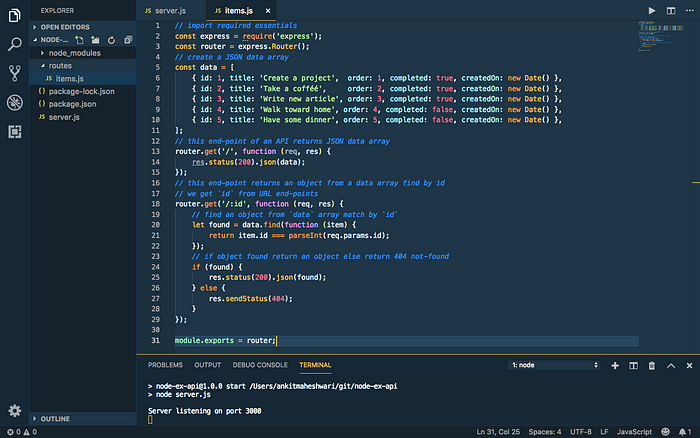
Next, Open up and update your node-ex-api/routes/items.js file with below code:
// import required essentials
const express = require("express");
// create new router
const router = express.Router();

// create a JSON data array
let data = [
  {
    id: 1,
    title: "Create a project",
    order: 1,
    completed: true,
    createdOn: new Date(),
  },
  {
    id: 2,
    title: "Take a cofféé",
    order: 2,
    completed: true,
    createdOn: new Date(),
  },
  {
    id: 3,
    title: "Write new article",
    order: 3,
    completed: true,
    createdOn: new Date(),
  },
  {
    id: 4,
    title: "Walk toward home",
    order: 4,
    completed: false,
    createdOn: new Date(),
  },
  {
    id: 5,
    title: "Have some dinner",
    order: 5,
    completed: false,
    createdOn: new Date(),
  },
];

// this end-point of an API returns JSON data array
router.get("/", function (req, res) {
  res.status(200).json(data);
});

// this end-point returns an object from a data array find by id
// we get `id` from URL end-points
router.get("/:id", function (req, res) {
  // find an object from `data` array match by `id`
  let found = data.find(function (item) {
    return item.id === parseInt(req.params.id);
  });
  // if object found return an object else return 404 not-found
  if (found) {
    res.status(200).json(found);
  } else {
    res.sendStatus(404);
  }
});

module.exports = router;
🌞 See below ↓↓
Register API endpoints
Let’s register it in the "server.js" file to make use of new endpoints.
Do not forget to install CORS.
Open your terminal in the "node-ex-api" folder and run this command:
npm install cors
Now, open up your node-ex-api/server.js file and modify with below code:
// import required essentials
const http = require("http");
const express = require("express");
var cors = require("cors"); // import `items` from `routes` folder
const itemsRouter = require("./routes/items");

// create new app
const app = express();
app.use(express.json());
// use it before all route definitions
// allowing below URL to access these APIs end-points
// you can replace this URL(http://localhost:8100) with your
// application URL from where you are calling these APIs
app.use(cors({ origin: "http://localhost:8100" }));

/* this '/items' URL will have two end-points:
→ localhost:3000/items/ (this returns array of objects)
→ localhost:3000/items/:id (this returns single object)
*/
app.use("/items", itemsRouter);

// default URL to API
app.use("/", function (req, res) {
  res.send("node-ex-api works :-)");
});

const server = http.createServer(app);
const port = 3000;
server.listen(port);
console.debug("Server listening on port " + port);
🌞 See below ↓↓
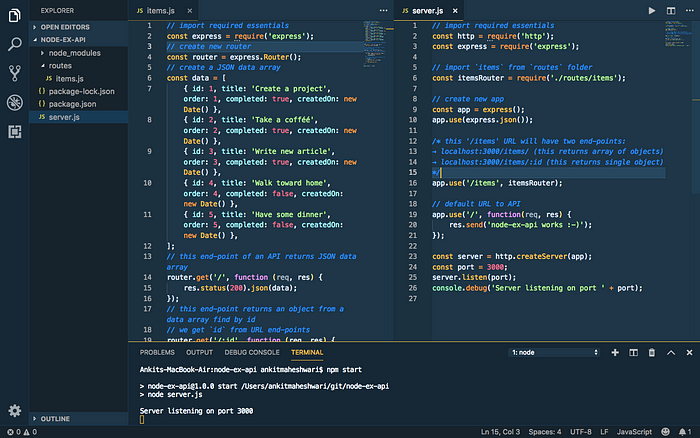
The "items.js" and "server.js" file will look like this ↑
Run API endpoints
Now, run npm start if your server is not running. This time we have three end-points:
→ localhost:3000 (Default)
→ localhost:3000/items (Returns all objects)
→ localhost:3000/items/1 (Returns single object of id=1)
🌞 See browser below ↓
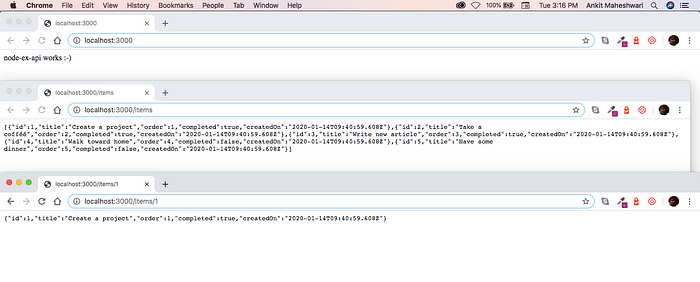
Click image 👆 If you can’t see this.
4. CRUD Operations and HTTP methods.
Yet we have a list of items ( localhost:3000/items). Next task is to manage this list. To do so we need to have CRUD operations Create, Read, Update and D elete over the list of items.
For Create we will create new end-point router.post('/', .......)
→ localhost:3000/items (With post request)
For Read we already have two end-points:
→ localhost:3000/items (Returns all objects)
→ localhost:3000/items/1 (Returns single object of id=1)
For Update we will create new end-point router.put('/', .......)
→ localhost:3000/items (With put request)
For Delete we will create new end-point router.delete('/', .......)
→ localhost:3000/items (With delete request)
Now, Open up and update your node-ex-api/routes/items.js file with below code: (HTTP methods ↓↓)
Important explanation about above ↑ code:
→ We worked on static array of JSON objects named: data.
→ All HTTP methods GET, POST, PUT and DELETE are just manipulating this JSON array.
→ Feel free to use any database instead of using local static array. The database code can be written inside these HTTP methods to do operations like GET, POST, PUT and DELETE.
5. Testing API with Postman.
We have tested the GET methods of our API in our web browser (check #4) and seen responses. But we can’t test POST, PUT and DELETE http methods in web browser. To test those methods we use Postman or you may use another http utility to call APIs.
Here we use Postman. So before start click here and install Postman.
Now, run npm start if your server is not running.
After Postman installation skip start window (if comes), then login with Google or email/password (whichever you prefer) and finally you must see this screen:

A place where we call HTTP request.
A place where we call HTTP request.
Now, make sure your server is running (by npm start) and Server listening on port 3000. Let's start testing with HTTP GET Request.
5.1. HTTP GET Request (to Get data)
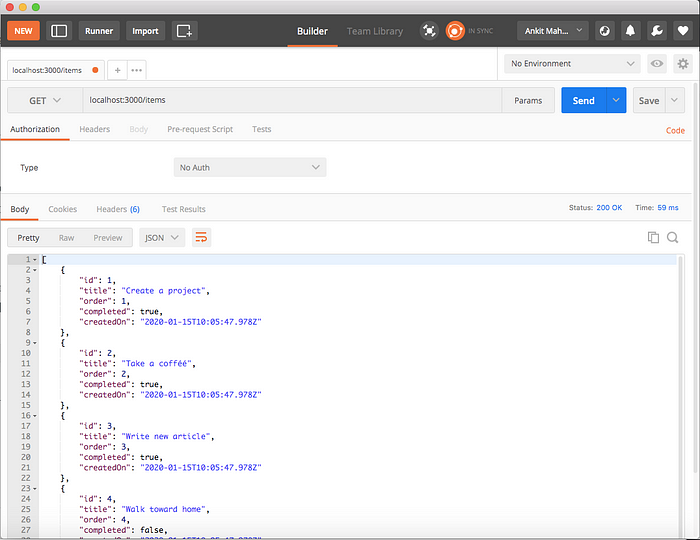
Enter GET request URL ( localhost:3000/items) in your input box of Postman where you see “Enter Request URL”.
 Click on “Send” button after enter URL: localhost:3000/items
You must see this screen ↓
 Similarly try for Single object Get Request. Click on “Send” button after enter URL: localhost:3000/items/1
This returns single object of id=1. You must see this screen ↓

The JSON output “object” of id=”1"
5.2. HTTP POST Request (to Add data)
→ Enter POST request URL ( localhost:3000/items) in your input box of Postman where you see “Enter Request URL”.
 → And “Do not forget to change HTTP verb to POST by clicking arrow at the start of your input box where you entered request URL.”
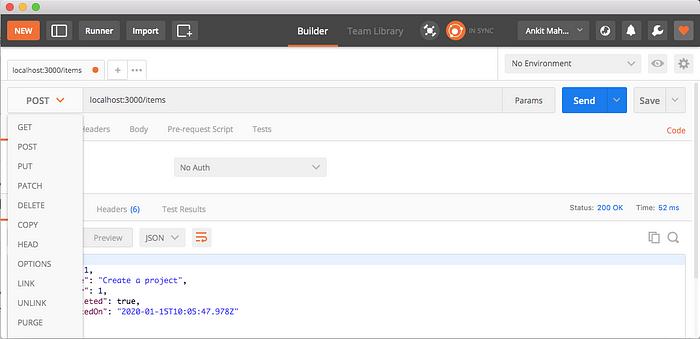
Select “POST” from select box to Send “POST” request with Postman
Select “POST” from select box to Send “POST” request with Postman
Before sending the POST request:
* Click “body” tab (1).
* Select “raw” from the radio box (2).
* Select JSON from the select box (3) — As we are sending JSON data.
* Add request data to the “body” of the request (4).
See below ↓
 To send POST request click on “Send” button after above four sequences.
You must see this screen ↓ where at the bottom you’ll get new item object details in the “Body”.
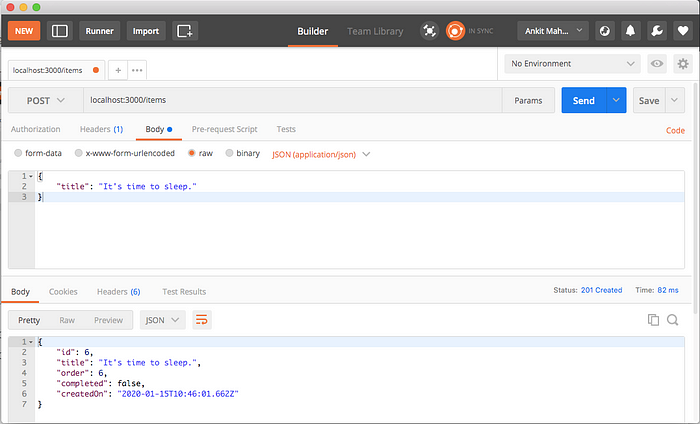
New item has been added to “data” array.
New item has been added to “data” array.
To see the latest items (Repeat #5.1) send a get request URL to localhost:3000/items address. You must see newly created item at the end of the list.
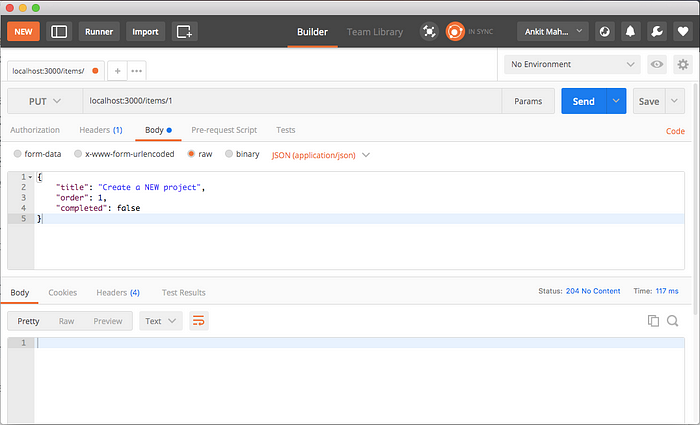
5.3. HTTP PUT Request (to Update data)
Sending PUT request is very similar to sending POST request. The most important difference is request url, and that should be pointed to specific item like this localhost:3000/items/1.
→ Enter POST request URL ( localhost:3000/items/1) in your input box of Postman where you see “Enter Request URL”.
 → And “Do not forget to change HTTP verb to PUT by clicking arrow at the start of your input box where you entered request URL.”
Before sending the PUT request: (EVERYTHING IS SAME AS “POST” REQUEST)
→ And “Do not forget to change HTTP verb to PUT by clicking arrow at the start of your input box where you entered request URL.”
Before sending the PUT request: (EVERYTHING IS SAME AS “POST” REQUEST)
* Click “body” tab (1).
* Select “raw” from the radio box (2).
* Select JSON from the select box (3) — As we are sending JSON data.
* Add request data to the “body” of the request (4).
But this time send all of the required data in the request body.
Your JSON request data in the body for PUT request will be:
{
  "title": "Create a NEW project",
  "order": 1,
  "completed": false
}
To send PUT request click on “Send” button after above four sequences.
You must see this screen ↓ where at the bottom we can’t see anything in the “Body” with HTTP response code “204 No Content”.
 “You can check item you updated by sending a get request”. To see the latest items (Repeat #5.1) send a get request URL to
 localhost:3000/items address. You must see updated item with updated information.
5.4. HTTP DELETE Request (to Delete data)
It’s easy to “delete” If you followed “Post” and “Put” properly.
→ To send a DELETE request, change the request url to address a specific item id like this localhost:3000/items/3
→ And select DELETE as http verb.
Like this ↓
 Then finally, click on “Send” button to call http DELETE request.
There is nothing you could see in the response “Body” but you could see HTTP response code with Status “204 No Content”.
“You can check item list status by sending a get request”. To see the latest items (Repeat #5.1) send a get request URL to
Then finally, click on “Send” button to call http DELETE request.
There is nothing you could see in the response “Body” but you could see HTTP response code with Status “204 No Content”.
“You can check item list status by sending a get request”. To see the latest items (Repeat #5.1) send a get request URL to localhost:3000/items address. You must not see deleted item in the items list.
6. Fix No ‘Access-Control-Allow-Origin’
You may face this error:
No ‘Access-Control-Allow-Origin’ while calling these APIs from another application. Some minor changes required to fix this error.
Do not forget to install CORS.
Open your terminal in the "node-ex-api" folder and run this command:
npm install cors
Next, open up your node-ex-api/server.js file and add below code:
// import required essentials
// ...
var cors = require("cors");
// ...
// create new app
const app = express();
app.use(express.json());
// use it before all route definitions
// allowing below URL to access these APIs end-points
// you can replace this URL(http://localhost:8100) with your
// application URL from where you are calling these APIs
app.use(cors({ origin: "http://localhost:8100" }));
Next
Learn to call these API end-points👆.
Conclusion
We have seen all the HTTP request methods (GET, POST, PUT and DELETE) working. With CRUD operations using Postman.
Done! 🤩 It’s that simple to Create HTTP/Rest API/Web services using Node.js and Express.js | with CRUD operations.
See you later 👋👋
Comments
Loading comments…