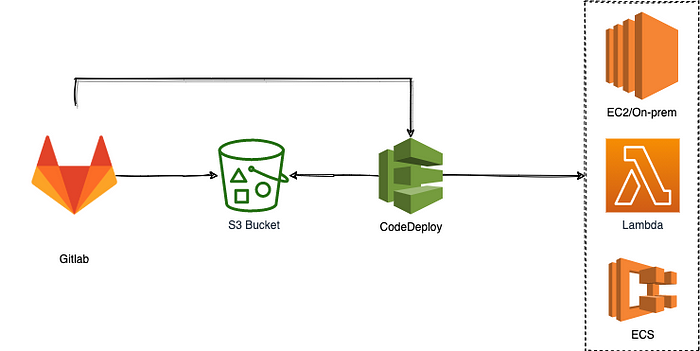
Deploy from Gitlab to AWS
Nowadays everything is hosted in a cloud which make sense. Anybody can create environment from scratch in a blink of an eye, cloud provides flexibility and scalability, cloud providers make sure you have plenty of choice in terms of resources and they take over more and more maintenance duties from you. While all this is true, it is common to leverage cloud and at the same time use what you already been using until now.
In this blog post, I’ll show you how to use Gitlab to deploy application on AWS.
We will provision EC2 instance in AWS, install NGINX and check that defult NGINX webpage is accessible and visible in web browser. Afterwards we will use CI/CD pipeline combining Gitlab CI and AWS Codedeploy to deploy another web page in the place of default NGINX web page.
- Create Gitlab Pages/Plain HTML project
- Create AWS resources
- Create programmatic user in AWS
- Create pipeline and deployment package
- Summary
Let’s use one of the available templates to create new Gitlab project. Click New project button and then From template -> Pages/Plain HTML.
This will create new project with example html and css file.
Now let’s setup necessary resources in AWS. You can choose two ways to provision resources: CloudFormation template or manual provision in AWS console. Luckily for you, I have already prepared CloudFormation template which will provision following resources:
- VPC
- Internet Gateway associated with VPC
- Subnet
- Route Table with route to Internet Gateway
- Key Pair
- Security Group with ingress connection on ports 80
- EC2 with installed NGINX, CodeDeploy and Session Manager agents and custom instance role (allows connection via Session Manager and Get, List operations on our S3 bucket)
- S3 Bucket with versioning enabled
- Codedeploy: Role (uses managed policy AWSCodeDeployRole), App, Group
Go to Cloudformation -> Create Stack -> With new resources (standard). Choose Template is ready and upload the template.
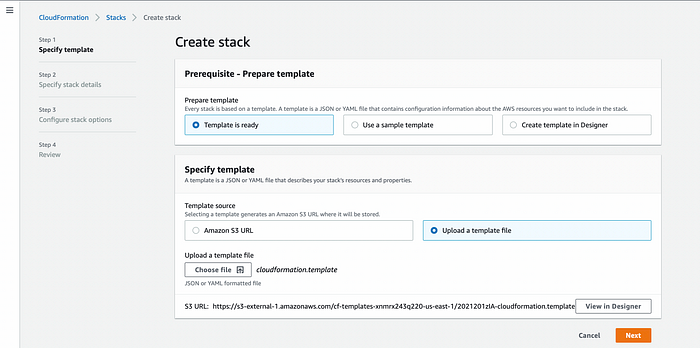
Create stack from existing template
Next set parameters defined in CloudFormation template.
Stack name- any nameApp name- any name, will be part of tag for each resourceBucketName- must be unique in AWS, only lowercase letters and number are allowedSourceIpIngress- CIDR notation, will be used for security group ingress rules. Put you IP address if you want to restrict access. I'm using default, EC2 is accessible for everyone on port 80.

Stack Parameters
Remember to tick checkbox for Capabilities which is necessary in case you have IAM role defined in template.

Stack Capabilities
Stack creation should take around 4 mins. Afterwards all mentioned resources should be already available. You should see last event with logical ID of your stack name in status CREATE_COMPLETE.

Stack Events
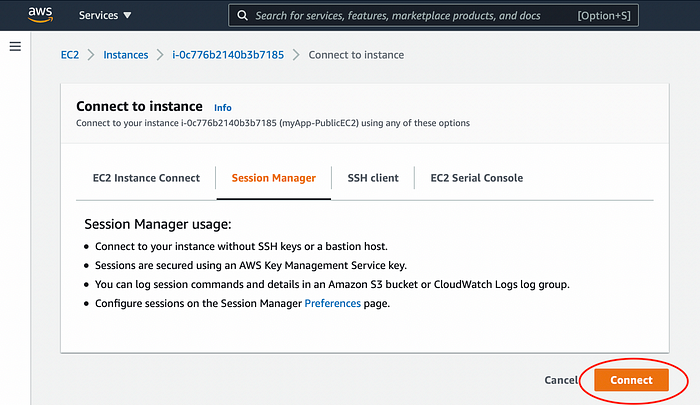
Go to Resource tab, find EC2 instance and click on hyperlink which will take you to instance view. Mark the EC2 instance and click connect.

EC2 Connect
Then open Session Manager tab. The connect button should be active thanks to CloudFormation template which has handled enabling Session Manager connection. Session Manager connection allows to securely connect without SSH keys or bastion host to EC2 instance.
CloudFormation template has done two steps to enable Session Manager connect:
- created instance role with necessary policies and attached it to the EC2
- installed Session Manager agent in EC2 instance using user-data
EC2 Session Manager
Connect to EC2 and run following commands to check that CodeDeploy and NGINX are installed and running:
sudo su - ec2-user
systemctl status nginx
systemctl status codedeploy-agent.service
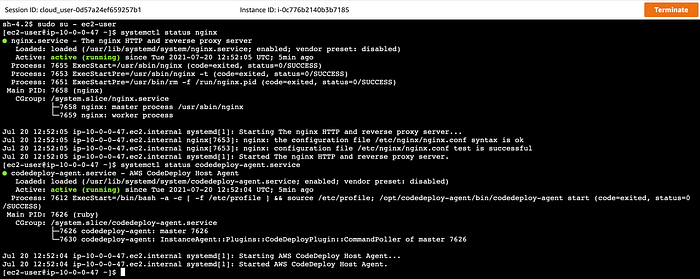
EC2 Commands
Check that default NGINX web page is accessible using EC2 Public IP address. Remember to copy/paste address. Using open address URL will default to https protocol, but NGINX page is available on http protocol.

EC2 Public IP
You should see the NGINX default welcome web page.
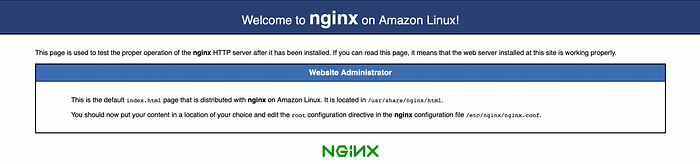
NGINX default web page
We also needed CodeDeploy Application and Deployment Group which were created by stack. Navigate to Codedeploy -> Deploy -> Applications and you should see defined application.
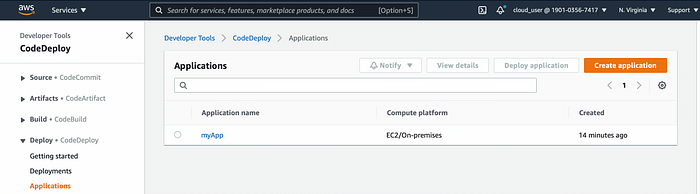
CodeDeploy Application
Click on Application Name, then on Deployment Group Name to check the details such as IAM Role assigned and which EC2 instances are targeted by the deployment group.
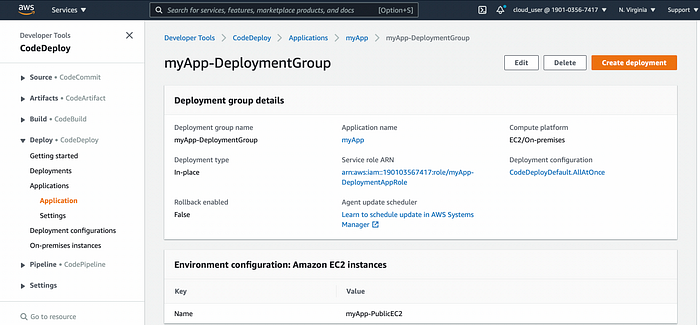
Codedeploy Deployment Group
Both Gitlab and AWS are done and ready. The last part is to integrate Gitlab with AWS to replace default NGINX page with Gitlab page created from Plain/HTML Pages template.
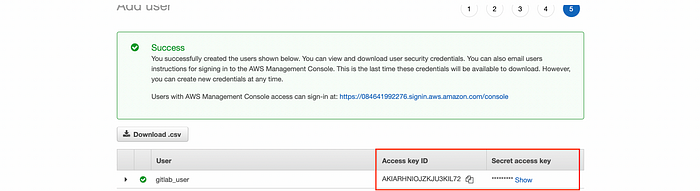
We need to have a way to access AWS resources directly from Gitlab CI pipeline. We do that using AWS programmatic user.
Go to IAM -> Users -> Add Users. Name the user and make sure you have checked Programmatic access checkbox. Then Attach exisiting policies directly and choose AmazonS3FullAccess and AWSCodeDeployDeployerAccess.
WARNING: Those permissions give more access than necessary. For the real world scenarios please adjust permissions for your needs.
Create the user and note down Access Key ID and Secret Access Key. They can't be retrieved again.
Programmatic User Keys
AWS part is done. We can now switch back to Gitlab.
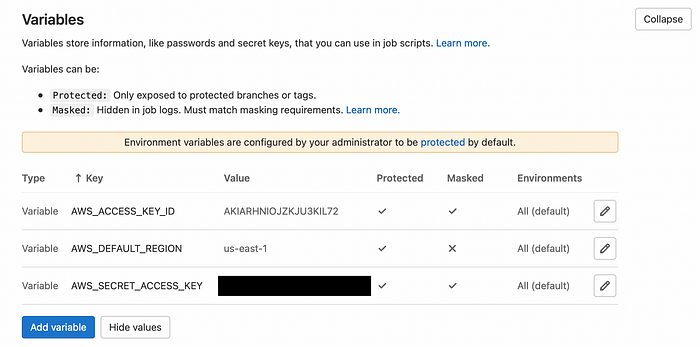
Gitlab allows us to use AWS programmatic user in pipeline. Configuring the user on Gitlab side comes down to adding 3 variables.
Go to Settings -> CI/CD -> Variables.
Add variables:
AWS_ACCESS_KEY_ID- Your Access key IDAWS_SECRET_ACCESS_KEY- Your Secret access keyAWS_DEFAULT_REGION- Your region code (the region you have used to create CloudFormation stack e.g. us-east-1)
Make sure to use the exact names for variables. They are special variables and Gitlab is aware that they should be use as credentials for AWS.
Gitlab AWS Variables
Last missing piece is the Gitlab pipeline.
Default .gitlab-ci.yml comes with project template. We need to adjust it for our case, but before that we need to add few things to make our deployment artefacts compatible with AWS CodeDeploy. CodeDeploy is expecting a ZIP file containing:
- deployment artifacts
- appspec.yml (appspec reference)
- any script necessary to be executed before/during/after deployment
Deployment artefacts include two files: html and css stored in directory. appspec.yml we need to create and place in directory. Create it and copy the code:
version: 0.0
os: linux
files:
  - source: /index.html
    destination: /usr/share/nginx/html/
  - source: /style.css
    destination: /usr/share/nginx/html/
hooks:
  BeforeInstall:
    - location: scripts/remove.sh
      timeout: 300
      runas: root
files section defines what files (source) should be copied to what destination.
hooks section define what script should be run in which stage. We only run script to remove old web page from NGINX before deploying artefacts.
Then create a script as defined in appspec.yml in public/scripts/remove.sh and copy the code:
#!/bin/bash
rm -rf /usr/share/nginx/html/*
Finally update .gitlab-ci.yml with the code:
image: registry.gitlab.com/gitlab-org/cloud-deploy/aws-base:latest

pages:
  stage: deploy
  script:
  - aws deploy push --application-name myApp --s3-location s3://namek999/artifacts.zip --source public/
  - aws deploy create-deployment --application-name myApp --deployment-group-name myApp-DeploymentGroup --s3-location bucket=namek999,bundleType=zip,key=artifacts.zip
  artifacts:
    paths:
    - public
  only:
  - master
Few changes were made:
Change image to registry.gitlab.com/gitlab-org/cloud-deploy/aws-base:latest
- It’s a special docker image maintained by Gitlab which has installed AWS CLI
aws deploy push --application-name myApp --s3-location s3://namek777/artifacts.zip --source public/
- Create a zip from
public/directory, passing deployment to application and push the zip file to S3 bucket - Replace application name and S3 bucket name (you can find them in CloudFormation stack, Outputs tab)
aws deploy create-deployment --application-name myApp --deployment-group-name myApp-DeploymentGroup --s3-location bucket=namek777,bundleType=zip,key=artifacts.zip
- creates deployment in CodeDeploy for specified application and deployment group
- points to location of the zip deployment
- replace application name, deployment group name and S3 bucket name (you can find them in CloudFormation stack, Outputs tab)
Commit .gitlab-ci.yml and go to CI/CD -> Pipelines. The pipeline will be trigged automatically after commit.
After it is done, go back to AWS Codedeploy -> Deploy -> Deployments and you should see completed deployment.
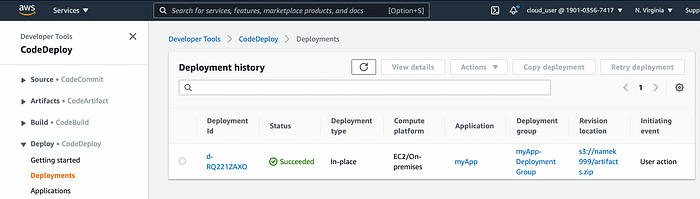
Codedeploy Deployment
Everything looks ok, then check what is now being served by NGINX. Navigate to EC2 public IP in web browser and you should now see different web page.
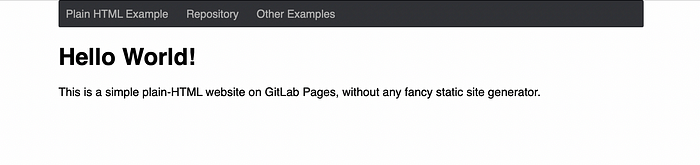
Gitlab Page
We have created pipeline which integrated Gitlab with AWS deployment. For successful deployment from Gitlab to AWS you need:
- AWS programmatic user
- S3 Bucket for storing deployment packages
- CodeDeploy Application and Deployment Group
- Complete necessary setup to be compatible with CodeDeploy (appspec.yml and scripts)
Thanks for reading!
Comments
Loading comments…