If you're a spreadsheet ninja, I can only assume you'll want to start your Jupyter/Python/Pandas journey by importing a CSV into your Jupyter notebook.
Let me just say that this is very easy to do, and I'm excited to show you.
Hit that easy button and let's do it!

Table of Contents:
-
Getting started
-
Imports
-
Read CSV
-
Do something to the CSV
-
Export CSV
Step 1: Getting started
First, you'll need to be set up with Python, Pandas, and Jupyter notebooks. If you aren't, please start here
Step 2: Imports
Next, you'll set up a notebook with the necessary imports:
import pandas as pd
Pandas is literally all you need for this operation, and it is often imported as pd. You'll use pd as a prefix for pandas operations.
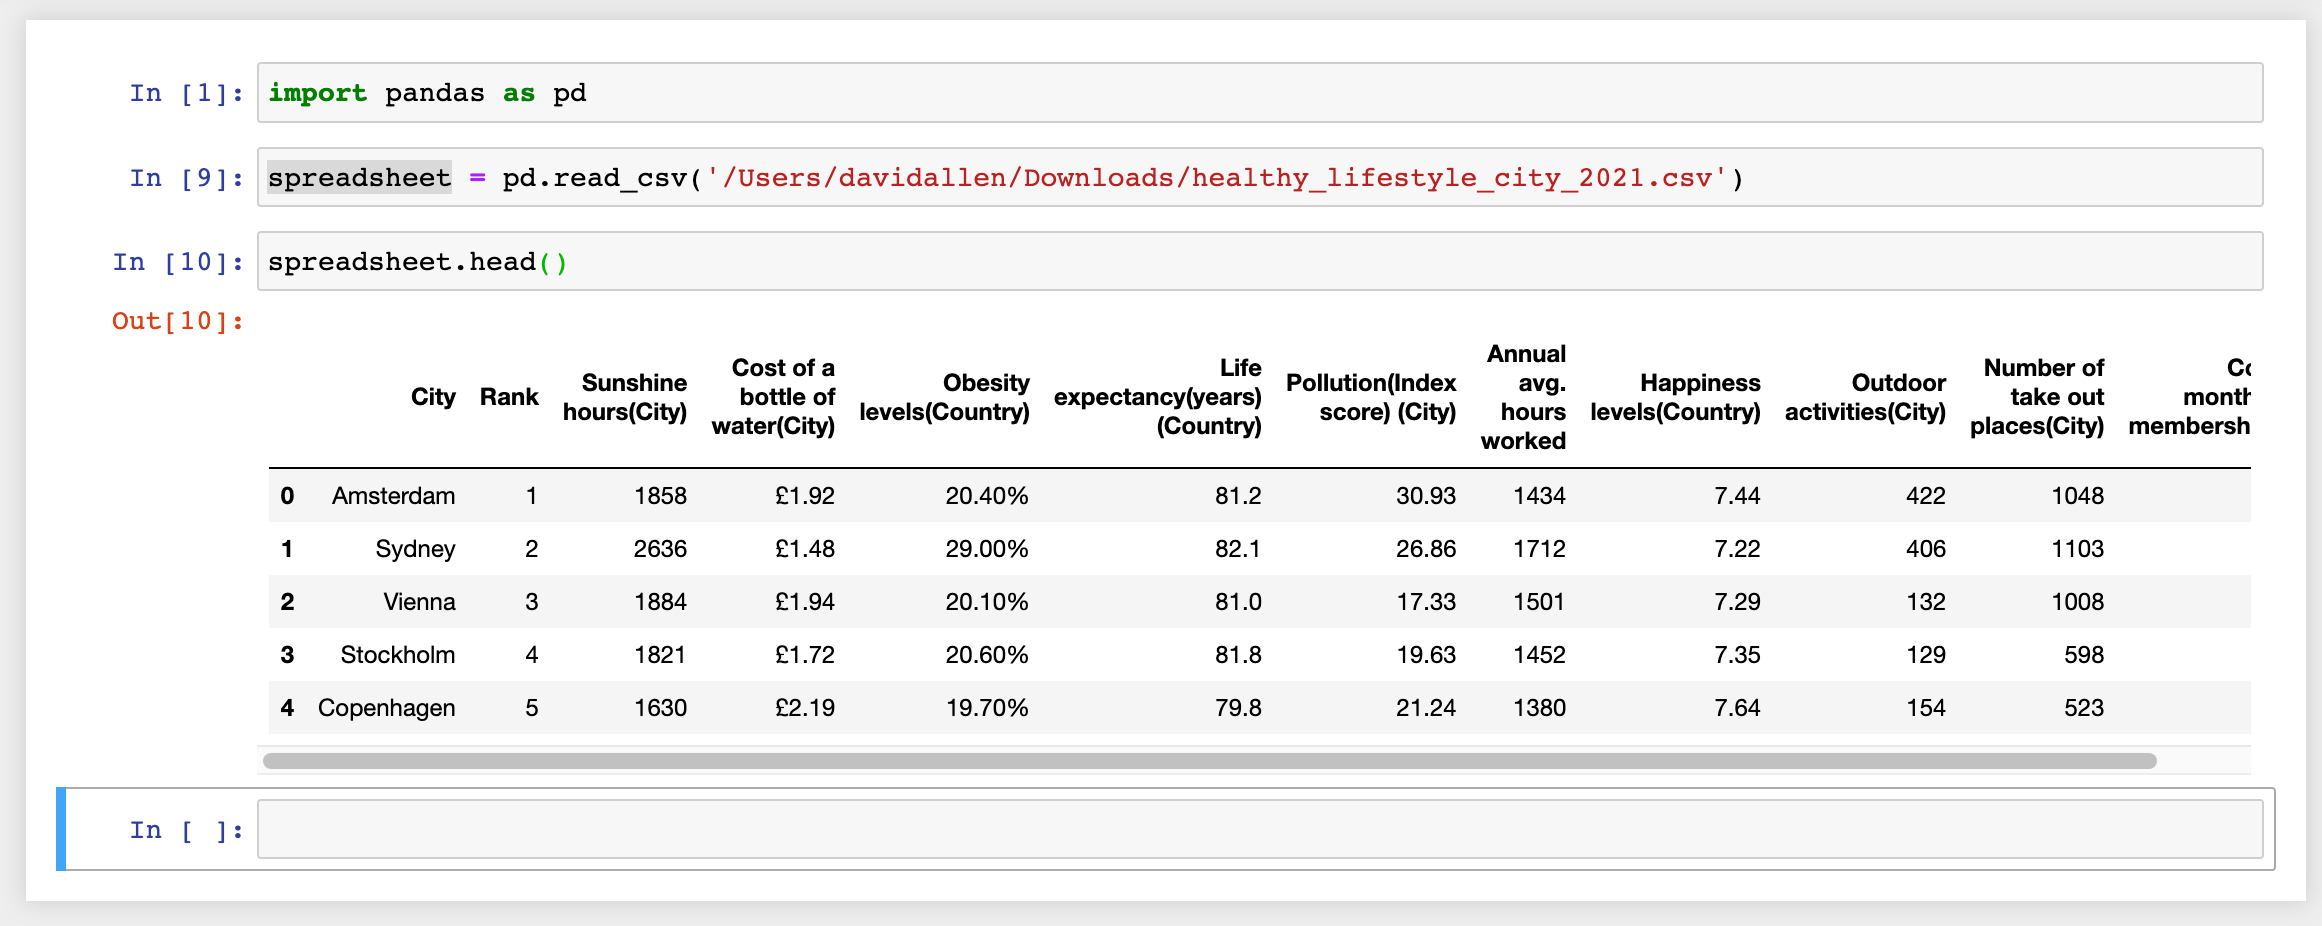
This is what your notebook should look like:

Step 3: Read CSV
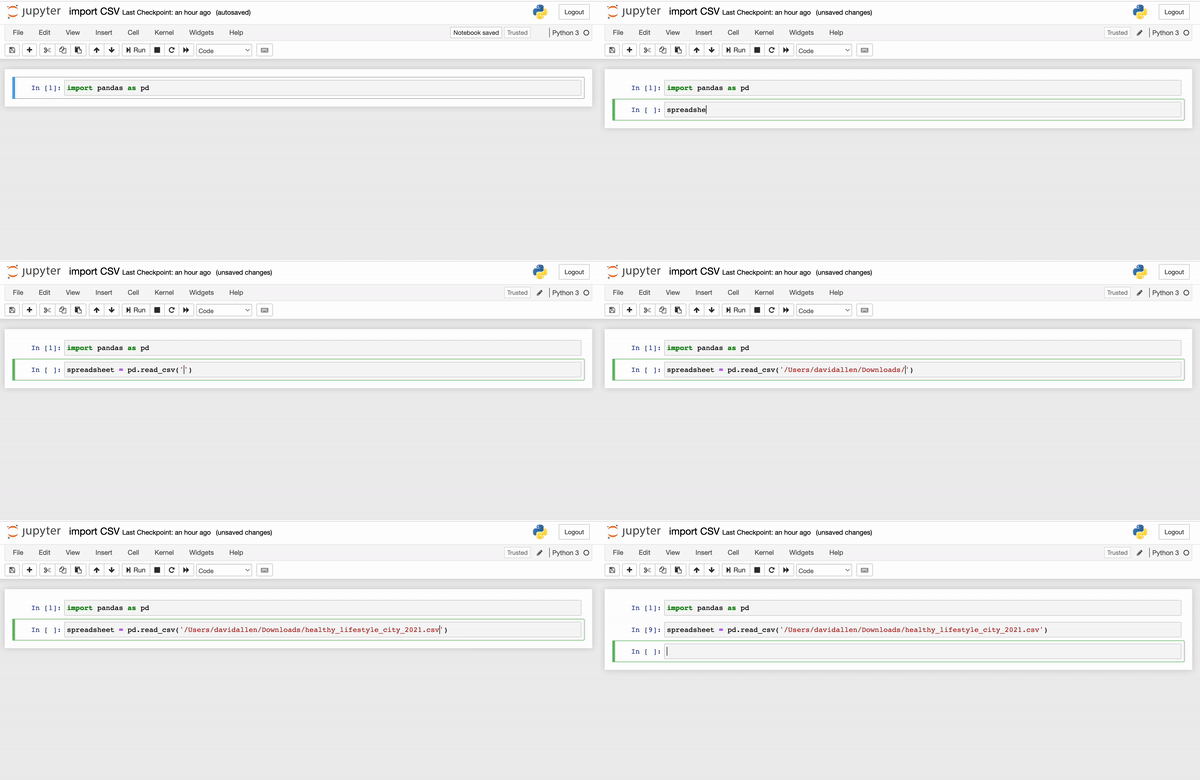
Next, you'll simply ask Pandas to read_csv, and then assign your spreadsheet a variable name. Sorta like this:
variable_name = pd.read_csv(‘file path')
The read_csv is a Pandas method that allows a user to create a Pandas Dataframe from a local CSV. You can read more about the operation here at https://pandas.pydata.org/, where you can find all the Pandas documentation you'll ever want.
Remember, we use the prefix pd to run any pandas operations:
spreadsheet = pd.read_csv('/Users/davidallen/Downloads/file_name.csv')
But first, we'll need a CSV to read! Let's use something from kaggle.com. I think this Healthy Lifestyle Cities Report is interesting, so let's use that one.

If you don't have a Kaggle account, go ahead and register. It's a worthwhile site to know about. Loads of datasets to peruse.
Then, just hit the download button to grab all the project resources. Open the zip file and you'll find your CSV in your downloads folder (or where ever your downloads go). Make note of the location and filename.
Now, let's import that CSV!
spreadsheet = pd.read_csv('/Users/davidallen/Downloads/healthy_lifestyle_city_2021.csv')

You can use the tilda (~) and then a backslash(/) in front of “Desktop” or “Documents” or “Downloads” before hitting “tab” to get some autocomplete help with the file path.
It should look like this before you hit tab:
spreadsheet = pd.read_csv('~/Desktop')
spreadsheet = pd.read_csv('~/Downloads')
spreadsheet = pd.read_csv('~/Documents')
And then your computer should autocomplete the path for you, like this:
spreadsheet = pd.read_csv('/Users/davidallen/Desktop/')
spreadsheet = pd.read_csv('/Users/davidallen/Downloads/')
spreadsheet = pd.read_csv('/Users/davidallen/Documents/')
Then, just start typing out the file name and hit “tab” again to autofill the rest of the path.
See it in action:

Step 4: Do something to the CSV
Now that we've loaded our CSV into our notebook, it's time to do something with the CSV.
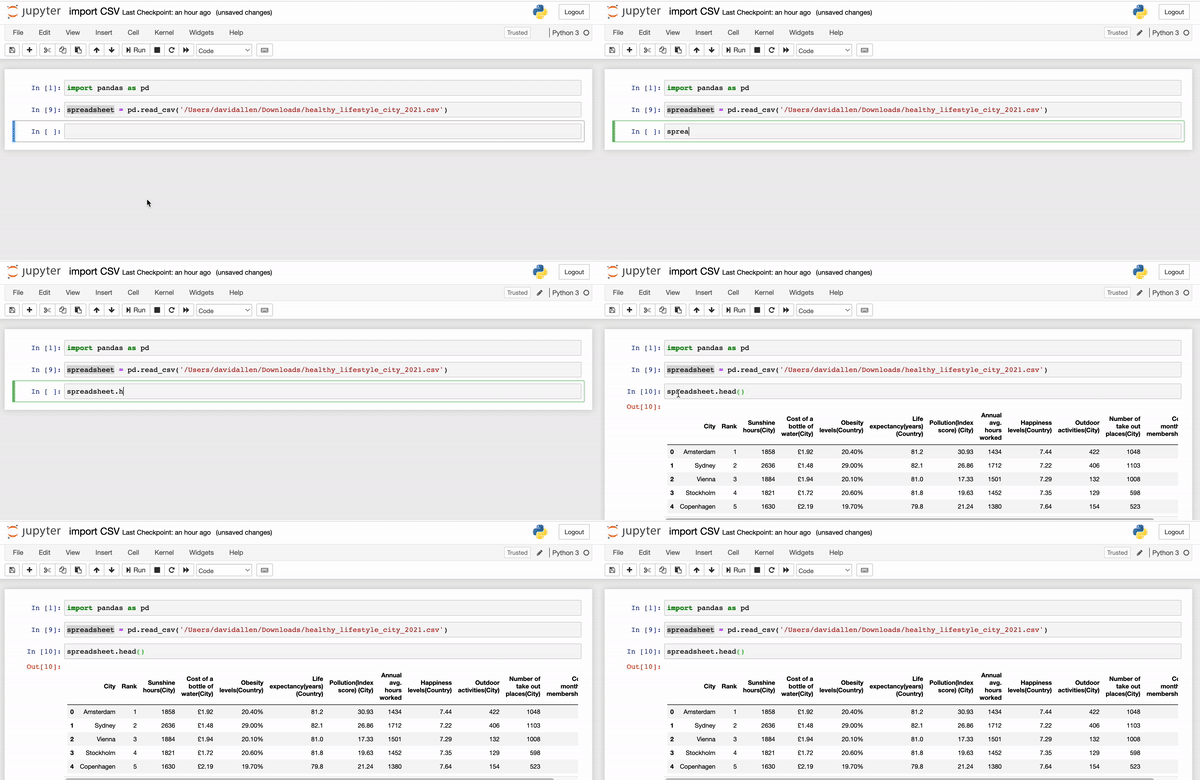
First, let's just take a look at the first 5 rows with a very popular command: head() .
spreadsheet.head()
This will show the first 5 rows (including column headers) of our DataFrame.

You can use the tab again to autocomplete the name of your variable spreadsheet
Just start typing spread and then hit tab.
Looks like this:

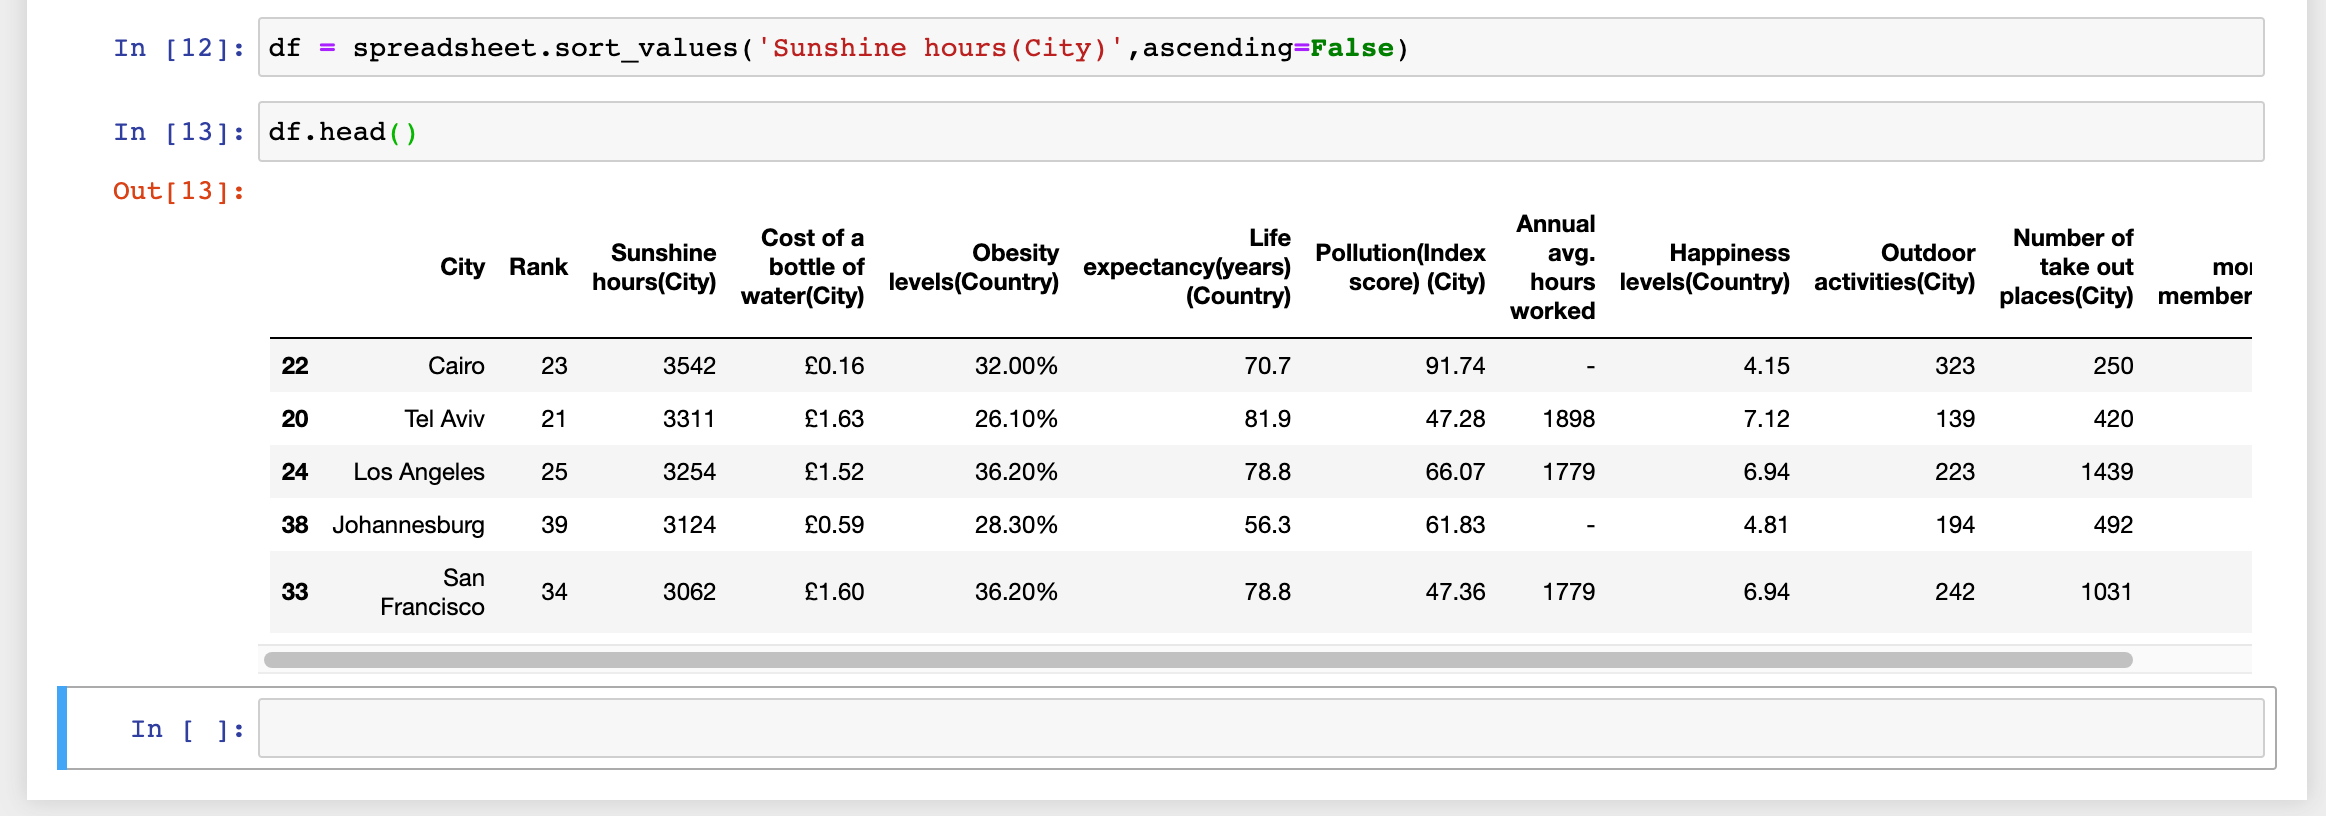
Very quickly, let's just sort the DataFrame by Sunshine hours(City), assign the sorted result to a new variable, and then we'll export this new CSV.
We'll assign the sorted DataFrame to a new variable df
df = spreadsheet.sort_values('Sunshine hours(City)',ascending=False)
.sort_values() does exactly what it sounds like. Just pass in the column name (or column names), and then specify whether or not you want to sort ascending or not. Setting ascending=False will sort the DataFrame in a descending manner.

Cool.
Next, we'll complete the tutorial by exporting the sorted CSV.
Step 5: Export the CSV
Exporting is as simple as importing. Just use the pandas DataFrame method to_csv to save your df to local storage:
df.to_csv('/Users/davidallen/Desktop/new_csv.csv')
Easy! Just imagine the possibilities. Now that you've mastered CSV imports, relax and unwind by exploring the best gambling websites.