
When your Discord bot responds to your server, you don't always want a boring default message to be sent back. Maybe you have links or images that you want to send back in chat. With Python and Discord.py, this is super easy to do in your Discord bot!
Python Discord Bots: Formatting Text: How to add rich formatting to Python Discord bots
Note: This is tested on version 1.4.1 of the Discord.py module. You will encounter issues if you are using a version lower than 1.0. It is recommended that you migrate your code to a more current version.
Building Embeds
Embeds in Discord are simple and have a very clean, formatted look to them. In this tutorial we will go through how to create an embed and customize every part of it.
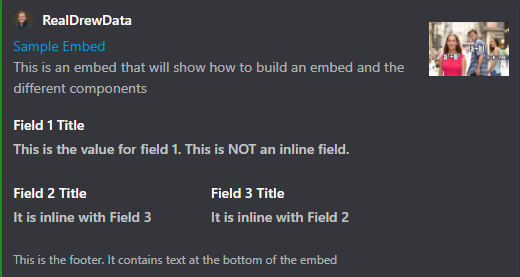
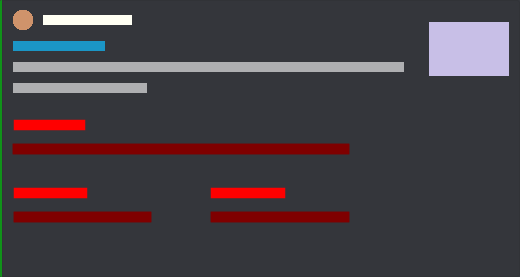
The embed below is similar to what we will be making. It has a lot going on. There are multiple pictures, links, and text fields that we are able to edit.
You'll know how to make this embed by the end of the tutorial!
Creating the Initial Embed
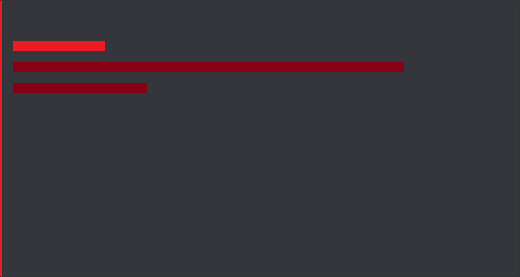
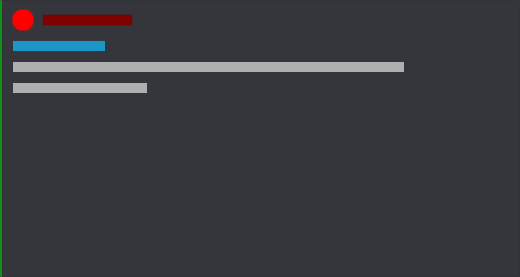
Title, Description, and color (color is the bar to the left side)
When creating an embed, you need to initialize an embed object using the Embed() function from the discord package. We will be using 4 arguments to get started:
-
title: a string to set the title. This is the first line on our blank embed
-
url: a string to set the link for the title. When you click on title in the final embed it will take you to this link
-
description: a string to set the description. This is the darker 2 red lines above
-
color: a color object. This will color the left edge of the embed.
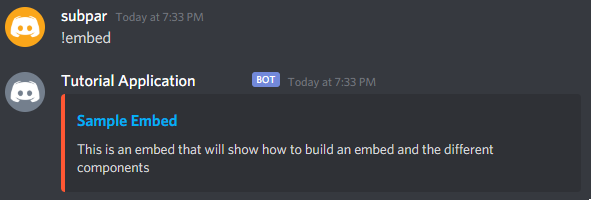
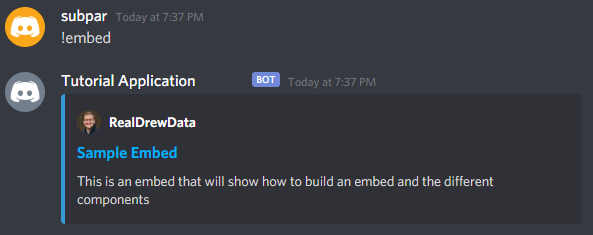
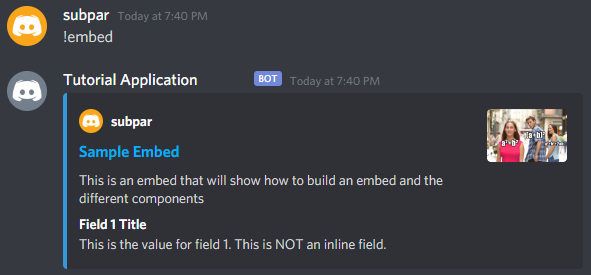
Let's create a new command in the bot code. Call it embed. All this command will do is build the embed and send it to the channel. In the command build the initial embed object like so:
    @client.command()
    async def embed(ctx):
        embed=discord.Embed(title="Sample Embed", url="https://realdrewdata.medium.com/", description="This is an embed that will show how to build an embed and the different components", color=0xFF5733)
        await ctx.send(embed=embed)
Start the bot. Go to the server where you joined your bot. Send the embed command we just created. Your bot will return the embed to you!
You have multiple options when it comes to colors. You can continue to look up HEX color codes with a tool like Google's Color Picker, or you can use the built in colors inside discord.Color. To use the built in colors, you just use the classmethod of that color's name. To turn the example blue, you would change it like this (change in bold):
    @client.command()
    async def embed(ctx):
        embed=discord.Embed(title="Sample Embed", url="https://realdrewdata.medium.com/", description="This is an embed that will show how to build an embed and the different components", color=**discord.Color.blue()**)
        await ctx.send(embed=embed)
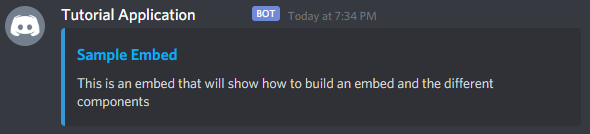 Now the embed is blue!
A full list of the color classmethods available for color in Discord.py are available in the documentation.
Adding an Author
The author is the text at the very top, and the icon is the circle next to that. Once we have our initial embed object, we can use the .set_author() method on it to add the information for the author. For the author, there are 3 arguments to know:
-
name: a string with the author's name
-
url: a string with a link for the author text
-
icon_URL: a string with the URL location of the picture to use in the author icon
In action, this will look something like this:
embed.set_author(name="RealDrewData", url="https://twitter.com/RealDrewData", icon_url="https://pbs.twimg.com/profile_images/1327036716226646017/ZuaMDdtm_400x400.jpg")
Running the bot and using the command in Discord will return the embed with the author information filled in.
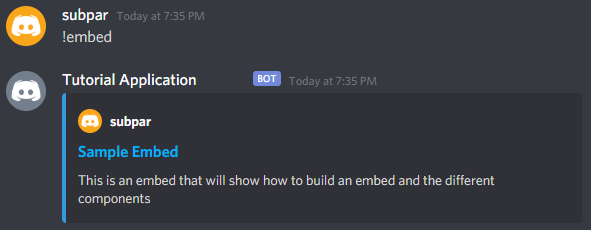
If you want the author name and icon to be the person who called the command, you can pull that information from the ctx, or context of the command. ctx.author.display_name will pull the username (or nickname if they have one set for the guild) of the person who used the embed command. ctx.author.avatar_url will retrieve the URL of their avatar to use in the embed (changes in bold).
embed.set_author(name=**ctx.author.display_name**, url="[https://twitter.com/RealDrewData](https://twitter.com/RealDrewData)", icon_url=**ctx.author.avatar_url**)
Once the .set_author method is updated, you will see that the icon and author name are updated to match the person who called the embed function.
Thumbnails
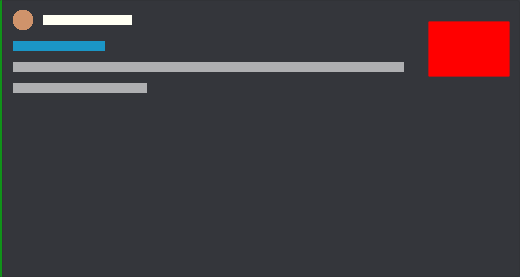
Our next step will be to add the thumbnail. This is the image that goes at the top right of the embed. To add this, we will use the .set_thumbnail() method on our initial embed object. The .set_thumbnail() method takes a single argument that we need to know about:
- url: a string with the URL location of the picture to use for the embed picture
In action, it will look like this:
embed.set_thumbnail(url="https://i.imgur.com/axLm3p6.jpeg")
Simple as that, our embed now has a thumbnail at the to right.

Adding Fields
When creating embeds, you have the ability to create a number of text fields with more information. To add these fields, we will use the .add_field() method on our embed object. There are 3 arguments that this method can take that you need to know about:
-
name: a string with the title of the field
-
value: a string with the body text of the field
-
inline: boolean specifying whether the field is inline
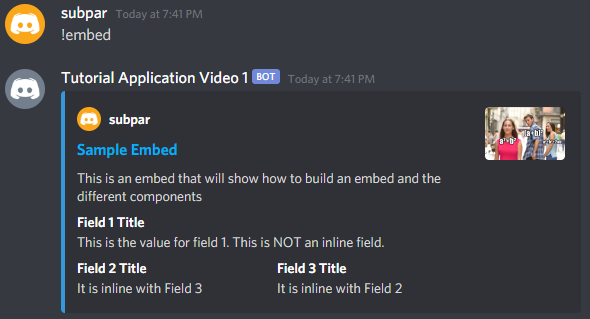
Our code will look like this to add a field:
embed.add_field(name="Field 1 Title", value="This is the value for field 1. This is NOT an inline field.", inline=False)
Field 1 is not inline, meaning that it will take up the entire line of the embed. If we want to put multiple fields next to each other, we can set inline=True. This will put the next 2 fields we create on the same line. The code will look like this:
    embed.add_field(name="Field 2 Title", value="It is inline with Field 3", inline=True)
    embed.add_field(name="Field 3 Title", value="It is inline with Field 2", inline=True)
And our resulting embed has both fields on the same line.
Adding a Footer
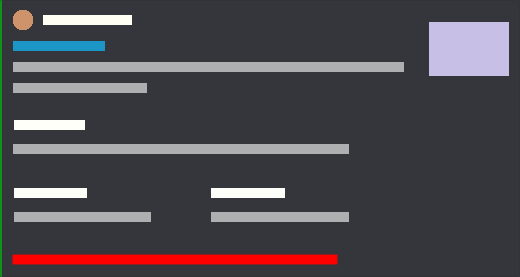
The final part to customize on our embed is the footer. This is done by using the .set_footer() method on the embed object. This method has only 1 argument, but it is a good place to play around and use information from the ctx variable to enhance it.
- text: a string with text to display in the footer
A simple footer is added by doing something like this:
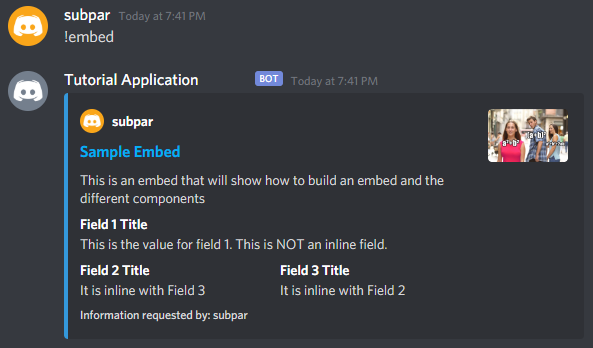
embed.set_footer(text="This is the footer. It contains text at the bottom of the embed")
And the result:
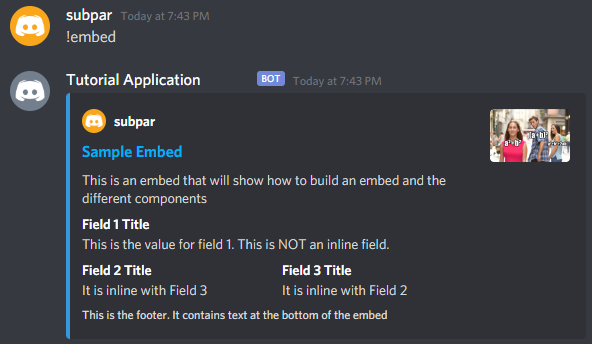
We can also do some simple string formatting to customize the text with information from ctx. To have it say “Information requested by: subpar”, we can type the sentence with {} as a placeholder for the name variable. Using the .format() string method, we can replace the placeholder with ctx.author.display_name. (Changes in bold)
embed.set_footer(text=**"Information requested by: {}".format(ctx.author.display_name)**)
When we request the embed now, we will see this output:
Conclusion
In this post you learned how to create an embed, adding features such as an author, thumbnail, and fields to make it look more interesting. Experiment with the different elements and get your embeds exactly how you like them.
If you are still having trouble creating your own embed, check out the visual embed creator put together by orels1. It has an easy to use interface that allows you to preview your embed and get the code to quickly implement it in your Discord bot.
Code Reference
#### Create the initial embed object ####
embed=discord.Embed(title="Sample Embed", url="https://realdrewdata.medium.com/", description="This is an embed that will show how to build an embed and the different components", color=0x109319)

# Add author, thumbnail, fields, and footer to the embed
embed.set_author(name="RealDrewData", url="https://twitter.com/RealDrewData", icon_url="https://pbs.twimg.com/profile_images/1327036716226646017/ZuaMDdtm_400x400.jpg")

embed.set_thumbnail(url="https://i.imgur.com/axLm3p6.jpeg")

embed.add_field(name="Field 1 Title", value="This is the value for field 1. This is NOT an inline field.", inline=False)
embed.add_field(name="Field 2 Title", value="It is inline with Field 3", inline=True)
embed.add_field(name="Field 3 Title", value="It is inline with Field 2", inline=True)

embed.set_footer(text="This is the footer. It contains text at the bottom of the embed")


#### Useful ctx variables ####
## User's display name in the server
ctx.author.display_name

## User's avatar URL
ctx.author.avatar_url
Comments
Loading comments…