Docker is a very convenient tool to host applications in any environment; Dash is also a very user-friendly visualization tool for Python users. Therefore, Dockerizing an image to host Dash would be a very convenient way to host dashboards in any or even multiple environments. In this article, we would go over how to Dockerize Dash in a Docker Image.
The best way to start Dockerizing a Dash dashboard is to develop a Dash application first and test it locally. Once you have prepared your Dash dashboard, you can start to Dockerize it by creating a Dockerfile (The file name is Dockerfile, without any extension). The Dockerfile represents a Docker Image and contains instructions on what operations to be done when building a container. Here is the Dockerfile on how to Dockerize a Dash application:
FROM python:3.7.1

WORKDIR /code

COPY ./requirements.txt /code/requirements.txt

RUN pip install --upgrade pip
RUN pip install --no-cache-dir --upgrade -r /code/requirements.txt

RUN pip uninstall --yes werkzeug
RUN pip install -v https://github.com/pallets/werkzeug/archive/refs/tags/2.0.3.tar.gz

COPY ./display_dash.py /code/display_dash.py

CMD ["python","display_dash.py"]
In a typical Dockerfile on Dockerizing a Dash application, you would do the following:
- Declare the base image — Python
- Install all the required dependencies including dependencies for both Plotly and Dash
- Reinstall the package werkzeug with version 2.0.3, because it ensures Dash runs stably
- Run the dashboard you built!
Note: The Dockerfile is also available in my Github repository
Once the Dockerfile is prepared, you may build the container and run it. You may run the following code on the command line at the directory where the Dockerfile is located:
docker build -t [image_name] .
docker run -h localhost -p 9002:9000 -d --name [container_name] [image_name]
The code does two things:
- The first line is to build a Docker container based on your Dockerfile and call it with [image_name]. Be sure to include the “.” at the end to indicate the directory of the Dockerfile!
- Once the Docker container is built, you run the second line to run the contain to expose the Dash application at localhost:9002. 9002:9000 means mapping the Port 9000 in the container at Port 9002 in your local environment.
Note 1: The reason for mapping the container Port 9000 because I declared the Dash Application at Port 9000 in the Python script
Note 2: In order to expose the Dash application, you must set the host = ‘0.0.0.0’ in the container environment! It will not work if you set it at ‘127.0.0.1’
if __name__ == '__main__':
    app.run_server(debug=True, host='0.0.0.0', port=9000)
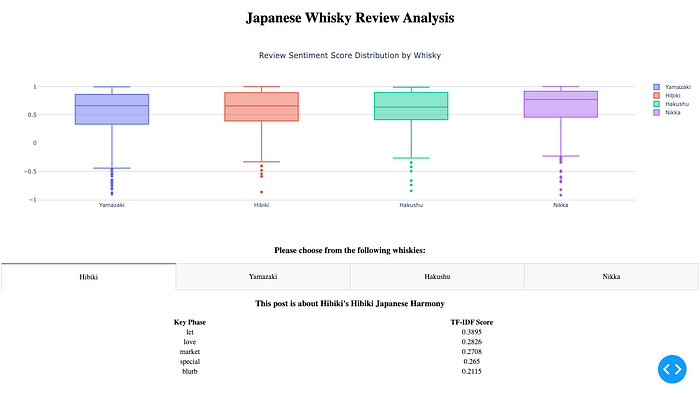
A good example of a Dockerized Dash example may be found in my recent project on upgrading the frontend of Japanese Whisky Review analysis, where I Dockerized a Dash dashboard for sentimental analysis on reviews and summarizing the reviews using TF-IDF. You may check out how I Dockerize the dashboard in the previous article, or my GitHub repository.
New Dashboard of Japanese Whisky Review Analysis:
Dockerizing a Dash dashboard is very easy, you just simply add a Dockerfile with a couple of lines of instruction, build a container with it, and run it!
Reference
My LinkedIn Profile:
https://www.linkedin.com/in/jacquessham/
My GitHub
GitHub Repository of example/instructions to Dockerize Dash application:
DashExamples/DockerizeDash at master · jacquessham/DashExamples
GitHub Repository of Dockerized dashboard example:
Comments
Loading comments…