VS Code or Visual Studio Code, a famous feature-rich and powerful code editor is almost known by every developer on earth.
Can you imagine how cool it is to create a remote code editor and host on a domain of your choice without requiring any dependencies. You can open the remote development code editor with just the browser itself. You almost get all of VS code features without actually installing the actual application.
Ok lets start and see how to do it,
**Prerequisites:
**1. An AWS account [covers everything under free tier]
2.Basic AWS knowledge [like creating an EC2 instance, security groups, SSH]
STEP 1 → Create an EC2 instance on AWS
- Login to your AWS account and create a t2.micro instance, I suggest you to choose a ubuntu ami because it comes with yum and apt pre-installed which we will be using in the process.
- Make sure your instance allows https/http traffic from outside i.e internet.
- Under “Security Groups” ensure you have rows for “SSH” (:22) and “HTTP” (:80) for ingress rules.
- Generate a key file and store it locally to SSH to your remote instance.
- Launch your instance and make note of public IP address of the instance.
STEP 2 → SSH to your instance
- Using the key pair ssh to your instance.
ssh -i "path-to-your-key-file.pem" <user-name>@<public_ip>
STEP 3 → Installing VS code server
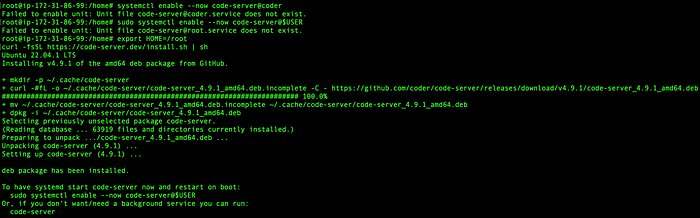
Once you are inside EC2 instance install code-server by running the following commands.
export HOME=/root
#normal install
curl -fsSL https://code-server.dev/install.sh | sh

#to view live logs while installing
curl -fsSL https://code-server.dev/install.sh | sh -s -- --dry-run

#Note: Run either of the two commands not both.
After successful installation you can see the below message.
IMG [1.1]:
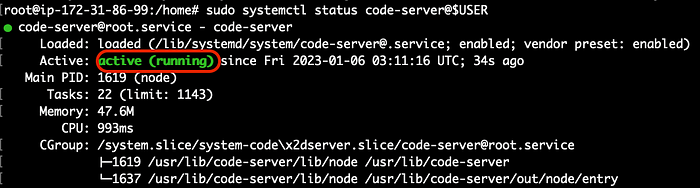
#To start code-server
sudo systemctl enable --now code-server@$USER

#Next check the status of code-server
sudo systemctl status code-server@$USER
IMG [1.2]:
IMG [1.3]:

If you scroll below you can find the IP address on which your code-server is listening to i.e http://127.0.0.1:8080 as shown in IMG [1.3].If we were running this on a local system we could have navigated to http://127.0.0.1:8080 in the browser to view our code-server but since we are in remote instance we need to install a web-server like NGINX to host our VS code-server on our custom domain.
If you don’t have a domain you can purchase one from sites like : Google Domains or in Amazon Route 53 (or you can choose any other one of your choice)
Once you have a domain name, add an A record to your domain that points to your instance’s IP address.
STEP 4 → Installing and configuring NGINX server
Now one more thing we need in addition to Nginx server is we need to add some TLS(Transport Layer Security) to our code-server to make it secure HTTPS connection.
So we install certbot alongside Nginx to get a SSL certificate for our domain.
- Install NGINX:
sudo apt update
sudo apt install -y nginx certbot python3-certbot-nginx
- Update
/etc/nginx/sites-available/code-serverfile using sudo with the following configuration:
server {
    listen 80;
    listen [::]:80;
    server_name yourdomain.com; #your domain name

    location / {
      proxy_pass http://127.0.0.1:8080/; #ip where you code-server was listening see IMG [1.3]
      proxy_set_header Host $host;
      proxy_set_header Upgrade $http_upgrade;
      proxy_set_header Connection upgrade;
      proxy_set_header Accept-Encoding gzip;
    }
}
- Enable the config:
sudo ln -s ../sites-available/code-server /etc/nginx/sites-enabled/code-server
sudo certbot - non-interactive - redirect - agree-tos - nginx -d yourdomain.com -m you@example.com
Be sure to replace you@example.com with your actual email and yourdomain.com with your actual domain name.
At this point, you should be able to access code-server via [https://yourdomain.com](https://mydomain.com./)
Nginx server options for reference:
sudo systemctl reload nginx
sudo systemctl start nginx
sudo systemctl stop nginx
sudo systemctl status nginx
For testing purposes I have hosted the code-server on my instances Public-IP instead of domain.
When you navigate to your domain name you will see the below page.
IMG [1.4]:
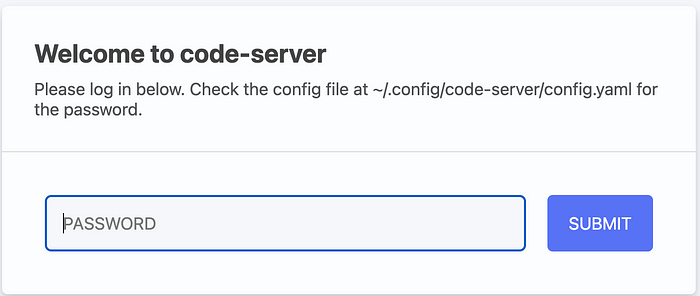
Extract the code-server password from the path shown : ~/.config/code-server/config.yaml in your /root folder.
You can now see the VS code window opened on your browser window, cool isn't it.
IMG [1.5]:
As I mentioned earlier instead of hosting on my domain I have redirected it to my instance’s public-IP address for viewing and testing purpose.
You can access all your files which is in the remote instance.
Thanks for Reading !!!
Taking a step further:
You can terraform your EC2 instance deployment and configure user_data of the instance to whatever development environment you need including code, packages, libraries, etc and just share the domain name for developers to work on. They get a ready made independent working environment which works in the browser. Since you will be using terraform you can deploy and destroy anytime with ease.
Resources:
GitHub - coder/code-server: VS Code in the browser
Comments
Loading comments…