In this article, you explore a common use case of sending emails. You would register users and send them an email with a verification link.
Sending emails to users is an important feature that should be implemented in Django your application, especially an application that involves users signing up with their email address. Sending emails can be useful in a Django application for various reasons.
It can be particularly useful in the following use cases:
- Verification of a user’s email
- Resetting the password of a user
- Sending notifications to users.
In this article, we would explore the first use case in which you will:
- Customize Django’s default
Usermodel so users can log in with an email instead of a username. - Register a new user.
- Send a verification link to the user’s email after registration.
This project’s source code can be found on my GitHub.
Prerequisites
Before continuing with this guide, you should be familiar with the basics of Python and Django Web Framework. In this guide, you would be making use of Django version 4.2.4.
Without further ado, let’s get right into it.
💡 Learn how we can change update Django serializers to load dynamic fields: > Take your Django Serializer game to the next level
👉 To read more such acrticles, sign up for free on Differ.
Project Setup
Create a Virtual Environment
Before starting your Django project, you should always install a virtual environment. A virtual environment isolates your project’s packages from your other system-wide packages. This helps prevent conflicts when you have multiple projects with different versions of the same package.
On your command line, install and activate a virtual environment with the following commands:
# create and navigate to the directory that will
# contain your project and its virtual environment
mkdir PROJECT-DIRECTORY
cd PROJECT-DIRECTORY

# Create virtual environment
python –m venv env
# Activate the virtual environment
Source env/bin/activate # Linux or MacOS
env\Scripts\activate.bat # Windows
Install Django and Create a Project
Install Django using pip — Python’s package manager:
pip install Django
Create a Django project using the django-admin command:
django-admin startproject sendemail
cd sendemail
Create an app named user in your sendemail directory:
python manage.py startapp user
Install the user app in your settings.py file:
INSTALLED_APPS = [
    ...
    'user',
]
Create a Custom User Model
In your application, you would want users to be able to register and login by entering their email address. But Django’s default method for login is using a username. You would want to change the unique identification of a user to an email instead of a username.
Fortunately, Django provides a way to customize this behavior by creating a custom User model. To create a custom User model, you need to create a model that inherits from Django's AbstractUser model.
To create a custom User model, open the models.py file in your user app directory and include the following code in it:
from django.db import models
from django.contrib.auth.models import AbstractUser
from django.utils.translation import gettext_lazy as _

class CustomUser(AbstractUser):
    username = None
    email = models.EmailField(_('Email Address'), max_length=50, unique=True)
    email_is_verified = models.BooleanField(default=False)

    USERNAME_FIELD = 'email'
    REQUIRED_FIELDS = []

    objects = CustomUserManager()

    def __str__(self):
        return self.email

    def save(self, *args, **kwargs):
        super().save(*args, **kwargs)
In the code above, you:
- created a model named
CustomUserthat inherits fromAbstractUser. - added a new email field with
unique=True- to ensure that two users cannot have the same email. - changed the
usernamefield toemail - added a
CustomUserManagerobject since the defaultUsermodel has been modified - saved the new
Usermodel with the new changes by callingsuper.save().
Right above the CustomUser model, add the CustomUserManager model so that we can manage our new User model:
from django.contrib.auth.base_user import BaseUserManager

class CustomUserManager(BaseUserManager):
    def create_user(self, email, password, **extra_fields):
        if not email:
            raise ValueError(_('The Email must be set'))
        email = self.normalize_email(email)
        user = self.model(email=email, **extra_fields)
        user.set_password(password)
        user.save()
        return user

    def create_superuser(self, email, password, **extra_fields):
        extra_fields.setdefault('is_staff', True)
        extra_fields.setdefault('is_superuser', True)
        extra_fields.setdefault('is_active', True)
        if extra_fields.get('is_staff') is not True:
            raise ValueError(_('Superuser must have is_staff=True.'))
        if extra_fields.get('is_superuser') is not True:
            raise ValueError(_('Superuser must have is_superuser=True.'))
        return self.create_user(email, password, **extra_fields)
Django needs to be aware you have modified its default User model. Specify this in your settings.py file:
AUTH_USER_MODEL = 'user.CustomUser'
Make Migrations
For simplicity’s sake, I would stick to using Django’s default database — sqlite3. Migrate the models to the database using the following commands:
python manage.py makemigrations
python manage.py migrate

# Start the development server
python manage.py runserver
In your browser, when you visit the admin login page at http://127.0.0.1:8000/admin/, you would see that you can now use an email address to log in instead of a username. When you also try to create a superuser, Django would prompt you for an email instead of a username.
Register a New User
Create Sign up Form
You would want to create a form with which a new user can sign up.
Create a file named forms.py in your user app directory and write a form class in it:
from django import forms
from django.contrib.auth import authenticate, get_user_model

User = get_user_model()

class UserRegisterForm(forms.ModelForm):
    password = forms.CharField(label='Password')

    class Meta:
        model = User
        fields = [
            'email',
            'password',
        ]

    def clean(self, *args, **kwargs):
        email = self.cleaned_data.get('email')
        password = self.cleaned_data.get('password')
        email_check = User.objects.filter(email=email)
        if email_check.exists():
            raise forms.ValidationError('This Email already exists')
        if len(password) < 5:
            raise forms.ValidationError('Your password should have more than 5 characters')
        return super(UserRegisterForm, self).clean(*args, **kwargs)
Create Sign up View
In your app’s views.py, write a view that registers a new user:
from .forms import UserRegisterForm
from django.contrib.auth import authenticate, get_user_model, login
from django.shortcuts import redirect, render

def signup_view(request):
    if request.method == "POST":
        next = request.GET.get('next')
        form = UserRegisterForm(request.POST)
        if form.is_valid():
            user = form.save(commit=False)
            password = form.cleaned_data.get('password')
            user.set_password(password)
            user.save()
            new_user = authenticate(email=user.email, password=password)
            login(request, new_user)
            if next:
                return redirect(next)
            else:
                return redirect('verify-email')
    else:
        form = UserRegisterForm()
    context = {
        'form': form
    }
    return render(request, 'user/signup.html', context)
In the code above, you imported the form used for registering users and passed the user’s data into it then saved it to the database. The user is then redirected to the verify-email URL if there isn't a next parameter in the URL.
Create HTML Template
Create a directory named templates in your project's root directory, and create another directory named user in the templates directory.
At the moment, Django is unaware of this new templates directory. Fix that using the following steps:
- Open your project’s
settings.pyfile - Locate and update the
TEMPLATESvariable as follows:
TEMPLATES = [
    {
        'BACKEND': 'django.template.backends.django.DjangoTemplates',
        'DIRS': [BASE_DIR / 'templates'],
        'APP_DIRS': True,
        'OPTIONS': {
            'context_processors': [
                'django.template.context_processors.debug',
                'django.template.context_processors.request',
                'django.contrib.auth.context_processors.auth',
                'django.contrib.messages.context_processors.messages',
            ],
        },
    },
]
Create a file named signup.html inside the templates/users directory, and add the following content:
{% if form.non_field_errors %}
    {% for message in form.non_field_errors %}
            {{ message }}
    {% endfor %}
{% endif %}
<form method="post">
    {% csrf_token %}
    <label for="email">email</label>
    {{ form.email }}
    <label for="password">Password</label>
    {{ form.password }}
    <input type="submit" />
</form>
In this basic HTML markup, the for block is used to display form error messages.
You can choose to style this page with CSS. Inspect the page by right-clicking and selecting inspect page, to get the class names for each field.
Add URL Routes
Open the urls.py file in your project directory and add the following URL routes:
from django.urls import include, path

urlpatterns = [
    ...
    path('', include('user.urls')),
]
Add URL routes for the user app. Create a urls.py file in the core directory and add the following routes:
from django.urls import path
from . import views

urlpatterns = [
    path('signup/', views.signup_view, name='signup'),
]
Open your browser and go to https://127.0.0.1:8000/signup/. You should see a basic sign up page with a sign up form. Filling and submitting the form would create a new user and redirect the user to the verify email route which we haven't defined yet.
Send The Verification Email
Your views.py is going to contain four views needed to send a verification link to verify a user's email. These views include:
- Verify email: send the verification link to the user’s email.
- Verify email done: tell the user to check his/her email.
- Verify email confirm: verify the link.
- Verify email complete: redirect the user to your website after verification.
Open the views.py file in the user app directory and write the first view that does the actual email sending:
# Add below existing imports
from django.contrib.sites.shortcuts import get_current_site
from django.utils.encoding import force_bytes, force_str
from django.utils.http import urlsafe_base64_encode, urlsafe_base64_decode
from django.template.loader import render_to_string
from .tokens import account_activation_token
from django.core.mail import EmailMessage
from django.contrib import messages

# so we can reference the user model as User instead of CustomUser
User = get_user_model()

# send email with verification link
def verify_email(request):
    if request.method == "POST":
        if request.user.email_is_verified != True:
            current_site = get_current_site(request)
            user = request.user
            email = request.user.email
            subject = "Verify Email"
            message = render_to_string('user/verify_email_message.html', {
                'request': request,
                'user': user,
                'domain': current_site.domain,
                'uid':urlsafe_base64_encode(force_bytes(user.pk)),
                'token':account_activation_token.make_token(user),
            })
            email = EmailMessage(
                subject, message, to=[email]
            )
            email.content_subtype = 'html'
            email.send()
            return redirect('verify-email-done')
        else:
            return redirect('signup')
    return render(request, 'user/verify_email.html')
In the code above, if the user’s email is unverified, an account activation token is generated using the account_activation_token class - which we haven't created yet. This token can be used to verify a user through email. A uid was also generated and encoded to ensure that the appropriate user - to whom the email was sent - gets verified.
To create the token generator, create a file called tokens.py in your user app directory and include the following class:
from django.contrib.auth.tokens import PasswordResetTokenGenerator
from six import text_type
class TokenGenerator(PasswordResetTokenGenerator):
    def _make_hash_value(self, user, timestamp):
        return (
            text_type(user.pk) + text_type(timestamp) +
            text_type(user.email_is_verified)
        )
account_activation_token = TokenGenerator()
💡 Don’t forget to install the six module with pip install six
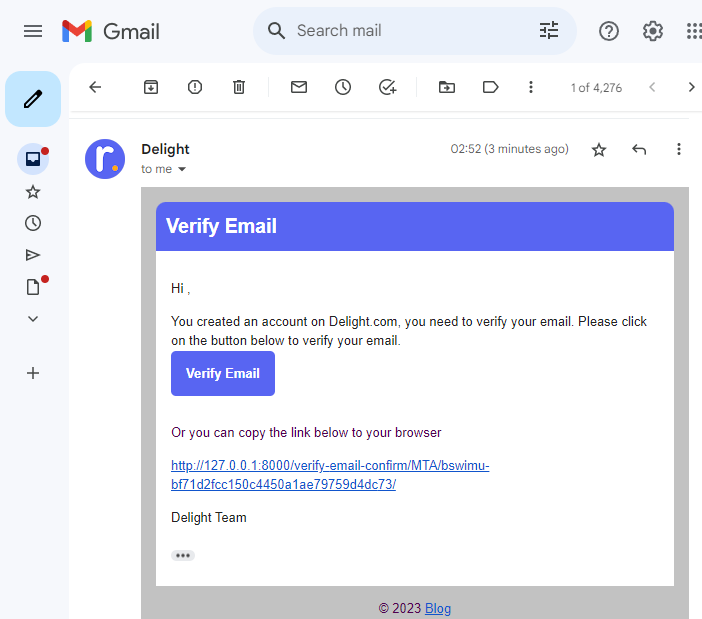
To create the email template, go into your user template directory, create the email template named verify_email_message.html and include the following HTML code:
<div style="background-color: #c2c2c2; padding: 15px;">
    <h2 style="margin: 0; padding: 10px; border-top-left-radius: 10px; border-top-right-radius: 10px; background-color: #5865F2; color: #ffffff;">Verify Email</h2>
    <div style="margin: 0; padding: 15px; background-color: #ffffff;">
        <p>Hi {{ user.name }},</p>
        <p>You created an account on Delight.com, you need to verify your email. Please click on the button below to verify your email.</p>
        <a href="{{ request.scheme }}://{{ domain }}{% url 'verify-email-confirm' uidb64=uid token=token %}" style="border: 0; color: #ffffff; background-color: #5865F2; padding: 15px; font-weight: bold; text-decoration: none; border-radius: 5px;">
            Verify Email
        </a>
        <p style="margin-top: 40px;">Or you can copy the link below to your browser</p>
        <p>{{ request.scheme }}://{{ domain }}{% url 'verify-email-confirm' uidb64=uid token=token %}</p>
        <p>The Delight Team</p>
    </div>
    <div style="text-align: center; margin-top: 20px 0;">
        <p>© {% now 'Y' %} <a href="https://delighto.medium.com">Blog</a></p>
        <p>Follow us on <a href="https://twitter.com/DelightGbolahan">Twitter</a></p>
    </div>
</div>
As you can see above, the verification link and other parameters are included in the email template to be sent to the user. Note that this file is an HTML file, not a text file.
Create the verify_email.html template we had previously specified in our sign up view and include the following:
<h1>You need to verify your email</h1>
<form method="post">
    {% csrf_token %}
    <input class="btn btn-primary max-btn" type="submit" value="Verify">
</form>
The next step is to create a verify_email_done view that just alerts the user that a verification link has been sent to his/her email. In your views.py file, include the following code:
def verify_email_done(request):
    return render(request, 'users/verify_email_done.html')
This is the view that the user is redirected to immediately after the email has been sent.
Create the verify_email_done.html file and include the following:
<h3>An email has been sent with instructions to verify your email</h3>
You are welcome to style and customize this HTML file.
The next step is to verify the link that the user clicks on. Create the verify_email_confirm view in your views.py and add the following:
def verify_email_confirm(request, uidb64, token):
    try:
        uid = force_str(urlsafe_base64_decode(uidb64))
        user = User.objects.get(pk=uid)
    except(TypeError, ValueError, OverflowError, User.DoesNotExist):
        user = None
    if user is not None and account_activation_token.check_token(user, token):
        user.email_is_verified = True
        user.save()
        messages.success(request, 'Your email has been verified.')
        return redirect('verify-email-complete')
    else:
        messages.warning(request, 'The link is invalid.')
    return render(request, 'user/verify_email_confirm.html')
This view decodes the link that the user clicked on and confirms if it is valid or not. If the token is valid, the email_is_verified field of the user is set to True and the user is redirected to the verify-email-complete URL. This indicates that a user's email has been verified. An appropriate message is then displayed to the user using Django's messages framework. However, if the link is invalid, the user is sent to the verify_email_confirm.html page.
Create the verify_email_confirm.html file and include the following markup:
<div class="container">
    {% if messages %}
        {% for message in messages %}
            <div class="alert">
                {{ message }}
            </div>
        {% endfor %}
    {% endif %}
</div>
The final step of the email verification process is to create the verify_email_complete which just renders a template informing the user that his/her email was successfully verified.
Create the verify_email_complete view in your views.py:
def verify_email_complete(request):
    return render(request, 'user/verify_email_complete.html')
Also, create the verify_email_complete.html file:
<div class="alert alert-success">
    You have successfully verified your e-mail
</div>
Create URL Patterns
Include the following URL patterns in the urls.py file of your user app:
urlpatterns = [
    ...
    path('verify-email/', views.verify_email, name='verify-email'),
    path('verify-email/done/', views.verify_email_done, name='verify-email-done'),
    path('verify-email-confirm/<uidb64>/<token>/', views.verify_email_confirm, name='verify-email-confirm'),
    path('verify-email/complete/', views.verify_email_complete, name='verify-email-complete'),
]
Set Up Your Email Backend
Every mail has a sender email address and a receiver email address. That is, an email address that sends the mail and another email address that receives the email. These email addresses are registered with email providers like Gmail, Mailchimp, etc. Some email providers provide custom domains (contact@delight.com), while others provide generic domains (delight@gmail.com).
For this article, you are going to Gmail to send emails to your users. Although, because your application might be sending thousands of emails per day, Gmail might not be the ideal option. However, Gmail should work just fine for our use case.
In the previous paragraphs, you programmed your application to send emails to users. However, Django doesn’t know what email address to send these emails from. You can fix this by specifying some parameters and credentials in your settings.py file.
In your project’s settings.py file, include the following parameters:
EMAIL_BACKEND = 'django.core.mail.backends.smtp.EmailBackend'

EMAIL_HOST = "smtp.gmail.com"
EMAIL_HOST_USER = "youremail@gmail.com"
EMAIL_HOST_PASSWORD = "your email password"
EMAIL_PORT = 587
EMAIL_USE_TLS = True
DEFAULT_FROM_EMAIL = "Delight youremail@gmail.com"
Make sure to replace EMAIL_HOST_USER with your email address and EMAIL_HOST_PASSWORD with the email's password.
Notice that the DEFAULT_FROM_EMAIL parameter contains a name and an email separated by a space. When your application sends an email, the name is displayed as the sender of the email.
💡 Note that: In production, you should always use environment variables instead of hard-coding your email credentials into your settings file.
Create an Email Password
As of May 30th, 2022, Google no longer allowed third-party apps to authenticate into a Gmail account using just a username and a password — for security reasons. You need to create an App password.
An App password is a 16-digit passcode that gives a non-Google app or device permission to access your Google Account. — Google
Visit this page to create an App password for your Django application. Then use this password as EMAIL_HOST_PASSWORD in your project's settings.py file.
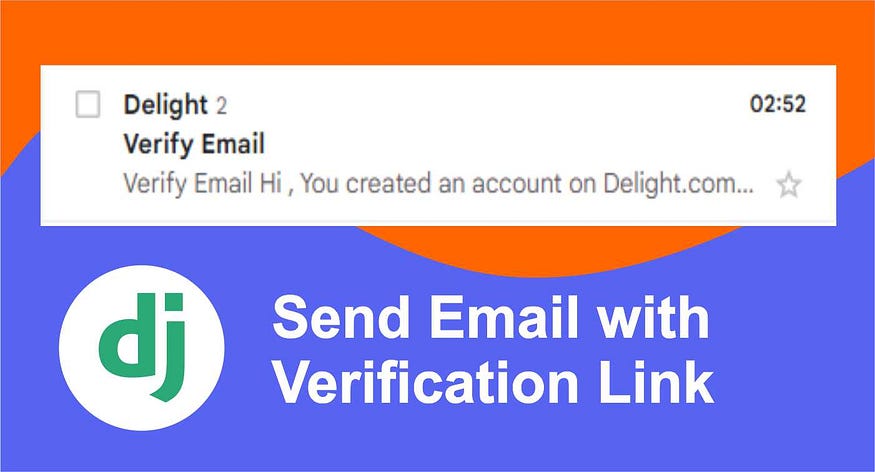
When Django sends the verification email, it should look something like the image below. Feel free to customize the email template.
Conclusion
Once the email credentials are correctly set up in your settings.py file, you can proceed to manually test your application. Create a user with the signup form, and a verification link will be sent to the email entered into the form. Input an email that you have access to so that you can see the whole verification process in action.
In this article, you have learned how to create and activate a virtual environment for your Django project, extend the default Django’s User model, create a signup form to register users and send emails containing a verification link.
Thanks for reading.
Comments
Loading comments…