Add a menu to your browser game using the same tools you use to build the game itself
Adding a menu to a browser game makes switching between different modes or accessing game options more user-friendly. Conveniently, if you create your game using JavaScript and the HTML canvas element, you can use these same tools to build a menu as well.
In this tutorial, I will walk through the process I used to add a basic menu to a browser game I recently created called What's Your (Co)Sine (which is free to play here if you are interested). The source code for my game, including the menu, is available here for reference. Note that this tutorial assumes general familiarity with using the canvas element for browser game development. If you are unfamiliar with the canvas, you may want to check out this tutorial on building a simple game with it.
Draw the Menu
First, we will draw our menu on the canvas. We will initialize several color variables that we will need at the top of the script, as below. While we could define these later inside our menu drawing function, defining them at the script level will allow their reuse throughout other components of the game for a consistent color scheme.
var bg_col = "#00FF00";
var sl_col = "#0000FF";
var lt = "#EEEEEE";
var dk = "#222222";
Next, we will define our function to draw the menu. At a high level, the menu consists of one large rectangle containing several smaller rectangles (representing our buttons) and text labels, so we can draw each of these rectangles and labels one at a time.
First, we will clear our canvas using [clearRect()](https://developer.mozilla.org/en-US/docs/Web/API/CanvasRenderingContext2D/clearRect) before drawing the large rectangle representing our menu using [rect()](https://developer.mozilla.org/en-US/docs/Web/API/CanvasRenderingContext2D/rect). Note that ctx is the context of our canvas element (i.e. var ctx = canvas.getContext("2d");). Also, note that we use ratios of the width and height of the canvas as our rectangle dimensions and starting points --- this makes scaling the game to fit different window sizes much easier.
function mainMenu() {
  ctx.clearRect(0, 0, canvas.width, canvas.height);
  // draw menu background
  ctx.beginPath();
  ctx.rect(
    canvas.width / 8,
    canvas.height / 16,
    (3 * canvas.width) / 4,
    (7 * canvas.height) / 8
  );
  ctx.fillStyle = lt;
  ctx.fill();
  ctx.closePath();
}
Now, we can add text to the top of this rectangle to display the name of the game using the [fillText()](https://developer.mozilla.org/en-US/docs/Web/API/CanvasRenderingContext2D/fillText) method. Note that the font size is also a ratio of the canvas width (rounded to the nearest integer) to allow for scaling. The size of text we want will depend on how much text we have (i.e. for a very long title we would probably want a smaller font, while for a short title we may want a larger font), so we can play around with different ratios for our font until we find something that looks good.
var px_size = (canvas.width / 22) | 0;

//draw title
ctx.font = px_size + "px sarif";
ctx.fillStyle = dk;
ctx.fillText(
  "WHAT'S YOUR (CO)SINE?",
  (3 * canvas.width) / 16,
  (5 * canvas.height) / 32
);
Now, we can add the buttons. For each button, we will need a rectangle and a label inside that rectangle. In our example, we have four buttons, one for a "How to Play" page and three for different modes of the game. Note that as we want the buttons to line up with each other, we can use set variables to represent the width, height, and starting x-coordinate of each button. We also define a starting y-coordinate of the first button, and then a set difference in the y-coordinate between buttons which we can use to calculate the y-coordinate of the remaining buttons (so the y-coordinate of the second button would be given by the sum of the starting y-coordinate plus the y-differential, the third button's would be given by the starting y-coordinate plus twice the y-differential, etc.).
var menuOptionWdth = 5*canvas.width/8;
var menuOptionHght = canvas.height/8;
var menuStrtX = 3*canvas.width/16;
var menuStrtY = 3*canvas.height/16;
var menuYDiff = 3*canvas.height/16;

// draw buttons
ctx.beginPath();
ctx.rect(menuStrtX, menuStrtY,menuOptionWdth,menuOptionHght);
ctx.fillStyle = dk;
ctx.fill();
ctx.closePath();
ctx.font = px_size+"px sarif";
ctx.fillStyle = lt;
ctx.fillText("How to Play", 23*canvas.width/64, 9*canvas.height/32);

ctx.beginPath();
ctx.rect(menuStrtX, menuStrtY+menuYDiff,menuOptionWdth,menuOptionHght);
ctx.fillStyle = dk;
ctx.fill();
ctx.closePath();
ctx.font = px_size+"px sarif";
ctx.fillStyle = lt;
ctx.fillText("2x2", 29*canvas.width/64, 15*canvas.height/32);

ctx.beginPath();
ctx.rect(menuStrtX, menuStrtY+2*menuYDiff,menuOptionWdth,menuOptionHght);
ctx.fillStyle = dk;
ctx.fill();
ctx.closePath();
ctx.font = px_size+"px sarif";
ctx.fillStyle = lt;
ctx.fillText("4x4", 29*canvas.width/64, 21\*canvas.height/32);

ctx.beginPath();
ctx.rect(menuStrtX, menuStrtY+3*menuYDiff,menuOptionWdth,menuOptionHght);
ctx.fillStyle = dk;
ctx.fill();
ctx.closePath();
ctx.font = px_size+"px sarif";
ctx.fillStyle = lt;
ctx.fillText("8x8", 29*canvas.width/64, 27\*canvas.height/32);
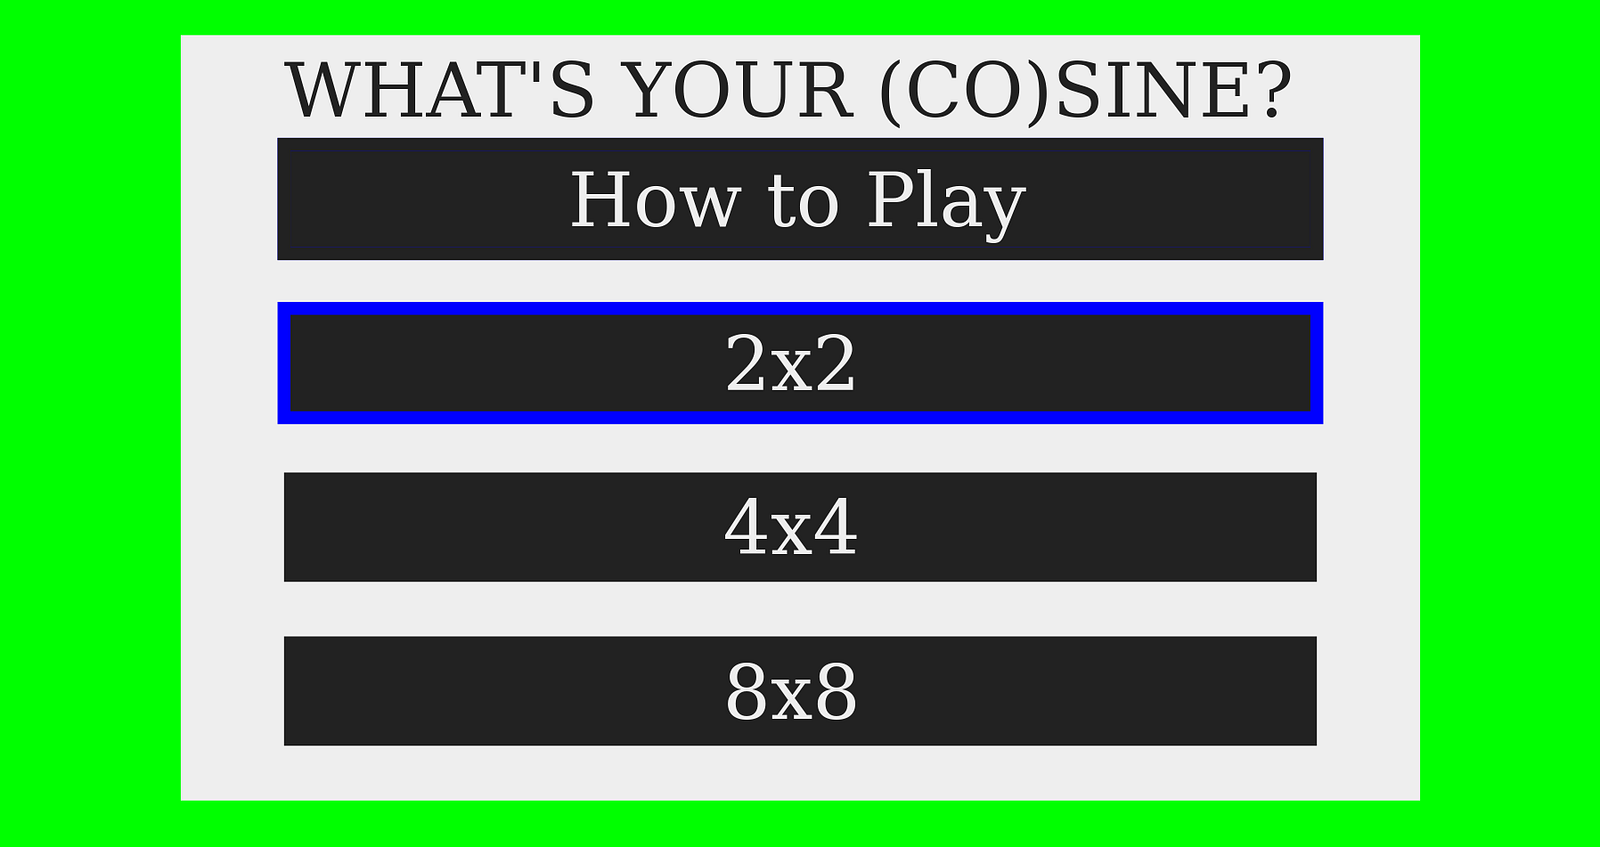
The menu image defined above looks like this:
Image by Author
Note that in the source code, we define the various width, height, and x- and y-coordinate variables outside of the mainMenu() function to allow their reuse in other functions.
Add Scroll Functionality
Now, we can work on adding the ability to scroll through our menu options. In this example, we will allow scrolling only with the keyboard arrow keys, but you could also add mouse support if you want.
Visually, the scrolling will be handled by outlining the current option. We can use the strokeRect() method to draw the outline, and we will pass in the starting x-coordinate, y-coordinate, and color to our new outlining function, menuHighlight(). Note that the menuOptionWdth and menuOptionHght variables are the same ones defined in the prior section (hence why we define those at the script level in the source code).
function menuHighlight(x, y, c) {
  ctx.strokeStyle = c;
  ctx.lineWidth = canvas.width / 128;
  ctx.strokeRect(x, y, menuOptionWdth, menuOptionHght);
}
Now, we will define a menuOpt variable that indicates which of the menu options is currently highlighted. This will be an integer variable ranging from 0 to 3, as we have four button options. We will also define two new functions to handle scrolling up and down in our menu. In each function, we first check if the proposed scroll is possible (i.e. we cannot scroll up if we are already at the top of the menu, nor can we scroll down if we are already at the bottom). Then, we call our menuHighlight() function using the x- and y-coordinates corresponding to the current option button and the color of our menu button background to cover the existing outline, so this option will no longer appear to be selected (i.e. we draw an outline with the background color, so that it appears there is no outline at all). Next, we either increment or decrement our menuOpt variable before calling menuHighlight() again, this time with the updated x- and y-coordinates and the outline color to draw and outline around the newly selected option.
var menuOpt = 0;

function menuUp() {
  if (menuOpt > 0) {
    menuHighlight(menuStrtX, menuStrtY + menuOpt * menuYDiff, dk);
    menuOpt--;
    menuHighlight(menuStrtX, menuStrtY + menuOpt * menuYDiff, sl_col);
  }
}

function menuDown() {
  if (menuOpt < 3) {
    menuHighlight(menuStrtX, menuStrtY + menuOpt * menuYDiff, dk);
    menuOpt++;
    menuHighlight(menuStrtX, menuStrtY + menuOpt * menuYDiff, sl_col);
  }
}
Finally, we need to call the menuUp() and menuDown() function from our keyboard input handling function, keyDownHandler(). However, at this point we need to think about how our menu will interact with the rest of our game. After all, the keys that we use to scroll through the menu can be used differently during actual game play, so we need a way to determine whether a key press should be handled by our menu functions or different, gameplay-related functions.
To do this, we will define the isMenu variable, which will indicate whether the game is currently displaying the menu or not. Then, in our keyDownHandler() function, we will determine the action to be taken based on both the key pressed and the value of isMenu. The full implementation of keyDownHandler() is included below to illustrate how different functions are called based on the different key and isMenu values. Note that only the up and down arrow keys result in scrolling actions within our menu.
var isMenu = 1;

function keyDownHandler(e) {
  if (e.keyCode == 39) {
    //right arrow
    e.preventDefault();
    if (isMenu + isHowToPlay == 0) {
      //in game
      moveRight();
    }
  } else if (e.keyCode == 38) {
    //up arrow
    e.preventDefault();
    if (isMenu + isHowToPlay == 0) {
      //in game
      moveUp();
    } else if (isMenu == 1) {
      //in menu
      menuUp();
    }
  } else if (e.keyCode == 37) {
    //left arrow
    e.preventDefault();
    if (isMenu + isHowToPlay == 0) {
      //in game
      moveLeft();
    }
  } else if (e.keyCode == 40) {
    //down arrow
    e.preventDefault();
    if (isMenu + isHowToPlay == 0) {
      //in game
      moveDown();
    } else if (isMenu == 1) {
      //in menu
      menuDown();
    }
  } else if (e.keyCode == 32) {
    //spacebar
    e.preventDefault();
    if (isMenu == 0) {
      //in game or how to play
      playGame();
    }
  } else if (e.keyCode == 13) {
    //enter
    e.preventDefault();
    if (isMenu == 0) {
      //in game or how to play
      if (isHowToPlay == 1) {
        //in how to play
        mainMenu();
      } else if (inGameOptNum == -1) {
        //in game
        selectCoeff();
      } else if (inGameOptNum == 0) {
        //in game
        playGame();
      } else if (inGameOptNum == 1) {
        //in game
        showAnswer();
      } else {
        //in game
        mainMenu();
      }
    } else {
      //in menu
      menuSelect();
    }
  } else if (e.keyCode == 77) {
    //m
    e.preventDefault();
    if (isMenu == 0) {
      //in game or how to play
      mainMenu();
    }
  }
}

document.addEventListener("keydown", keyDownHandler, false);
Now, we can scroll between buttons on the main menu. Note that we also call a menuSelect() function when the enter key is pressed and isMenu == 1 --- this is the function we will define in the next section to take action when a button is pressed.
Add Option Selection Functionality
In our menuSelect() function, we want to take an appropriate action based on which button was pressed. To do this, we can just check the value of our menuOpt variable and then call an appropriate handler function. Note that in the sample code, we set a few variables before calling playGame() --- this allows us to reuse that same function to run the game in different modes based on the value of those script level variables.
function menuSelect() {
  if (menuOpt == 0) {
    // launch how to play screen
    howToPlay();
  } else if (menuOpt == 1) {
    // launch 2x2 game
    wdth = 2;
    sqrwdth = (5 * canvas.height) / (16 * wdth);
    playGame();
  } else if (menuOpt == 2) {
    // launch 4x4 game
    wdth = 4;
    sqrwdth = (6 * canvas.height) / (16 * wdth);
    playGame();
  } else {
    // launch 8x8 game
    wdth = 8;
    sqrwdth = (7 * canvas.height) / (16 * wdth);
    playGame();
  }
}
Again, this menuSelect() function is called by our keyDownHandler() function when isMenu == 1 and the enter key is pressed.
Conclusion
At this point, we have created a basic game menu. When developing your own games, though, make sure to think through the implications of having a separate menu state and to handle resetting menu and game variables as players switch back and forth between the menu and the game itself (you can see examples of this in the source code). Be sure to test switching between the menu and the game repeatedly to verify that no game settings get mixed up in the process.
I hope this was helpful, and happy coding!
Resources
Source code for example game: https://gitlab.com/karldeve/whats-your-cosine
HTML canvas documentation: https://developer.mozilla.org/en-US/docs/Web/API/Canvas_API
HTML canvas game development tutorial: https://developer.mozilla.org/en-US/docs/Games/Tutorials/2D_Breakout_game_pure_JavaScript
Comments
Loading comments…