 One of the things that always caught my attention was animation — making things come alive and going the extra mile to make sure that they look clean.
In this article, we will be using open-source illustrations from Undraw.co — a stellar project and my go-to for illustrations. While the example here is fairly straightforward, the possibilities are almost endless. Feel free to play around and let your imagination run wild!
One of the things that always caught my attention was animation — making things come alive and going the extra mile to make sure that they look clean.
In this article, we will be using open-source illustrations from Undraw.co — a stellar project and my go-to for illustrations. While the example here is fairly straightforward, the possibilities are almost endless. Feel free to play around and let your imagination run wild!
Step 1. Find your favorite SVG and import it to Figma
At this point, you may also decide to fine-tune the colors of each vector, by selecting it and then playing around with the fill hex value, or even adding a custom gradient.

Adjusting the vector colors Adjusting the vector colors
Step 2. Group the vectors that you wish to animate
Here, we want to group the vector images that we wish to animate, in a way that makes sense based on our end goal. For clarity, I am going to group together the vectors that make up each message bubble, as each message would be animated differently. Another group would be the two vectors that the plant consists of.
On Windows, the shortcut for selecting multiple vectors is Shift + Click. Once we have selected the vectors we wish to group, we can group the selection with Control + G.
At this point, our group is assigned a generic name (see Group 1) and is visible in the Layers menu. It is really important to rename it with a unique identifier, as we will be using it to animate that group later on.

Grouping the vectors and assigning a unique ID Grouping the vectors and assigning a unique ID
Step 3. Exporting the SVG
To export the whole frame, we select the parent frame through the Layers menu and then define the exported file type as SVG,through the Design Menu on the right.
What is important here is to check the ‘Include id Attribute’ option, as this will allow us to use the group names we defined earlier.
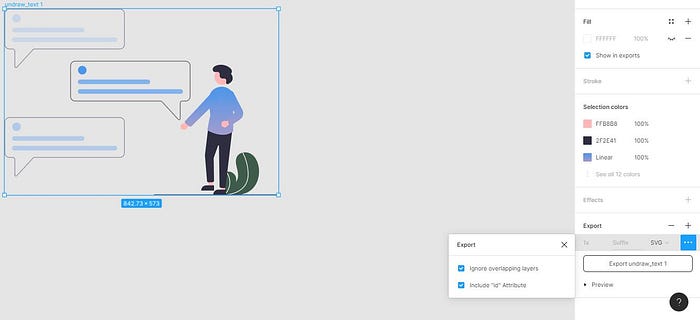
Exporting the SVG with the corresponding identifiers Exporting the SVG with the corresponding identifiers
Step 4. Import to React and use it as a component
As long as you are using react-scripts@2.0.0 & react@16.3.0 (or higher) you can directly import and render the SVG as a React component, by using the following syntax:
Tip: Do not forget to add an accessible title prop.
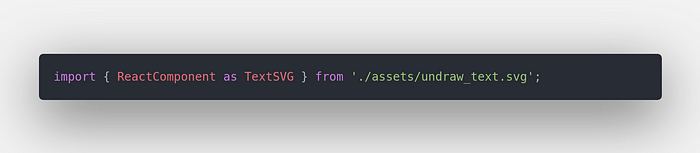
Importing it as a React component Importing it as a React component
Step 5. Define your animation
At this point, you can let your imagination run wild. The only thing to keep in mind is that to apply the animation, you will be using the ids we set earlier through Figma, as typical CSS id selectors. I have prepared a sandbox for you to play around with, so feel free to fork it and experiment. I really hope that you enjoyed reading this article and that you have found it useful. Making SVGs come alive in a creative way certainly is a pleasure, but it is important to avoid going overboard with it, as it can impact the user’s experience and your application’s accessibility. As always, I would highly recommend following WGAC Recommendations and incorporating animation into your design, in a meaningful and useful manner. Thank you for taking the time to read this and I am looking forward to seeing you in the next one!
Comments
Loading comments…